Box5
-
Posts
48 -
Joined
-
Last visited
Content Type
Profiles
Forums
Blogs
Events
Gallery
Downloads
Store
Everything posted by Box5
-

Yet another LS 260z swap :)
Box5 replied to christianmoller's topic in Gen III & IV Chevy V8Z Tech Board
5 years to finish, as if you don't have enough stress with this build. At least you got the greenlight for now. Maybe I missed it, but did you buy halfshafts from somewhere, what's the wait on them? -
Yet another LS 260z swap :)
Box5 replied to christianmoller's topic in Gen III & IV Chevy V8Z Tech Board
Very nice build so far, looking forward to your updates as you go. -
Relentless - 1977 280z LS (5.3l L59) swap
Box5 replied to Box5's topic in Gen III & IV Chevy V8Z Tech Board
Definitely couldn't hurt, let me know when you do that how it goes. -
Relentless - 1977 280z LS (5.3l L59) swap
Box5 replied to Box5's topic in Gen III & IV Chevy V8Z Tech Board
With that said, I still have new tie rods, and some various front end bushings coming to tighten things up even more. -
Relentless - 1977 280z LS (5.3l L59) swap
Box5 replied to Box5's topic in Gen III & IV Chevy V8Z Tech Board
Good news, the straight line shimmy is 100% gone as of today. Went to a buddies and we ran fishing line on jackstands to check toe on all 4 wheels with steering wheel centered (working out degrees later tonight because im curious). Front Left was 4mm toe in Front Right was 9mm toe OUT Both rears were 1mm toe in My Car would track right pretty heavy, and the 9mm toe out explains it all. As soon as I adjusted the front right Tie Rod, we got it dead on 4mm toe in and the shimmy disappeared completely. Can cruise in 5th 2000rpm with a rock solid steering wheel, that use to be the worst spot for vibration. -
Relentless - 1977 280z LS (5.3l L59) swap
Box5 replied to Box5's topic in Gen III & IV Chevy V8Z Tech Board
That's frustrating since i've seen that theme in some searches I did, one guy went to 3 places, at the third shop the vibration finally went away when they balanced it correctly. I just had them balanced two days ago, but i'm tempted to do like you did and get a second opinion. Thanks for the feedback. Good choice in wheels btw . I've heard positive and negative things about a wheels on the car balance, but in most cases it completely solved peoples issues. Seems like an all too common issues on Z's and very aggravating like you said. With my old tires, I was at the point of not enjoying the drive anymore. I replaced my front wheel bearings a few weeks ago, but it didn't have any effect on the vibration. An alignment would be smart for me as well, I think i'll take both your feedback, go to another shop tell them my situation and get re-balanced and aligned. -
Relentless - 1977 280z LS (5.3l L59) swap
Box5 replied to Box5's topic in Gen III & IV Chevy V8Z Tech Board
Also been trying to solve a steering wheel shimmy (vibration) at about 55-60mph not related to engine rpm. I thought these wheels/tires would fix it, which they did help a lot but it's still there just a lot less pronounced. I've done a lot of searching, but the results are pretty much ANYTHING in the front suspension/steering as potential causes other than wheels/tires. So i'm gonna start with the TC bushings since mine are pretty cracked, then tie rods, and test/report back after each, unless anyone else has some advice on that, it would be much appreciated. -
Relentless - 1977 280z LS (5.3l L59) swap
Box5 replied to Box5's topic in Gen III & IV Chevy V8Z Tech Board
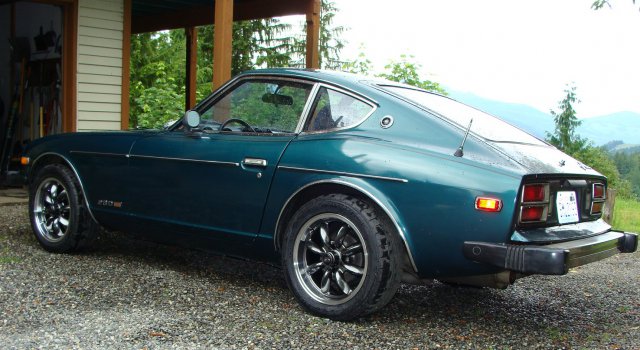
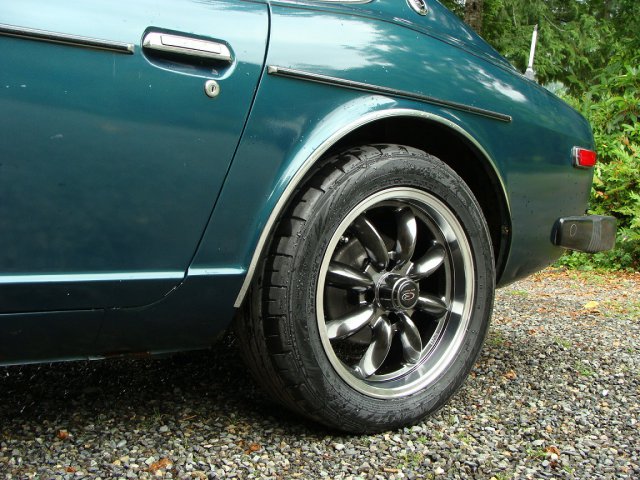
Thanks for the tank pics guys, that's definitely a mod I want to do at some point, maybe if/when the external pump acts up. On another note I joined the RB club, I know the wantabe style is used a lot but it's always been my favorite so it was a easy choice. Wheels = Rota RB, 16x7 +4 in Hyper Black (looks like a dark chrome in most light). Tires = Dunlop Direzza DZ102, 215x50r16 (compromised between 225's and 205's) So far zero rubbing anywhere on one hard drive. I really want to lower it about 1" somehow.
-
Relentless - 1977 280z LS (5.3l L59) swap
Box5 replied to Box5's topic in Gen III & IV Chevy V8Z Tech Board
If you can, get a ID size of the tank outlet port. The 7/16" hose is a tight fit so it may be 3/8" ID already. So far so good though, I haven't noticed it being a problem when I mash it on my stock LS setup, no big power mods (LS6 intake/injectors is about it). The limiting factor in my setup is the 6AN stainless braided PTFE, the ID of that measures out closer to 5/16", so with actual 3/8" ID line you'll be well off. The Baldwin pre-filter I got is extremely high flow, I wanted something to catch potential debris before the pump but I hear what you're saying with the more constrictive filters. The pump seems happy and quiet being mounted so low it chugs along well. -
Relentless - 1977 280z LS (5.3l L59) swap
Box5 replied to Box5's topic in Gen III & IV Chevy V8Z Tech Board
Shotty vid, but you can at least hear how it sounds and see a little rip. It's tempting to slide every corner, everywhere. ZLS.mp4 -
Relentless - 1977 280z LS (5.3l L59) swap
Box5 replied to Box5's topic in Gen III & IV Chevy V8Z Tech Board
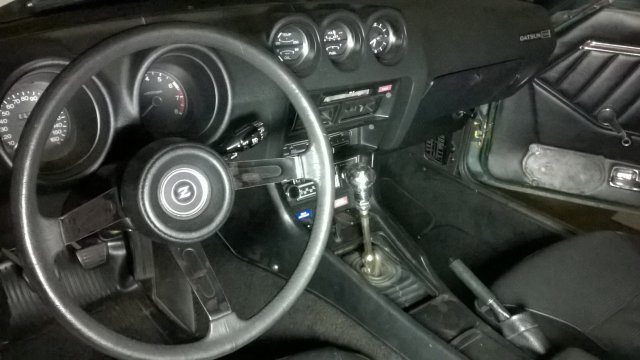
You did an amazing job from the looks of it, what a clean Z. I'm glad I could help, just passing on the information I learned here on HybridZ. That custom center console is really nice, did you have that done before the swap and adjust the shift boot, or just do it now? I like where you mounted the fuse block under the dash, that helps keep the inner fender clean on the passenger side. If I redo the wiring i'm gonna move the ECM and Fuse block inside to really clean up the engine bay and make maintenance that much easier. Love the subtle stripes in that paintjob too. -
Relentless - 1977 280z LS (5.3l L59) swap
Box5 replied to Box5's topic in Gen III & IV Chevy V8Z Tech Board
Hey Whitley, Only mechanical updates/issues were a wobbly Harmonic Balancer after I drove for awhile (may have always been there but I spotted it recently). It's a higher mileage motor and i've been pushing it hard so that's understandable, got a new pulley and ARP bolt coming to hopefully take care of that. The car itself with this drivetrain is so much fun, it has the perfect power band for around town and country roads, and with the T56 3.54 diff it cruises so easily at 80-85mph on the highway. Next update will be a brake job and some new wheels/tires. Planning to go with 15x8 0 offset Enkeis with 225/50 tires. From what i've gathered they fit no flare Z's well without much issue and will be a big improvement over the current pizza cutters I have. My only handling complaint at the moment is with the tall skinny tires, I can feel them flex during heavy cornering but the upgraded 225/50r15's should help a lot. Overall, i've daily driven it to work on every dry day and had a blast. It's basically a streetbike on 4 wheels with how fast you can scoot around people. -
Relentless - 1977 280z LS (5.3l L59) swap
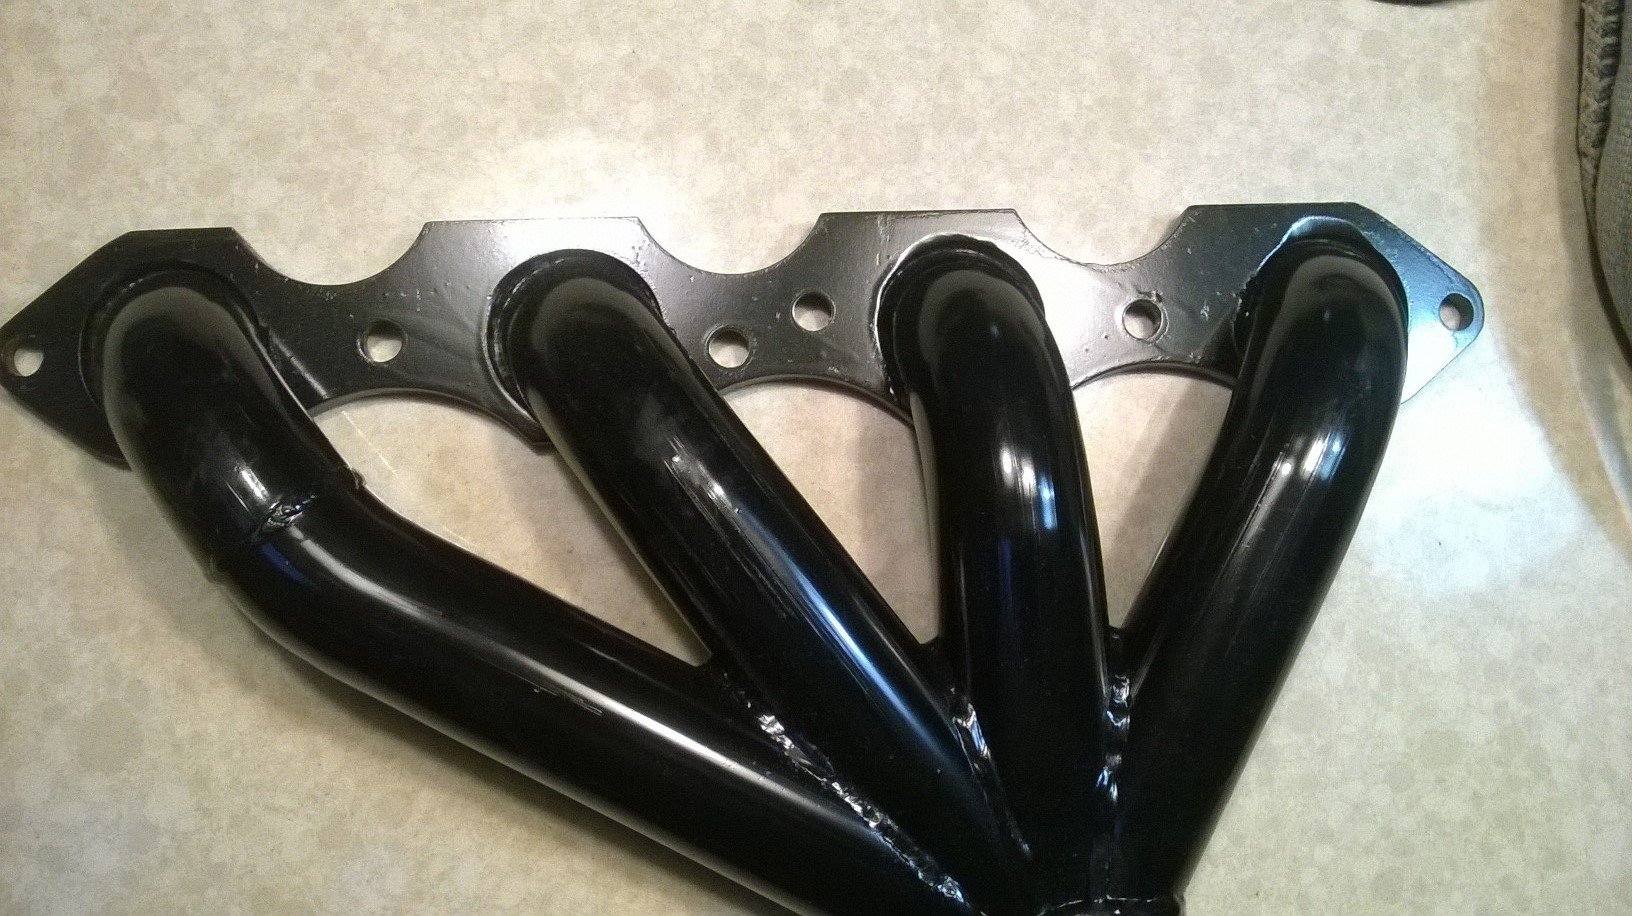
Box5 replied to Box5's topic in Gen III & IV Chevy V8Z Tech Board
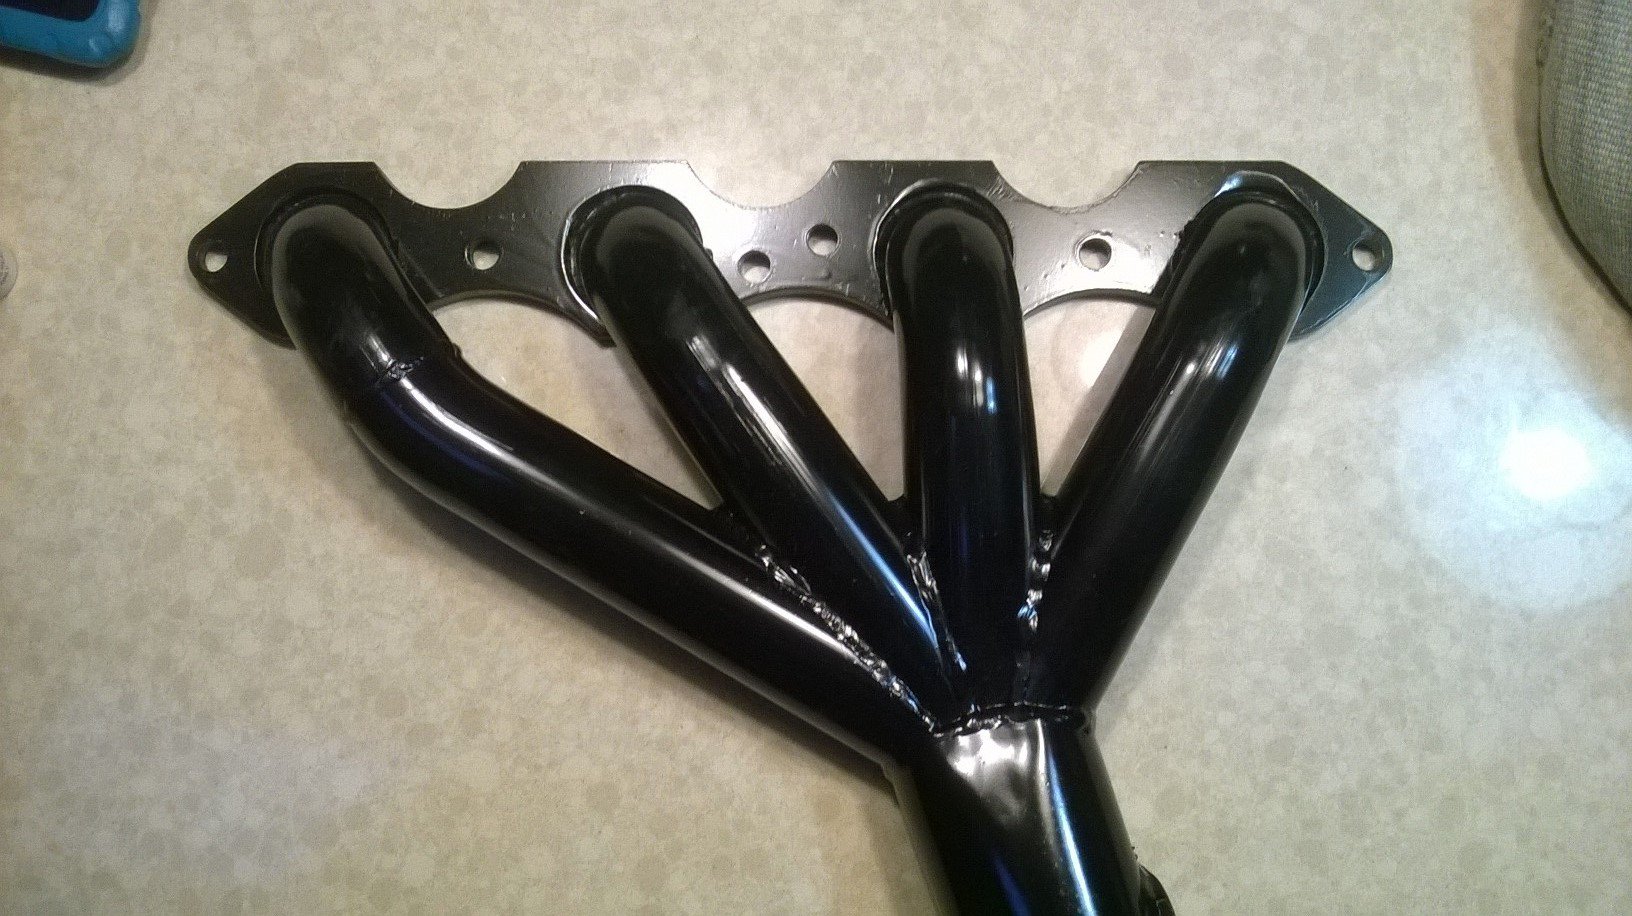
Sorry to hear you have fitment issues. Those appear to be the 2.75" tubes? I had to send mine back to be modified like the pic below. I'm surprised they sent out the original design knowing it had no chance to clear the #1 spark plug, or #7 plug like in your pics. Passenger side was never an issue, but Drivers side needed the jog on #1 primary (pic below), and #7 needed a dent or jog (I dented mine) because I wasn't going to send them back again.
-
Relentless - 1977 280z LS (5.3l L59) swap
Box5 replied to Box5's topic in Gen III & IV Chevy V8Z Tech Board
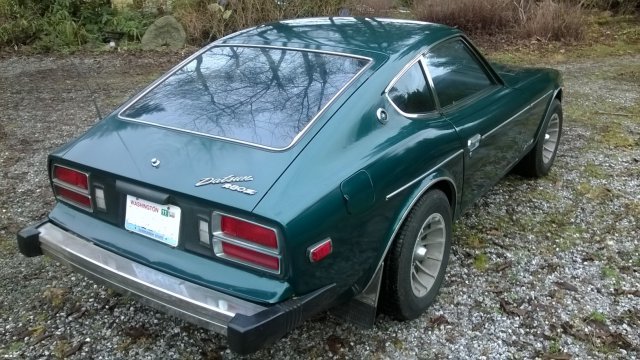
Thanks Richard. The exhaust was one of my favorites parts to do, i've never done a full one myself before so it was a nice test. Your Z is awesome, that looks really good and extremely clean, especially the 240z bumpers and air dam, love that look. Hope your LS swap goes off without a hitch, you're gonna love it. Where did you find your bumpers listed to get them from Vietnam? -
Relentless - 1977 280z LS (5.3l L59) swap
Box5 replied to Box5's topic in Gen III & IV Chevy V8Z Tech Board
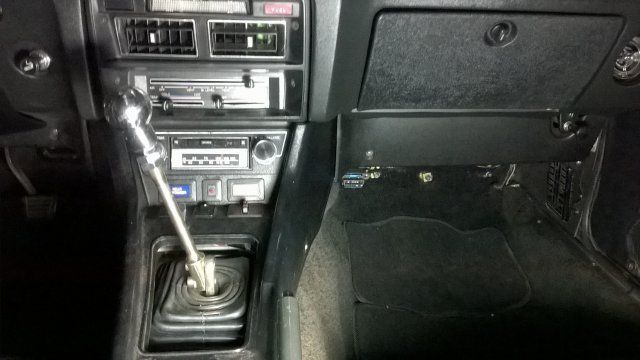
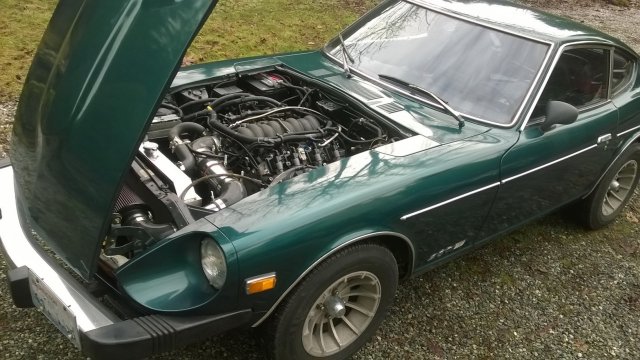
About time to ditch the crash bumpers now that it drives again. Interior somewhat sorted too. Spectre 6284 shift boot worked after modifying it but wouldn't recommend due to the custom nature of it. Working on a leather outer boot now. The shift ball is a trailer hitch modified (shift balls are pricey :X) one day i'll get a real one :D.
-
Relentless - 1977 280z LS (5.3l L59) swap
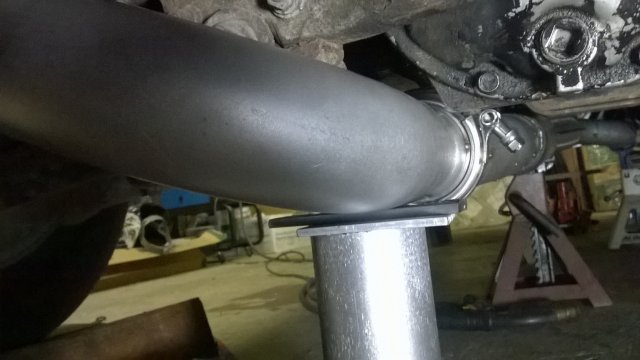
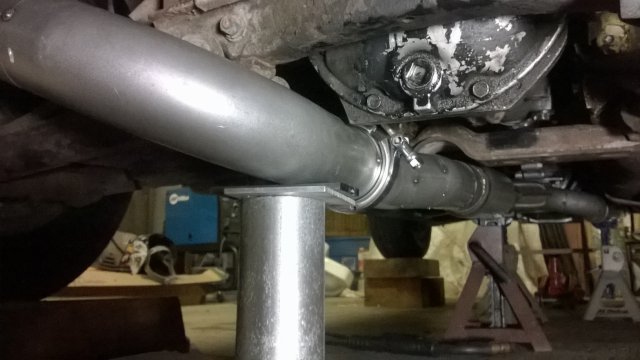
Box5 replied to Box5's topic in Gen III & IV Chevy V8Z Tech Board
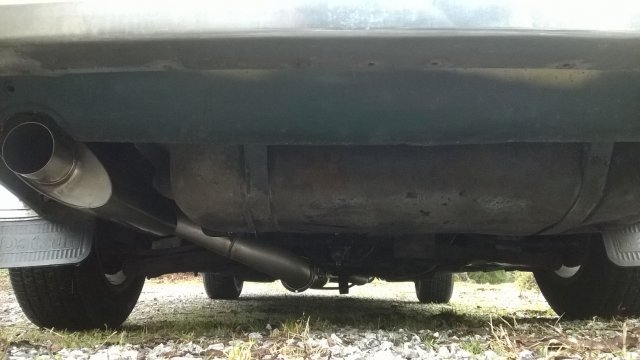
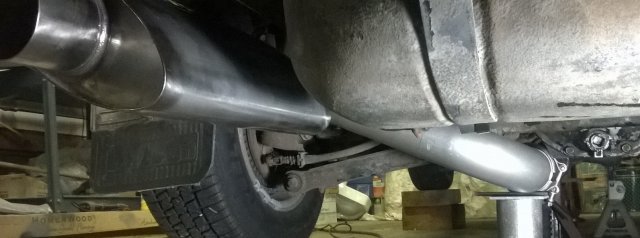
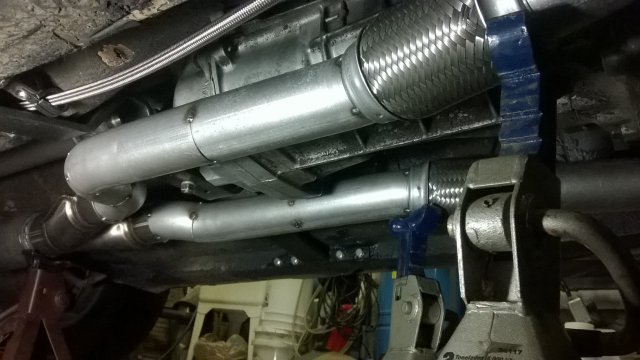
Got the last bit done tonight, tucked as close to the diff as possible. Just need a couple hangers here and there and full weld it. *Got it fully welded and driving. The combo of Dynomax Bullet and Borla Pro XS are an amazing combo. Smooth deep and mellow at idle, comes alive with rpms but still smooth and deep with no rasp to note, very happy with those products. I was able to do the entire exhaust with just the mandrel bends listed above, didn't require any straight tubing.
-
Relentless - 1977 280z LS (5.3l L59) swap
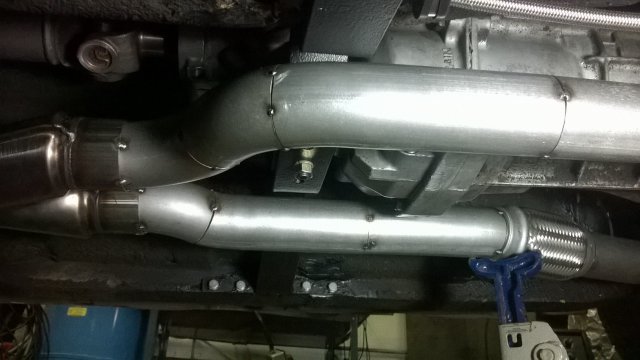
Box5 replied to Box5's topic in Gen III & IV Chevy V8Z Tech Board
Got some time after work to start the exhaust. Tacked everything back to the bullet so far. Didn't end up needing the 2.5" straight piece, the mandrels above had enough straight sections. Tomorrow hopefully get the 3" section and muffler in place.
-
Relentless - 1977 280z LS (5.3l L59) swap
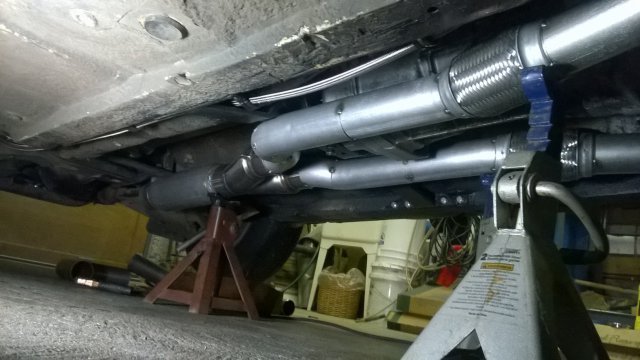
Box5 replied to Box5's topic in Gen III & IV Chevy V8Z Tech Board
The video was open headers but my next step this week is to fabricate an exhaust. Got a straight stick of 3" and 2.5" pipe along with the following parts: (My goal is for little to no drone, but still a nice deep rumble, so we'll see how this goes).
-
Relentless - 1977 280z LS (5.3l L59) swap
Box5 replied to Box5's topic in Gen III & IV Chevy V8Z Tech Board
ZLS.mp4 -
Relentless - 1977 280z LS (5.3l L59) swap
Box5 replied to Box5's topic in Gen III & IV Chevy V8Z Tech Board
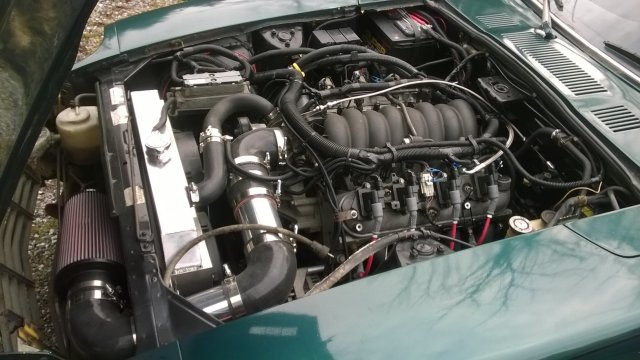
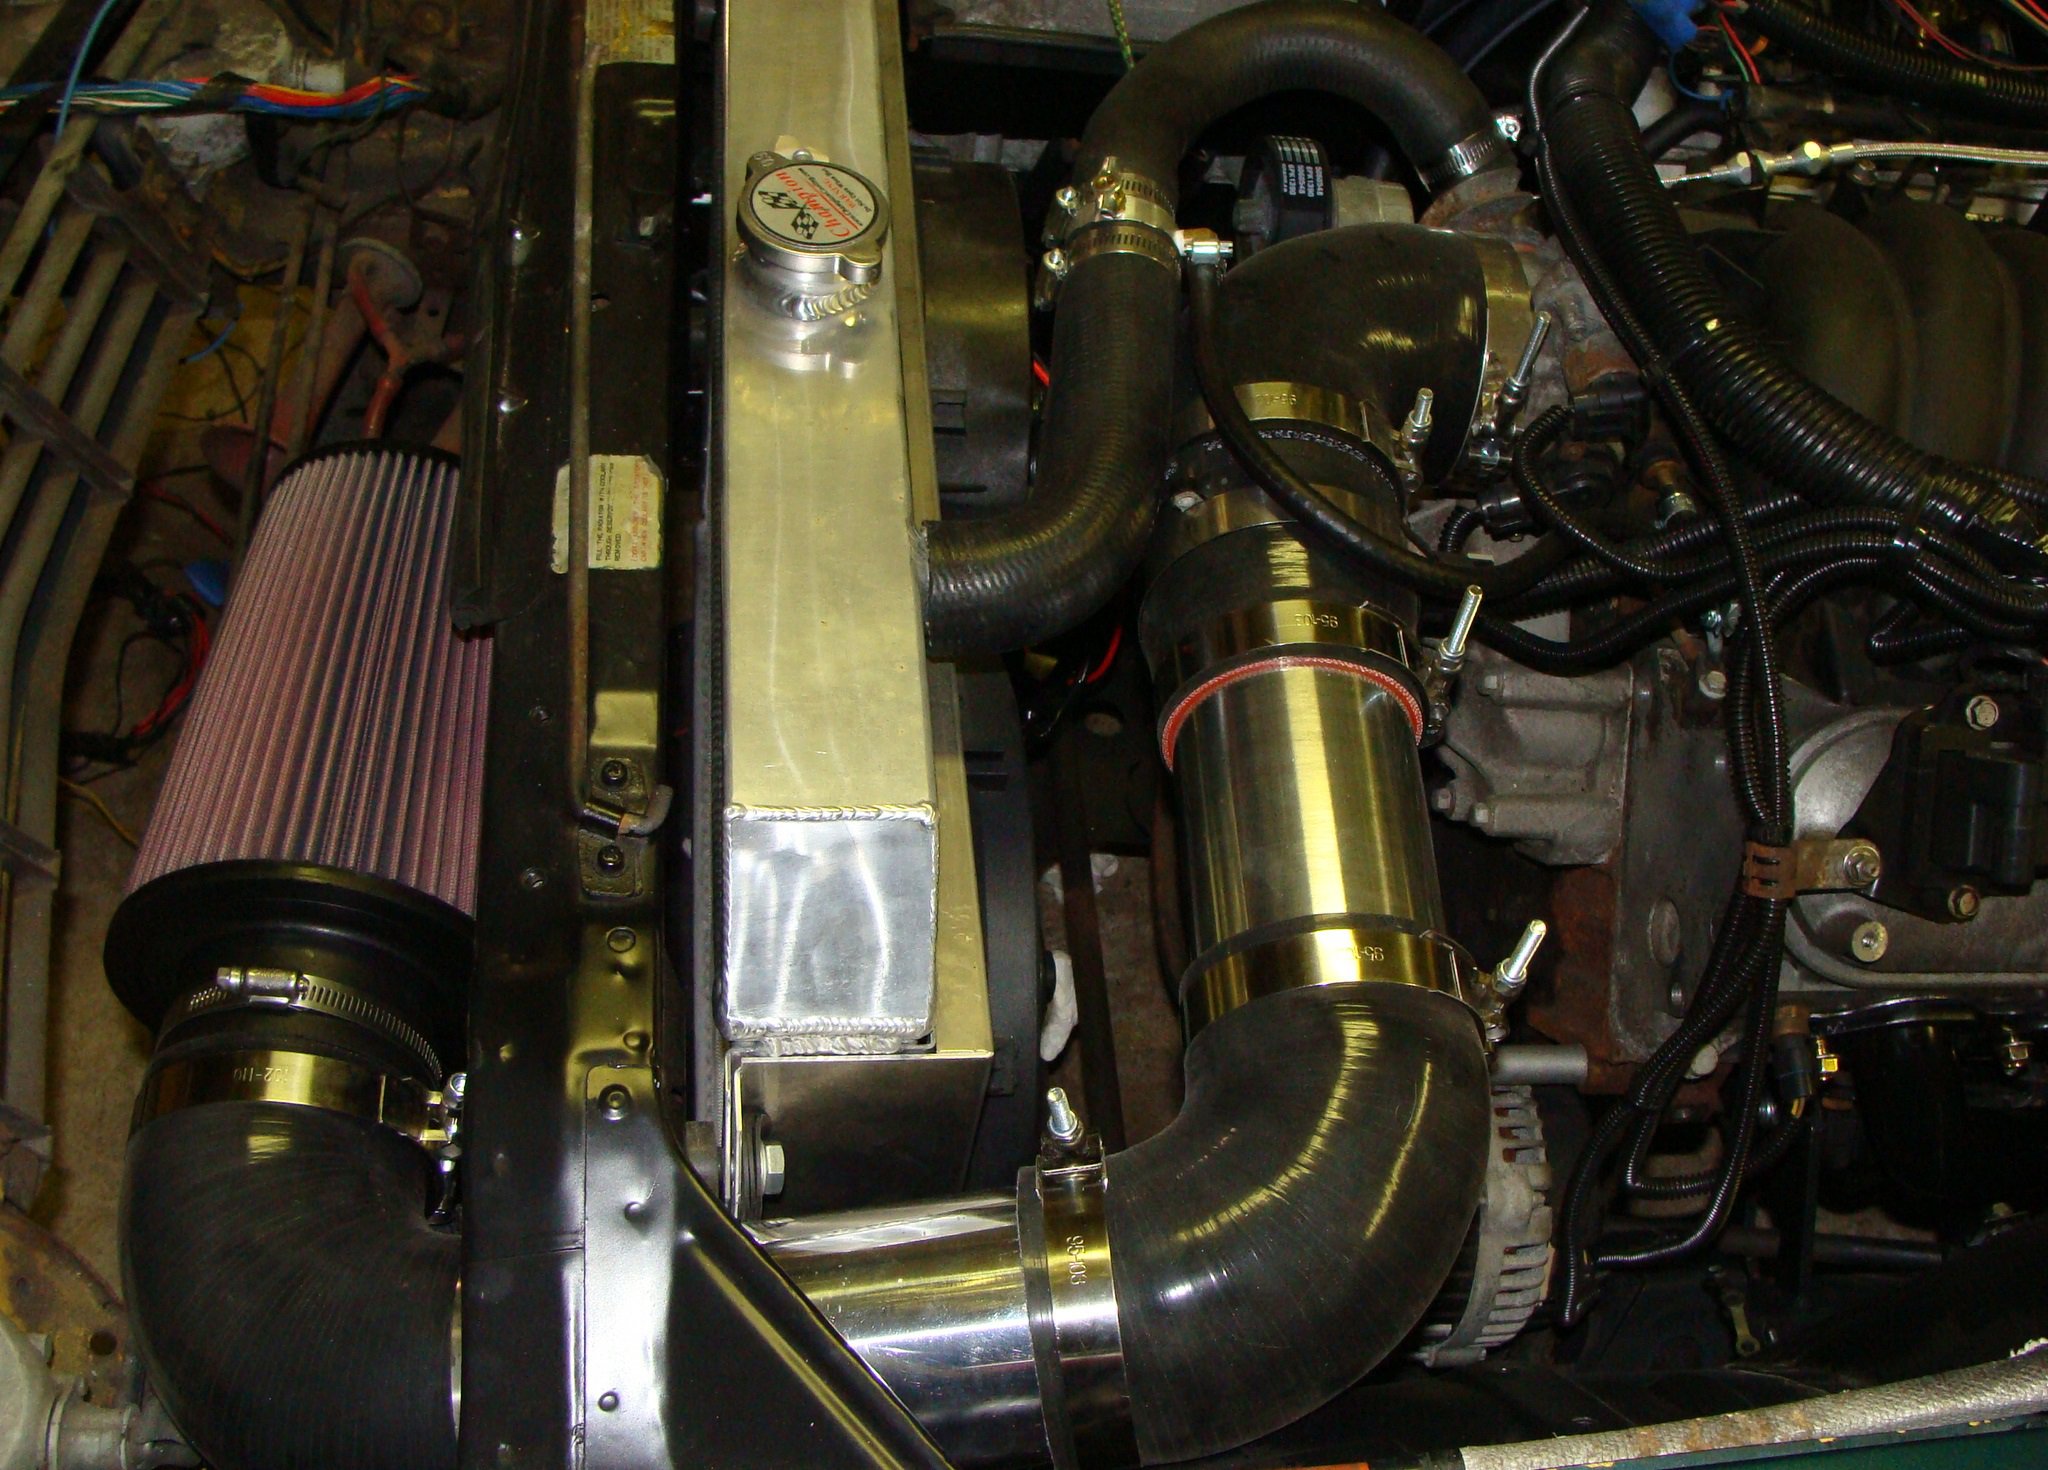
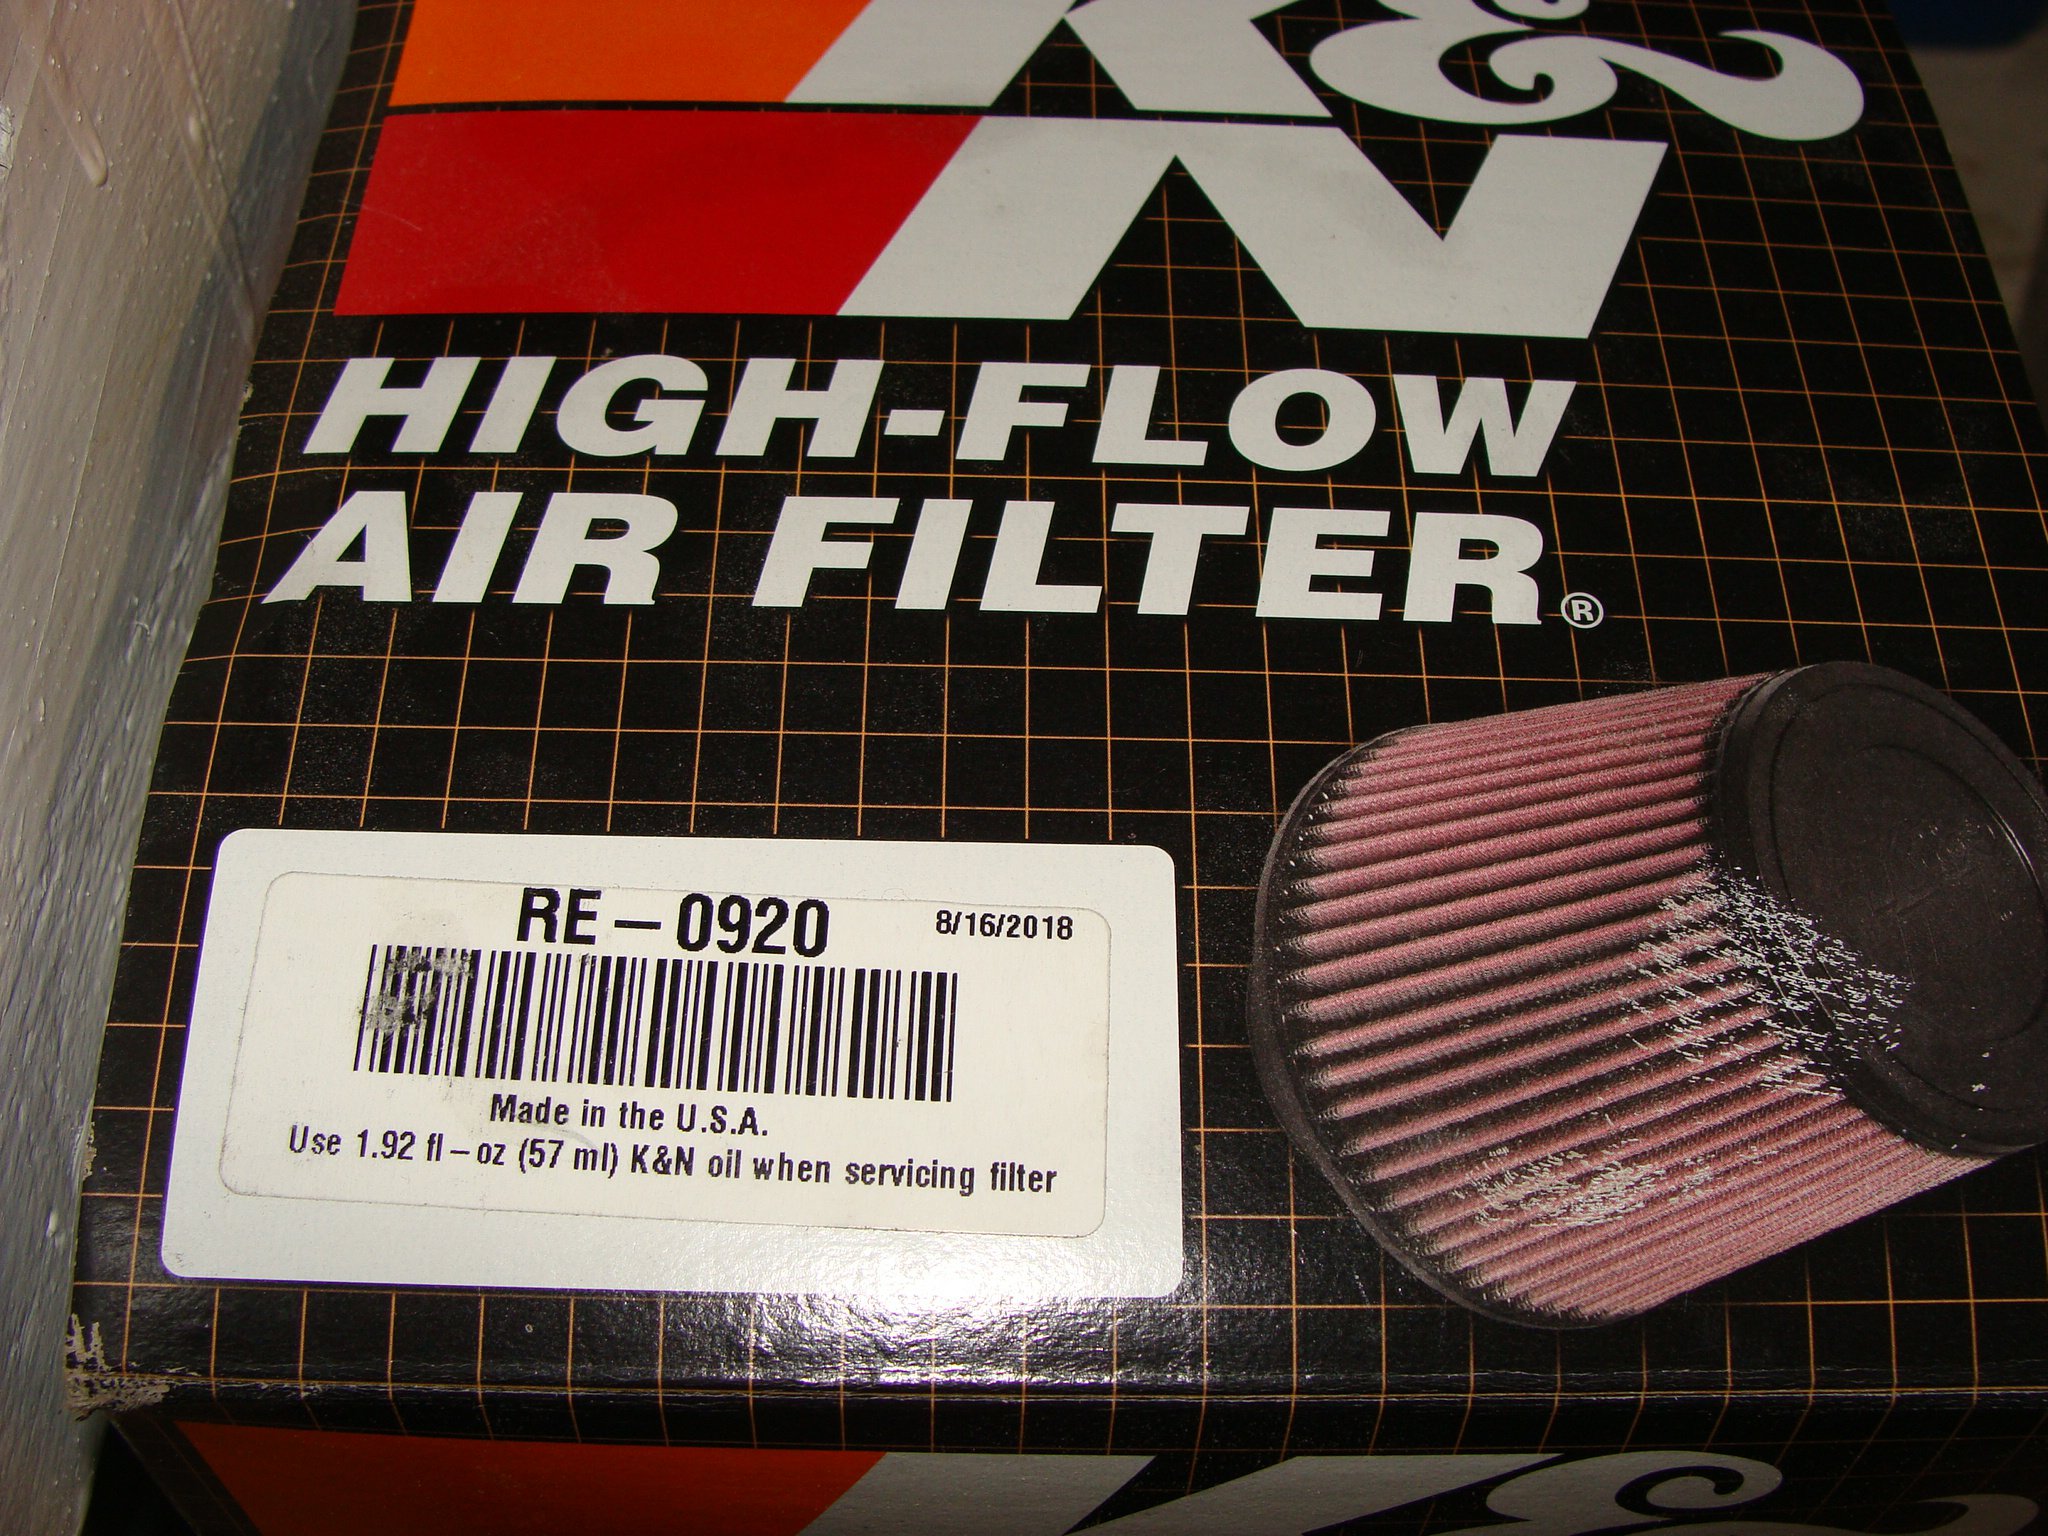
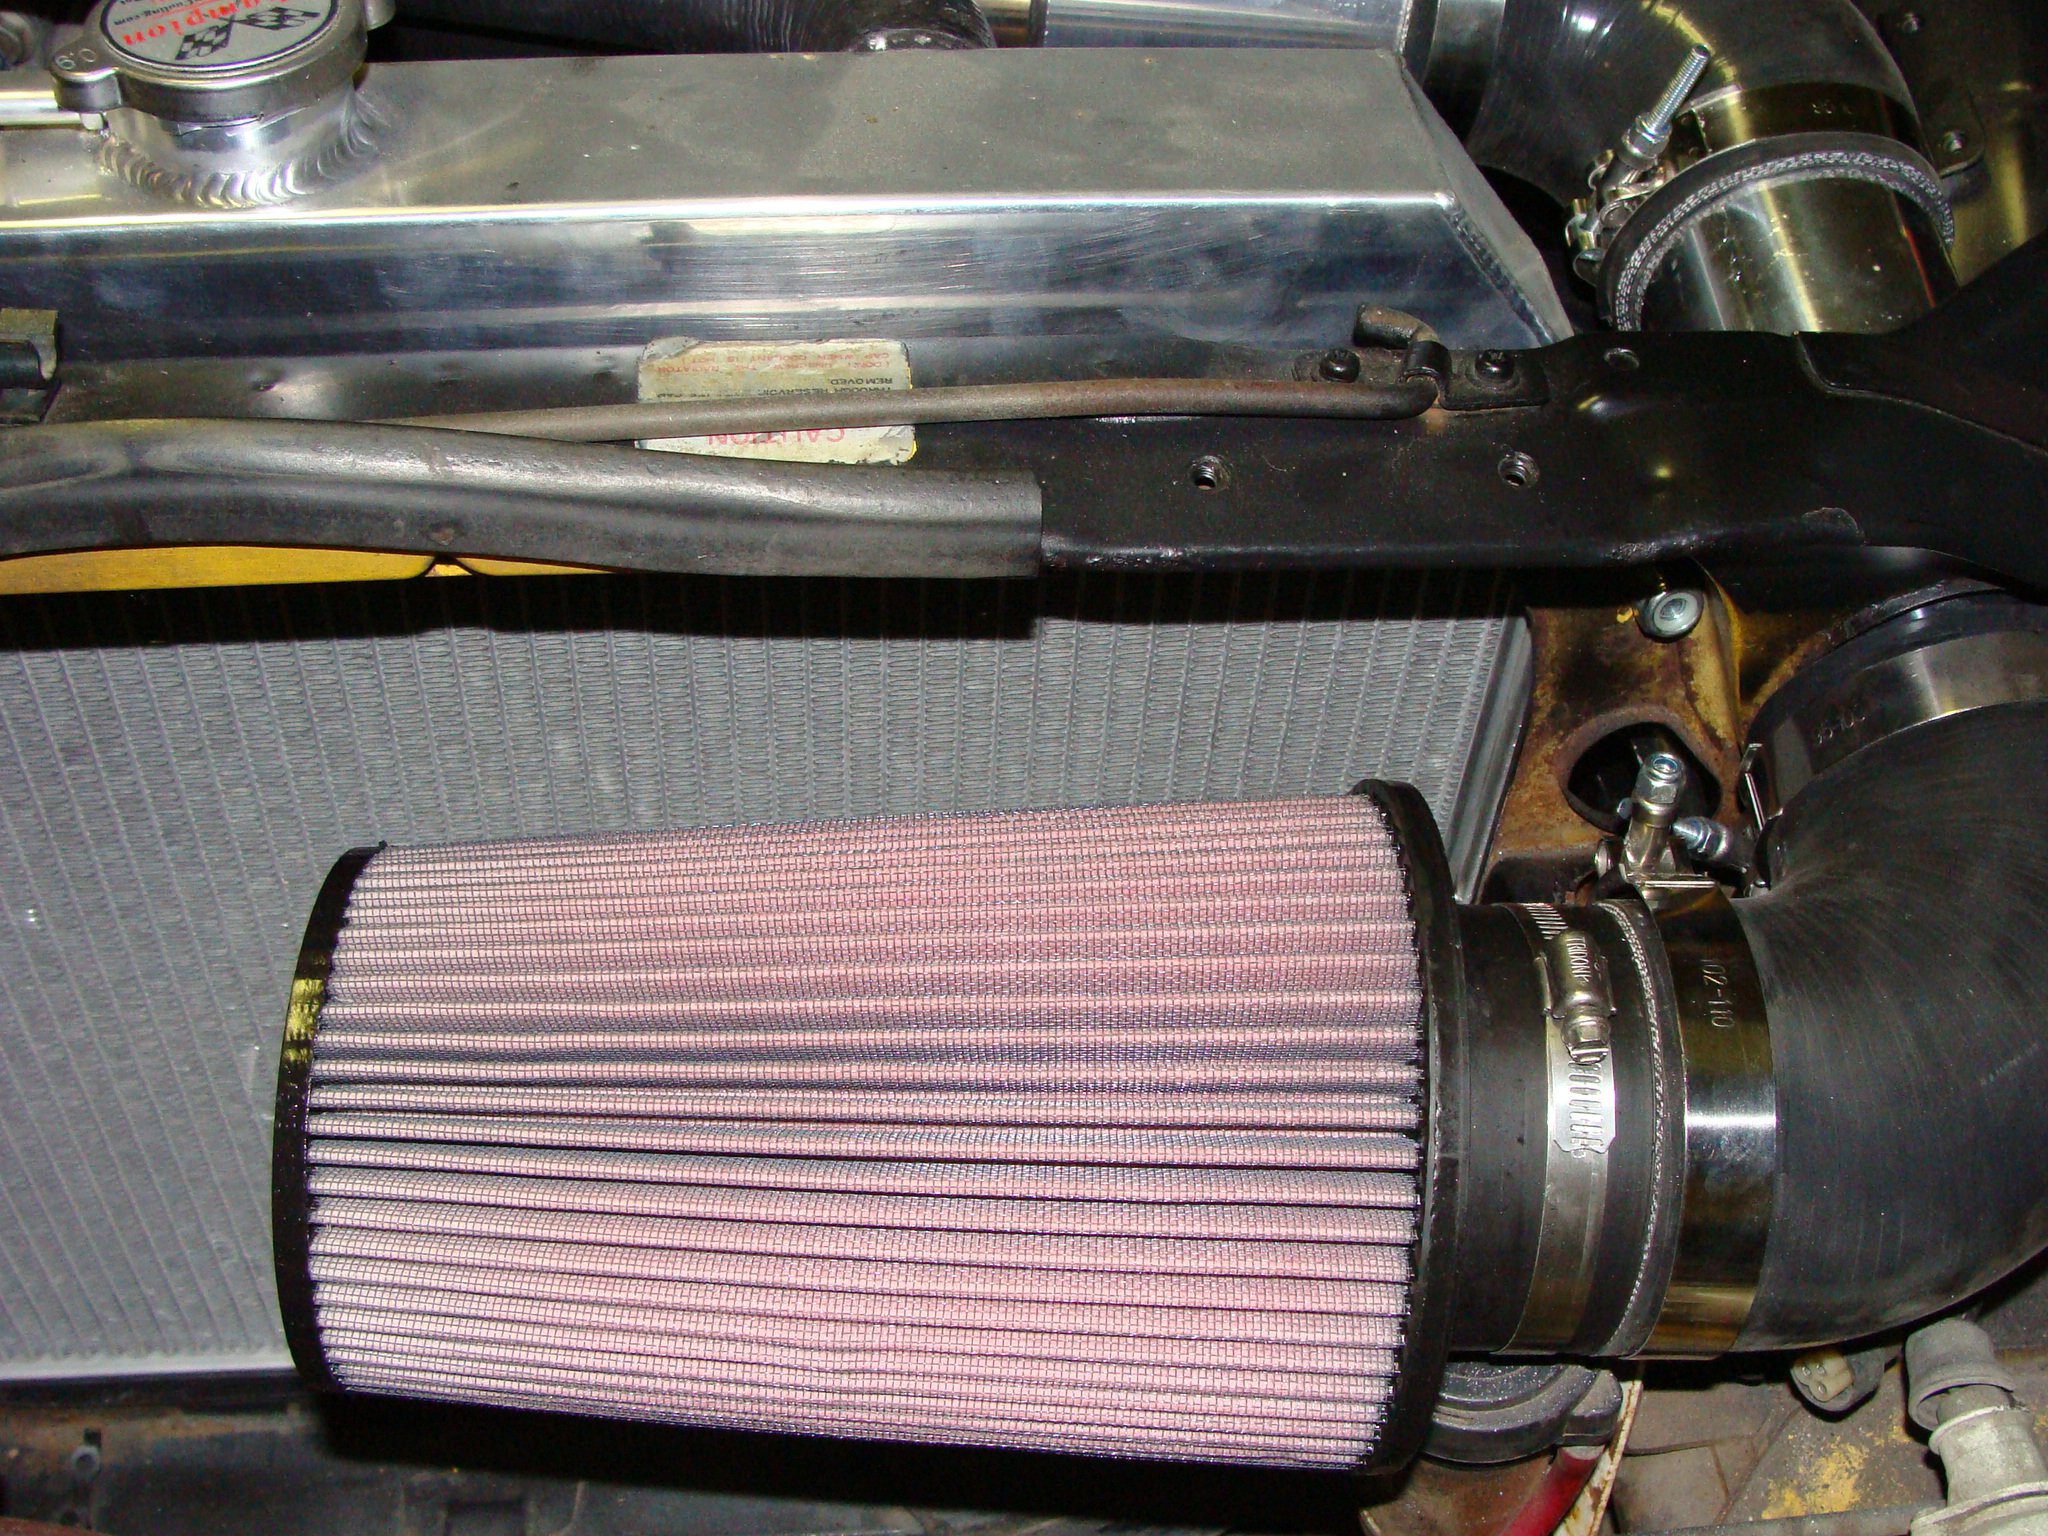
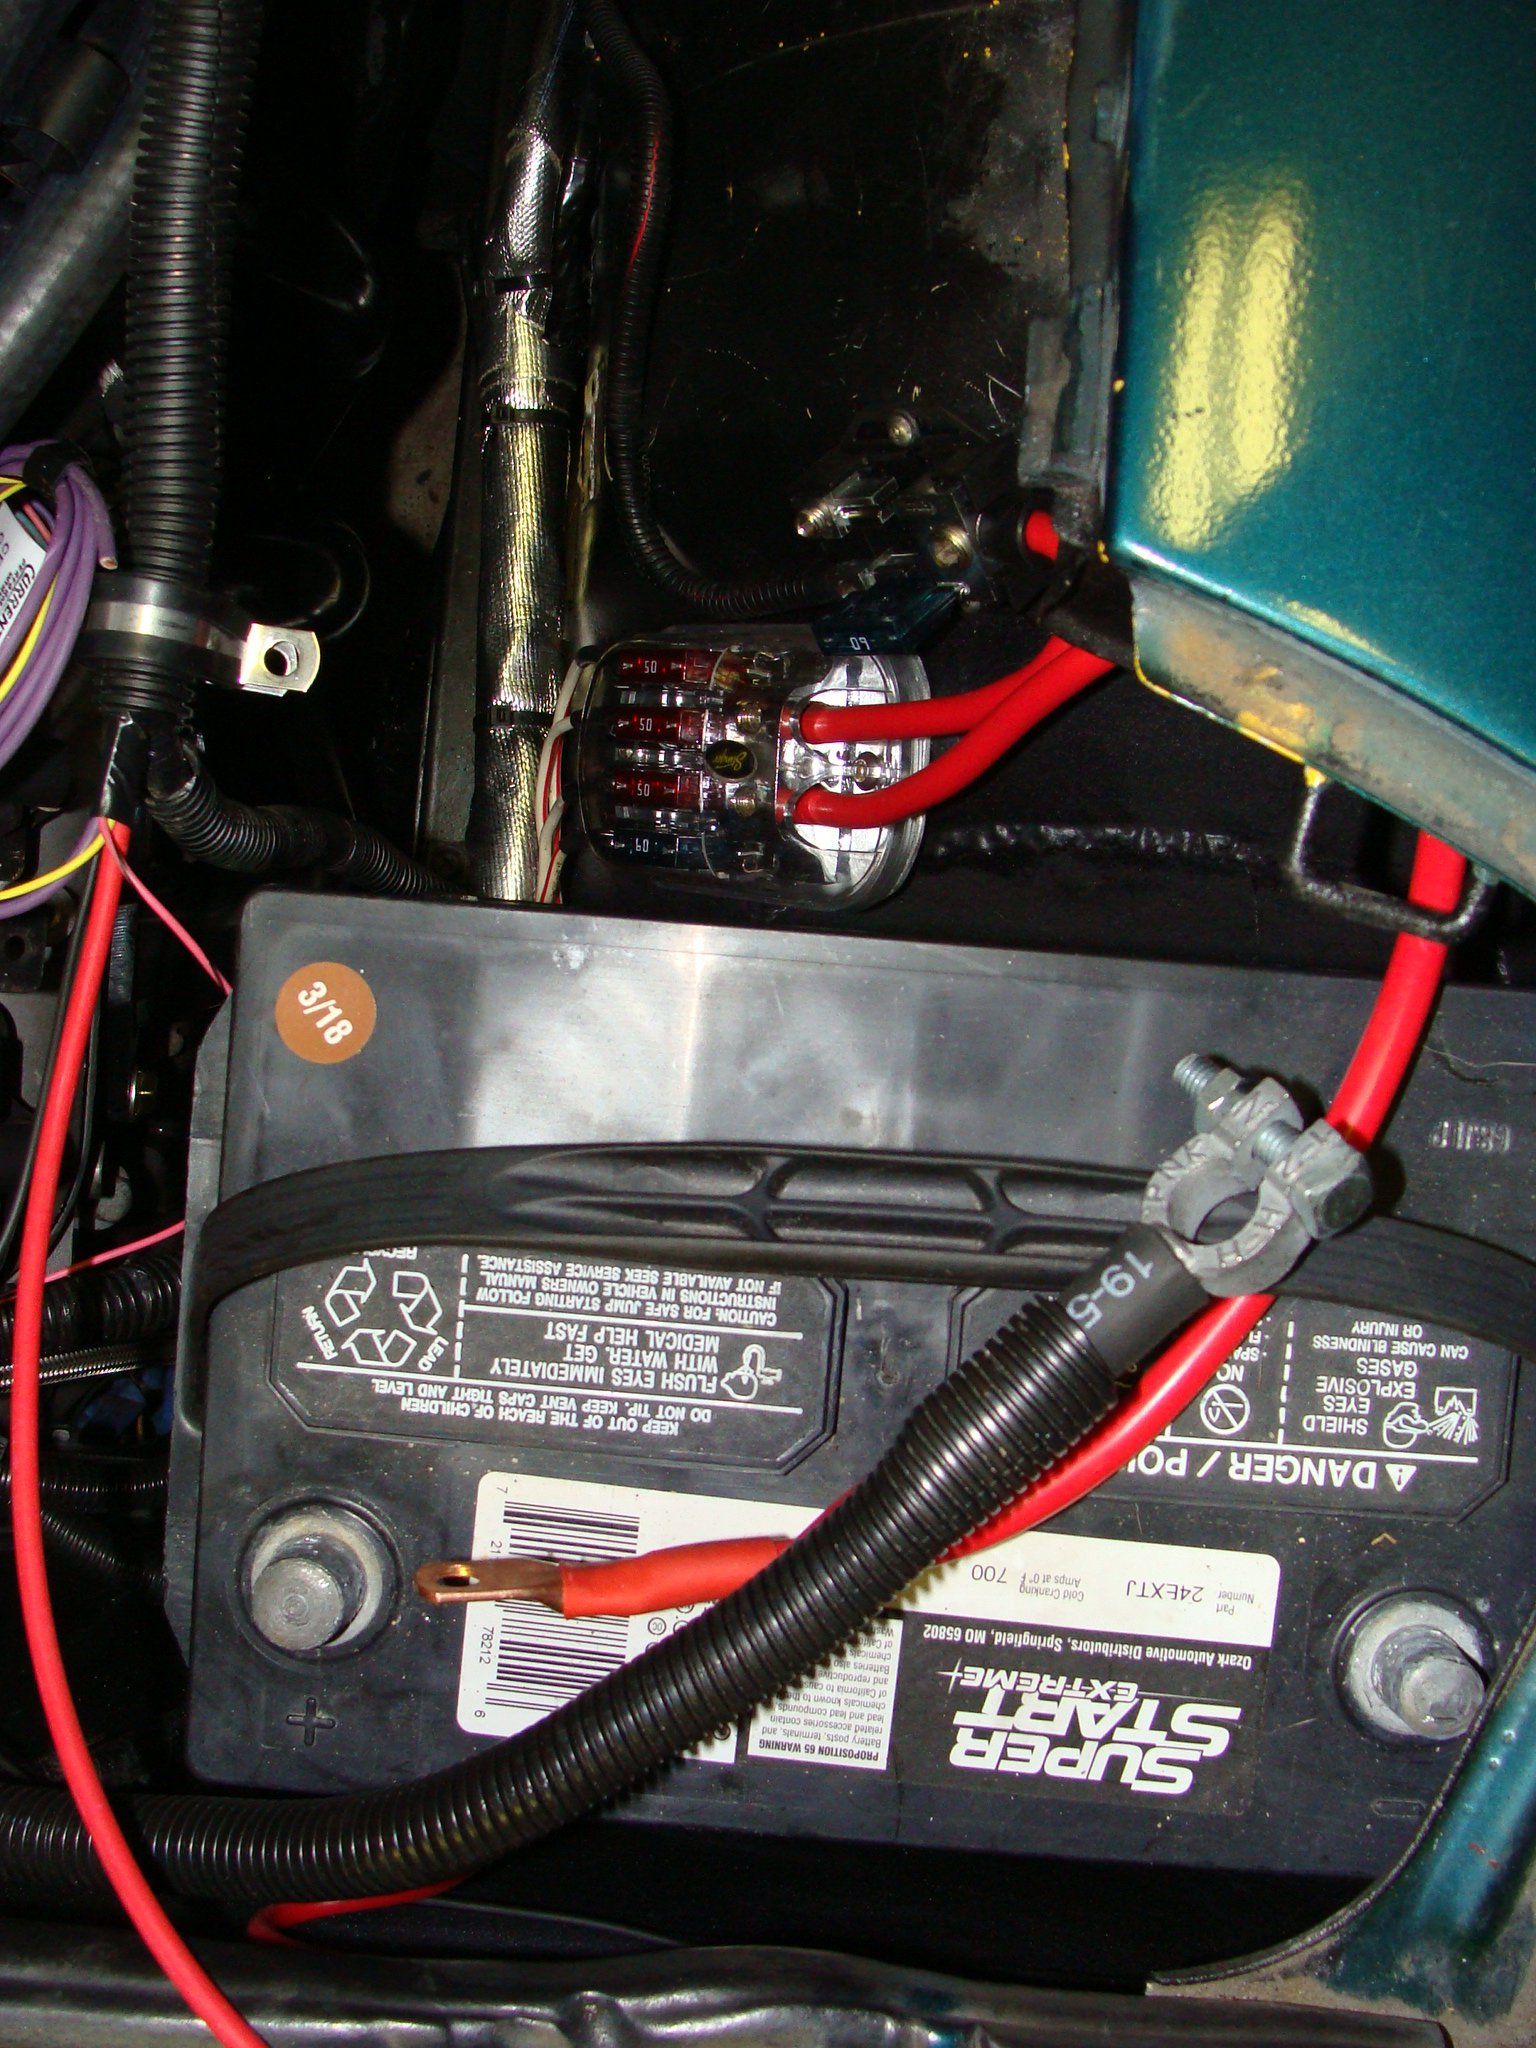
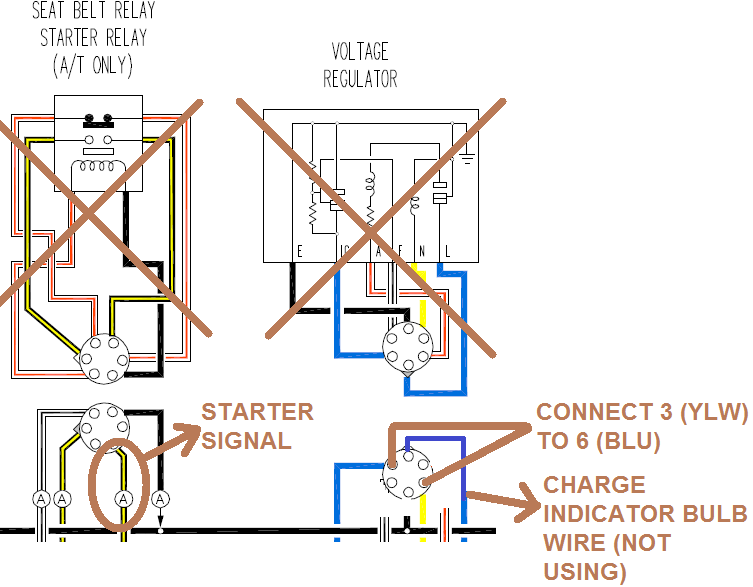
Wiring is "complete" aside from shortening o2 sensor wires and lengthening the oil pressure wire. Grabbed IGN+ 12v from the Ignition Coil/Resistor since it's hot in Start + Run for the ECU. (Voltage dips between start/run but that's a split second). My car was an automatic so I grabbed a direct starter signal from the seat belt relay (near the fusible links on passenger fender) this takes the inhibitor switch and seat belt relay out of the question. To get rid of the voltage regulator I saved the #1 (Blue) charge indicator bulb wire in case I want that someday, then connected the #3 (Yellow) and #6 (Blue) wires on the car side of the voltage regulator plug for the brake warning relay to still work. The plug has 6 pins counting clockwise from the top. The rest of the wires ignored/removed. Maxi Fuse Block powering the 4 old fusible link body harness wires, second maxi block for alternator and engine harness, straight 4 gauge from the battery, 8 gauge to alternator. Intake complete with 3.5" aluminum tube K&N RE-0920 Filter (3.5" ID flange)
-
Relentless - 1977 280z LS (5.3l L59) swap
Box5 replied to Box5's topic in Gen III & IV Chevy V8Z Tech Board
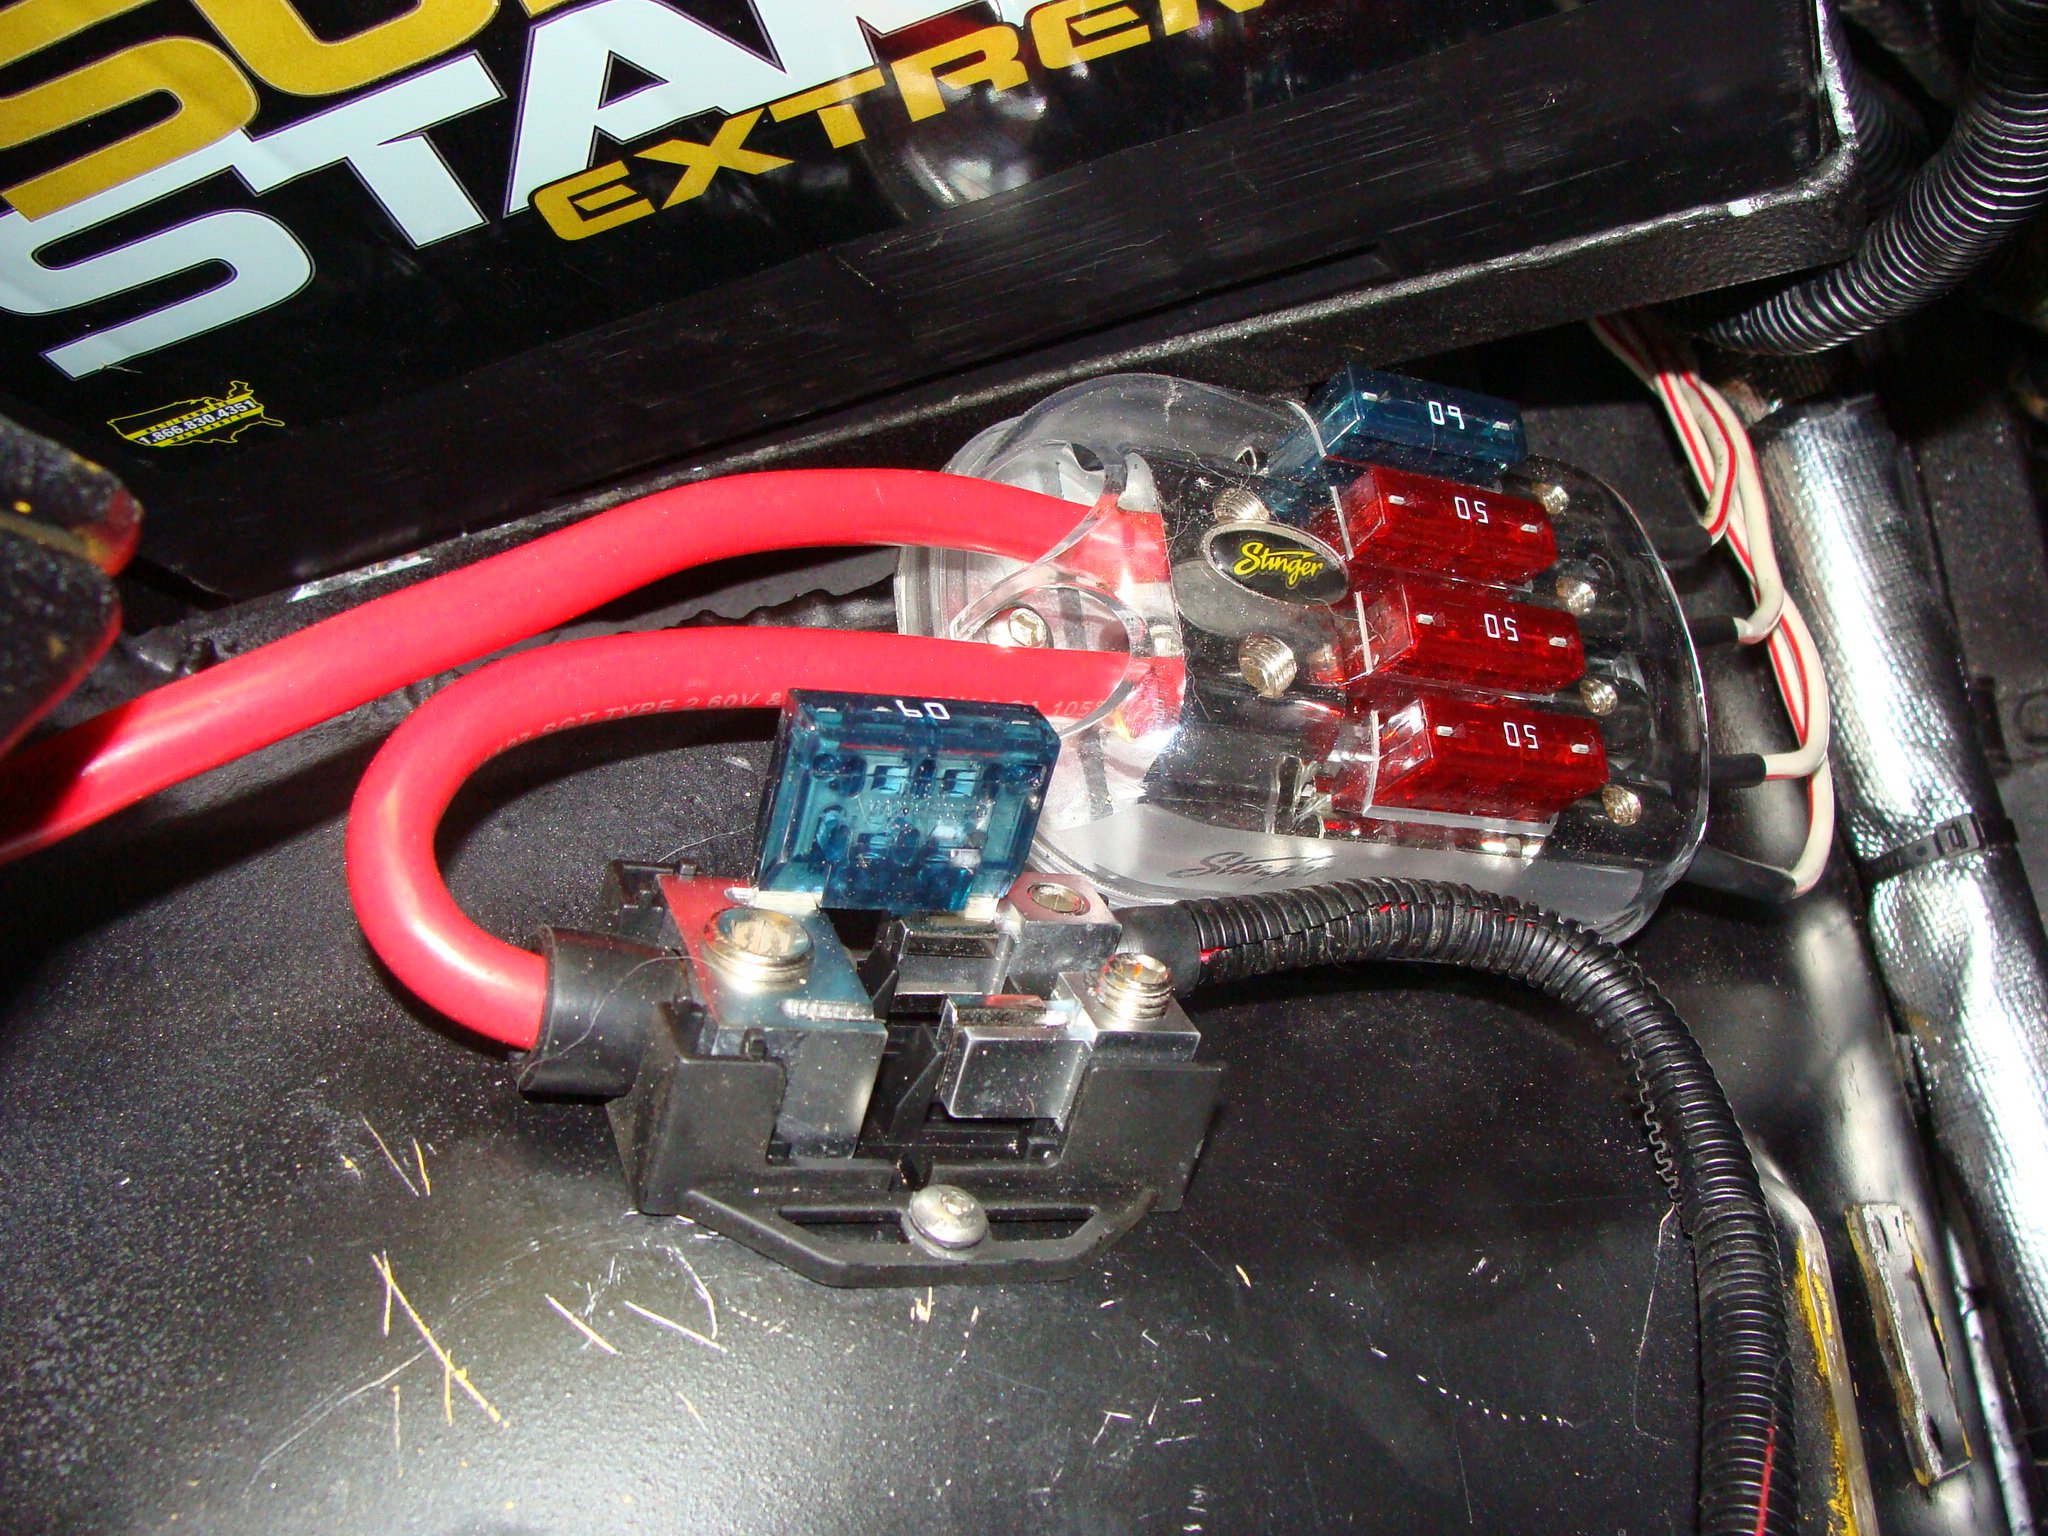
Got some electrical parts to convert to maxi fuses and protect everything off the battery. Alternator wire will be 5ft long when installed (max current for that is about 125amps @13.8v) So with the 105 amp alternator it should be ok and with a 100 amp maxi on that wire.
-
Relentless - 1977 280z LS (5.3l L59) swap
Box5 replied to Box5's topic in Gen III & IV Chevy V8Z Tech Board
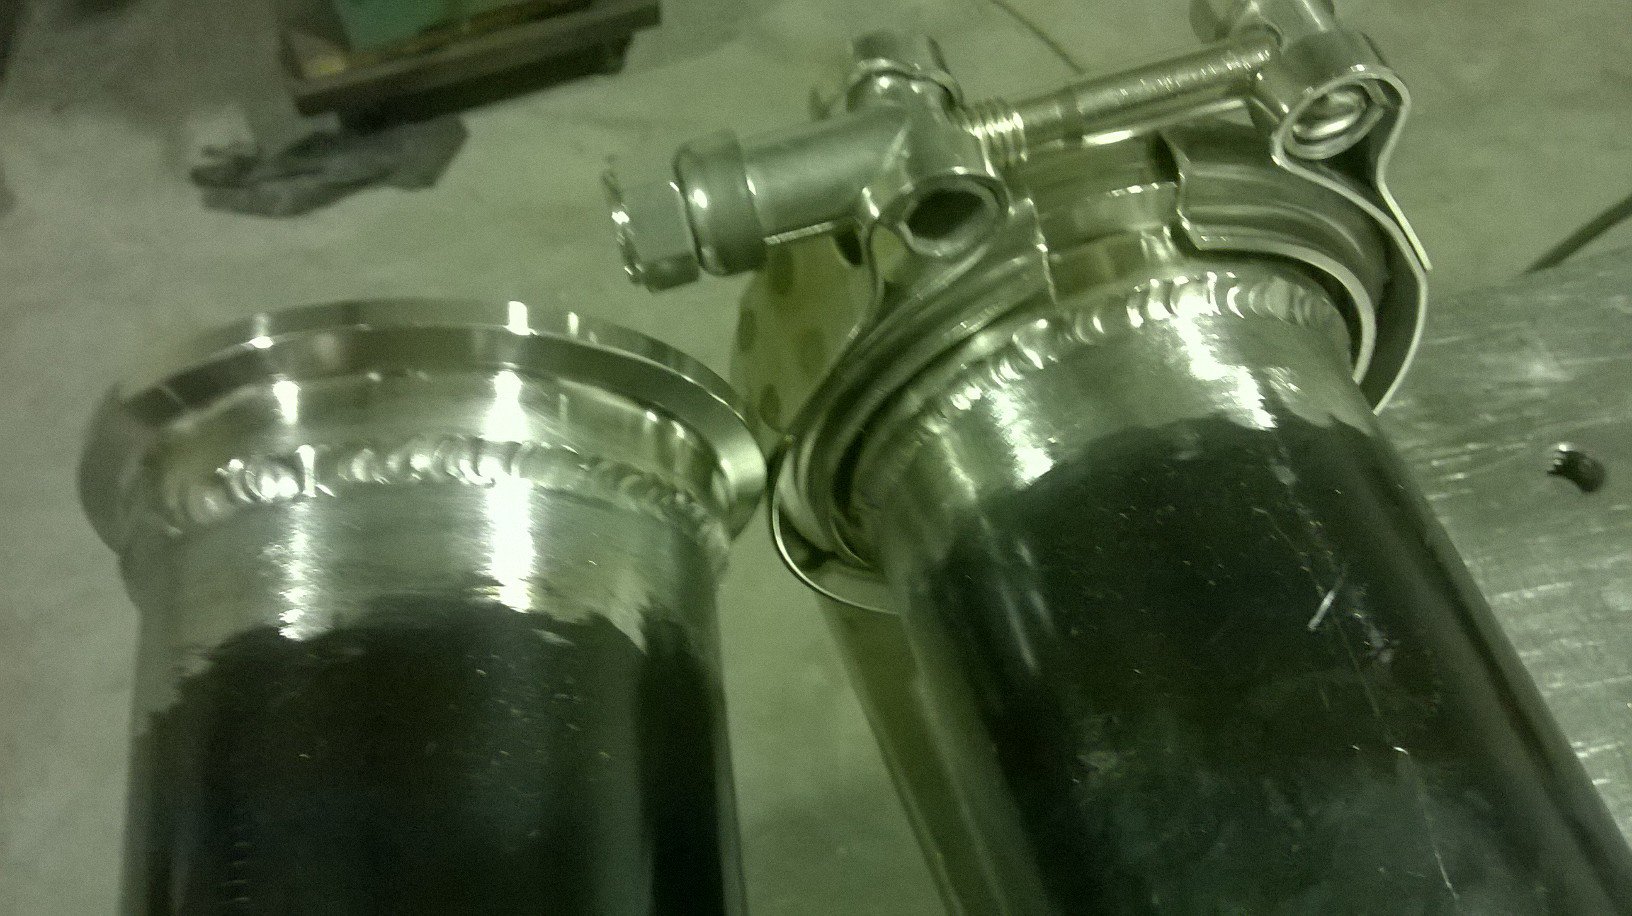
Tig'd some Evil Energy 2.5" SS V-Bands on.
-
Relentless - 1977 280z LS (5.3l L59) swap
Box5 replied to Box5's topic in Gen III & IV Chevy V8Z Tech Board
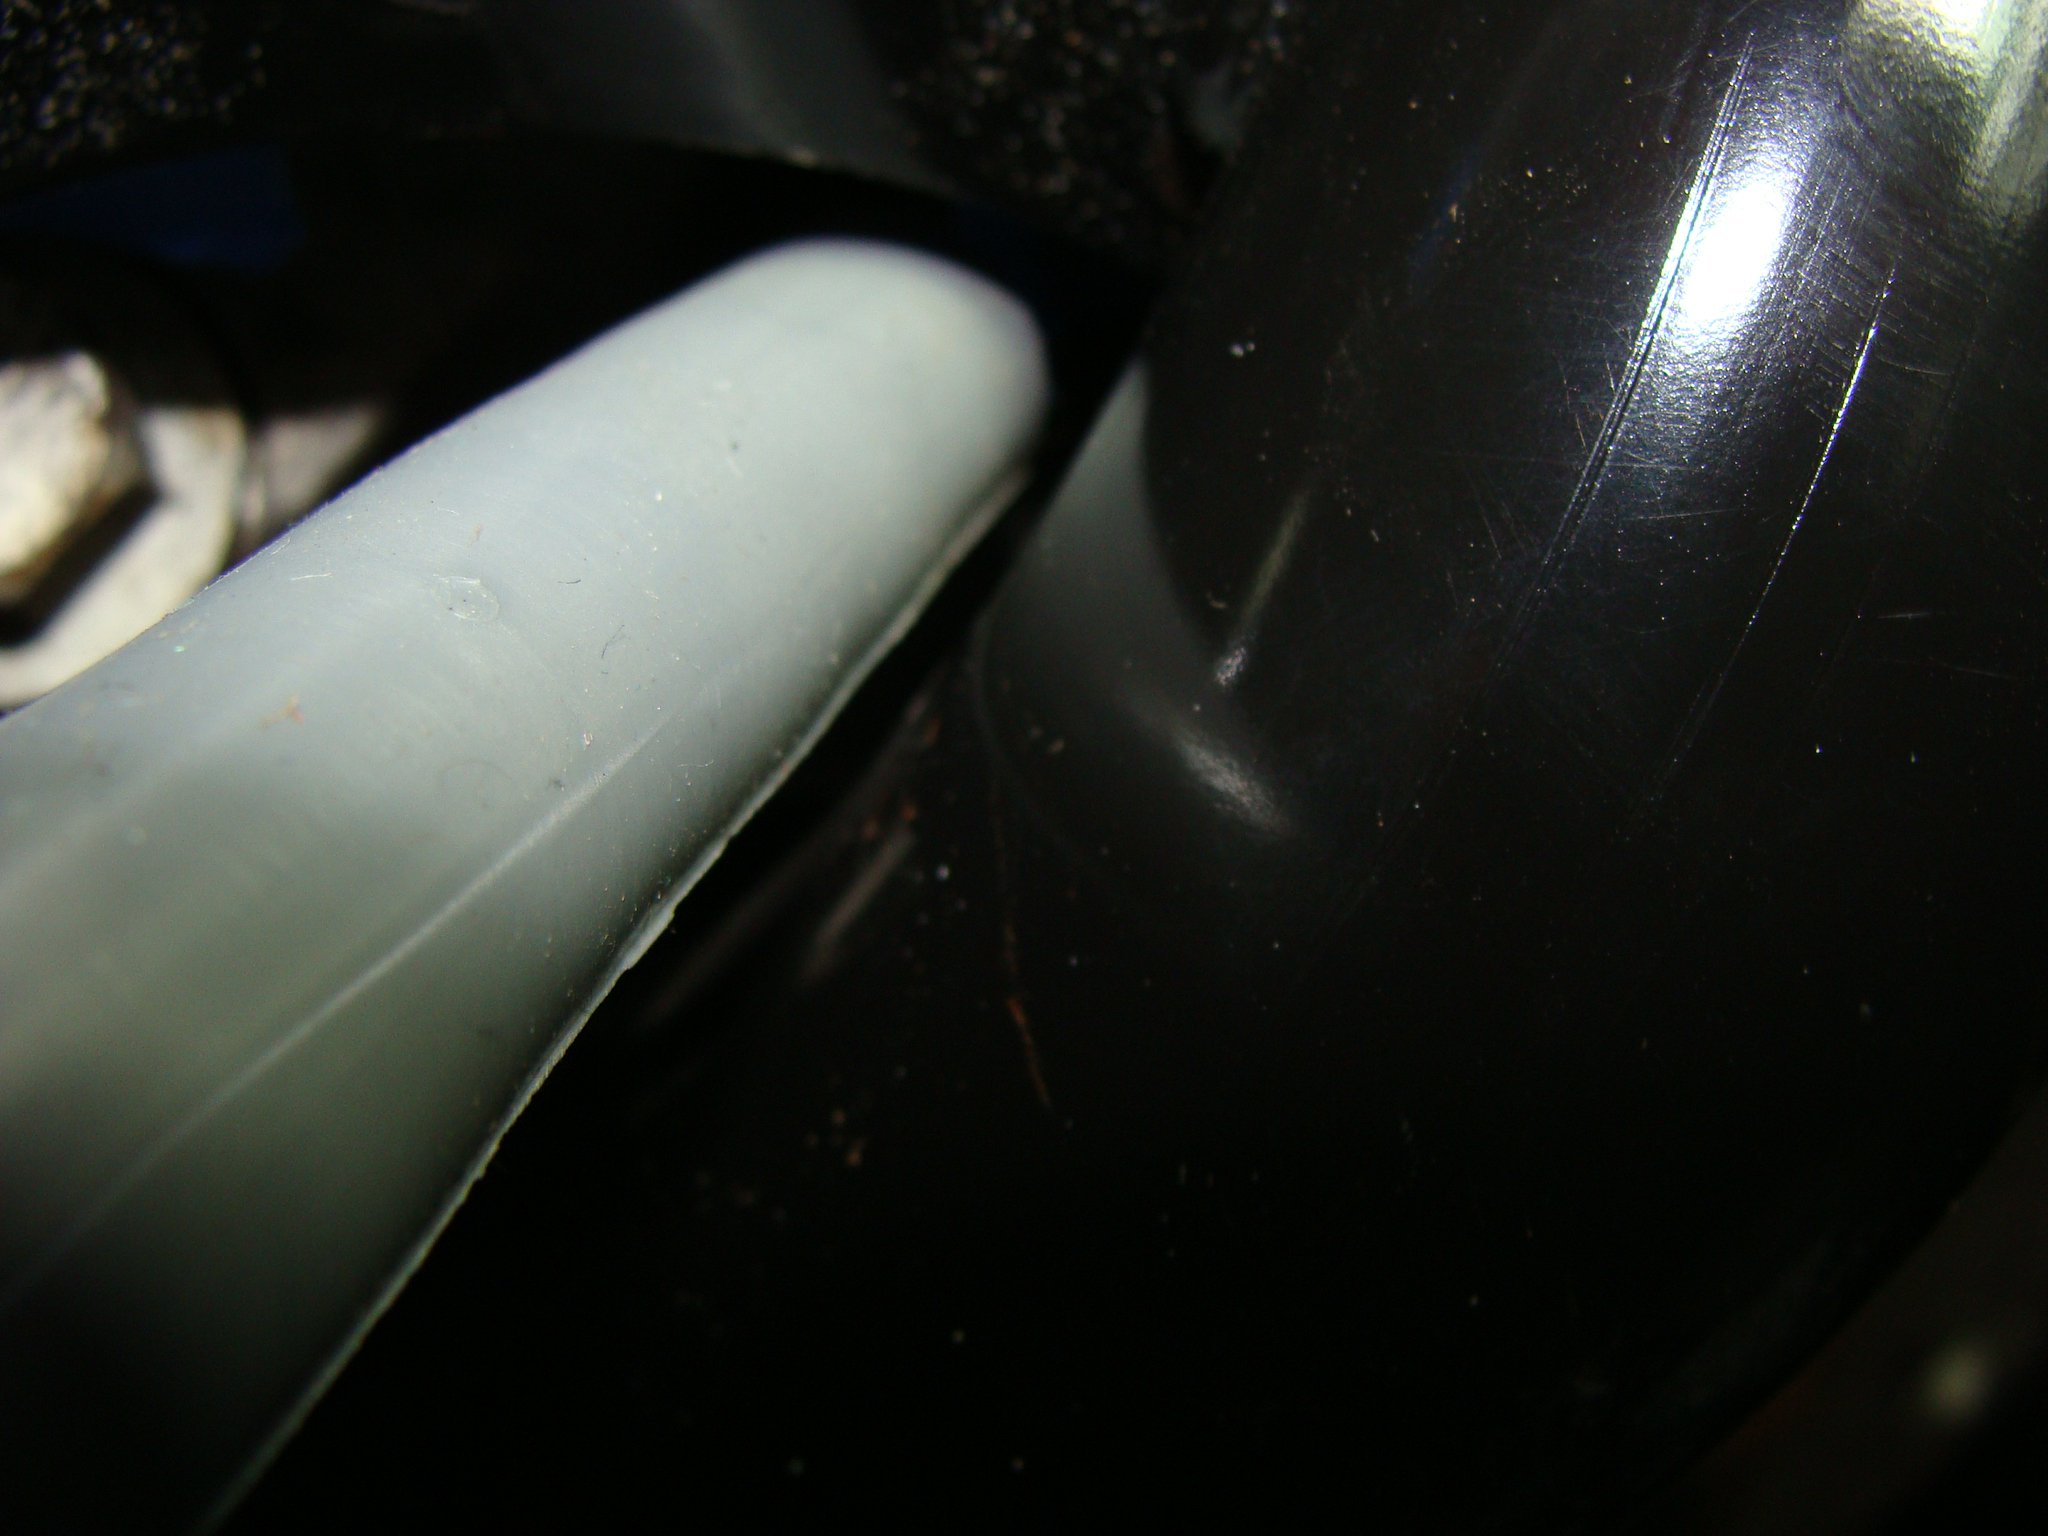
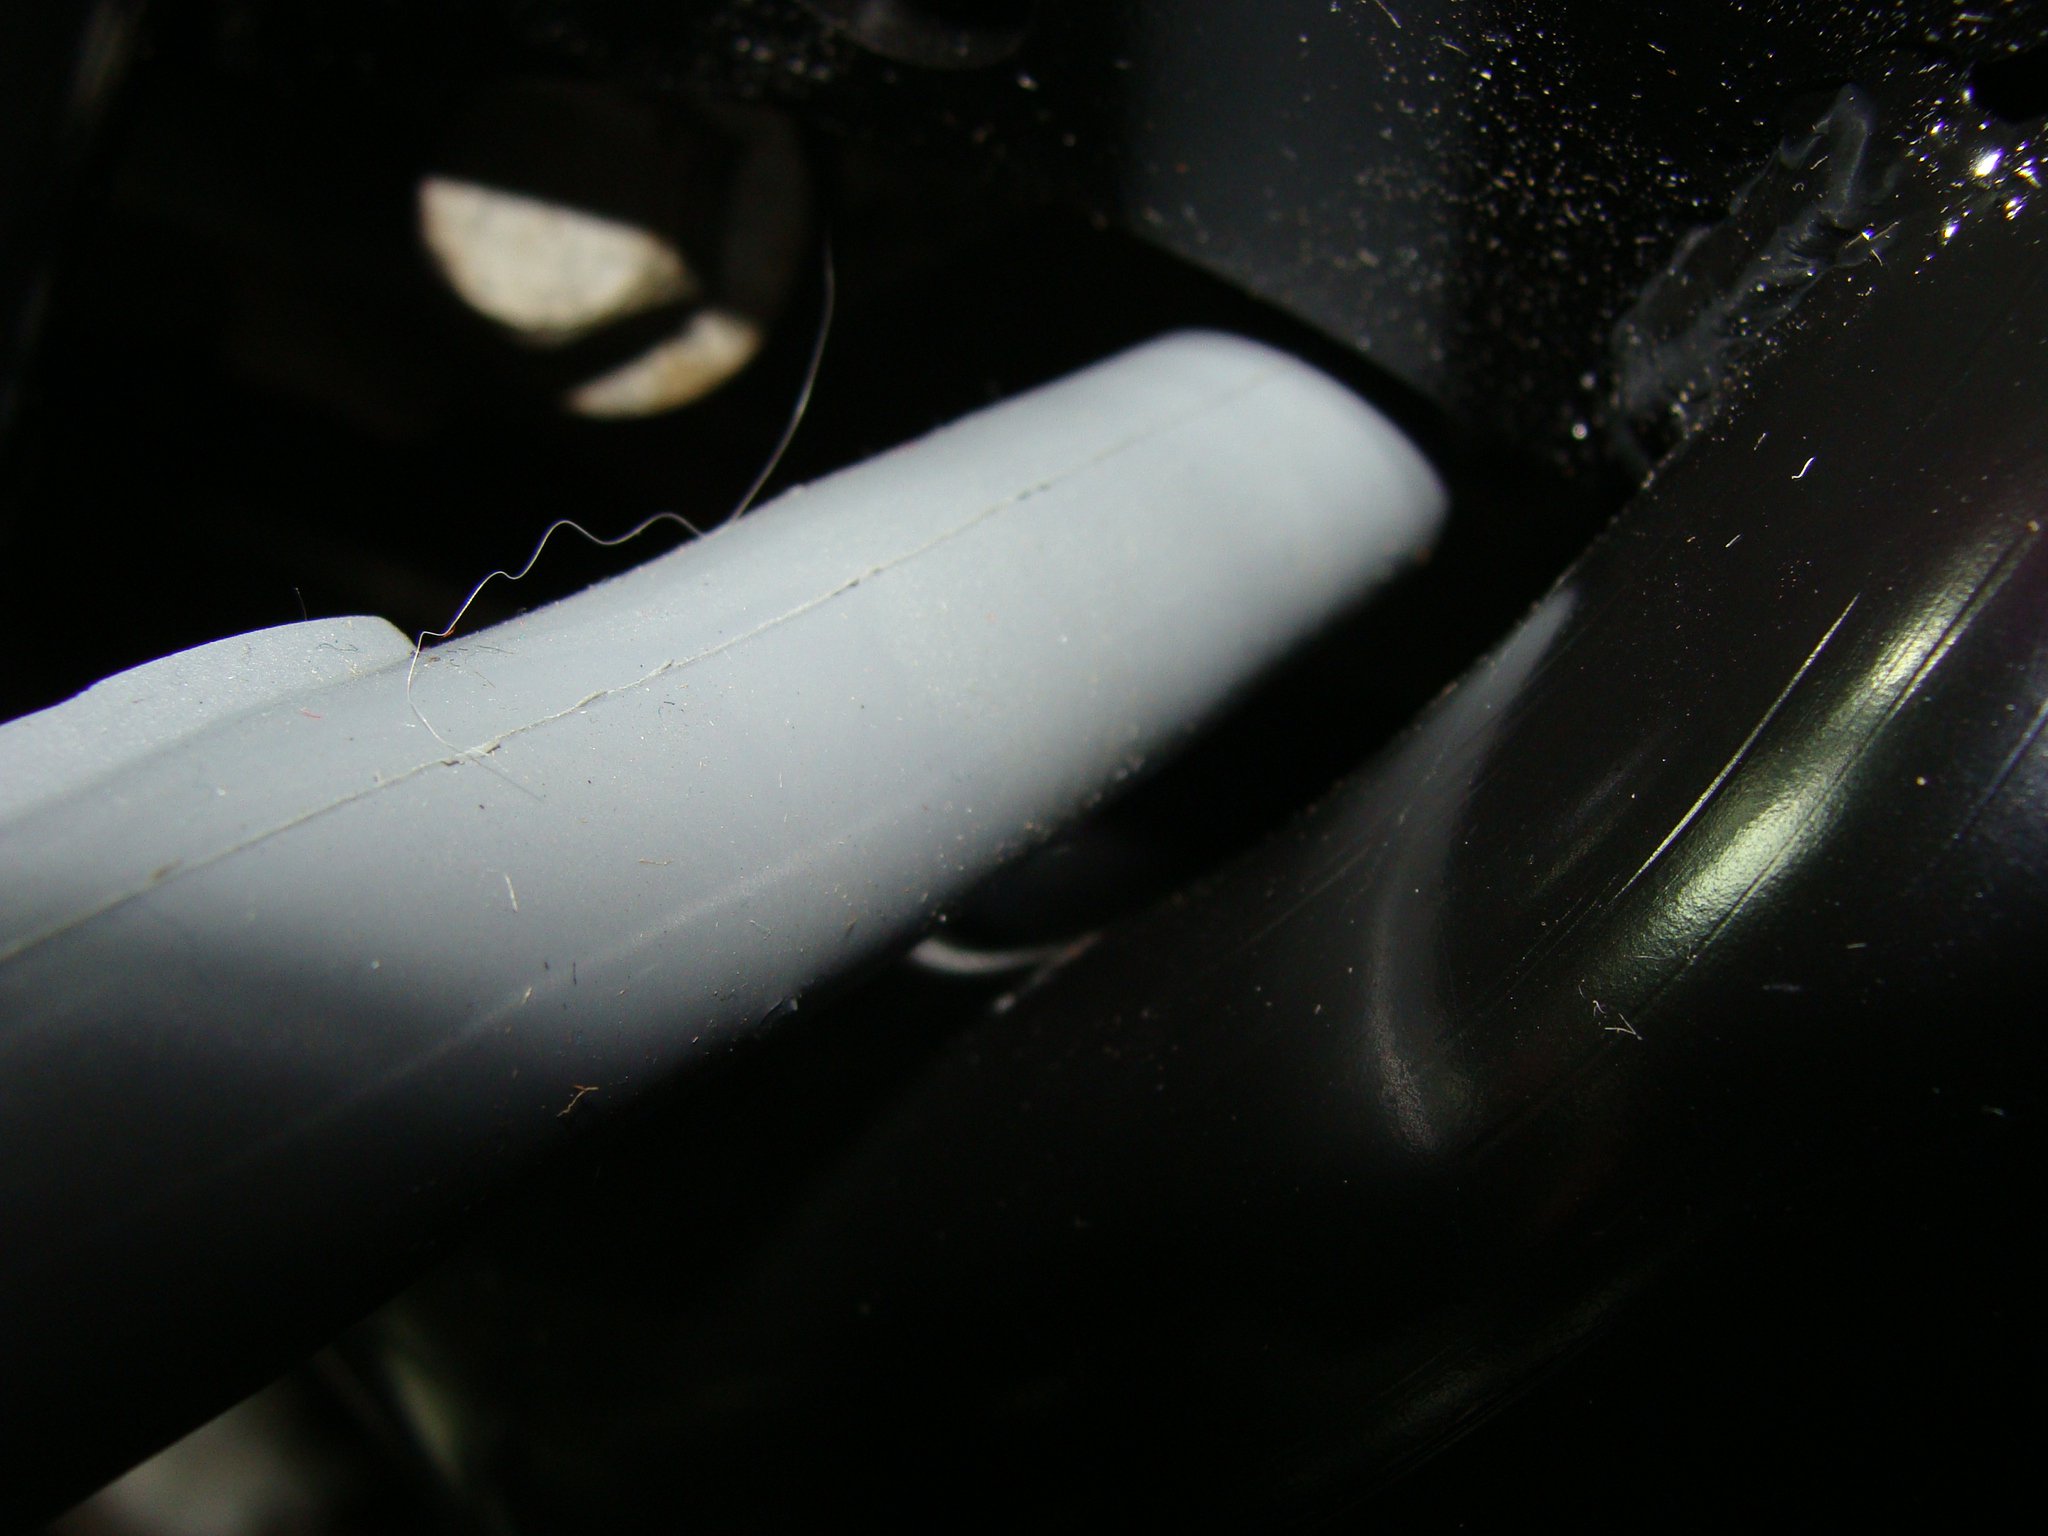
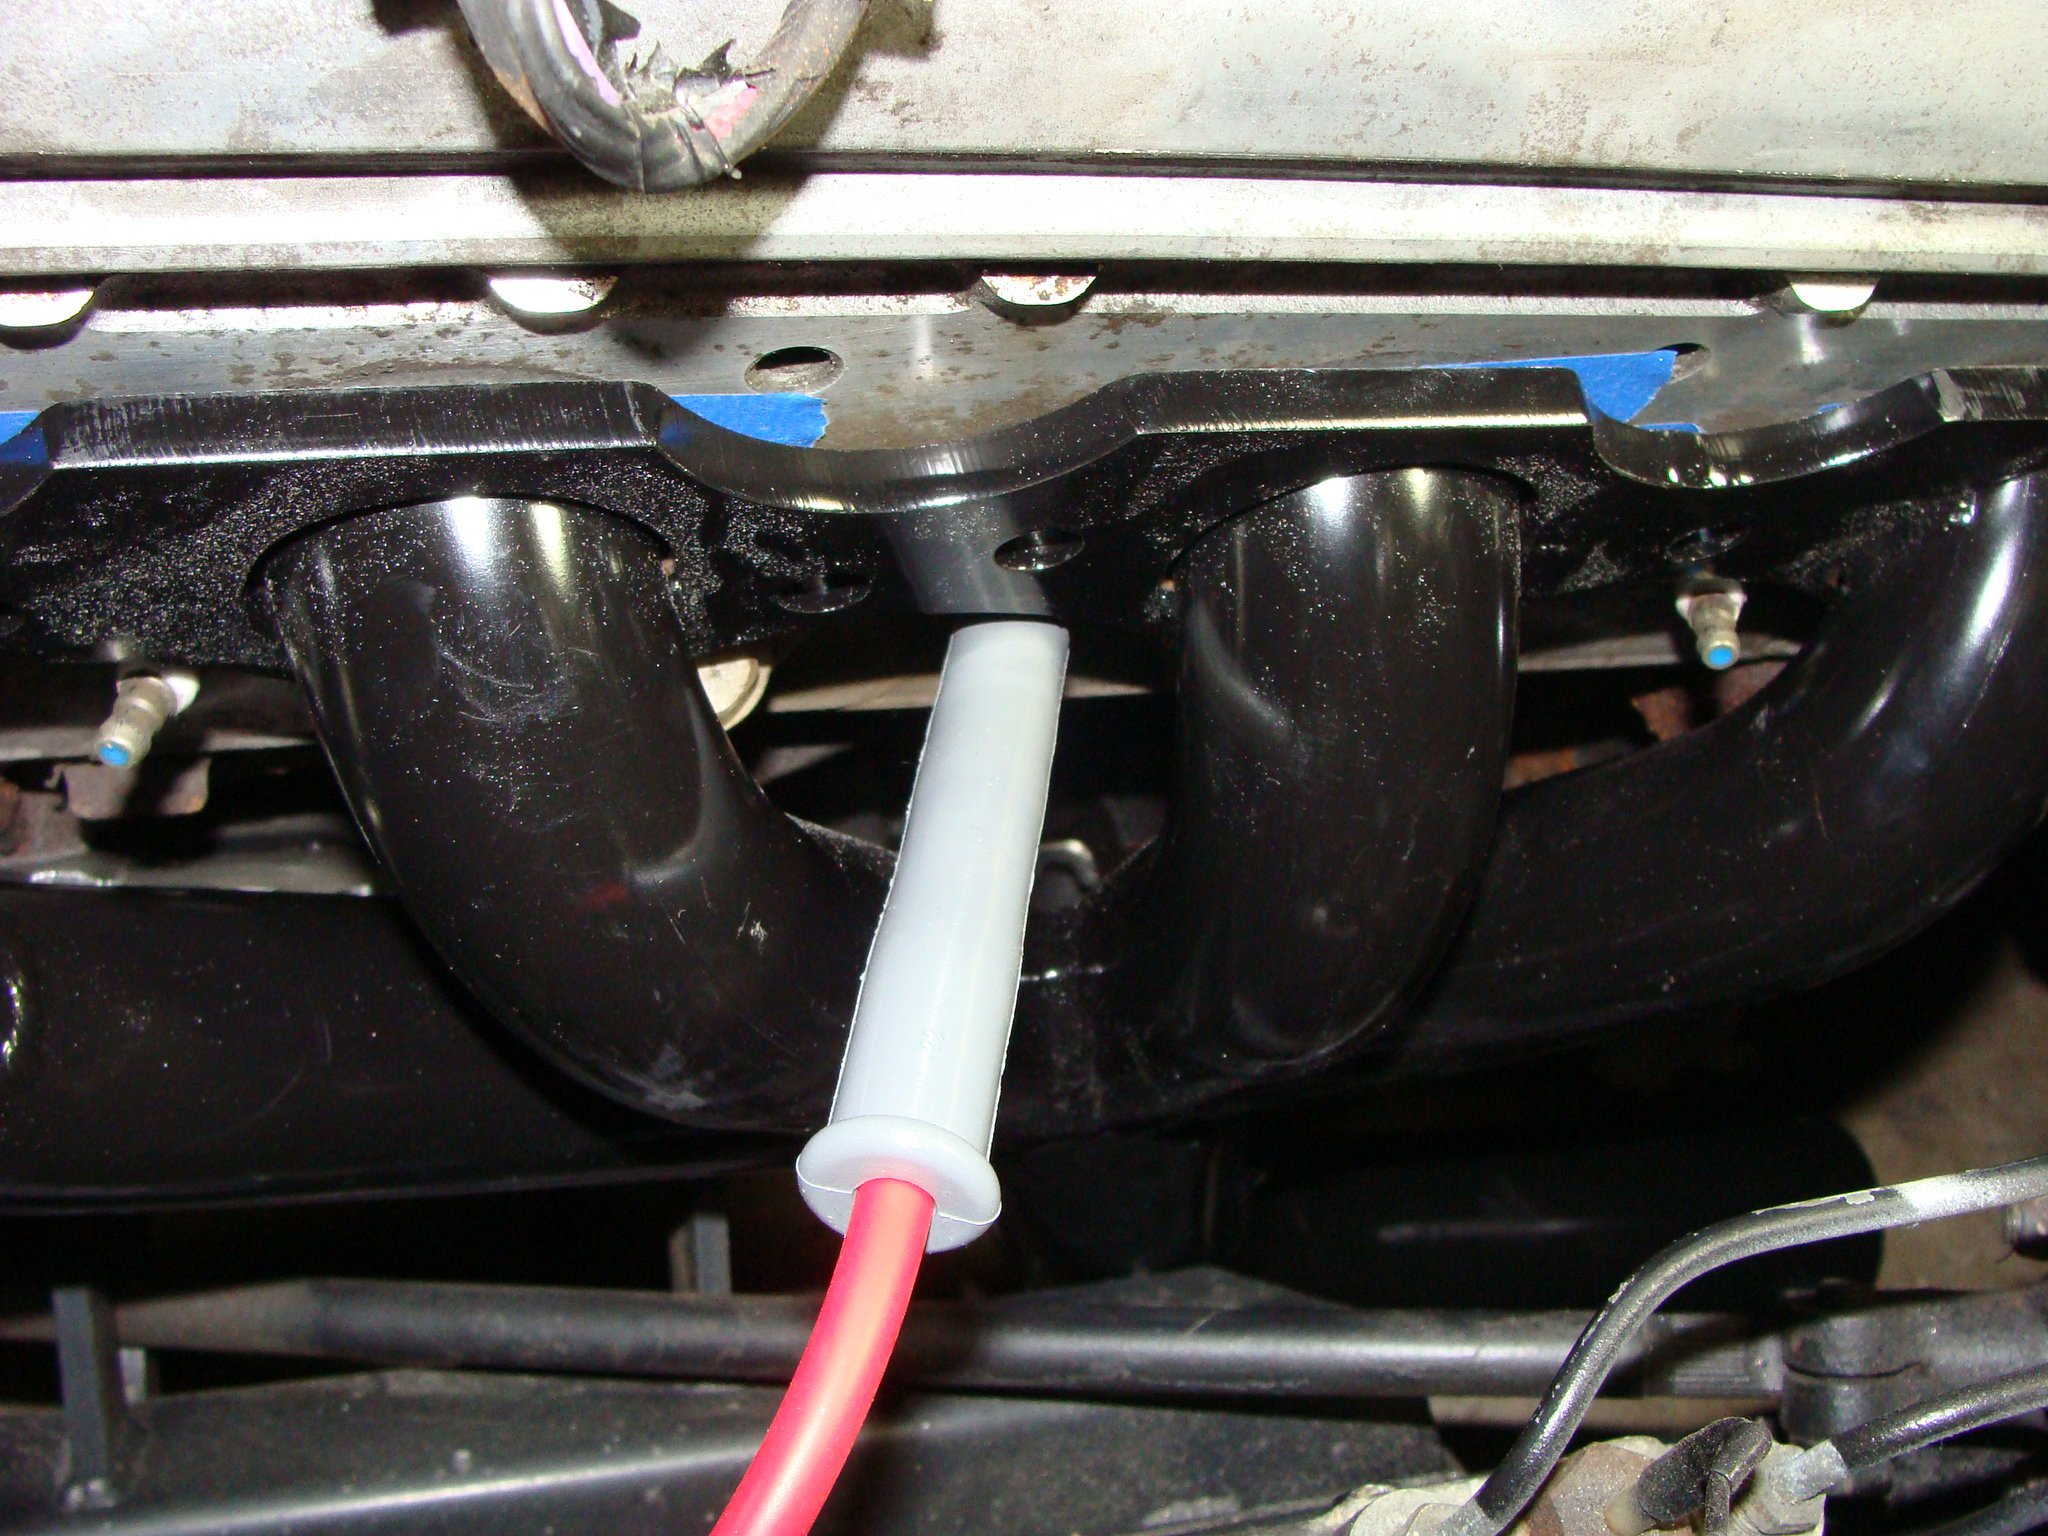
I received the Tachometer today with a note saying "requires ECM input only," so big thanks to JCI for that. Also JCI came through with the 1.75" header revision, they look like the ticket now. Bought MSD 32829 Plug Wires. (narrow, bendable) Only tight boot clearance is Cylinder 7 (Drivers side Firewall) but there is a small air gap. I plan to lightly tap a dent for more airflow around the boot, but I believe JCI will revise that on future batches and these headers will be spot on for 280z LS guys. Cylinder 7 Cylinder 7 close up (small air gap but close) I can bend them away so might not even need a dent. Next closest boot is Cylinder 1 (Passenger front) but has a healthy air gap and I haven't bent the boot for more yet. All the rest fit like this with tons of clearance.
-
Relentless - 1977 280z LS (5.3l L59) swap
Box5 replied to Box5's topic in Gen III & IV Chevy V8Z Tech Board
With the JCI reworked tach, do I still need to run the LS tach signal wire through the stock resistor under the passenger dash? -
Relentless - 1977 280z LS (5.3l L59) swap
Box5 replied to Box5's topic in Gen III & IV Chevy V8Z Tech Board
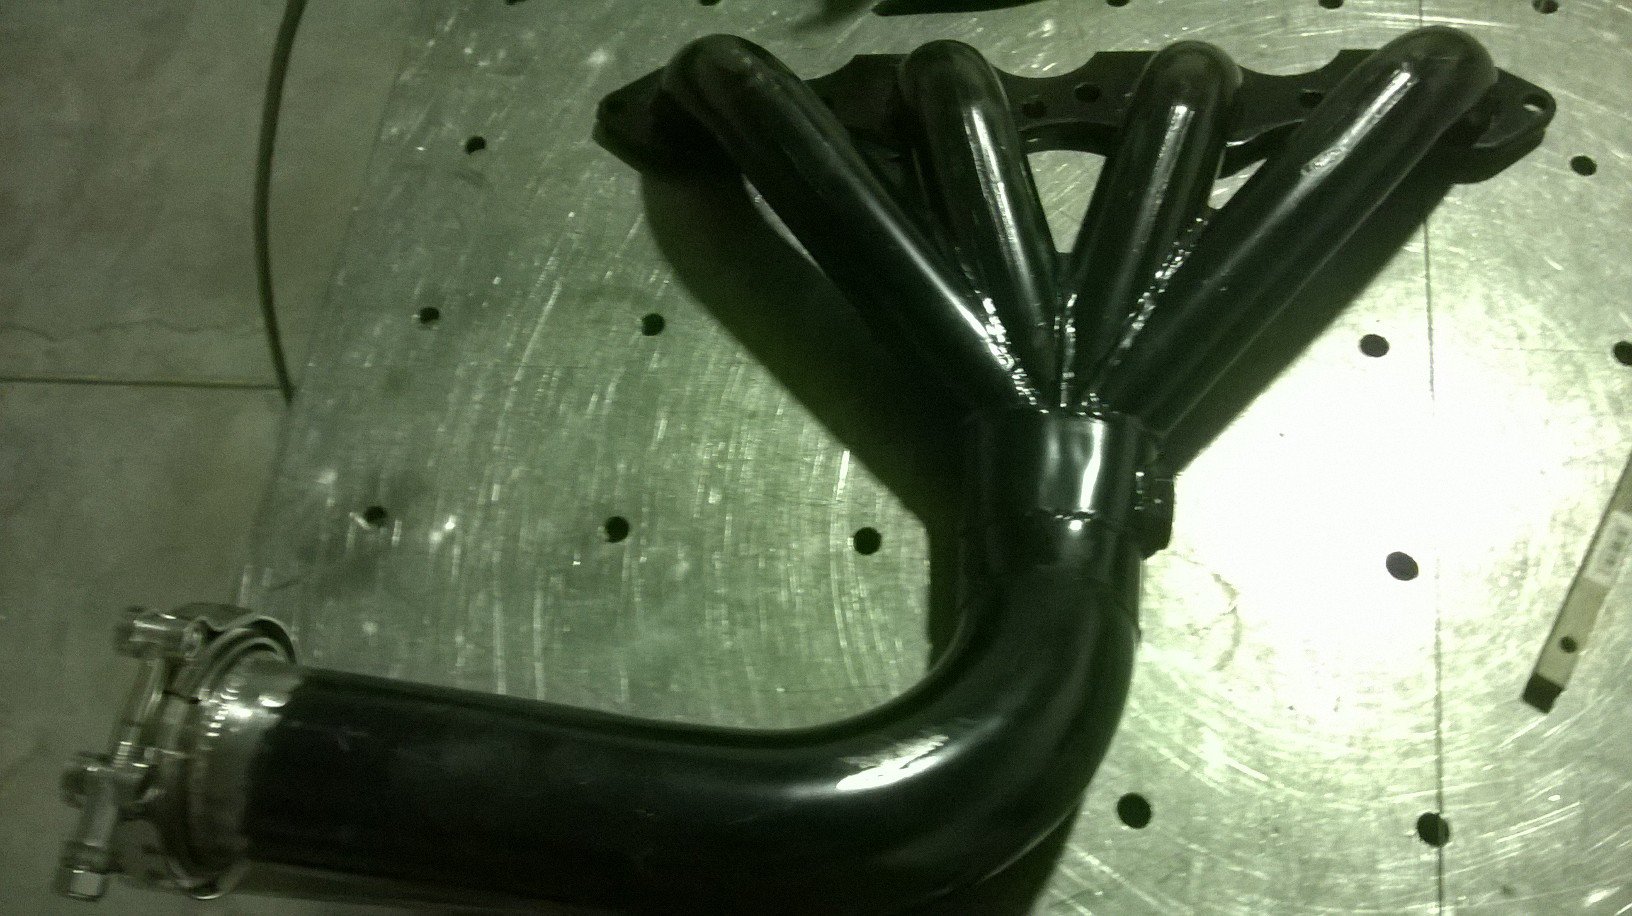
Bit of confusion with the header situation from JCI (thought i was getting 1.5's back, but I ended up getting a reworked 1-3/4" set. You can see the modified first primary to clear a spark plug and boot well (I'll get pics installed with MSD 8.5mm bendable boots tomorrow to show clearances). Still might dent the drivers side primary closest to the firewall (far right in the pic below), but it should be minimal and if JCI can touch that primary up on future batches these headers should be perfect for LS swaps in 280z's. Thanks I appreciate it. Good luck with your build, I'll keep an eye out for when you get going on it.


.jpg.96e6181bb1a5eb308d109ea22a060935.jpg)