

Arif
-
Posts
383 -
Joined
-
Last visited
-
Days Won
4
Content Type
Profiles
Forums
Blogs
Events
Gallery
Downloads
Store
Posts posted by Arif
-
-
Ok I promised to provide an update on the brake bleeder so here it is. I started with the passenger side caliper and it bled with no problem so then I proceeded to do the driver's side and that literally took 5 minutes to do. The only issue I have was bleeding the master cylinder which I think I'm going to have to pump the brake pedal to get the air out.
As far as the bleeder is concerned it was sturdier than I thought it would be. It was made of high impact plastic that was heavier than it looks. Overall a very easy system to use and while it is expensive I felt it was worth it.
-
Steve/Sparky
Yeah I'm a member of the local zsport club. If you like different makes then check out the monthly Cars and Coffee the last Saturday of each month.
If you need some help just let me know. I'd love to come check out the ride either way!
-
That $30 tool is junk. I went to PepBoys and all they had was that one. The handle broke halfway through my brake job so I'm ordering the one I posted about. I'll follow up and let you guys know how it goes.
-
If you use a brake bleeder like this http://www.brakebleeder.com/products/best-sellers/v-12-diy.html
would you still have to reposition the caliper so the bleed screw is facing up? Seems like the air would be pushed up like in the video.
-
Are you guys members of zsport here in San Antonio?
-
Steve,
That's a great project you've got! I think I've seen your car around town too.
-
Still need the MM adapter.
Too bad, I emailed Ross just to see if he had them in stock and he never got back to me.
-
Glad you're ok. Also good thing she didn't hit you on the driver's side. That Z32 should make a very cool RB swap though! Keep us posted.
-
Yeah I used the disc to cut off the handle right before it goes through the guide. It's not in way because the stock rails has the handle on the other side. Which reminds me I need to wrap mine in tape so someone doesn't cut themselves on it.
-
Will I still need to get the mm adapter flanges to make this work or will the cv you are making make it long enough so you don't need it?
-
There's still a crap load of corvettes but every now and then you get something interesting show up like this guy's car. I learned a ton just talking with him for 30 minutes. I'll ask him if I see him again what forums he hangs out in.
-
This was in San Antonio at a burger joint called Biff Buzbys. I had never seen a set up like his before. I asked him if he can put a big turbo on a 2.4 then you should be able to run a T4 turbo on a 2.8 and it should be as responsive as a T3/T4 turbo and see higher boost levels at lower rpms.
-
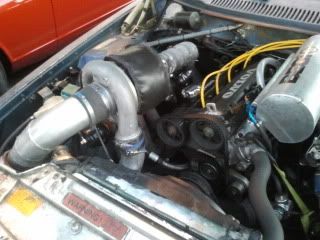
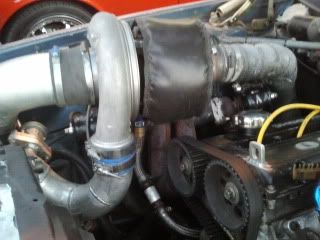
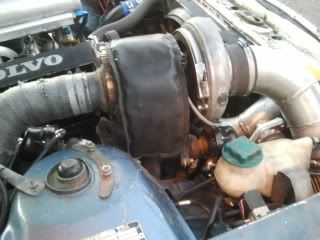
I went to the local car show tonight and saw this strange looking Volvo with a HUGE turbo sitting on top of the engine. So I park next to him and check out his set up. Here are the details: Volvo 2.4L engine with 11:1 compression, Vovlo/Holstet truck turbo, custom exhaust manifold and dual wastegates.
He's running 100% ethanol on this thing.
The reason for the dual wastegates is because he's separated the exhaust gases from cylinders 1 and 4 from 2 and 3. This way the turbo sees exhaust gasses in synch rather than all 4 cylinders. According to the owner (who used to work at Bell Engineering aka Corky Bell's shop) another benefit is turbo lag is greatly reduced despite the size of the turbo on a rather small engine. Enjoy the pics:

-
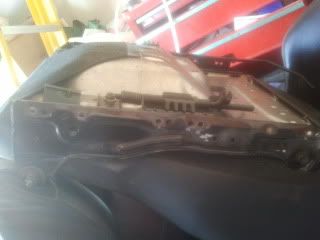
I used a drill with a cut off wheel. I think I went through 2 or 3 discs before I got the rails off the seats. It goes easier if you cut off the rivets that attach the rails to the frame of the seats. After the head is cut off of the rivets I just used a hammer and screwdriver to push the rest of it out.
I'm assuming you talking about the connector that the seat belt clicks into. My S2000 seats didn't come with seat belt connectors so I used the stock ones.
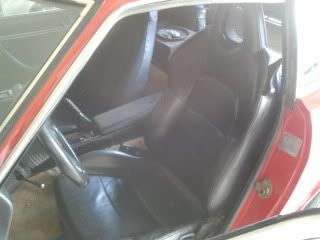
They are so comfortable after you get used to the higher seating position.
BTW My driver's side armrest is pushing into the seat when the door is closed. I think I'm going to remove the armrest and cut about 1/2 off of it and reinstall it. The seat belt guide on the side of the seat also rubs so I'm going to cut part of that so it clears.
Good luck installing them. You won't regret it.
-
DuoWing,
The passenger seat was a lot easier to install. There's more room on the passenger side so there's less critical measurements needed. If you need pictures let me know.
-
For me it's a chance to meet up with other gearheads. We sponsor events like car shows, track events, pool parties, etc. I look forward to our monthly meetings because someone is always modifying their car so you can see what they've done. Last month a guy showed up with a G35 with a LS2 motor.
-
Thanks Wedge. I took it out for a ride and I'm definitely sitting up higher than the miata seats. They are more supportive and comfortable though!
-
It's not mine but depending on mileage it might be a good deal for someone: http://dallas.craigslist.org/mdf/pts/2549469219.html
-
For those that are interested in installing the s2000 without welding or bashing your transmission tunnel here is the link to my write up: http://forums.hybridz.org/index.php/topic/101727-s2000-seats-installed-in-a-280z/page__gopid__953917#entry953917
-
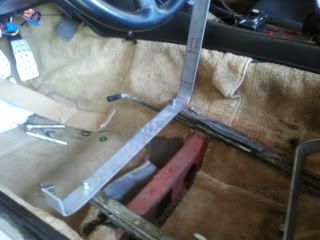
I went over to a friends house to bend the metal on his vise. Here is what they look like:
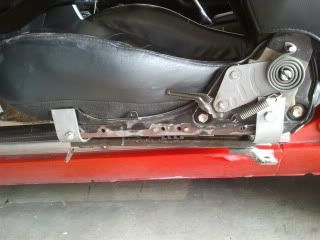
Once the metal was cut I bolted them to the stock frame rails:
Here is the metal bolted to the seat bracket:
The finished product:
After finishing the driver's seat I've accomplished my original goal of installing the S2000 seats without bashing the transmission tunnel or welding(used locktite). The process was simple just a lot of measuring, drilling and putting the seat in and out to test fit them. I anticipate the passenger seat will go a lot faster since the measurements are close and I know what I'm doing now.
-
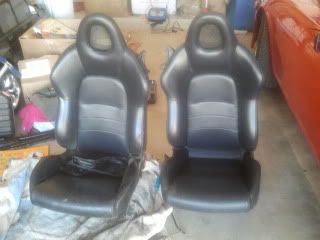
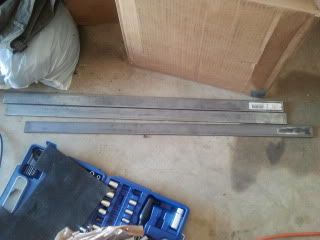
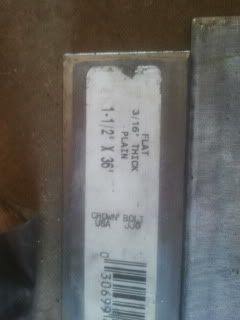
I've been looking at how others have installed their s2000 seats in thier Zs. As discussed before, the transmission tunnel is too wide to mount the seats with their rails on the 280Z. I didn't want to bash my transmission tunnel in order to get them to fit and I couldn't find a local shop that was interested in welding the brackets like misterz's old s2000 seats. So I headed to home depot and bought metal stock that were 3/16" thick (the others were too thin and flexed easily), 1 1/2" wide and 36" in length. I also bought some nuts and bolts.
The seats I'll be installing. Still need to be cleaned after grinding off the rivets holding the brackets to the rails
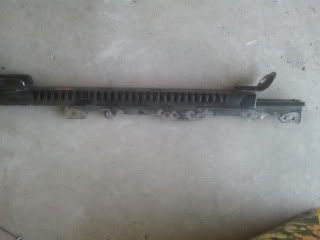
Here's the brackets after the rails have been cut off
Here's the rails that were cut off. I won't be using them because I plan to use the stock frame rails
These are the metal stock I got from home depot that I'll be using to mount the brackets to the stock frame rails
Since I'm removing my Miata seats I'll be heading to the pick and pull to grab a set of stock frame rails. Then I'll bend the metal stock, drill the necessary holes and bolt the seats in. Stay tuned.
-
I'm experiencing the same thing however my IATs shoot up from 100 degrees to 150-170 degrees if I shut the car off and then return in about 30 minutes to start the car. My fuel rail has a return line and I don't remember the car having this problem last summer. How do I prevent the IATs from spiking up so high once it's shut off? It happens whether I have a full tank or 1/4 tank.
-
I need to replace my check valve that runs close to the fuel pump to remedy my hot start issue . I've been to Autozone, called Napa and neither one of them carry a check valve or fuel damper for a 280z. The only place I've found them at is motorsport auto but at $113 that seems kind of pricey. Any suggestions?
-
Here is a good score for someone close by: http://www.corpusracing.com/community/showthread.php?7911-S2000-seats-for-sale
You can set up an alert in Google mail that will send you a link for whatever your parameters are. For instance, I set one up for "S2000 seats sale" and I get an email every time someone posts a set for sale.

S2000 seats installed in a 280Z
in Interior
Posted
The stock s30 brackets have holes on the sliders front and back. It sounds like you've got sliders/brackets for the Z31 or a custom job. Do you have any pics?