

Bartman
-
Posts
2048 -
Joined
-
Last visited
-
Days Won
3
Content Type
Profiles
Forums
Blogs
Events
Gallery
Downloads
Store
Posts posted by Bartman
-
-
Yes, essentially that's it. You probably want the Factory Service Manual or something similar to help decipher what all the wires are, but it's not that difficult - it just takes some time and effort. If it winds up to be too hard, you can always purchase a ready to use engine harness that includes fuses and relays and just requires you to hook up positive, ground, and ignition hot.
-
Are you guys using the jtr mounts or the scarab/msa ones?
JTR mounts on mine.
-
So I resolved the body line issue where I thought it wasn't straight. I just thought it was an issue because of the way the rear of the car tapers in. From some angles it looks like it angles down towards the back, but it does in fact stay horizontal.
I made very good progress this weekend and am quite happy with the results.

-
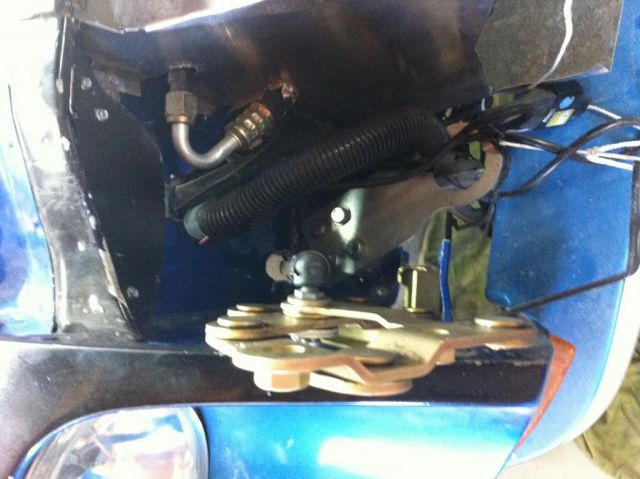
I think this is a great product, but there are obviously some issues.
The good:
-
- The plates that mount the lower ball studs appear to be of very hiqh quality and strength.
- The design appears to be well thought out and executed
- Seller is easy to work with and friendly
The bad:
-
- Installation instructions could use some improvement
- The installation templates don't seem to be accurate
- The installation seems overly difficult - especially having to center drill and tap the existing bushings to install the upper ball stud. (I got Jerry to do this for me since the delivery took so long). I think most buyers would wind up having to use a machine shop for this.
- Quality control - sending out the wrong shocks appears to have happened more than once
Specific problems with my order:
-
- Delivery time
- Wrong shocks
- Template for slot needed to allow shock travel didn't line up correctly
- I was sent upper ball studs that were supposed to be long enough to allow them to be installed using a nut instead of being welded on to the bushings, but they were still too short to allow the nuts Jerry included in my kit to be used (I purchased longer ball studs myself).
-
-
I'm running ceramic coated Patriot block huggers on my LT1 with no clearance problems.
-
...From the pictures that I have seen on the net they should be straight all the way.
I was afraid of that.
-
Post a picture of your body line and I will see if it matches mine.
I still have to essentially 'recreate' it on the rear quarter panels. The line is there behind the rear wheel openings, but not before it. If I extend the line from the door and the line from behind the wheel openings they don't line up. They aren't parallel and would cross each other above the rear wheel opening. So it appears that the body line arcs a little over the rear wheel opening and then is straight again going to the rear of the car. I just need to confirm this is correct.
-
No one can help me on my rear quarter body line question?
-
Sorry my car is so messy! If you want to see a specific shot or angle, just let me know.
The problems are still not over. I wasn't unable to completely close my hood after installation of the kit, and for a long time I couldn't figure out why. I finally removed my fender and figured out that the shock was bottoming out before the hood could close! I got ahold of Jerry and was able to convince him he sent me the wrong shocks. He's told me he will be sending out the correct one's shortly.
-
I finally decided to go ahead and buy this kit:
Gas Hood Schock Assembly Kit from Z Race Products and I have rather mixed opionions about it. First it took forever to received the shipment (ordered on June 20th, shipped on August 6th), but they seem very friendly and easy to work with. I can't find the post, but someone complained before about the documentation, and I would have to agree - but the kit itself seems to be of high quality. The templates provided didn't line up correctly on my install so I had to enlarge the opening to allow the strut to have room to go through the body. I made adjustments on the other side and that one works just fine.
I'd like to hear from anyone else that has performed this install and see what their thoughts are.
-
I did a better search and actually found I started a thread about this same question years ago!
In that thread Savage42 post a great image with the look I'd like to achieve
My question is it appears that my body line from the rear wheel opening back slants down, is this normal?
-
Take it down to bare metal and see what you actually have. Ideally you would run the panel over a roller to get more definition of that body line but I think you would have to machine a custom pair of rollers to get the break angle right. That would work for the front fenders and door skins. For the rear fenders you would have to dolly the line or cut the fender off and run it through the bead roller.
I guess that would be the best route, but a little more work than I was hoping for.
-
I use masking tape to mark the body line. Once the masking tape is applied sand all the way to the edge of the tape and then remove the tape and apply a new tape line at the bottom on the body line and sand to that edge. This will give you a straight well-defined body line.
http://www.how-to-build-hotrods.com/body-lines-straight.html
thanks darl_db that's a good link. It's close to the process I'm already trying with a couple extra tips that should help out. I think the one thing that will really help right now is a long piece of flat stock steel or aluminum that will stay straight, but bend along the curve of the body.
-
I am once again in the process of doing bodywork and paint on my Z. I really want to increase the quality of the body including door and hatch gaps, panel alignment, and sharpening and aligning the body line on S30’s that start from the top of the front fenders and extend all the way to the rear of the car. I want this body line to be well defined, and straight – especially on the rear quarter panels where sometimes they seem to get lost.
Can anyone share any tips or techniques of what has worked for them?
-
Overall I think it looks great!
I hope you don't think I'm being to critical, but I think with a different offset you should be able to tuck your rear wheels up under those subtle Z rear fenders. It may not be the case, but it appears that the rear tires are still sticking out a little.
-
Not the hood vent studs but I've had good success using regular JB Weld to fix plastic stuff. I glued one of my door lock buttons back together with it, its held up great for several months of use. Let it set up for a few days before applying any stress to it.
I was thinking of using JB weld to build up some area on the backside of the vents and then drill, tap and insert studs.
-
Any more insight on a fix for 280Z hood vent studs? I got one that I thought had all the studs intact, but a few came off after just a short time.
-
So here's what my passenger side door panel looks like right now.
It isn't complete, this is just a proof of concept done with rattle cans. The panel did require quite a bit of work to fill in air bubble holes, but since this is made to be covered I think this is to be expected.
-
I don't know the current availability of these door panels, but I just got a set from a fellow HybridZ member. They appear to be of very high quality and fit pretty easily on my 73 240Z. One thing I didn't really realize was that you have to go with power windows with this upgrade, so now I'm buying the SPAL deluxe kit and switches. I'm planning on painting mine instead of covering them.
-
Just to be clear I think you're saying popper when you really mean solenoid. My kit came with a popper too, but that's a purely mechanical devie that helps physically open the door after the solenoid releases the latch.
From your post I don't know if you've every installed on an S30, but you're very limited on space in the location you mentioned - especially with the window when it's down. The inside door handle opening when the door opens doesn't bother me and it would be pretty hard for anyone to see it unless they were inside the car when the door was opened with the remote.
I don't know that I have the best solution, but I'm happy with it. Mine uses a rod instead of a cable and the amount of throw from the solenoid is pretty close to exactly the throw from the inside door handle. In addition the solenoid supplies an almost identical resistance to opening the door as the spring that was used on the inside door handle (I removed it after the install).
That being said it would be great to see other solutions.
-
I cut my rail where the pulley is, I am going to just weld in an L bracket and it will be just as strong as an uncut one.
Did you cut for the compressor or just an A/C delete pulley? I'd like to see someone that was able to mount the compressor in the stock location to see how much framerail modification would be required.
-
...DON'T cut the frame rail!!
Actually I was thinking of cleaning up my engine bay and trying to put a Sanden compressor in the old stock LT1 compressor location. Why are you saying not to cut the frame rail. Don't you think that it would be possible to do the job properly so that it would be as strong if not stronger than it is now?
-
But do I cut the frame rail to make it work. Do you happen to have a picture that I could see? Maybe I have to large of a pulley.
I don't have a picture, but mine fit easily. If yours interferes with the frame maybe you do have a different pulley.
-
You need to put the a/c delete pulley back on. It will fit and I don't think you can route a belt without it or something similar in its place.


lt1 wiring
in Gen I & II Chevy V8 Tech Board
Posted
I'm afraid it's not quite that simple. Even just doing a standalone engine harness will require multiple feeds and fuses based on the various loads that need to be supplied to the various engine components. I know it's not cheap, but if you want a standalone engine wiring harness ready to go, you can use something like this: LT1 Standalone Engine Wiring Harness