

GTZ
-
Posts
41 -
Joined
-
Last visited
Content Type
Profiles
Forums
Blogs
Events
Gallery
Downloads
Store
Posts posted by GTZ
-
-
Alrite guys, as much as I'd like a gt35 on a beautiful full race manifold, I want to be driving my Z sooner rather than much later. I have come across a setup that is affordable and with as little of compromise as my budget will allow. I wanted your thoughts on it before I started making purchases. Keep in mind I don't have thousands to spend so I am making some compromises where I can.
The turbo is a Precision 5431, journal bearing and I was considering going .82a/r as I want more top end. It's externally gated with a T3 flange. Precision a reliable unit?
The wastegate is a Tial 38mm unit.
The manifold is an eBay top mount with a T3 flange and 38mm wastegate flange. Would the cutting of the wastegate downpipe be trivial to clear the steering shaft? What bracing should I do to make it a little more sturdy? Would heat wrapping it be a good idea?
Finally; an "Isis" greddy knock off plenum as I've heard they are the "best" knock off available.
My future goals are about 400rwhp down the line. Thanks for your thoughts. I wanted to consult you guys before I make any moves as I have the funds available, am back at work after we opened again for the semester, and have paid off all my school fees and books.
precision is a good turbo. If I am not mistaken they use garrett turbo's and modify it. I don't know how much top end you want because if you can I would recommend the .78 a/r twin scroll housing. Fast spooling and great flow without choking topend. I am using the ISIS and have no complains. Clean up some of the castings on the water inlets. If you will be pushing bigger boost I recommend you go bigger than the 38mm wastegate.
Good luck
-
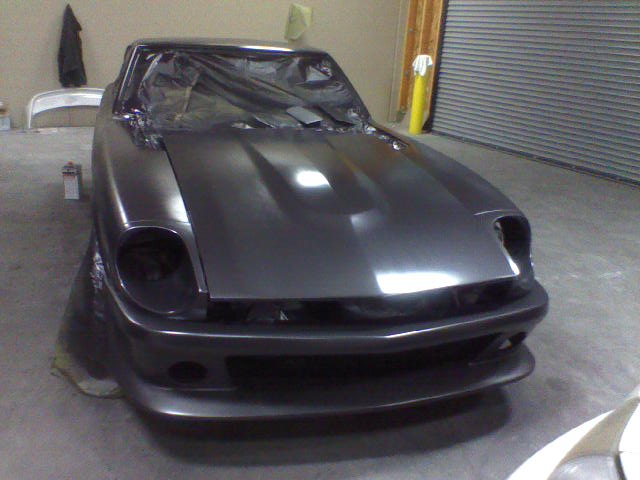
It looks like a normal Z, cause I abandoned the reversed hinges, for the time being... I didn't get the range of motion that I was hoping for out of the hinges, and when it came to fabricating the latches, they were just coming out ugly. It was getting ridiculous and I needed the car on the road again so I reinstalled the original setup, more or less.
I will come back to the project when I have more time, and the new hinges will be a scissor type hinge which will lift the hood and allow it to clear the cowl properly. In the meantime, the car needs sheet metal in the front.
Cheers
Ryan~
Hi there Ryan,
I successfully reversed my hood hinges and will post pics up soon.
-
Engine bay is getting buttoned up now. Doing the final install on the hood and installing the hood pins. More pics coming soon.
-
I was wondering what are people's views between running a pull or a push fan when running a intercooler.
-
Must not have explained it correctly, I am only using the mount that the ears attached too, I will build new ears off of this. Check out the following pictures to explain it better.
And this is the start of my crossmember
ok i see what you mean. well you have almost all of it done. cool looks good. should be easy to now.
-
Wow...looking nice! All your hard work is paying off.
thanks man. yeah alot of work but it is certainly worth it. i'm waiting for my friend to do the sheet metal work so the engine bay will be dialed. everything will be polished and barely any wires visible. just got to wait. patience. like my neighbor says "do it once and do it right".
-
Thanks for the photos mate, mine is looking a bit different then your mount.
I have kept the original support (minus the ears) so that I could use that as a point to weld to, then I have fabricated some 2mm plate (same thickness as original mount) into a box section on the drivers side and welded it flat on the passengers side. My crossmember I have started making out of 2mm plate but have built a box section similar to the original crossmember but with longer arms as the new transmission sits lower.
Just got to work out a way to attach the crossmember to the tunnel mounts. Was thinking of cutting off the circular mounts from the original crossmember and using those as a basis for my new crossmember.
if i'm not mistaken those ears will not be very durable and won't reach either. use some angle iron and work with that. it will be a good strong metal and easy to weld. you need those *ears* strong as it is your primary mounting point and takes the initial load.
-
hey nice build! i'm planning to do a similar swap. What do you have for a fuel tank setup? Is it a modified stock tank? If so, how so?
I running a RCI 12 gallon fuel cell. It has a sending unit, foam, and set up fr fuel injection. Its really easy to put in.
Personally I like it and haven't had any problems with it. I won't even waste my money a surge tank and any of that using this fuel cell. what's more important is to mount the fuel pump closer to the fuel pick up and lay if flat either below the pick up or the same height. I'll put some pics so u can see what I mean. I'm easily laying down over 400whp. Believe it or not if people spend more money on better tuning they will not have to buy parts that they don't need for the power they are trying to make.
-
Ah, great. I am building my transmission mount now, I have the latter model mount in my car which has the ears sticking off the transmission tunnel so it will probably look different to yours. Will be good to see someone elses to compare against though.
I have the later model as well. 9/74 which has the catalytic converter hump on it. I had the ears on the side as well with the reinforcement piece going all around. Its a little pain in the ass but take that whole thing out and grind it all clean.
1. make line up the transmission and see where you need to make the new mounts. look at my pic
2. get 1/8'' steel plates and cut them about 4'' by 6''. clean the edges easier to weld
3.lay the pieces on both sides and weld them solid.
4. I think thats a 3/8'' piece i used on the bottom to make plate. you can see what you have to do
5. i used 1 1/2'' square tubes angle cut too make those 2 horn looking things. measure it 5 times to make sure the length is right before welding it
6. use 1'' angle iron to make the ears. support the tranny where it need to be, bolt the bottom plate to the tranny, line the horns, put the angle iron (2 pieces for each side) on the 1/8'' plate you welded and tack it in place good. Now drill it through
7. make sure everything is set right than weld everything solid.
8. not that hard. No exhaust clearance issues at all. 2 bolts will get tranny out. Now for those who will say 2 bolts won't be strong enough than you really must have no clue as to what the stock rb25 mount looks like. look at the material and thickness. check how many bolts are holding it together???
any questions just ask. here are some pics
-
Ah, great. I am building my transmission mount now, I have the latter model mount in my car which has the ears sticking off the transmission tunnel so it will probably look different to yours. Will be good to see someone elses to compare against though.
I have the later model as well. 9/74 which has the catalytic converter hump on it. I had the ears on the side as well with the reinforcement piece going all around. Its a little pain in the ass but take that whole thing out and grind it all clean.
1. make line up the transmission and see where you need to make the new mounts. look at my pic
2. get 1/8'' steel plates and cut them about 4'' by 6''. clean the edges easier to weld
3.lay the pieces on both sides and weld them solid.
4. I think thats a 1/2'' piece i used on the bottom to make plate. you can see what you have to do
5. i used 1 1/2'' square tubes angle cut too make those 2 horn looking things. measure it 5 times to make sure the length is right before welding it
6. use 1'' angle iron to make the ears. support the tranny where it need to be, bolt the bottom plate to the tranny, line the horns, put the angle iron (2 pieces for each side) on the 1/8'' plate you welded and tack it in place good. Now drill it through
7. make sure everything is set right than weld everything solid.
8. not that hard. No exhaust clearance issues at all. 2 bolts will get tranny out. Now for those who will say 2 bolts won't be strong enough than you really must have no clue as to what the stock rb25 mount looks like. look at the material and thickness. check how many bolts are holding it together???
any questions just ask. here are some pics
-
tranny mount pics will be up tomorrow.
-
RB25DET Build Break Down
Rb25det motor, tranny, minus intake manifold, fuel rail& inj, ecu and correct harness.
I sold the guy my l26 draw through complete setup for 1000
1250
Included brand new N1 oil & water pump, oem rebuild gasket kit, IC in pics, brand new 200zr oil pan & pick, garrett gt40 twin scroll turbo, top mount ext manifold, brand new tension and idler pulley, exedy clutch kit, motor mounts and isolators (eric wong or something) might be forgetting a few things.
90 044 bosch fuel pump (brand new got lucky)
Silicone couplers and t-bolt clamps 200 (siliconeintakes.com great products best prices)
238 PRC radiator
250 Braided fuel lines, oils lines and fitting
89 Sard frp
200 Aem wideband (recommended whatever brand)
125 Aem 3.5 bar MAP sensor (summitracig.com best prices)
1300 = aem standalone ecm, 1000cc precision injectors, top mount fuel rail, ISIS intake manifold complete, wiring harness plug & play, ls1 coils, msd wires, aem iat sensor, aem water temp sensor and new a friend. Priceless
150 Aem methanol inj (got it on a back door deal. Not needed for the swap)
200 custom driveshaft with Spicer yoke and u joints
100 turboxs bov RFL (real one don’t cheap out on these things)
120 tial wg 40mm
120 magnaflow muffler 3’’
130 exhaust pieces all mandrel bent, 1 v bend clamp set, 2 hangers
40 ss flex (always check the ID, once again don’t cheap out or its meaningless for a 3’’ ext)
150 nuts and bolts (look closely 80% zinc coated allen head bolts thanks to ace and orchard supply)
250 HDi ebc not needed for the swap
100 wires, connectors, shrink wrap, fuses, relays etc
150 AC autotechnic tach includes oil pressure, oil temp, water temp. works great another back door deal.
100 electronic boost gauge (manual will work fine)
150 fabrication material, steel, alum, and whatever else
42 redline MTL 2 quarts Lightweight shockproof 2 quarts for transmission (local autoparts store is a major redline retailer. Unbeatable prices) shifts like butter
25 Mobile One 10w30 engine oil synthetic of course
20 prestone coolant (walmart trust don’t get 50/50 waste of money?
5 coolant flush
35 greddy trust shift knob not needed for swap
15 k&n oil filter
45 earls -8 fuel filter. You can use cheaper ones
40 oem timing belt
30 ngk spark plugs
50 nismo clutch slave (another back door deal)
220 crank collar and labor
12 alternator belt
300-500 worth or sh** I am forgetting. Remember this doesn’t include tuning cost.
My 2cents
This build was an amazing experience and really challenging as well. In a way I think you either have a lot of cash laying around or have a good cash flow to finish this swap properly. I did not cut any corners in my eyes and paid 80% attention to detail. I was lucky to have my neighbor as I used a lot of his tools to finish the job. His fabrication skills are one of a kind and I’m lucky enough to learn from the best. Its all the little things that get you in this build and trust me it gets you good. Every time you turn around you need something else and every dollar adds up quick. I am not writing this to discourage you but rather give you a heads up. I know this has been said many times but you can’t really understand it till you experience it.
My experience doing this build has certainly raised my self esteem towards fab work. Now every task had gone from its hard to how to. It took me 2 tried to do the reverse hood and it was done. Never get discouraged rather learn from it. Now it’s a piece of art to me. The tranny mount is straight forward and simple that almost anyone can do with a welder, grinder, cut of wheels, some metal and 2 bolts. Clears the 3’’ ext just fine.
Wires are all pretty muck tucked away and whatever is visible will be gone soon. I like polishing things and basically polished everything on the motor. You will encounter many obstacles and my solution was simplicity. For example the turbo wouldn’t fit due to the mounting angle of the flange so I put it on a belt sender and angled the flange. Now it works.
Invest in some good tools and don’t hesitate to buy new tools as you do the build. You can rent from a local autoparts store like autozone or something its basically free as they return you money when you return the tool. For some tasks you are only as good as your tools. Get a vise if you don’t have one. Very helpful and important tool. It will be your very strong hand.
Tally what I have listed and now think about labor. I was able to do everything with the help of one person and not really have to pay anyone for labor. You will need Luck for this build as well. I got lucky with a lot of these parts so it kept the cost some what low. 151 psi compression across every cylinder (cold crank). Some one had done a complete rebuild on the block and barely ran it. Like I said Luck.
I did my entire exhaust so saved there as well. Hate those rip off muffler shops.
In the end when that motor purrs, its all worth it. Even my wife was excited about the car running. It’s a great swap and worth every penny. Forget the hp numbers and all that because it will just turn heads and put a smile on your face regardless of those numbers. NOW that is Priceless
-
Lookin awesome crappy camera or not!
Love build threads that come out of nowhere.
How's it running with that big turbo you got?
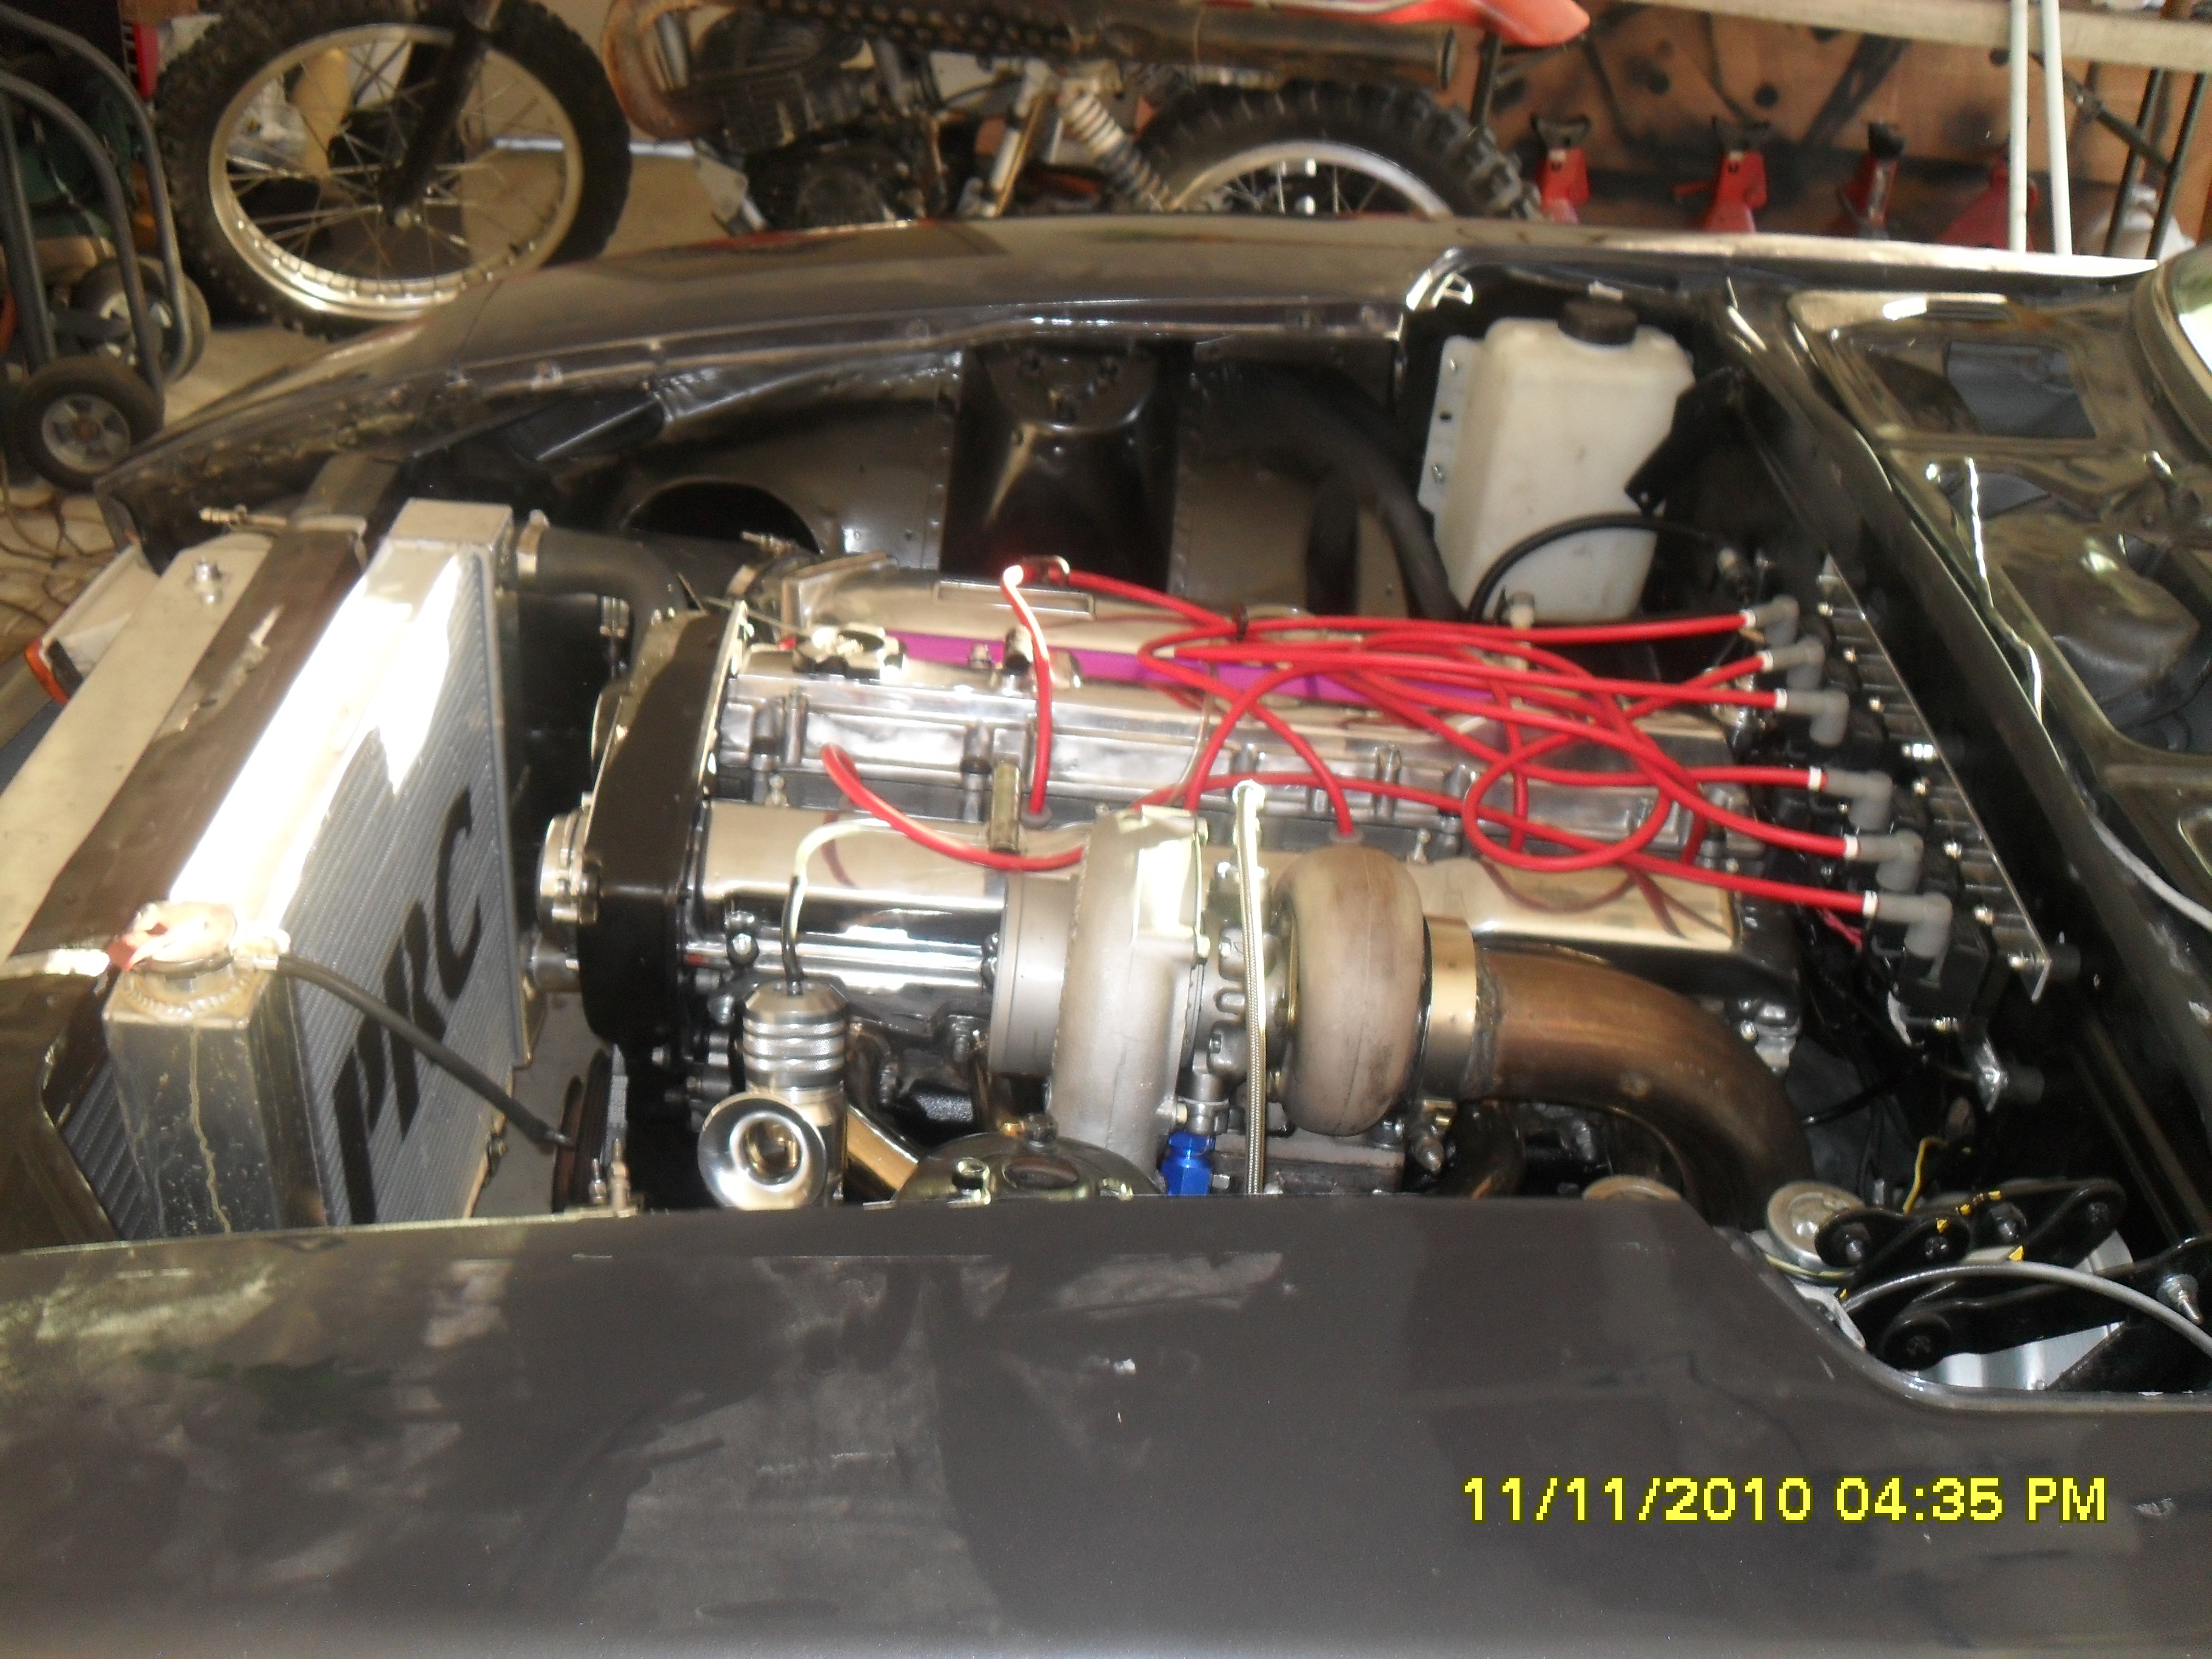
new pics from good camera. lol
thanks man.
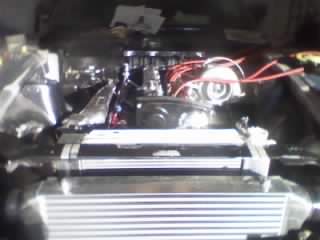
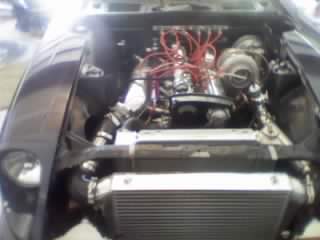
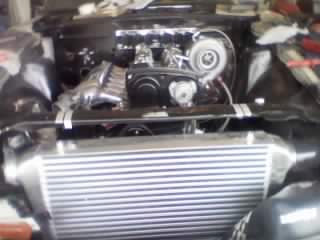
it ran awesome man. its a gt40 (not a gt40r) 1.0 ar ext side. have it set at 15psi. ran like crazy. scared me as the frontend got way too light and rear end kept stepping out. 05 supercharged m3 is still wondering what happened. third gear bloody rips.
-
Yea, better pics is a must!
Turbo sticking out of hood? Looks mighty high.
here are some better pics. The turbo clears the hood. I was afraid it wouldn't but got lucky.
disregard the muffler you see. thanks to the wife for all the financial support.

-
Still havent fixed the gap between the IC and Radiator have you?
Cant tell if you rotated the TB 90* yet either from those pics...
Get a real Camera! Jeez...
It looks 4X better in person than those fuzzy things.
And your not even going to show off that 3" mandrel exhaust system or custom trans mount? Come on man! These guys are gonna wanna see the details!
Seriously though lots of people will be interested in seeing your trans mount as you have a CAT equipped floor pan.
thanks for the first reply ray. I am going to run with the current IC and radiator layout and see how it works as i'll be using a pusher fan infront of the radiator.
I didn't rotate it yet. I am not sure if I will do that as it doesn't look right. will have to do something about top radiator hose.
yeah yeah I know. Don't worry good pics will be up here soon. Trying to figure out the new camera. lol
I can't just give everything away at once. little at a time. Don't worry I'll have all that including the side exhaust on her soon. Trans mount came out that clean thanks to steve.
-
don't mind crappy pics. ph cam not that good. will post better ones soon
-
I've been working on this for the past 6 or so months. The entire build was done by two people, my neighbor and I. I want to thank ray for his help for the info and good guidelines.
Besides the swap i also reversed my hood so now it opens normally. It wasn't as hard as people make it to be. there is no clearance issue and it sits just like stock. I am using hood clips as the latch didn't look good in front of the IC.
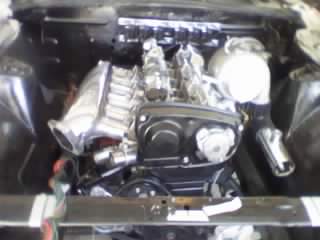
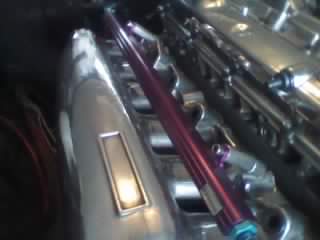
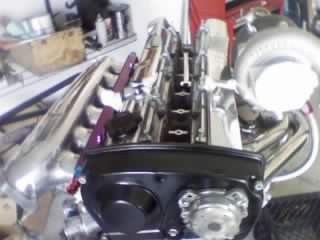
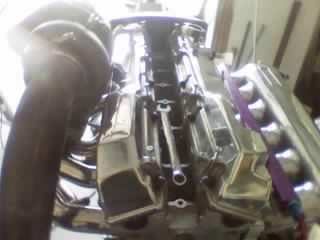
I polished every piece of exposed aluminum and stainless steel. Its not complete yet so don't mind the spark plug wires as i still need to make the plate to cover middle and trim the wires. Waiting on the piece that will go on top of the radiator and Ic. Its a custom cut and bent one piece.
new to this forum and first posting so take it easy but not new to fabrication so ask away. lol
thanks
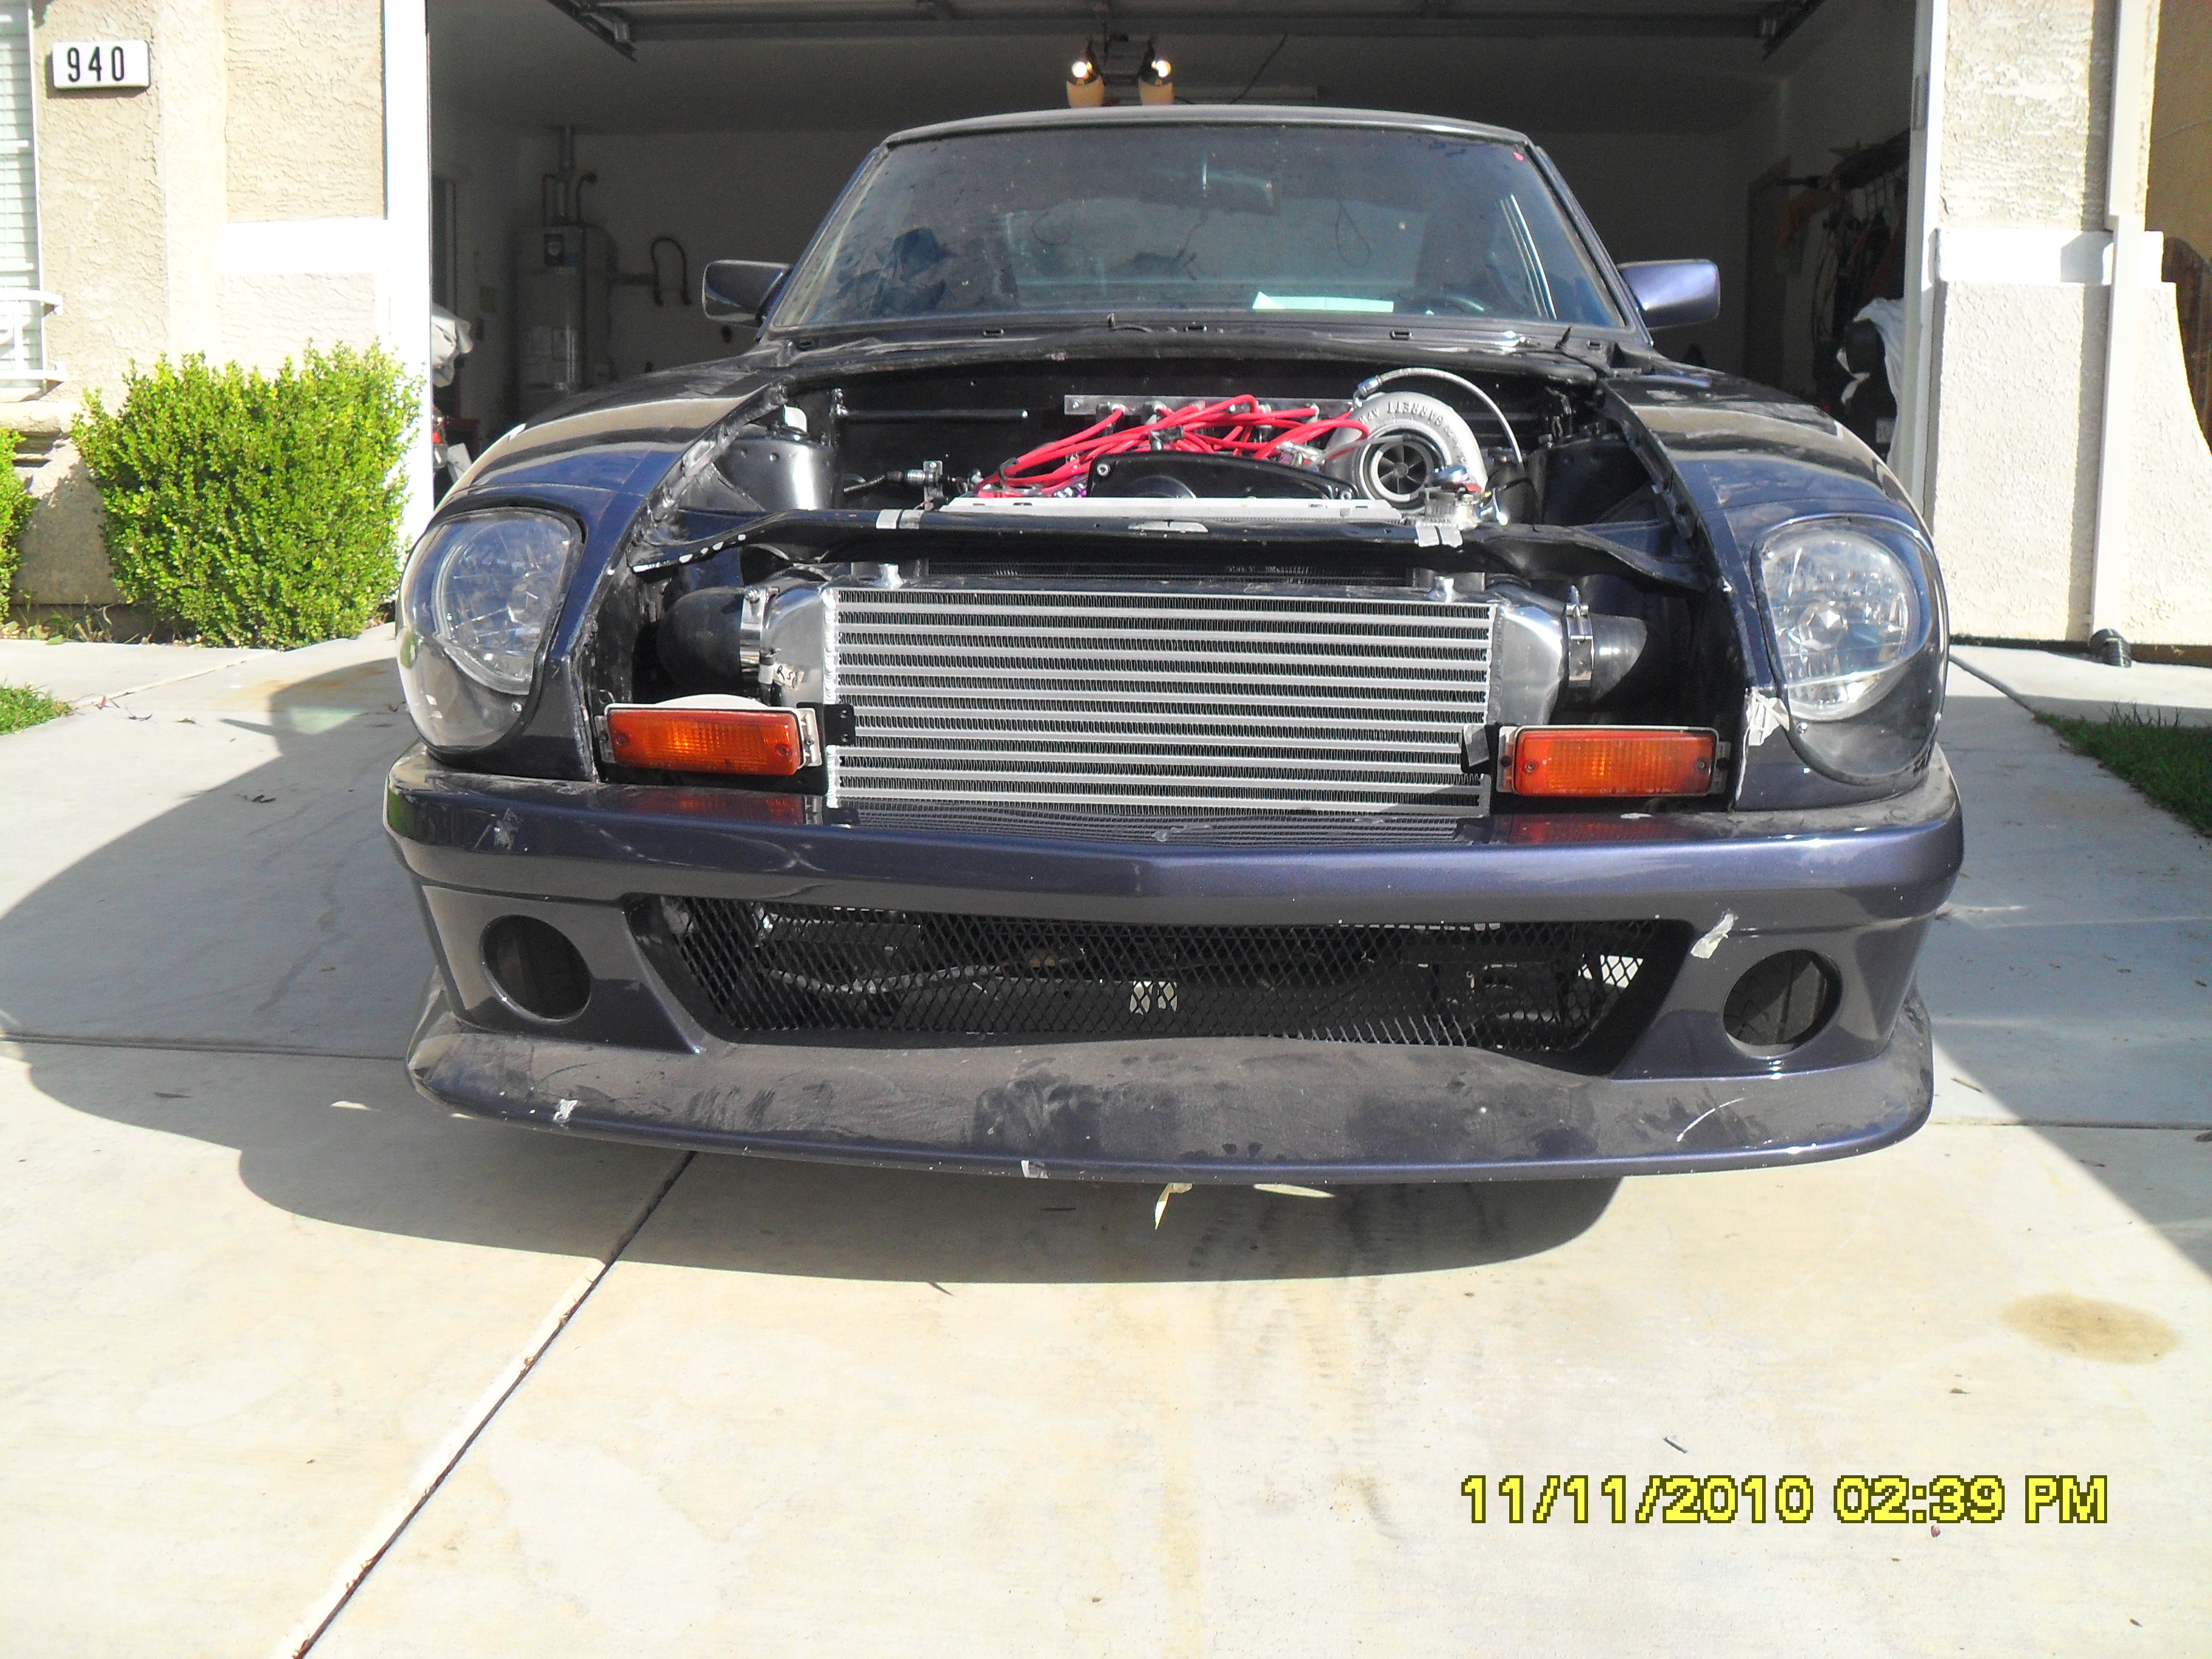
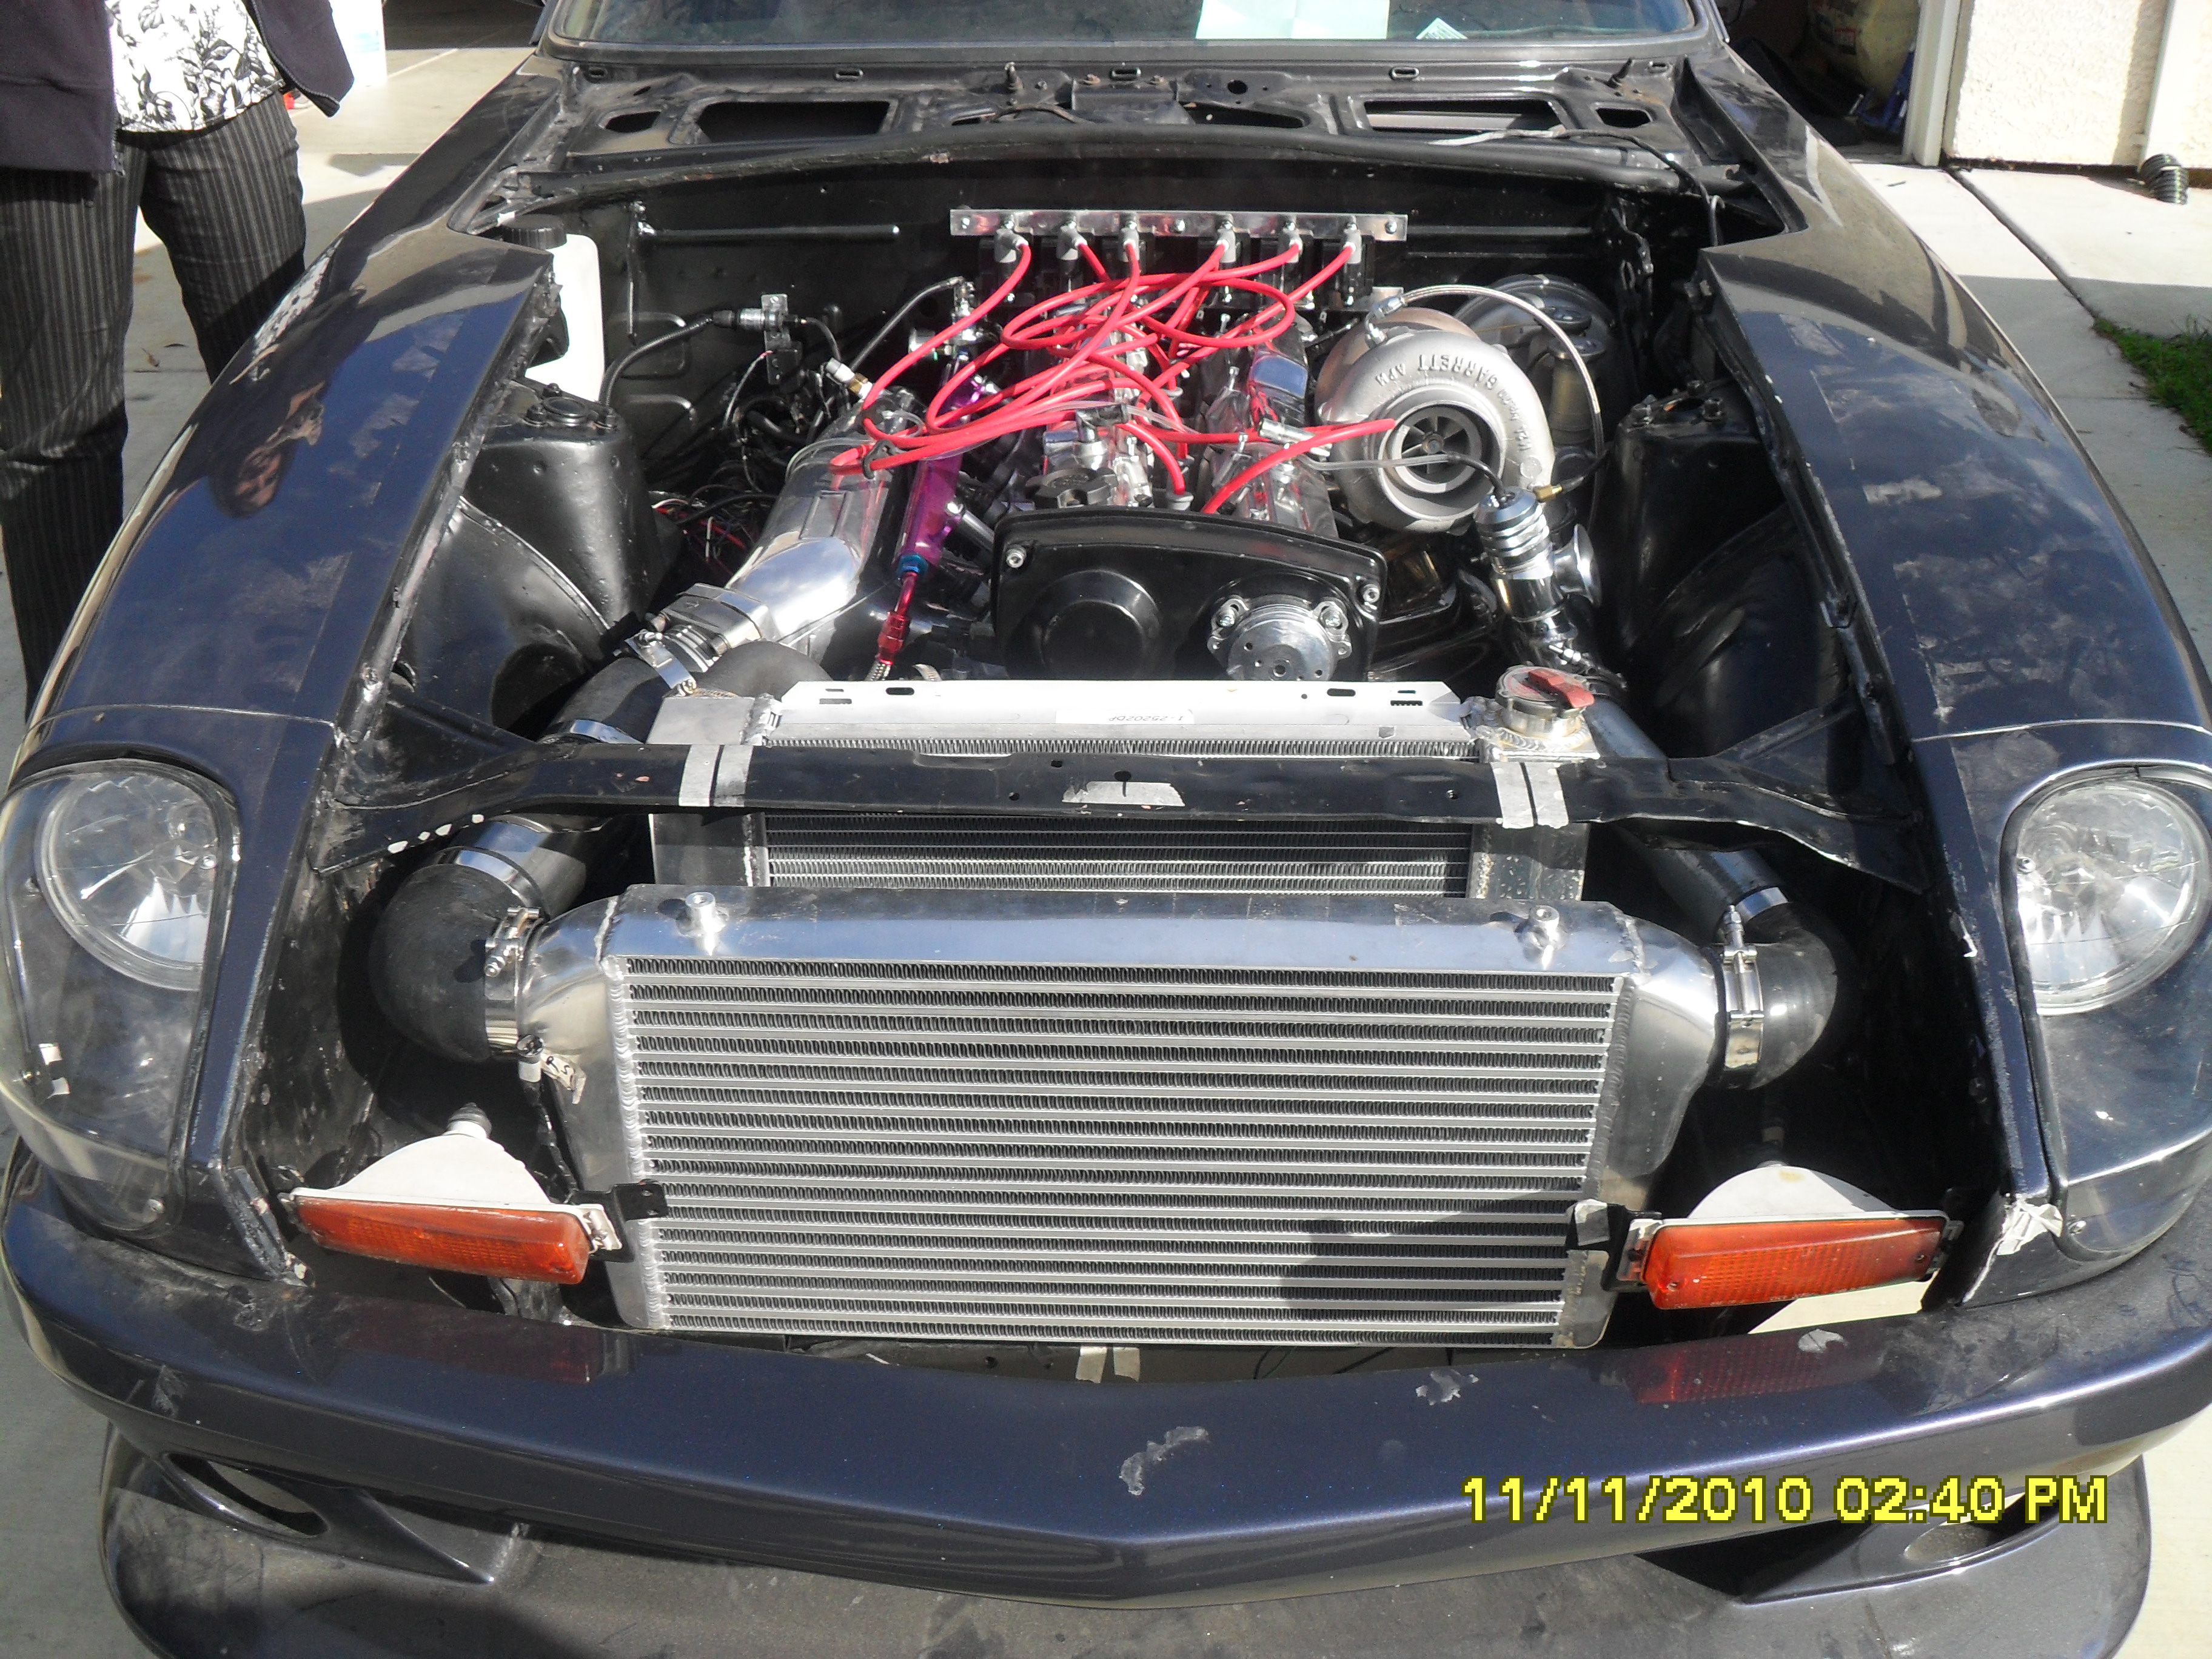
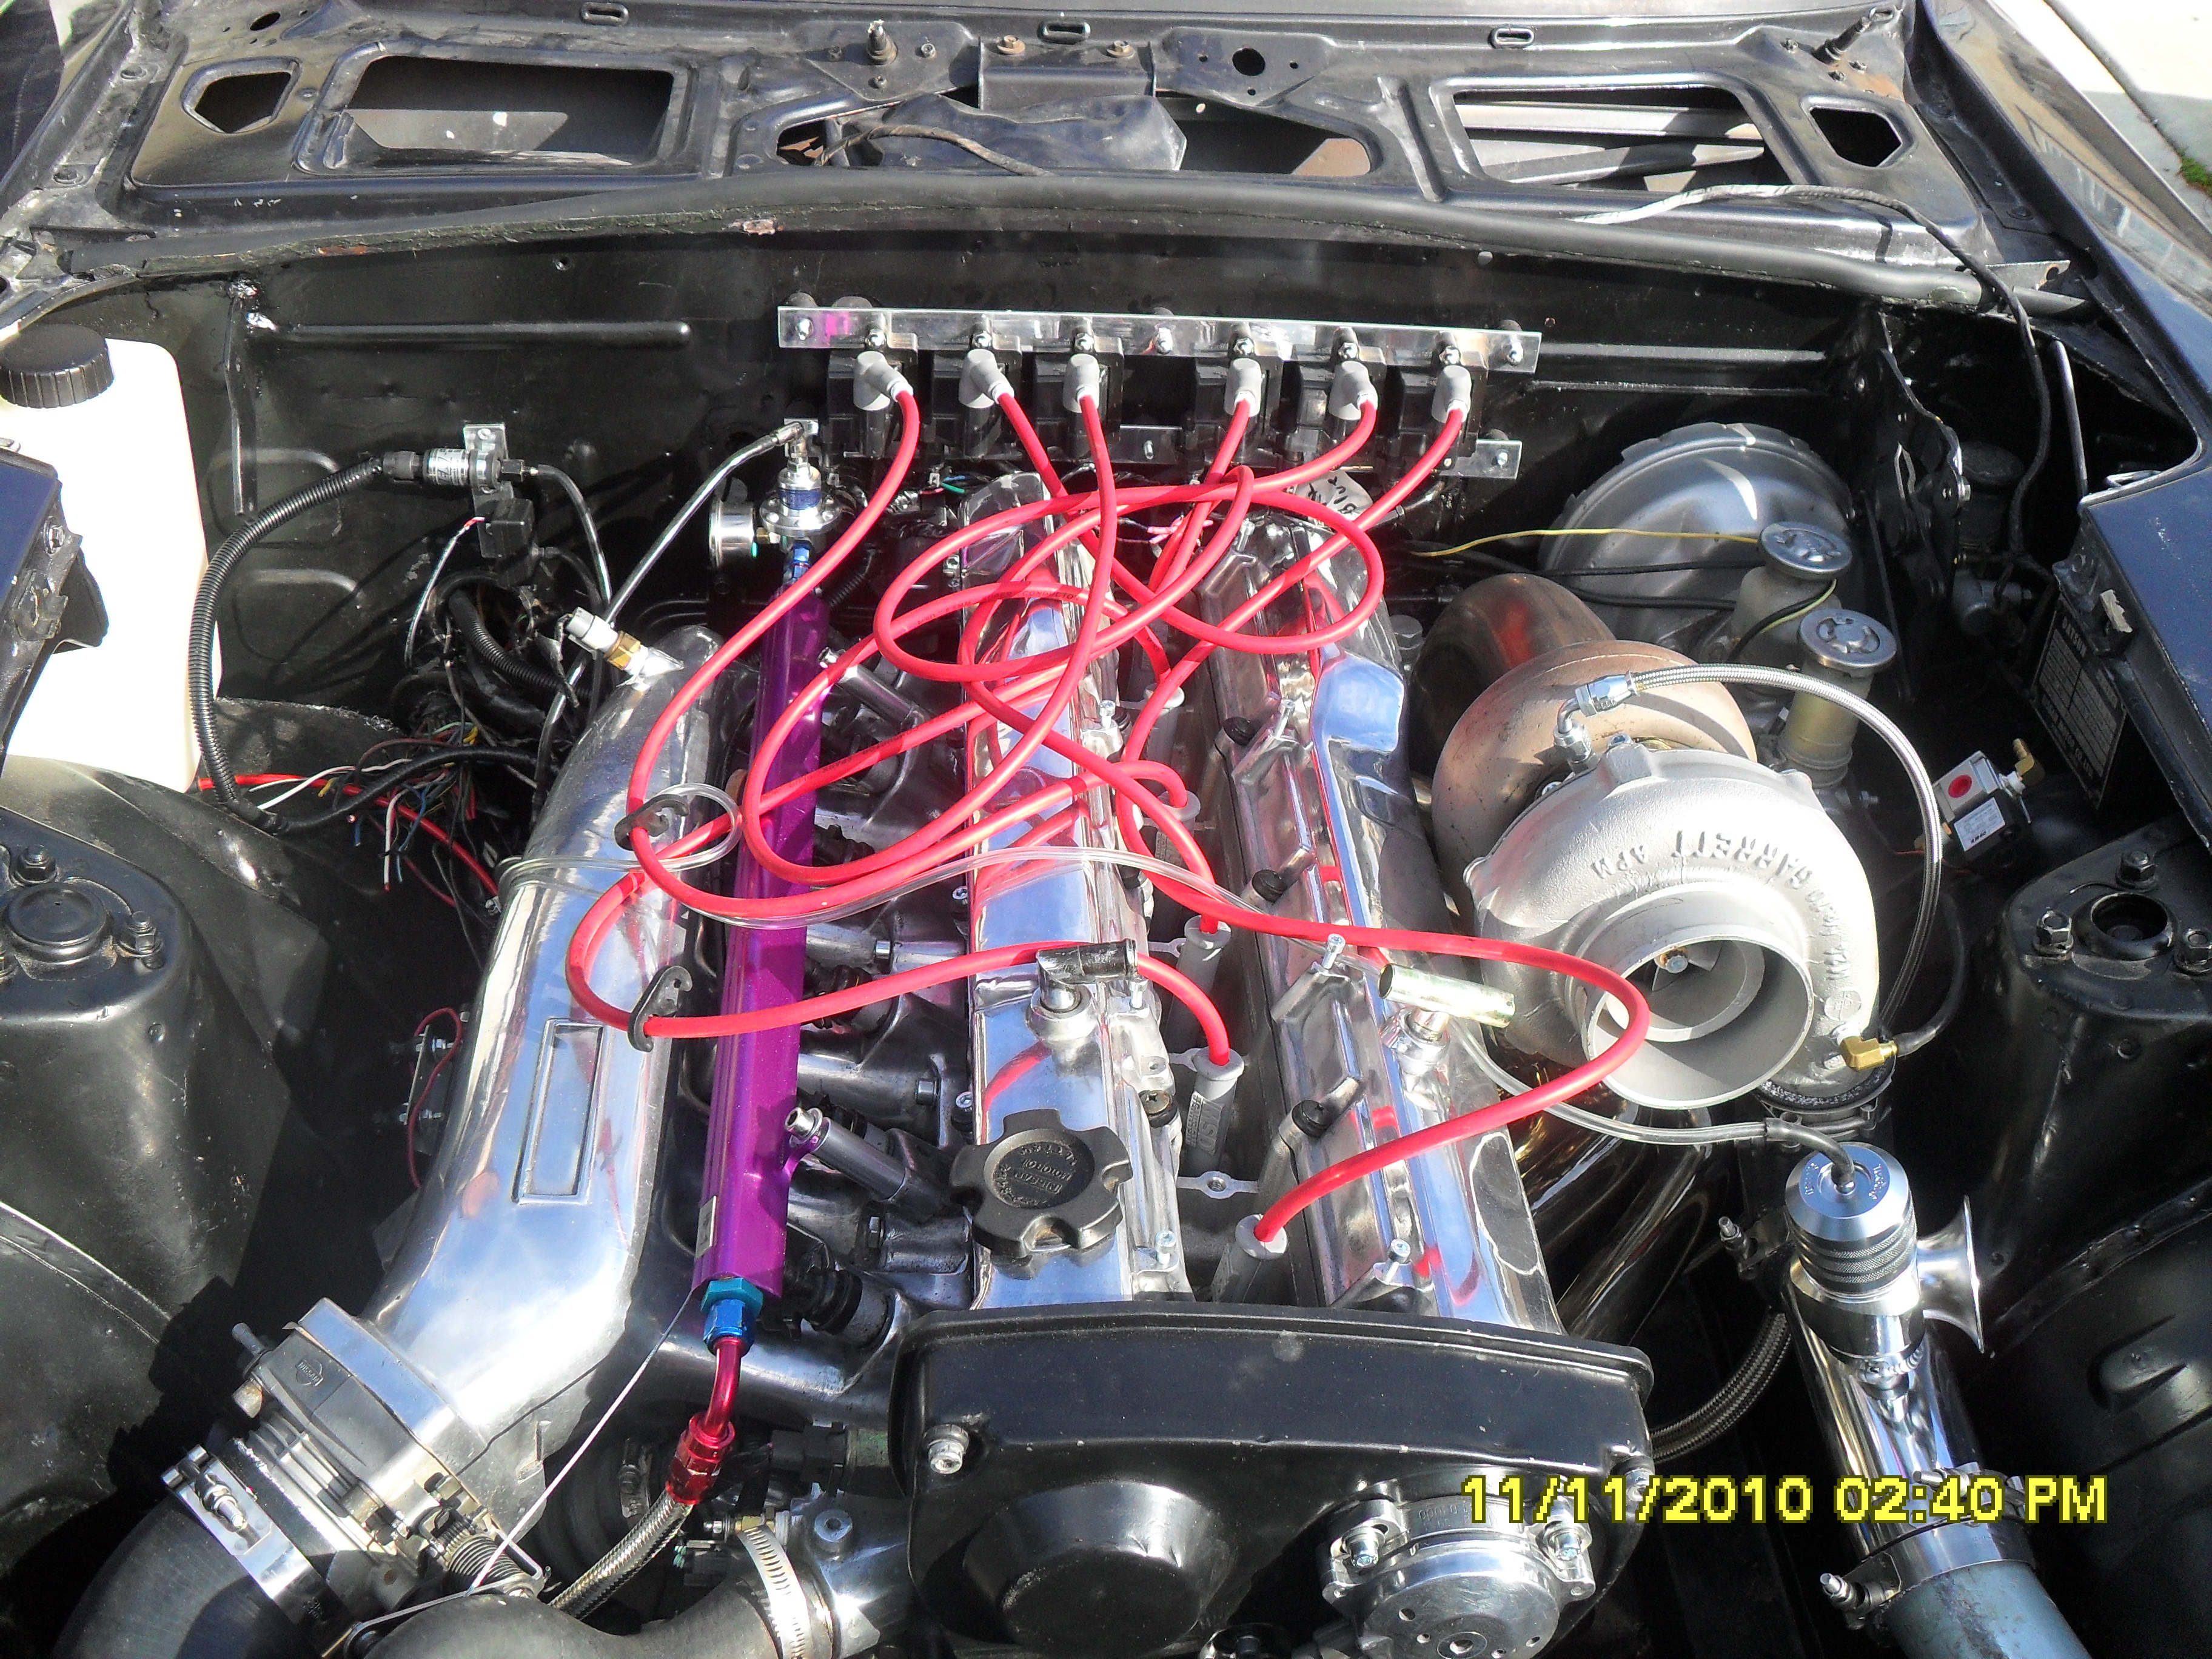


1971 240z rb25det build thread
in Nissan RB Forum
Posted
jakeoster I agree with you about the N1 oil and water pump. I'm running N1 oil and water pump on my car and have no complains. The ones I took off were N1 as well. All of nissans N1 products are better than the oem stuff.