
PapaSmurf
-
Posts
234 -
Joined
-
Last visited
-
Days Won
1
Content Type
Profiles
Forums
Blogs
Events
Gallery
Downloads
Store
Posts posted by PapaSmurf
-
-
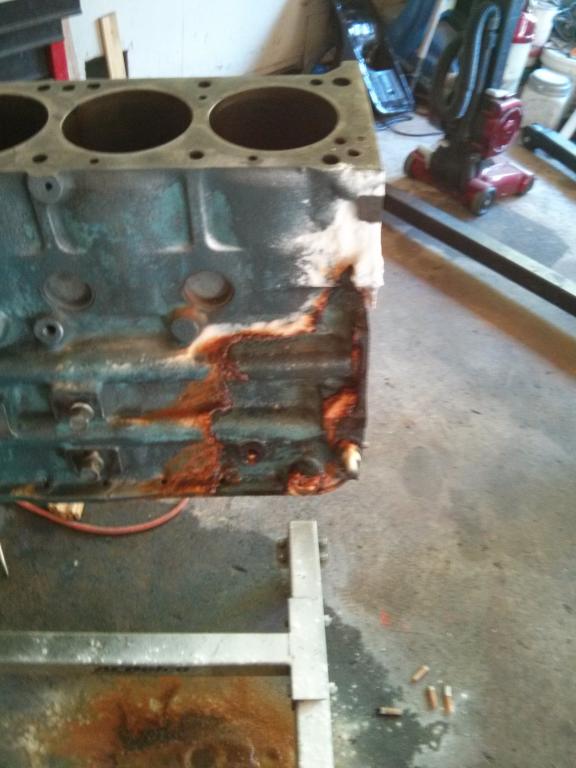
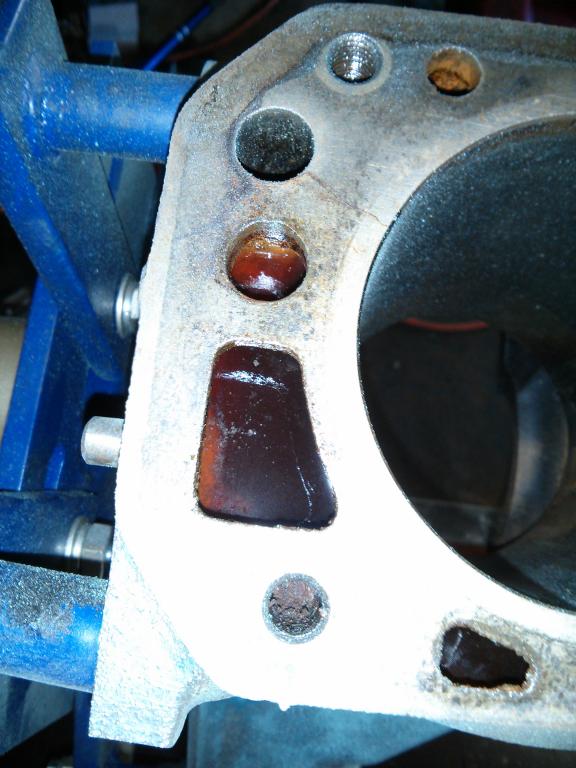
I removed the freeze plugs and found large rust "flowers" after the vinegar
 so I chisseled and scraped them all out and took it to the machinist to deck the block. He put it in the wash machine which is basically an actuated pressure washer and that got most of the remainder out but I can still stick a finger in and brush out rust. Oh well it will flow now at least I'll just have to change the coolant a few times during break in.
Freshly machined parts are so sexy
This is why you always use the proper mixture of coolant I think someone filled it with saltwater and it sat in the yard for 20 years rotting. Sooo much rust.*edit and paint
-
Thanks for clearing it up for me tony I just want to do it right the first time
unfortunately I can't reuse the stock rings they are fairly brittle one broke when I removed it I was trying to measure the old ring gaps to get a better idea of where I stood with the new set ugh I'll use these then. The pistons seem to be in great shape I measured the ring lands and they don't seem to be worn or damaged at all. From the stock is better mentality why would I want to buy an expensive set of new pistons that will likely be of inferior quality. That's what I'll tell myself for now at least as I don't have the money to throw down for new ones. I guess I'll have to replace them eventually with concave ones anyways if I ever want to go turbo. Buying a new set of pistons would force the choice of turbo or n/a with this p79. So this build really only needs to last me 10k miles at most I only tore it down to get the block decked and I became side tracked and forgot my objective.maybe I am obsessing over silly details. This is my first complete tear down so I just wanted to question myself as much as possible as usual my natural instincts and assumptions are incorrect ha -
So why not just leave the top ring at .35mm and use the bottom at .5mm the top is in spec and according to the books is actually on the large size if I just give it a proper break in that gap will probably expand quickly due to wear in which I assume is accelerated in the beginning running against that deglazed surface. I don't intend to take this to the track anytime soon I'm going for optimal compression and minimum oil consumption as well as the longest possible time between rebuilds. If .35mm is in spec for top and .5 is good enough on bottom that's what I'd rather run. Is there any reason the second ring HAS to be gapped tighter than the top? Or do you really think that the top ring gap is too small at .35mm?
-
So .5mm on the second ring is OK? Or would I be better off getting an oversized set and filing them down? Its the $50 question
-
Are you saying my second gap of .5mm is good enough? This engine is a stranger to me I got it outta the yard so I really don't know anything about its oil consumption or mileage. According to the books the second ring gap is too large so I assume I need to buy an oversized kit to file down - tony you're confusing me ;p
I can use these top rings at least less filing required
-
One last question I'm reusing these stock pistons and rods should I have the wrist pins replaced or are they usually good to go? They move freely on the axis they should but there is a very slight wobble in the other direction. The rods/pistons I pulled from my n42 block behave the same way
-
My conversion may have been off yes all the bottom rings measure the same and oops a 76 is a 2.8l too for some reason my tired brain plugged in an l26 there haha yeah I guess I'm gonna be buying an oversize set and modifying them or maybe I can scrounge up enough to get her bored ever so slightly and start all over to be sure these cylinders are true gap is tighter above the stroke of the rings by a few thousandths which I don't like. I'll probably cheap out and just file down oversized rings and make it go
-
Oops my math was flawed 86mm unbored cylinders with only slight wear from use and a hone is 3.25in not 3.5in would call for a gap of .00975 to .013" according to itm which would make my gaps even larger relative to what's called for. I hate these conversions
If I can find a ruler i'll measure to make sure nobody bored it before i got to it. It had std size rings in it but that doesn't mean anything...
The 81 spec is different than the 76 because it has a larger bore.
-
OK so my top gap is good enough but a bit wider than optimal and my bottom ring gap is horribly larger than it should be I guess I'll order an oversized set and get out the file. Im Still confused about why itm packed smaller bottom compression rings
-
FSM says .30mm for second ring which would be a larger gap by .05mm why the discrepancy between this and your how to rebuild book? Seems like my bottom ring gap is going to be out of spec and my top is on the ragged edge according to the itm instructions I don't think I can trust itm since they gave me two different sizes of rings and one spec
-
The itm instructions are hurting my head. It says gap should be .003" to .004" for every inch of cylinder diameter and that's all it says so they seem to imply that top and bottom gaps should be the same which makes no sense because these bottom rings have a larger gap than top. But according to their math 3.5in bore needs .010" to .014" or ~ .25 to .35mm which would fit the top ring gap barely
Are you sure the second compression ring gap should be tighter? I can't understand why they would be gapped larger on this kit and they didn't specify a different gap size
-
Forgot to mention this is for a n/a f54 with flat tops not a turbo which would nessicate larger gaps
-
Honed my cylinders and started measuring ring gaps and they seem really big compared to FSM
Old top ring gap was at .80mm
New top ring gap is at .35mm
New bottom ring gap is .50mm
This is with std size itm rings. So do I need a new set of rings maybe ten thousandths over sized and filed down a bit or will these work without hurting my compression and increasing oil consumption too much? Fsm states a minimum top ring gap of .25mm but I'm not sure about the maximum/preferred obviously its best to stay close to the minimum spec but my wallet hurts.
-
Just seems like he should have taken it undersize so clearances would be perfect and the surface would be as well. If you guys think its OK though that's good enough for me.
-
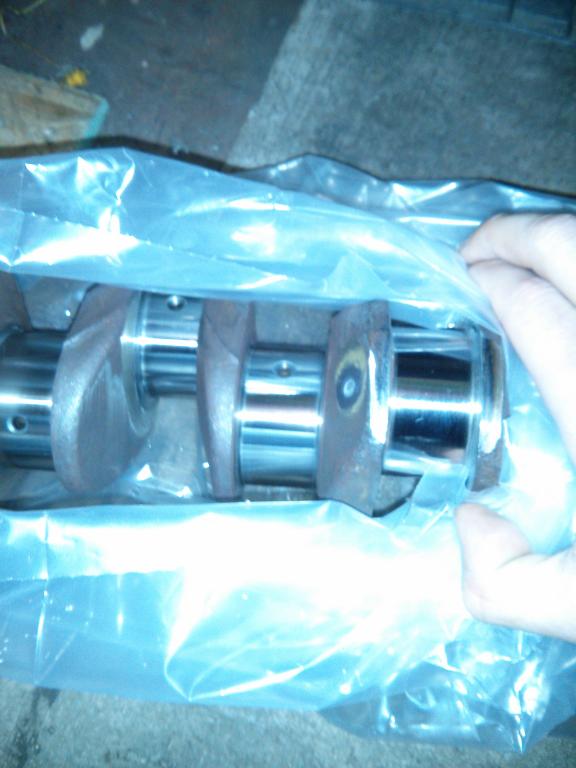
I just got my crank back from the machinist - this is the first time I've used this guy and I only did because no one else in the area was able to polish such a long crank. I need you guys to look at these pics and tell me if he did it wrong. I think he just threw it in the wash I can see lines on all the journals...
The larger wear line on the back that rides the rear main seal doesn't really bother me I can understand why he wouldn't polish that down. The lines on the rod and main journals do bother me. What do you guys think? Is this going to cause problems? I can't feel these lines but I can see them...
-
You should add some piss and just use that blend instead of coolant. Should be good for some horsepower if the old saying runs true...
sounds legit I think I'll paint flames on it too that always makes things faster
-
I made a block off plate for the water pump and filled a crusty l28 block with the clr stuff you get at hardware stores.The soak time was 3 days.All rust was removed and results looks like a good old school hot tank job-bare grey metal.Stuff was $26/gallon though.I was %100 happy with the results.Rinsed very well with water when done.I would try vinegar becuse its cheaper bit I am kind of skeptical about it beating the clr.
The vinegar takes longer but at 2 bucks a gallon it's a great option if you're waiting for money/parts and she's apart. it took 2 cycles to remove the bulk of the rust so it cost me $4 dollars instead of $100 for tanking or $30 for clr. that's money saved to spend in other places.
-
Well the rust is gone vinegar worked! I took my crankshaft in to get it polished and balanced today and I was turned away he said it was too long (gigity) so I took it to a different guy. The worst sort of machinist the profiteer. Guy quoted me 100dollars to polish and measure it. He said it would be 70 bucks just to polish without measuring and he was telling me that he could balance it but its not like balancing a tire its involved lol he started trying to prepare me for a huge markup and I just turned him down. I think I still got screwed 100 bucks for a polish? Seems unreasonable. Im pretty sure I can't afford a good running engine
-
I just hosed her out and I'm actually amazed at how much rust was removed I'm gonna fill it up again and let it go for another day or two so that the remainder is removed but all in all I'm satisfied
-
I found a guy local that has a small tank but for 80 bucks I think I'd rather invest that somewhere else the vinegar is on day 3 and still hasn't finished. I think I've got another 4 days to go but I still don't have the cash to get this decked yet gotta get the crank polished too before I go putting it back together. There is a part of me screaming just put it together and drive but I know I'll regret it lol
-
Damn environmentalists make our hobby so expensive. I've seen people build their own tanks out of a parts washer and hot water heating element but its kind of overkill for me at the moment. Someday when I build my dream garage - (with smaller attached house) I might set one up.
-
Yep no hot tanking around here my machinist just has an automated pressure washer closet dodad. I don't mind it taking off a few thousandths of good metal so long as it removes the rust
-
Yeah I considered alternatives but at $2 a gallon I figured vinegar was the most economical choice. Gotta save whatever scratch I can for the machine shop they tend to overcharge quite a bit. They know they're the only decent shop in the area not so much because of know how but because they're the only ones who have decent machines.
-
So I finally figured out why I've been having so many issues with this junkyard f54 block. I got it torn all the way down and on the engine stand, then I skimmed off all gasket material and removed as much paint as I could. The plan is to get it into the machinist as clean as possible so he can get it even cleaner in the tank. While I was brushing off the paint I peered into the front coolant passage and noticed something interesting - rust stalagmites/stalactites the passages were almost blocked. This lines up with the state of the water pump pretty much rotten. I also pulled out what appeared to be a chunk of a wire brush from the coolant loop in the head going to the heater core! This is the kind of thing that might be blowing my head gaskets and causing some overheating
so I made a block off plate for the front coolant passage going to the water pump and I've filled the water jackets with vinegar.block off plate made with sheet metal and permatex
the vinegar ate through the permatex
I have some cleanup work ahead of me.
So has anyone tried this? I hear it works and it's safer than muriatic acid just slower. If it works I'll be doing this with my heater core as well I'm sure it's full of rust. I need to replace or tank the radiator before it all goes back together too. It's been sitting like this for a day now I can still see the vinegar bubbling and popping out the coolant jackets presumably disolving rust. If this works I've just found an awesome new tool


 so I made a block off plate for the front coolant passage going to the water pump and I've filled the water jackets with vinegar.


Crank polished - doesn't look like it
in Nissan L6 Forum
Posted · Edited by PapaSmurf
Wow I just learned something I had no idea that (speedi sleeve) existed I already got the crank I guess I'm going to find out if it leaks without it. Next time I guess. I'm waiting on my ARP rod bolts and then this things gonna go back together as fast as possible im moving in 2 weeks and I don't know what I'm gonna do about my garage and shop I need a magic geenie