revlis240
-
Posts
75 -
Joined
-
Last visited
-
Days Won
1
Content Type
Profiles
Forums
Blogs
Events
Gallery
Downloads
Store
Everything posted by revlis240
-
225/50/16 16x7 rubs rear struts....what??
revlis240 replied to revlis240's topic in Brakes, Wheels, Suspension and Chassis
Thanks Leon. Im curious, how can you tell? The face of the wheel looks just like the enkies i have now with 0 offset. I thought offset was determined by how far back the part that mounts to hub intrudes to the inside of the rim, and obviously you cant see that in the picture! Sorry for the noob question, i dont really know much about offsets and such. Abe -
225/50/16 16x7 rubs rear struts....what??
revlis240 replied to revlis240's topic in Brakes, Wheels, Suspension and Chassis
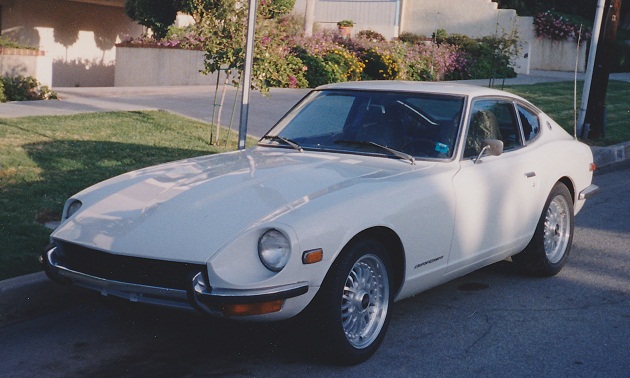
Hey guys, this is the car the wheels came off of. The owner insists suspension was stock, tire size was 225/50/16 and no spacers were used. UUUUGH!!
-
225/50/16 16x7 rubs rear struts....what??
revlis240 replied to revlis240's topic in Brakes, Wheels, Suspension and Chassis
^ good point. I suppose the guy may have used spacers and forgotten about them. He said the wheels were on his Z 10 years ago. I hate my current wheels, thats why I got these new ones. I took the guys word that they fit the Z just fine, but were a good deal nonetheless. Maybe Ill put a 215 tire and a small spacer and see what happens. Whats the widest spacer I can use without breaking my studs every week? -
225/50/16 16x7 rubs rear struts....what??
revlis240 replied to revlis240's topic in Brakes, Wheels, Suspension and Chassis
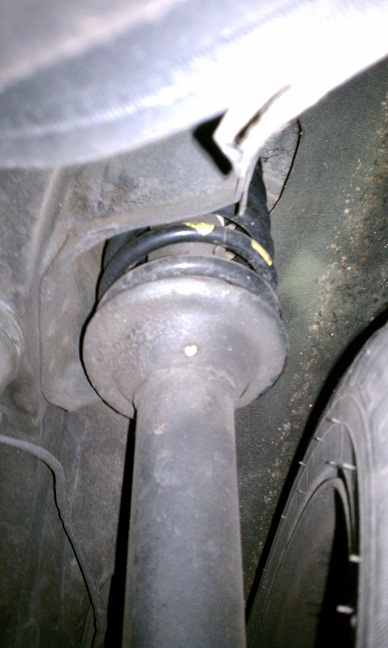
Hey guys, Thanks so much for the replies. The only thing I can see stamped on the back of the wheels says "16x7 2PC" and lot of random numbers. I measured the backspacing to the rear edge of the rim and I get 4.75" Here are some pictures of my 15x7 0 offset (I think?) Enkies that are on there right now. In my first post I said I had 16x7 right now, I dont, I actually have 15" wheels with 205 tires. The 15" wheels with 205 tires are barely 1" away from the strut. adding another 20mm to the tire + bulge = hitting strut. I confirmed the new wheels are off of a 72Z with NO spacers being used on it. How odd. I dont even know if these springs/struts are stock or not. I dont see any markings on them what so ever. Take a look at the pics and see what you think. Again, this is with my 15" enkies and 205 tires. But its pretty apparant how close that strut is!
-
Hey Ive been doing a LOT of searching and it seems many people are using 16x7 wheels with 225/50/16 tires and around 0 offset without issues. I currently have some old Enkie 16x7 0 offset wheels with 205 tires all the way around. I have about 1/2" clearance to the bottom of the spring perch on the rears. I bought a set of 16x7 (and I believe 0 offset) from ANOTHER 240Z GUY who was using them on his supposedly stock 240z. Upon installation, the rear tires are hitting the bottom spring perch. I will either need to get a spacer or use a 205 tire. The power that my Chevy 350 is putting down, I would really prefer a 225 tire, but I would love to know how you guys got past this issue? I searched for an hour and no one else seems to have this problem? Im Confused! Abe
-
Hey guys, Going through my highschool memories and I stumbled upon this now 10 year old picture: Im not very good at the wheel and suspension on a Z, so my questions are: 1) Anyone care to guess the size of those wheels? 2) Anyone care to guess the offset of those wheels? 3) Are there any non coilover kits that will produce a clean drop like that? Thanks! Abe
-
ford master cylinder / camaro slave / plastic line
revlis240 replied to revlis240's topic in Gen I & II Chevy V8 Tech Board
I think that slave is your downfall. I would try to find one with a bleeder. -
th350 vs tremec t-5 driveshaft info
revlis240 replied to a6t8vw's topic in Gen I & II Chevy V8 Tech Board
Update and answers: Confirmed: Spline count is the same TH350-T5. Length (with my 71 closer mustache bar) was trimmed about 2" at a cost of $75 including balancing! Happy trails -
ford master cylinder / camaro slave / plastic line
revlis240 replied to revlis240's topic in Gen I & II Chevy V8 Tech Board
did you do the part 2 bleed of the slave? you push IN the fork all the way, open the bleeder, get someone to SLOWLY push the clutch in from the pedal, close the bleeder and repeat. Once thats done, the fork should see a good amount of travel, ~.75". Did you adjust the rod on the M/C? I had to remove my stopper and have the pedal come up like 2" past the brake pedal to get to a point where the clutch travel is acceptable. The pedal is high as hell, but work-able. If all that is done, are you sure the fork is moving? -
Car Won't Go Into Gear When Running
revlis240 replied to 240zBoy's topic in Gen I & II Chevy V8 Tech Board
If you guys are having issues, see my thread and read #6: http://forums.hybridz.org/index.php/topic/99584-just-finished-t5-camaro-swap/ "6) FOR THOSE WHO HAVE PROBLEMS GETTING THE CAR INTO GEAR AFTER INSTALLING A NEW CLUTCH: More than likely your pilot bushing is seized onto the input shaft, causing a hard connection to the engine. Put the car into 1st gear and "bump" the starter. This will cause the bushing to free up." Let me know if it works! -
Hey guys, I just finished my Turbo 350 to Camaro T5 swap and would like to share some tips I gathered across my readings. 1) The Turbo 350 and the T5 have the same output shaft splines. But the drive shaft needs to be shortened (in my case, with a '71 and the straight mustache bar, it was about 1.5") 2) To get to 1 bolt on the bell housing which is so close to the firewall on the passanger side, I cut a hole in the firewall 3) I installed the bell housing FIRST then the transmission into the bell housing. This makes for a far easier install of the transmission 4) Using the plastic clutch pilot line up tool is a BAD idea. It allows for too much slop and makes the trans hard to slide in. Try to find an actual input shaft to use as a clutch pilot tool. Or, make sure the disc is CENTERED before tightening the pressure plate. Just putting the pilot tool in does not fully center the clutch. 5) I used Lee's thread on using the ford F150 master and plastic clutch line. It works VERY well and is a cheaper/easier to replace/find alternative than the Tilton/custom line setup. Clutch feel is basically stock. 6) FOR THOSE WHO HAVE PROBLEMS GETTING THE CAR INTO GEAR AFTER INSTALLING A NEW CLUTCH: More than likely your pilot bushing is seized onto the input shaft, causing a hard connection to the engine. Put the car into 1st gear and "bump" the starter. This will cause the bushing to free up. 7) The angle of the Turbo 350 and the angle of the T5 are off. I could not line up the engine the way i needed to and had to redrill 2 bolt holes for the cross member to the floor pan. No issues so far due to this. 8) You have to trim about 1" off the left side of the shifter hole to line up the shifter, this is normal. 9) A sideways STOCK 240z lower rubber shift boot makes a decent fit onto the now crooked shifter. Hope that makes sense. Ill add more as I think of it! Abe
-
sbc starter ...it doesnt fit JTR lets me down...
revlis240 replied to revlis240's topic in Gen I & II Chevy V8 Tech Board
As far as I knew those mini starters fail a lot more frequently than the direct drive oem ones. I have a totally destroyed one sitting in the parts bucket the car came with. Anyway, I bit the bullet and fired it up, she works fine! So we'll see how long it lasts. I didnt even have to shim the starter. -
*sighs* I drove an hour today to pick up a 153 tooth starter for my turbo350 to T5 swap. Bring it back and guess what? Technically it does fit the frame per the JTR manual but there is no way on earth that the giant nose of the starter is fitting in the small 2" nub of the camaro T5 bellhousing. This is starter #5 in the manual It seems my only option is the hi torque mini ones. Just sucks when the manual is wrong.. I considered cutting the nose the starter to make it fit...bad idea? Just a thought since I have to trash this starter anyway... ----------------- Edit: Does anyone think installing this is a bad idea? It fits now
-
MONDO EDIT below ---------------------------------- Hey guys, I started this thread asking some questions about this setup. Well I got bored and tackled it head on. So instead of questions, here is my write up on using the F150 master cylinder, F150 plastic clutch line and stock camaro slave in your Z. Installing the master cylinder: I dont know if its MY Z or if they call came that way, but Lee's instructions on "just drilling 1 hole" was severely understated. You do have to drill a hole, but behind the hole is a bracket (see pic below on how I had to shave the top part) and that bracket makes it hard to bolt the master down. Anyway, 2 hours of grinding and cutting and hammering and drilling later, the master is installed. Maybe my car has more reinforcement in the pedal box area (there was THREE sheets of metal) from a previous owner. I dont know. I will see how long this lasts. The F150 master has a heim setup on the end of the rod, so you do NOT have to use the stock datsun clevis. Rod/thread/clevis issues are thus solved. Routing the clutch line: This took some thought. The clutch plastic hard line is straight and I was afraid it would break. But see the pic below, the rest should be self explanatory! This entire setup costs $82 after tax. Im reusing the slave until it melts (it seems fairly new) and I will get the metal one at that time. The Mcleod setup is EASY. I read all the previous posts for HOURS. These pics would have helped me, so I hope it helps someone!!! Thanks Abe
-
Fitting 240sx NISSAN retractable seat belts in the S30
revlis240 replied to lumberjackj's topic in Interior
I bought lumberjacks RetrobeltUSA seat belts for my S30 and just installed the passanger side last week. Its funny how what one person hates is what another person likes. I think the floor mounted retractor makes the seat belt kind of cool. Im 5'7" AND I have a 71 chassis so I mounted my retractor where it doesnt come near my seat (on a 71 you have to drill a hole). Anyhoo, with all the MSA/Retro non-love I thought I would chime in and say theyre not that bad! Me likey -
i would think all you need to do is rough up the alum part with some steel wool or sand paper and it will stick just fine. I just had to cut a few holes in my firewall...i never thought of using alum tape to seal it. Good idea!
-
funny..i didnt think it was a big deal to even bother installing it. Did I miss a memo on how crucial it is?
-
the engine is resting against the distributor...
revlis240 replied to revlis240's topic in Gen I & II Chevy V8 Tech Board
$400?! Thats half of what i paid for mine and a fraction of new ($2500+) Make sure its got 2 hydraulic arms and the locking center safety latch grooves. Safe? Yeah absolutely. I spend lots of time under it and the car is rock solid. Ive seen 2/4 posts fail as well, so there is nothing as 100% safe, but I trust this setup more than jackstands or a single floor jack! -
the engine is resting against the distributor...
revlis240 replied to revlis240's topic in Gen I & II Chevy V8 Tech Board
my solution: I realized I must do this because when I put the trans back on, surely then itll be too much for the dist and it may crack. -
So amidst my T5 conversion i realize that I dont really have a way to support the motor from "leaning back" against the dist/firewall. I have the car on my mid-rise lift and tried to strap the back of the motor to the front sway bar but its not strong enough. Right now its resting against the dist, but it doesnt seem to be hurting the dist. Is this normal for you guys? Any ideas? This is on a JTR mount with a HEI dist.
-
th350 vs tremec t-5 driveshaft info
revlis240 replied to a6t8vw's topic in Gen I & II Chevy V8 Tech Board
Update: Once again, spleen count is the same, but the Th350 is approx 28.75" long and the T5 is 31.75" long so 3" will have to be cut out of the driveshaft. I will take exact measurements in the future, but with the amount of slack in the yoke it wont matter much anyway. How much should an average shop charge to trim 3" off a driveshaft? -
miles, im searching my memory from 10 years ago (last time i did a clutch) and i recall also not having the dowel pins on my flywheel. If i was to guess i think they AID in the lining up of the pressure plate but are not absolutely necessary. Just make sure you torque the PP to the correct specs and you should be fine. Line up the PP as if the dowel was there ofcourse. I may be totally wrong, but if it were me, thats what i would do!
-
hrmm, ill have to custom make that spacer then, mine are long gone. rturbo, I can only tell you that its a 16mm or 5/8" bolt head. The pitch and what not I dont have on hand sorry.
-
I bought a nice 3 point seatbelt thats identical to the Z store one, off a member here. Question, are you not supposed to torque down this bolt? Doing so would crack the trim piece under it:
-
Trying to connect an Autometer electric speedo to my NONWC T5. They make an official autometer part ($80) that plugs into the T5 and sends out an electric signal. Similar to this: http://cgi.ebay.com/ebaymotors/ws/eBayISAPI.dll?ViewItem&item=250516909116&ssPageName=ADME:X:RTQ:MOTORS:1123#ht_500wt_956 Anyone here use that one before? Its the same thread size, 7/8-18 so it SHOULD connect. Just wanted to confirm! Thanks