-
Posts
37 -
Joined
-
Last visited
Profile Information
-
Gender
Male
-
Location
Ontario Canada
geezer's Achievements
Newbie (1/14)
10
Reputation
-

Steel Brace for R200 CLSD Finned Cover in S30; New List and design...
geezer replied to BURLEIGH's topic in Vendor's Forum
Payment sent. Thanks for all your help Richard! I really appreciate the effort you have put into these. -

Need info on this cowl hood...zwolf or primadonna Z?
geezer replied to zeeboost's topic in Body Kits & Paint
I just noticed your post. Sorry, bad timing, I sold the hood 4 weeks ago. -
Pull a spark plug, feed in a length of 3/8" cotton rope leaving enough rope to remove it later. This will prevent the piston from reaching TDC and lock the rotating assembly allowing you to apply enough torque with your breaker bar to remove the crank bolt. Good luck!
-

Need info on this cowl hood...zwolf or primadonna Z?
geezer replied to zeeboost's topic in Body Kits & Paint
This is not a good picture of the hood but I think it is the same. This was from this recent Ebay auction. http://cgi.ebay.com/ebaymotors/Datsun-240z-260z-280Z-Jim-Cook-Wide-Body-centerline-/320622674635 -

Need info on this cowl hood...zwolf or primadonna Z?
geezer replied to zeeboost's topic in Body Kits & Paint
I have the same exact hood that is pictured on Eric Bernstein's IMSA 240Z. I got it as a package deal, with my car about 5 years ago and didn't know the origin of it, but suspected it is a Jim Cook hood. I've had it stored away ever since I got it. I don't know the composition of materials, but it is very rigid and easily lifted with only one finger. It is in primer and has never been painted. If you want pics and dimensions, I can make the short trip to do so. -
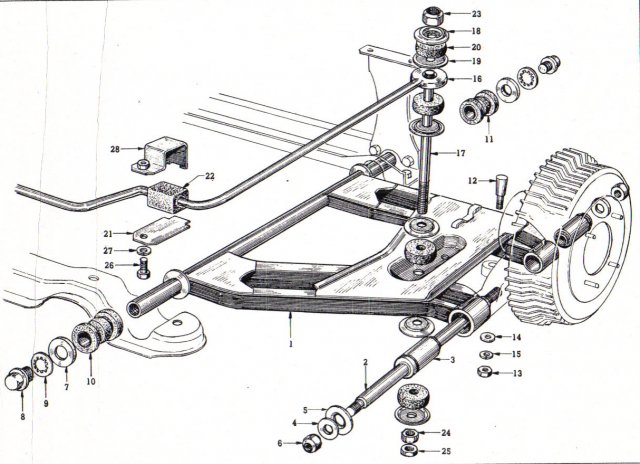
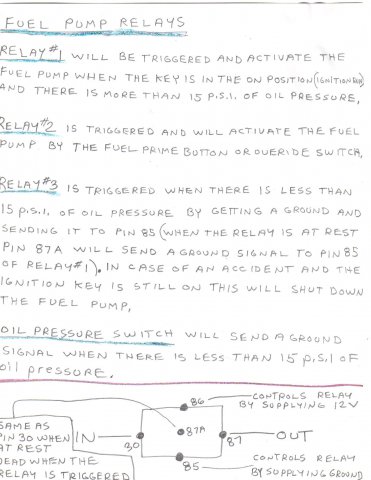
I dug up an illustration. Just as jasper pointed out, you have it backwards. It's kind of a generic drawing and doesn't show it but from looking at your pics, I'd say you have it upside down also.
-
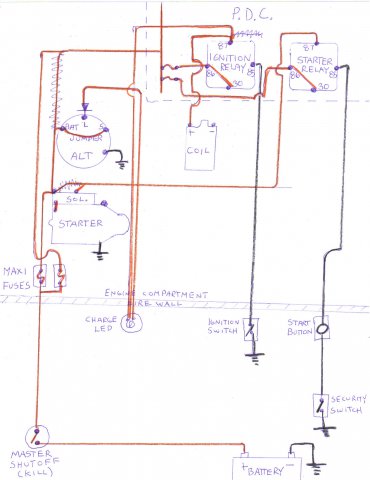
It is good to go, as far as keeping with your minimalist theme. If it was my car, I would use whatever extra wire was needed in order to separate the control side of the relay (pin 86) from the battery power (pin 30), using seperate fuses to protect, but it will work as is. A few more details will have to be kept in mind when you actually implement the plan. It would be a good idea to separate the bus bar (fuse feed), so the headlights high beams and low beams and perhaps the fog lights are derived/grouped from a dedicated Maxi Fuse. Look at any fuse box and you will see that the high amperage draw items have a dedicated wire and fusable link/maxi fuse connecting to the bus bar. Just something to keep in mind, instead of having 1-150 amp Maxi Fuse covering everything on 1 bus bar. That is something you can decide on when the components come together in the car. Each end device/accessory and length/gauge of wire used will have to be evaluated in order to assign the proper sized fuse for each. You can never go wrong by using too small of a fuse to start with. Good luck and I hope I was helpful.
-
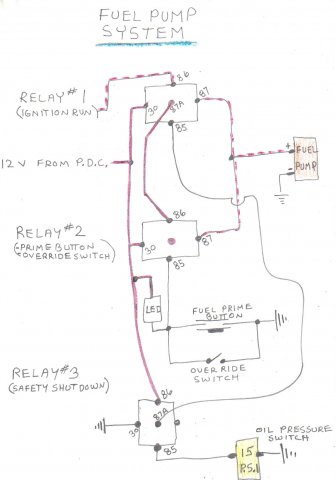
Yes, just change the numbers. The reasoning is, Pin 87A can be utilized if you abide by the "in 30 out 87" rule. If you wished to incorporate the Fuel Pump Shutdown Relay I showed you, this comes in handy, as well as in many other circumstances.
-
I did not look at this latest diagram close enough before saying it was a good plan. I was pressed for time and just assumed that you followed the example in my diagram. You changed it up and compromised the Starter Relay circuit's protection. You have not made the distinction between Maxi fuses and Mini fuses. Take another look at the way I have Pin 86 and also because it is jumped, Pin 30 protected by a Mini Fuse in the PDC. Same as the Ignition Relay. The Starter Relay is only being used as a means to control the Starter Solenoid with a Ground. The Maxi fuse is intended to protect the downstream cable coming from the Battery and the Starter Motor only. The way you have it configured the Starter Relay and associated wire can go up in flames before the Maxi Fuse blows. Take another look at my example diagram. Its a crude drawing, the Mini Fuses aren't labeled, but everythings shown to make the Starter circuit safe and reliable.
-
-
I didn't have to replace my front frame rails because they were done by the PO, but I did replace the floors, supports. outer rockers, quarters, etc. I think it would be easy enough to replace the front frame rails and position them correctly also. The dimensional body schematic in the FSM is good to have. Maybe I'm not the right guy to answer your question. I didn't use a frame rack or any type of jig but I did have the car mounted on a rotisserie, that made it extremely easy to level the car perfectly while upside down. When these cars were built, platform jigs were used to position & clamp the frame and floor components correctly prior to being welded together. Knowing this and since the rear frame & floor section were still in great condition, I used a lazer level mounted across the rear frame section to project a consistant reference point along the horizontal plane of the car. I also had taken and recorded several measurements before cutting out the rusted sections. It made it easier to position the new floors and supports. A homemade rottiserie along with a dimensional schematic and a lazer level worked great and with a little ingenuity you could do the same without the rottiserie and the car leveled right side up. I didn't take pics of the lazer level use but I think you can visualize how easy that is to do. After I had the laser level mounted square with the rear frame section, the line projected stayed consistant no matter what position the rottiserie was in.
-
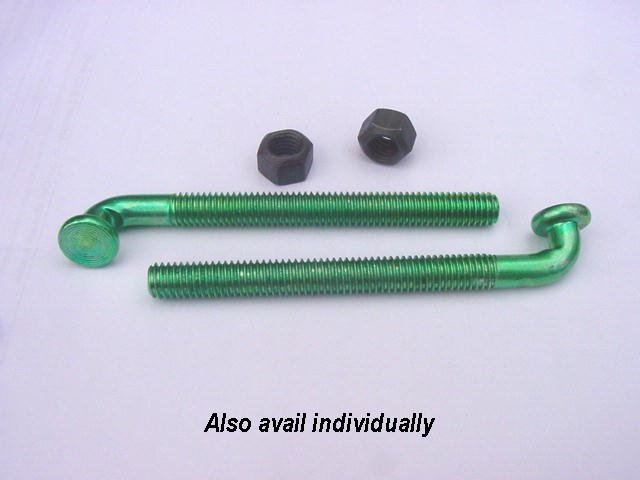
These J-bolts are available for $14.00 a set at amhightechauto.com. if the Nissan ones aren't available or too expensive. The Mopar ones I have do not have the proper bend and they have a stove bolt square shoulder also.
-
More info...The fuel tank and strap changed with the introduction of the '74 1/2 model. This is when the fuel tank capacity increased to 17.2 US gals from 15.8 US gals. So with what Nigel has said, that makes 3 different sets of straps for the S30. Just trying to help you draw a line for the different usage. I can look it up in the microfiche for you if it will help others when ordering. Edit: The Gas Tank Strap part numbers 17410-N4500 (RS) & 17405-N3400 (LS) are shown as being used from 09/74 - 07/76. That pinpoints the use of all 3 different sets. Hope that helps.
-

Trying to find out what I have
geezer replied to backalleyracer's topic in S30 Series - 240z, 260z, 280z
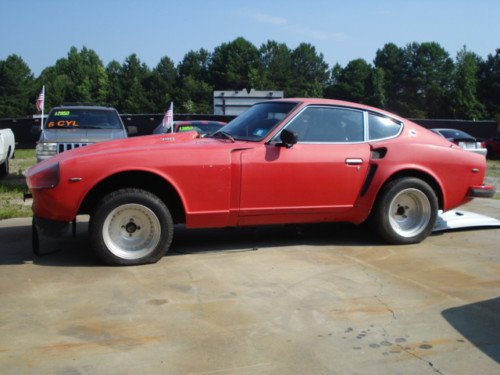
It appears to be the same kit as the one on this car in the link, although not executed quite as well. I recognized it and saved the link because I have what I think could be a Jim Cook hood. It looks identical to the one shown in this link. I haven't checked out the composition of the hood yet or weighed it. It is in primer and so lightweight, I can lift it easily with 1 finger, yet it is very rigid & strong. http://www.cardomain.com/ride/649840/2

