

z240
-
Posts
397 -
Joined
-
Last visited
-
Days Won
4
Content Type
Profiles
Forums
Blogs
Events
Gallery
Downloads
Store
Posts posted by z240
-
-
No user servicable parts inside. Perfect excuse for a new stereo.
-
To help understand if the problem lies with the tire or the rim, take one of the "good" tires and try to swap the good tire to the problem rim, and then the problem tire with the good rim. One should work, one should not. I'm betting on the rim.
-
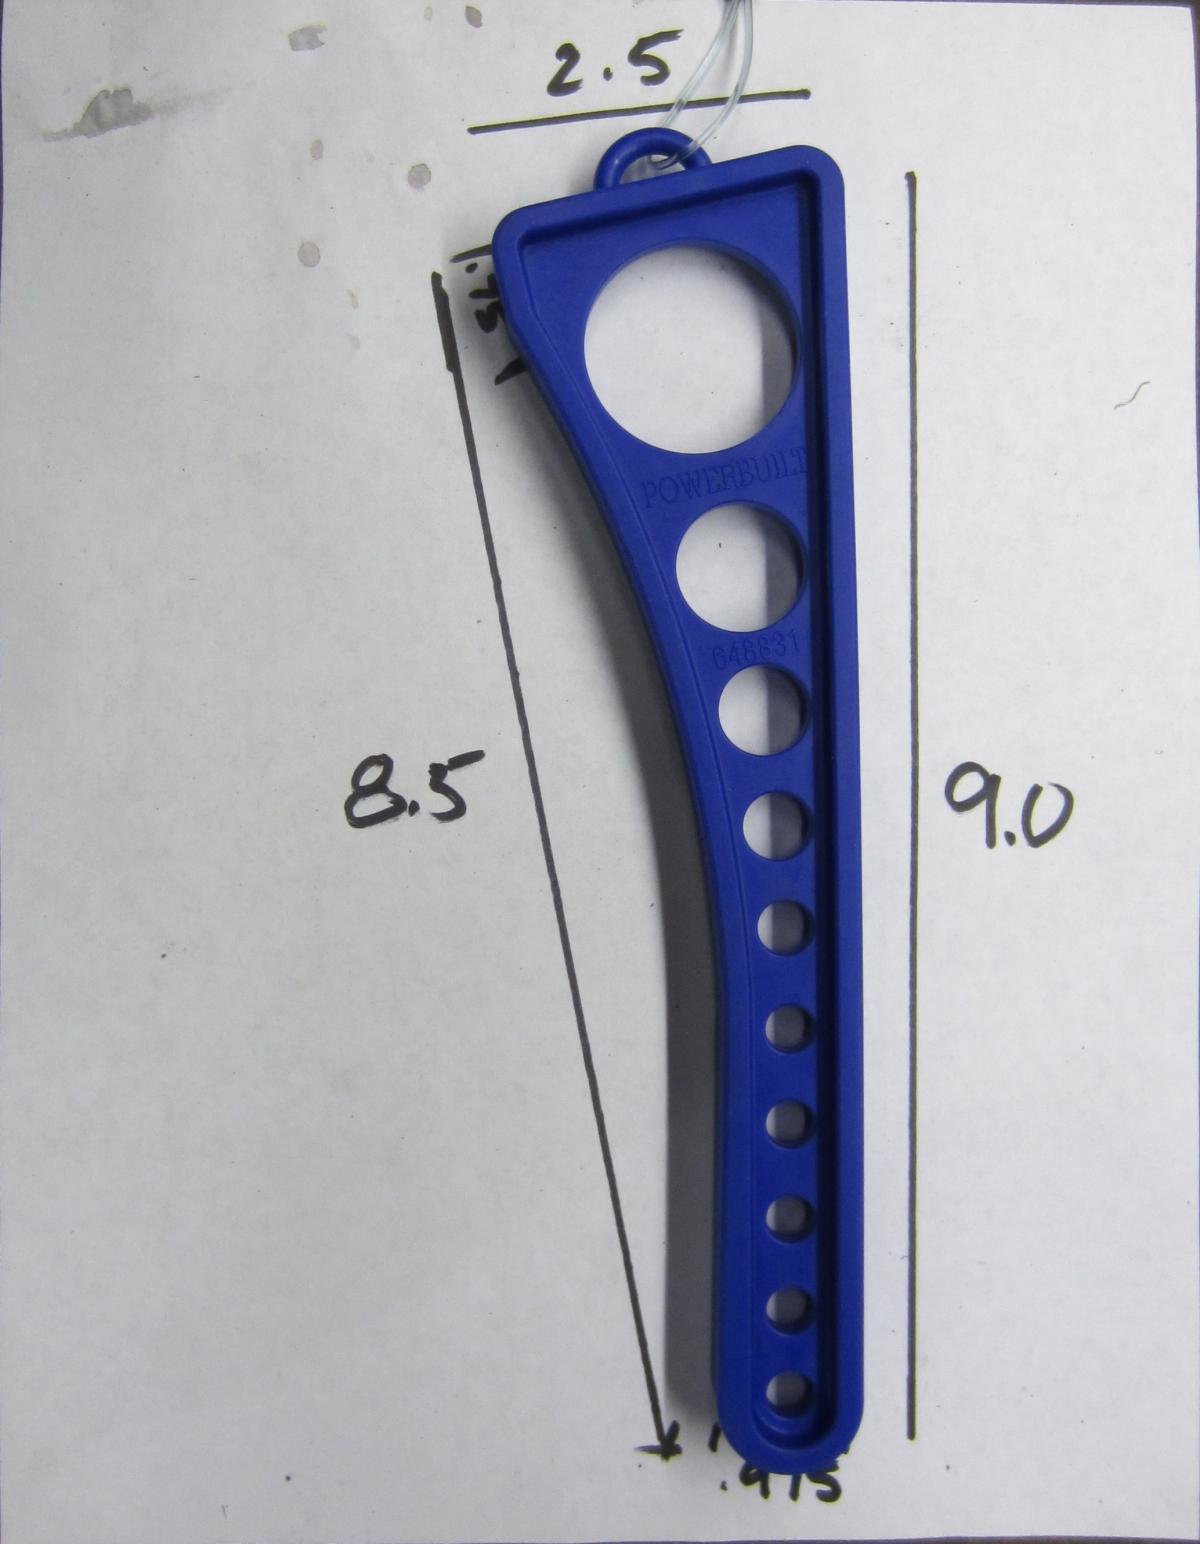
I received the Powerbuilt timing chain wedge tool today from ToolSmith. Nice piece. Its rubbery and appears well made.
I've attached a nice pdf with a picture of the tool scaled to real size so you guys anxious to make one of your own can do it easily.
Print it to 8.5 x 11 paper with NO scaling or centering or margins, or whatever your printer driver would like you to use. The real dimensions are on the picture as well for comparison.
The only part that didn't scale very close to reality is the width of the skinny part of the bottom. It is 0.975 inch wide, not the 1" that comes out on the paper print. There is some photographic distortion from paralax I'm sure.
Enjoy!

-
Rad repairs are pretty routine and low tech and not much $$ typically. I'de investigate a rad shop fix first.
-
Assuming both have AC or not they are pretty darn close. I have an early 260 heater panel if you really want one. Let me know
-
As they say, take one gram out of 10,000 places and you can save, hmmmm, 22 lbs! Or just hire a skinny driver...
-
There are two separate seals. The "main" one that seals the hatch to the body when the hatch is closed, is larger, and goes around the full perimeter of the hatch opening. The smaller outer seal is more of a water deflector strip and attaches to the body on three sides, top and down both sides on the smaller L shipped body lip. Neither of these seals appear to have the exact Nissan seal cross section shape, though they are likely to work okay if installed well.
Take the hatch off to do both seals so you're not tempted to "cheat" and not use enough adhesive (or none!) when you do the part at the top due to restricted access up there.
-
Now that I think about it, the fact that the handle tipped a bit crooked when you pull it up might actually mean one of the two nuts that hold the handle down may be loose, which then gives too much play to the rod. Check those first (8mm heads). The handle usually doesn't act/feel any differently with a broken off tang since its action/piviots are what's bolted to the door.
Yes to removing both of the on-door guides. Leave the regulator bolted to the door though! That would make way too many degrees of freedom to corral. Work on holding the window at just the right angle and get the regulator at just the right position (leave crank on it) to get things to go together. Its a bitch, keep trying.
-
Pac_man, you've suffered enough. Your door handle very likely is broken in a very common way. The pot metal arm that attaches to the rod that opens the door breaks. You have two choices. Switch the left and right handles (they each have two of these arms, ie no left or right handles), or buy a new handle.
As to the window being off its rollers, that's tough to describe. Here goes. The window crank mechanism has three arms with a white roller on the tip of each. Two of these engage the track on the window, one engages a short horizontal guide track on the door. The window also rides in a vertical guide channel at the front of it. This guide channel is attached to the door by two 10 mm nuts. Remove it. Take the nuts off and slide it down off the nylon strip on the front of the glass and remove it. There are two identical nuts that hold the horiz strip that guides the one roller. Remove it. NOW you have the flexibility in moving the window glass around to get it back on the two rollers that engage it.
The big hint now is that the rollers can only enter the guide tracks on the window from ONE END, at least for one of them. Determine which this is, then put the regulator about 1/2 way down and start the process of positioning the window so that you get both rollers in the guides. It requires you to tip the front of the window down if I remember. Then once its on those rollers, THEN you can put the front and center guide back on the door.
This isn't fun, but its possible. Patience grass hopper.
Oh, and replace the door handle with the glass out. It MUCH easier....
Oh, and you have to remove the outer horiz SS trim along the glass to give you more play room.
Good luck....
-
Yes. Been discussed. There are comprimises.
-
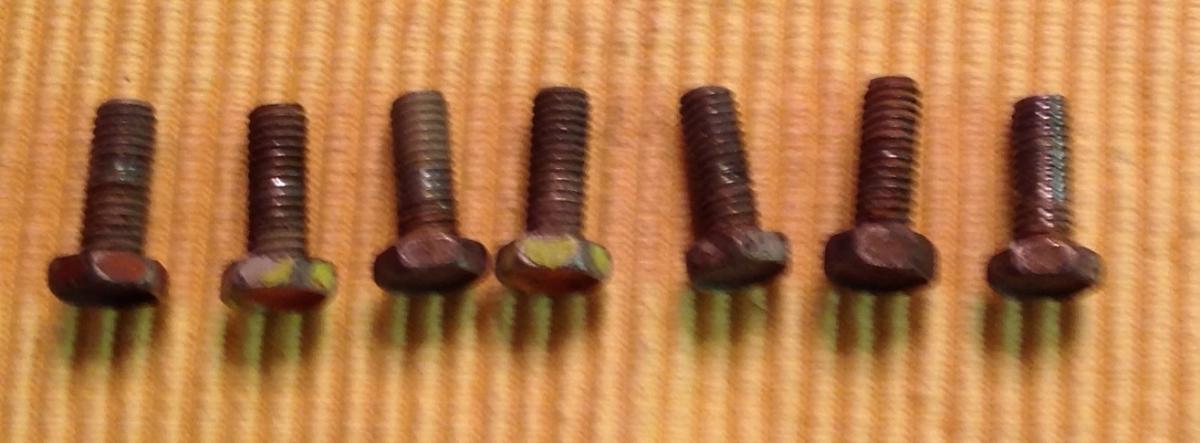
Most front fender to body bolts are 6 x .1.0 except the two go straight up underneath just in front of the door, and the one that hides up top until you open the door, which are 8 x 1.25.
As was recently pointed out to me (thanks John!), the 6 (three each side) 6x1.0 bolts along the inner fender lip where the hood fits have a very special thin head, and after going through my pile-o-bolts, sure enough, I have quite a few. Guess they thought the close fit with the hood required thin heads. I'm using regular head bolts with no problem, but if you 'correct' minded, then let me know.
Hope that helps! Happy thread shopping.
-
I think of it like this. To totally change your harness to another type, you will, in natural course, have to learn all about your current wiring so that you can 'change' it to the new system (note I didn't say improve it....).
Why not do this learning of the current electrical system in the context of your current harness? Then add or improve it based on your evolving needs? This significantly reduces the overall effort. If my assessment of others who have gone down this road and discussed it here, most seem to have regretted it...
I have massively added to my wiring to handle all my new "necessities", but there is plenty of the original wiring too. Most of my improvements are high current, fusing and power supply based.
BTW I have a full early 260 harness I just removed from a parts car if yours is beyond repair.... Lots of other 260 specific bits as well. Let me know. There is even a full early 260 for sale near here in Edmonton on kijiji. I guess we are hiding them all.
-
still looking? I can send you one. drop me a note z240@shaw.ca.
-
Mousetrap springs on backward or missing? Lash clearance mis-interpreted as inch/millimeters or visa versa and now wayyyy too wide? grasping at straws now...
Man a picture would be worth a thousand words here... Also some audio would help us understand if its one cylinder or all of them (from frequency of noise).
-
If that spring is nearly "loose" at the current lower perch position, then making the perch lower will do nothing for ride height. Me thinks you might be at the min height now..
and speaking of bump stops, I'm not seeing any on that strut....
-
I'm not close, but I have a couple of these if you get skunked. Yours for the price of postage. Let me know at z240@shaw.ca
Happy new year!
-
I have the bits you're looking for over here in Calgary. Do you need the straight or curved rear brace that goes around the back of the diff? send me a note to z240@shaw.ca.
Jim
-
Have you taken yours apart? Typically the contacts just need cleaning. Pry those tabs back and open her up slow and careful. Take pics at each step. I have a spare switch if things are beyond repair. PM me if you need help or a switch.
-
Uship is the company the "stars". (shippers) use to bid on shipments. No doubt a sponser of the show...
-
I've always been tempted to try uship.com. Seems like an great idea to let the current market determine the price.
But after seeing 'Shipping Wars" I'm not so sure.
-
How about a slightly used one for a "bit" less than $85? PM me, I'm parting an early 260 right now. Anything else 260 specific (and small) you need?
-
2014 in San Diego HK. Have to wait one more year. Worth the wait!
-
On a recent trip south. -
I captured the Racer Brown on-line article as a pdf attachment to help it live longer and be easier to find.
-
 1
1
-


WTB 70-72 240z heater blower resistor
in Parts Wanted
Posted
I have a spare one of these. Drop me a note to z240@shaw.ca and we'll set ya up! Hows $10 + shipping sound?