
Daeron
-
Posts
2148 -
Joined
-
Last visited
-
Days Won
2
Content Type
Profiles
Forums
Blogs
Events
Gallery
Downloads
Store
Posts posted by Daeron
-
-
Firing order should be the same on every L6 engine, even the diesel (joke. The part about the diesel; every gasser L6 oughta have the same timing. that part was serious.)
Pull the spark plugs, make sure you're on the compression stroke (it is ALWAYS good to go all the way back to basics, especially if you have never seen this engine run) and get the rotor to point at a terminal on the dizzy cap. Use that terminal as cylinder 1 and go from there. There IS a chance that it is set up with a front cover or dizzy piece from a USDM L6 and that somehow, timing marks were changed, and something is odd with the timing when you set it with a light. Pieces are different, and L6 motors have had timing issues before because of odd hardware mixups like this.
If you try this and it doesn't work, at least you have ruled out the possibility.
And incidentally, I want that crankshaft. Not cash-in-hand "want", at the moment, but I want it. If you're in Mobile, then you are closer to me than any other L20A crank I know of.

-
Those silly looking SUs are two of the best little machines ever designed for feeding fuel into an engine. They open up to 2" in diameter, and that is twin 50mm throttles. To make them flow enough fuel at the right mix for the bigger engine, all it needs is a replacement of the needles and you are good to go. for an interim solution, the SUs are certainly not off the table. If you know four barrels, then stick with what you know, but there is far more know how regarding the SUs on a Z engine as there is four barrel on a Z engine.
I am no SU tuning guru; for specifics, you will have to turn elsewhere.. but I had to step up in defense of my favorite toilet bowl apparatus
-
I use it when the engine is hot as can be. Good hard run, park, seafoam the intake, cut, ten minutes, fire it up, good GOOD hard run. No Mosquitoes Tonight!!!!! Awesome stuff. I'm not convinced it really makes a difference every time but I use it regularly as fuel treatment and intake fogger on all my vehicles. After a while you can tell what smoke is Seafoam smoke (white, with one particular smell) and what smoke is carbon smoke (black, smells like a Datsun)
I only use it through my tank (kinda hard to do it through the intake with triple mikunis, unless you *want* to start unbolting everything). While in theory its probably find to run it through the sump, I follow the school of thought that says only oil should go into your oil sump
Put it in a spray bottle and hose it on in while the engine is running.
OK, good luck.It's not magic, it's a solvent. It only helps if there is a problem cured by a brief exposure to it. The caution is that adding it can also introduce problems (like adding it to a gunky gas tank will let gunk get picked up into the fuel system, adding to oil releases valve cover gunk suddenly back into the oil system, etc.).
Only application I've used it for is to loosen up sticky EFI flappers though any carb type cleaner in a pressurized can work better at aiming it just where it's needed.
YMMV.
BEST POST IN THREAD. I LOVE Seafoam, I SWEAR by it. (They make a penetrating lube called Deep Creep that makes PB Blaster look like WD-40. Pricey but WORTH IT.) But even still, I use and recommend Sea Foam (especially added to motor oil) only with caution.
I would NOT pour it into the crankcase of a motor with less than 100K on it, I would not bother using it on an engine I know the history of. I wouldn't use it in the oil of your car unless you have a very specific aim or problem you want to deal with. If you blew a head gasket and want to run it through, great. Ticking lifter on a used car purchased with over 150K on the odometer? I left the Sea Foam in my old Subaru for almost 1000 miles once (yes one thousand) and it was OK. Cleared the lifter up (mostly) and no real problems down the line. BUT, I still don't recommend the product without a word of caution.
Using it for a fuel additive, or fogging the intake, are essentially harmless operations. The only risk in fogging the intake is that of overdosing the engine with the liquid and hydrolocking somehow, which seems really unlikely. But adding chemicals and solvents to your motor oil is a risk, regardless what the label says on the product. The people trying to sell you that are trying to sell you that, not take care of your engine. Thats the good people at Mobil and Shell and all those other awful petrol-pumping pinheads.
-
This sounds like an awkward situation.
Being unfamiliar with the laws in your country regarding vehicle importation, most of us are at a severe disadvantage. On top of that, alot of us are Americans, so some of us kind of ignore the fact that other countries exist. Sorry about that!!!
The modifications that you mentioned are in no way stock or factory, and although they may have been somewhat contemporary I doubt it would count as "original." In other words, unless "period-correct modification" is allowed I would say the suspension and brake mods count against "originality." Coil-overs are basically just macpherson struts with adjustable height, though, and brake upgrades (especially something as simple as adapting Wilwoods to the car) have been around as long as we have had race cars... so I may be wrong.
There are a few European members here (one i believe is frank280ZX but that may be frankS280ZX or some other variant.)
You might want to try to send a PM to one of the moderators requesting a title change for your thread indicating that you are in Europe and have questions regarding importing a vehicle. Or start a new thread with a different title.
-
As many of you know, some parts aren't available any more and you have to go scrounging. My '74 260z has inspired several scrounging trips.
Good stuff, thanks a bunch!!
That is what this thread is all about right there!!!! -
My car is a 1976. I modified mine by moving the mounts back (slotted the holes) and cutting out the inner structure on the bumper and rebuilding a recessed mount. Welded some new ends on and smoothed out any mounts/bolt holes. It's painted black in the last pic, I'll eventually get them powder coated. Here's what I ended up with....
I really like the way this looks!! Too bad the bumpers are still such hefty brutes..
-
Thanks for clearing that up.
I got a little done this week, I cleaned my garage a bit more, there is like a foot more room width wise, but there is still like 4 more feet of stuff to get out of there, like a dresser and some cabinet thing. There is room for the Z to fit and to open a door about half way. I cleaned the v8 oil pan and belt pulley (the pulley on the front of the motor that is connected to the crank) and painted them both black. Hopefully I can get more done in the next few weeks. I think I should have made a New Year's resolution to get off my ass and do stuff. That would have been a good idea.
If you are made the right size for a Z (picture your typical adult Japanese) you oughta be able to leave the window open and just slide in in a garage.....
Datsuns are small cars. It took about 20 minutes of convincing, but I finally convinced my uncle to try sticking two Roadsters side-by-side in one of the bays of his shop, and he has been thanking me ever since....
-
Ain't freakin FAIR.
Nice pics, man. Incidental images of a car in such great shape are some of my favorites.. Seeing every little corner and cranny, but its all so clean.... Ain't freakin FAIR!!!!!
-
My front and rear bumpers are gone too along with the spare tire and a gutted interior. I notice a power difference though between this Z and my completely stock '78 with full interior.
16x6.2 pounds per gallon = 99.2 pounds.
Your stocker with a full tank weighs the same as your "lightened" car on empty.
-
I can't imagine that taking off the bumper will net a 2-3mpg increase. Not with the aero the Z has. The Z isn't weight limited, it's brick wall limited.yea, like i said. not much.This coming from a car that gets 17-18 mpg
First off, if you are only getting 17-18 mpg in any stock S30, you need to tune up your car and quit running so rich. That is NOT what your Datsun should be giving you unless you've built some musckles into her. 17-18 oughta have some pretty significant musckles, at that.
Secondly, I believe the quote on mpg reduction through bumper removal was not intended to mean a gain through decrease of drag; rather of decrease in mass. Both bumpers and all four brackets certainly weigh well over 100 pounds, and even if it comes in at 120 pounds out of 2500, that is still almost five percent reduction in weight. 2-3 mpg is possibly an exaggeration... but I suppose it depends on how grandma-like you drive. I could certainly see somebody hypermiling a vehicle with similar weight and aerodynamic features and achieving a 3 mpg improvement below, say, 55mph through a 5-10 percent weight reduction.
Of course, saying you gained 3 mpg in your Z by dropping the bumpers is, realistically, almost ALWAYS going to be an exaggeration, but it was one of mass not drag.
-
9/74 260z was the 280z style 260z. Other than that it was 240z style.
But, all 260Zs had "280-style" dashboards and taillights. All 260 and 280 dashboards (the raw core, wire harnesses changed every year, the gauges got switched around a bit and the typeface changed, but the dash itself) and taillights are interchangeable from whenever 260Zs started production through the end of the S30 after model year '78.
-
I'm awesome.
I just had to say that set me to a rather vigorous chuckle that still hasnt abated...
-
Awesome, this means that Somebody else, Somewhere else, WILL wind up with something like this!!
Just, awesome! What sort of price would you put on just a set of six injector holddowns??
-
Those pictures.... are super-wow.
As usual I am at SUCH a loss for words that Wow is all I got. Just, Wow, on every comprehensible level, simultaneously, in three-part harmony. Heck, make it four-part harmony (always did like it better when they had Neil Young in on it.)
I must admit, though, that I am still waiting for the complete front bodywork reassembly before this job is "done" to me. Every stage had been Epic, and I wouldn't have done this any other way.. I am enjoying the suspense and like the way you've left it all off until the package is buttoned up.. I'm just expressing anxiety and excitement.. This project was SO intense that the real, really-real, LAST update pictures are all that will really scratch this itch.
I gotta say Thanks again for sharing this with so many people.. But in all ways, I keep repeating myself.
-
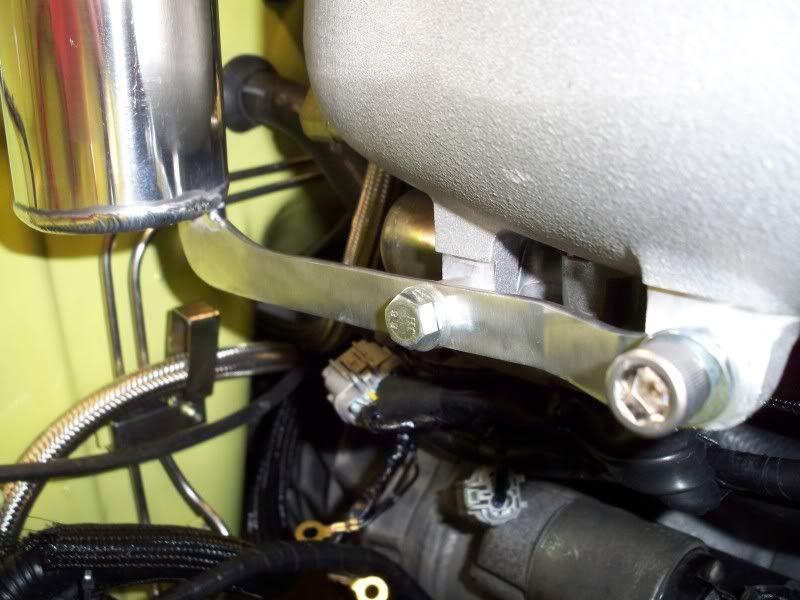
What are the odds that this catch-can bracket here:
Might, over time, encounter undue vibrations leading to a crack??
Might there be a way to insulate it with a rubber mounting somehow?
Or am I chasing an issue that I perceive in a photo, that really probably isn't a big deal?
These questions come alongside the already stated "OHHMYGOD" that I simply can't find another way to say every single time I see more pictures
and the obligatory request:VIDEO!!!
-
3. And fuel filter I took it out and checked it and everything was clean and clear.
Since you found the tank to be full of rust and your gauge is after the filter, I'm sure the filter is clogged causing the low pressure situation.Joe
Not to bash on you, beebee, but this illustrates a point that cannot be emphasized enough. Fuel filters, at least OE filters on old fuel injected cars with high pressure systems, CANNOT be judged by a simple visual inspection. Unless you are backflushing it with some clear gasoline with some additives, you will frequently see BAD filters flow through pretty clean. I have seen filters that made me think "Well, that can't really be problematic, can it?" and re-installed, only to replace later because they sure were no good.
The fact that the filter has been filtering large amounts of particulate matter out for XX hours is one good reason to replace it, and Joe's point brings up another good reason. Chances are a presssure gauge placed inline between pump output and filter inlet would show good pressure, and your nice looking newish fuel filter is the obstruction point.
Change the filter; its got crap in it and you want to finish this job and say "I know all that stuff is clean and clear." Fuel system gremlins aren't the ones to ignore...
-
Twin 50mm/2 inch pipes there would give you just a hair less cross sectional area of a single 3 inch/75 mm TB.
Maybe more like 70mm.
Anyhow, the rough equivalent of the 60mm TB everyone likes to use would be twin 1.75 inch pipes there. (incidentally, thats a pair of 44mm pipes. Perspective!) Twin 1.5s is still more than the stock TB!
-
The round barrel thingy on the outside of the door is supposed to rotate into place in the "G-shaped" catch in the doorjamb. You need to rotate the barrel with a screwdriver while liberally applying your favorite penetrating lube/cleaner, and then OIL the mechanism thoroughly. You should also make sure the door is lined up at least OK with the other body panels, and try your best to eyeball the alignment of the barrel/catch plate.
There are two positions to the barrel; there is a good chance your barrel is stuck on only the first. I would recommend taking the door panel off so you can get a good visual on all of the mechanism and see if there are any loose tolerances you could tighten up. If nothing else, it would help you get a grasp on how it all goes together.
But I want to go back and add emphasis to using oil as a lubricant here: I put a door from a 72 or 73 240 onto the passenger side of my 75 280Z and drove it for two years, always having to show people exactly how to finesse the door ALL the way shut. I just pushed downwards a little in the right place while I shut with moderate force and it worked 98% of the time. All this time, I was under the impression I *had* used actual motor oil (or similar) on the thing. One day, on a lark, I had a tube of oil and decided to hit the latch. This was after the car was sidelined. To this day (4-5 years later) that door closes and sounds like brand new. It LEAPS into position at the lightest finger-force slam, and I haven't touched it since. Cha-KUNK!!!
-
I think I have to buy a better torch for this task
Torch is Always Excellent.... but never underestimate the power of the Deep Creep. I've only seen this stuff on the market for a bit more than a year now, so it hasn't had a chance to gain a reputation. I HATE hawking a product unless I swear by it.
Six point box wrenches are of paramount importance, and Beware Easy-Outs!!!!!!
The six pointers are less likely to round off a fastener head than a twelve point. Flare nut wrenches are also a must.
Just going over a couple points to make sure you've heard them at least once. Some advice merits being passed on even if it is redundant conversation.
-
Sea Foam Deep Creep
Makes PB B'Laster
Look like watered down Tab
Its about $8 US a can, but it is WORTH EVERY PENNY (or whatever Queenly copper coins you canooks use
) and it lasts longer than PB or WD-40 because you use very little of it at a time.Keep it up, man!!! It can't rain all the time, right??
-
WOW did that ever come out nice!!! Good work!!
-
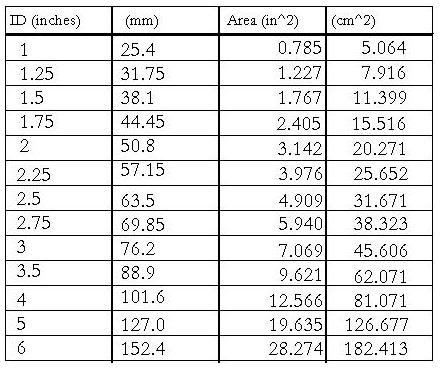
This calculator is the absolute BEST, and although I think I have thanked you in the distant past, Thanks again!! I always share the link, but never without recommending that all real hard parts be measured when choosing/purchasing components. Just a standard type disclaimer.
The L20A info is the only real problem I have ever seen with it, and as mentioned above, more selection of heads (although it IS easy to sub in your own CC volume figures) and possibly a wider variety of pistons and rods that may be relevant in certain sizes... But THAT is a project that can easily get rather out of hand, so I can see why you might want to keep the "noise" down to a certain level. All this is speculation; my bet is that adding much more by way of piston/rod selection to the dropdowns, you start losing simplicity through complexity.. Feature Creep.
Maybe having a link to a page with verified figures for a broader selection of various manufacturer, OEM rod and piston specs? Just for reference, so the user could plug in these values. That puts the data there (if you have the resources to collect it.)
I don't have any tables like that bookmarked or otherwise handy, but i know they have come up in several threads. If you are interested in expanding this aspect, and no one else chimes in, I'll start digging through my subscription list and find some tasty morsels.
-
Step change is only going to affect you if the rings run over the gap...
Outside the box, gentlemen, please! LOL
so the moral is, chop a 90 mm section off the top of one F54 block, then take another F54 block and knock the top 75mm off of it, so you can run a 3.1 liter stroker (or better) at 89mm bore or less with longer rods?
-
I'd be ok with any diff that allowed me to cruise at 70mph or better at less than 3k.
my 280Z has a 3.54 in it, and in fourth (1:1) it was right about 3-3200 for 70mph.
 That is what this thread is all about right there!!!!


ok, what do you make of this???? HG Failure....
in Nissan L6 Forum
Posted
wow, what a thread!! Bookmarked!