

Geking
-
Posts
147 -
Joined
-
Last visited
Content Type
Profiles
Forums
Blogs
Events
Gallery
Downloads
Store
Posts posted by Geking
-
-
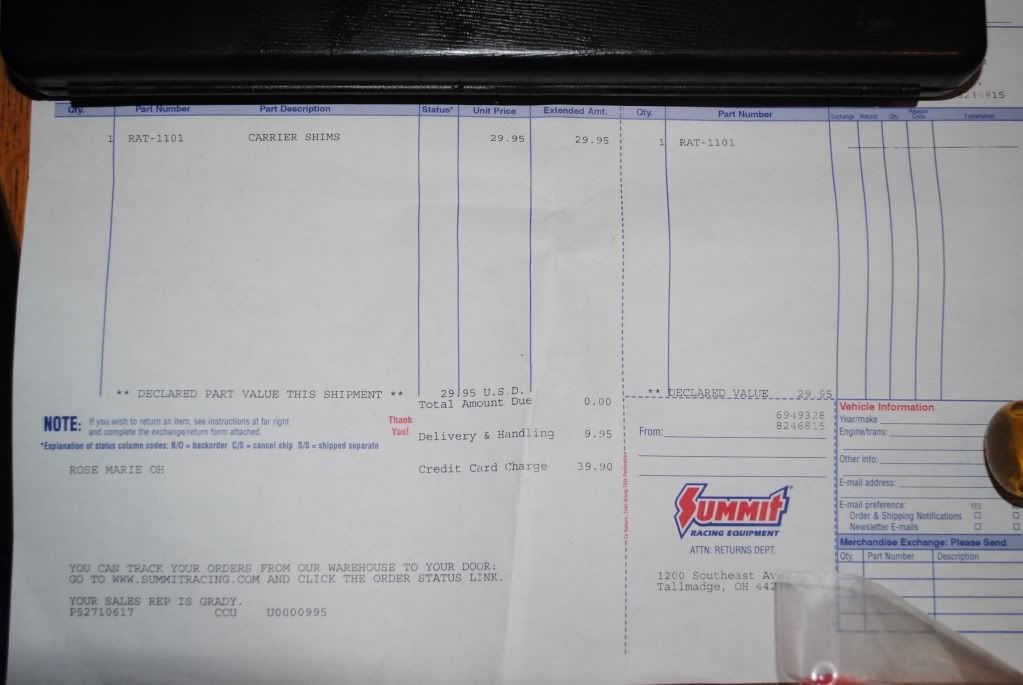
per the last few posts of http://forums.hybrid...n-differential/
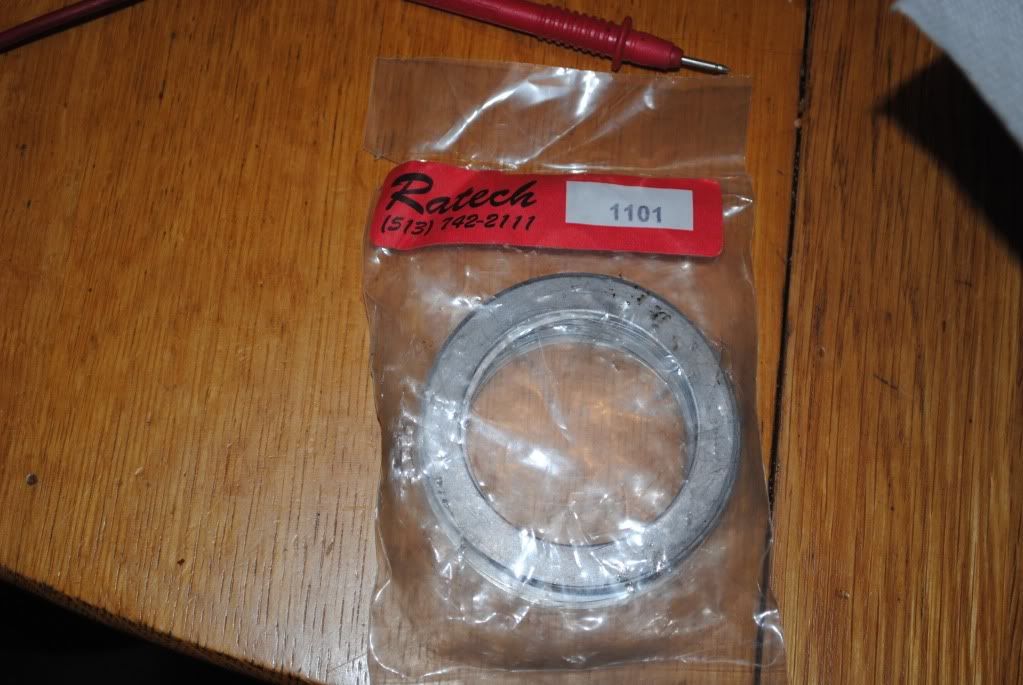
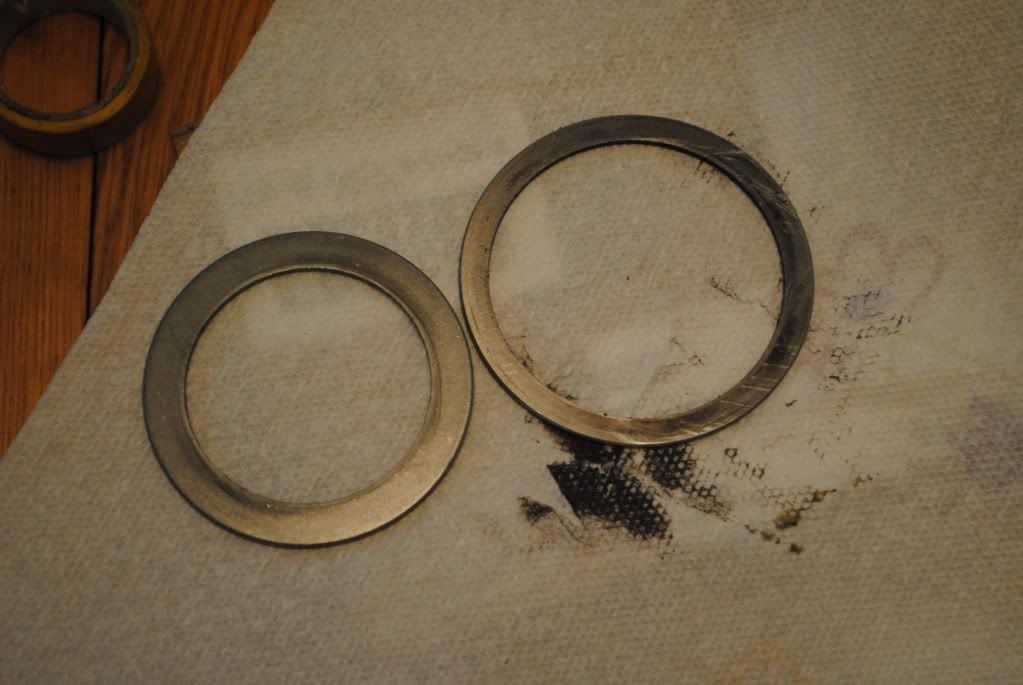
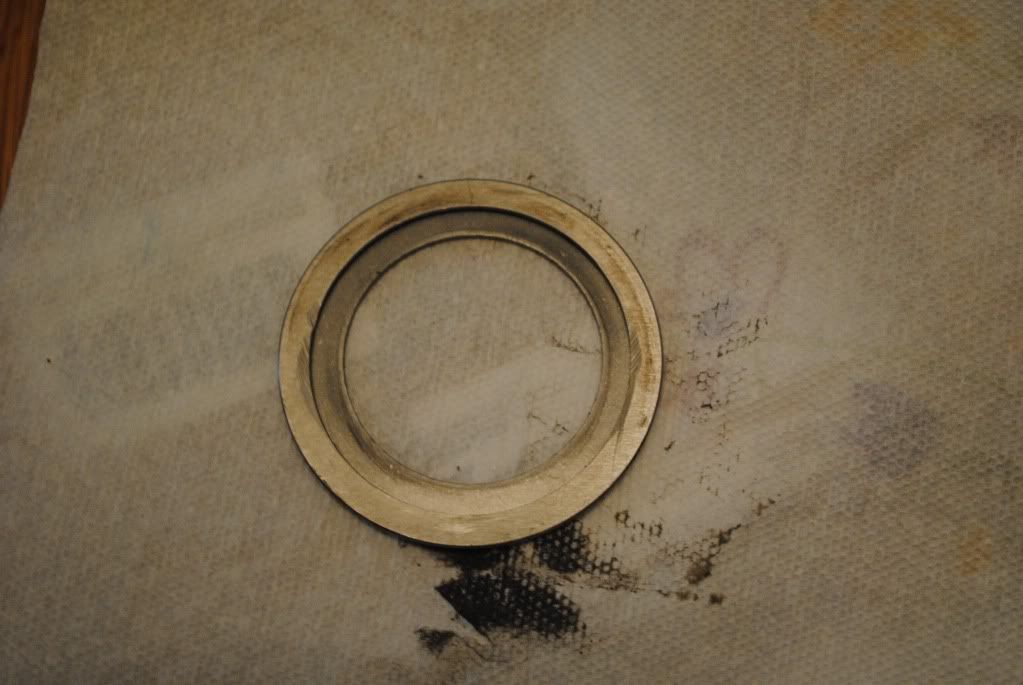
I ordered the GM 12 bolt shims
As I have not found anyone else posting definitively on whether or not these will work, I thought I should.
packaging

The Nissan shim is on the right.
partnumber from summit.
It includes 4 X 2.5mm shims, 2 x .5mm, 2 x .4mm, 4 x .3mm and 2 x .23mm shims.
-
I have a 94 lt1 with the MAF sensor. I bought a custom Harness with a chipped ECU from a guy that had a 93 lt1. Is there a way to install the MAF sensor into the new "custom" harness or do I even have to use the sensor? I did search but got tired of reading the same info.
I can ship you my old map if you want
-
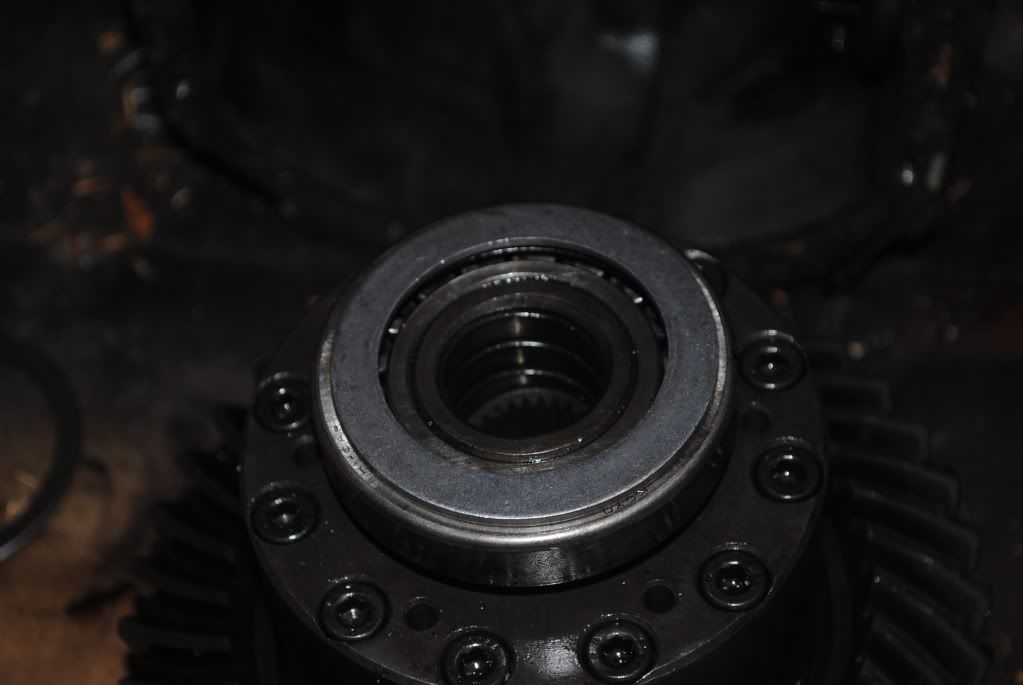
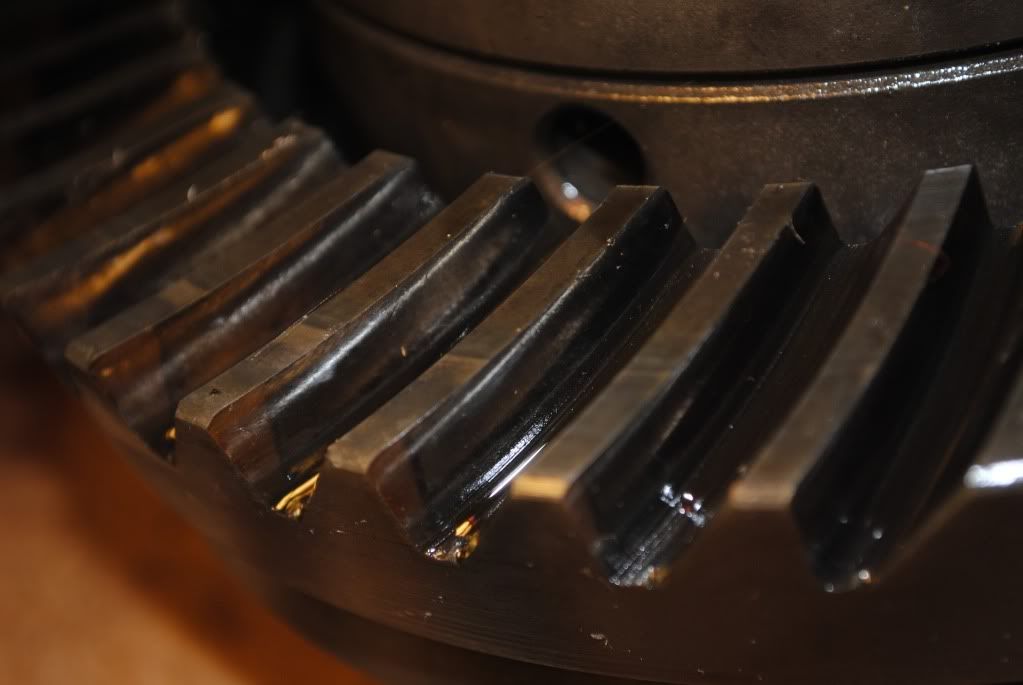
I got home and took some photos. I guess I did not notice it before, but there is some wear on the gears. Notably on the flat side of the ring gear teeth and the back of the pinion gear teeth.
Is it too bad? Should I call this one parts?
EDIT:
Looking at the pinion gear, it is not as bad as it looks. Because the dif got hot, the carrier gear has black crud on it. The extremely shiney parts are just lacking the crud, there is no noticeable run out or wear, at least in my opinion.
-
Well I've got an open 3.54 that came in my car laying around if your current one is buggered. It's priced well below $150
I might take you up on that, thanks!
When I get home tonight I will upload a high res closeup of my ring gear and possibly one of the pinion if I can figure out how to get a large camera back in there to take the photo.
Thanks again all.
-
Thanks guys, Lowcarbz, I am not a car noob, just the first time doing something like this.
I guess I could get a new diff, but I think it would sit as a spare. I do not think that there is anything wrong with my current ring and pinion gear set as they do not show any wear, no extra shiney parts. I did not wipe all the old oil out the first time round, i only got a little magnetic sludge on the plug. If you guys want I can take a closeup picture of the gears.
What do I have to lose by trying to shim it myself besides the time? Especialy if I am getting suggestions to buy a new R200. Besides, if I have messed the diff up beyond the point of repair, all I am doing is learning for the next diff, so I don't mess up the new one if I need to do work on it.
In short, I work on my car to unwind after a long work day, so I don't mind doing things like pulling the diff. I have spent more time working on the car than driving it, it is a hobby to me, not a project.
Jmort, I followed the guide in the FAQ. I read in that thread that the backlash realy does not change, so I ignored the 2 steps about that. Boy what a mistake.
-
Are you talking about play in the ring and pinion gears? [Please be specific when describing your problems
]IMO, It might be best to bite the bullet and let the shop handle it if you don't have the proper tools.
Yes, I played with it some more. I swapped the driver's and passenger side spacers leaving the large spacer on the passenger's side. This allowed the pinion and ring gears to turn a little better as this moved the ring gear .08 mm to the driver's side, as I really do think the pinion and ring gears are binding due to being loaded.
Oh, I agree on the shop Flat Black. My plan is spend under $50 in tools/spacers, do it as well as I can, then even if I think I have it right, get a shop to check it out. I won't learn if I don't stick with it.
Please excuse my noobishness in this area, as I have not rebuilt a motor, trans or diff before. (essentially anything requiring precise measurements)
EDIT: by spacers I mean carrier shims.
-
Update, I spun the shaft while tapping it with a hammer to reseat the circlip. Then, using my biggest hammer the stub axle came out.
Now to address the cause of the issue.
I can not get the diff to spin freely if i tighten up the driver's side carrier cap. This could be caused by a backlash issue, as I do not know how to check that, I think I need a magnetic based gauge, like in
I have absolutely no play in the gears as I tighten it up, so I guess that could be my problem.
Thanks in advance for your ideas.
-
No, I botched it all by my self.
I later tied it between 2 cars and gave it quite a good jank that way. I can bash at it through the center of the washers. My thought is: the ring gear is not seated properly on the carrier and thus is giving friction on some turns. At other points of the axel rotation it spins smoothly.
Yes I put oil in it, and the oil I drained out was black and burnt after only 7 miles. Goodness burned trans oil makes normal trans oil look like perfume.
-
Sorry, the stub shaft will not come out, I did install the circlips, but one might have goten a little bent in the install, maby that is what is giving me a hard time. When I pulled with the come along I had the dif to the Pontiac and the Ujoint where the stub axel is to the come along (to a buick)
Right now I have the diff and the driver's stubaxel with the halfshaft attached out of the car and on the ground. I did have to completly let the drivers LCA out and loosen the 3 upper strut nuts to let the suspention swing out of the way.
Thanks guys.
EDIT-yes, I flipped the gears/replaced the washers in the diff per Trumpet's writeup. I did put the circlips on the inside part of the gear, sio I got the right gears flipped the right way on the right side.
I am in Burke/Springfield on Burke Center Parkway/Lee Chapel.
-
oh ok so the info ive been reading from other sites must be unreliable which is good to know. ill stick to this site from now on. and so since its not lsd both wheels wont spin in the same direction when off the ground correct? and when you mean direct bolt on you mean the unit itself will go into the r200 casing? sorry for the newbness im trying guys. lol
Both wheels will only spin in the same direction if the car is out of gear.
Yes, you will take the cover off, undo the 2 caps on the sides, pull everything out, take off the ring gear, press bearings onto the LSD carrier if it does not already have them, put the ring gear on the LSD, then reasemble.
There is info on how to swap an LSD into your dif as well as what a LSD diff looks like in this subform.
-
that depends. Why do you think you are getting too much pressure?
Can you verify this before you throw a part at it?
If you do have too much pressure and you are flooding the carb, it would get terrible gas mileage (worse that it should, no such thing as great with that set up) it would run like crap at idle and cruising as well as the gas would flood the carb.
It could be that your accel jet is too big, or are you sure that it is too rich? My 73's webbers are not tuned properly and it stumbles when I punch it due to being too lean.
-
There are two major types of heads that are on the LT1. If you have iron heads, you have strait sparkplugs. If you have aluminum heads, you have angled sparkplugs.
That being said, ANY CHEVY SMALL BLOCK headers with tolerances for the right kind of sparkplugs will bolt onto your motor. As far as getting that to clear the rest of the car...
I have iron heads, so I used
-
I have to come out and admit it, I screwed up.
I installed an OBX H LSD in my R200, and a few problems have come up because of this.
First problem was the pinion shaft became hard to turn, and if the car was driven on this, the diff would heat up. (only drove it once)
So decided to pull the diff back out and take a look. The problem is, I have broken a screwdriver and a crowbar trying to pull my halfshaft out. I even tied it to a Pontiac Aztec and used a come along. I ended up pulling the 4 wheel drive SUV in park.
Am I stuck, do I have to buy a new r200 or do something as extreme as cutting the half shaft off then grinding it down, then buying a new OBX carrier gear?
Thanks.
Rob
-
Heres an interesting one that i couldnt really search.
my blinkers have not been working for a while. so i decided to buy a new electronic flasher, and another fuse. viola it works.
the only down side is that when you blinker left or right, ALL of the lights come on, just like the hazards.
btw hazards work fine.
Any input will be appreciated.
thanks
Please search, this is on the top of the page as a sticky in the electrical form.
http://forums.hybrid...-signal-system/
EDIT Typo
-
Hate to be so difficult, but it is worth what people are willing to pay. Where I live that would be gone in a week, in CA not so sure. I think you need more info like a personal inspection or very detailed pics of the frame rails.
-
oil consumption: search, may require a rebuild, may be something already covered.
Gas smell, common on these cars, again search, may require a new hatch gasket
Rust, search
shifter, search for new bushings
Looks great and it seems to be quite a steal for only $1700. I payed $700 more for mine that makes yours look like cherry off the lot car. (Mine had 4+ colors...)
Good luck.
-
I had the same issue. Wirebrush, rust converter, a paint like por15, then some body seam caulk to seam it up. I made life more difficult for myself and I did not remove the cover. I did find that a drop light up top and working from the bottom made it easy to find the holes.
This was 3 years ago I did the fix, still holds water.
(I park my car on the street outside of the garage. With the care that people in my house take, I actually get less paint chips and dings on the street.)
-
Looks great, from what I can tell you did a fantastic job painting the beast.
-
I have disconnect all the wiring to the SAW coming at the 37 pin connector and it is still floating at 5V at the MS. To test them together will be difficult unless I set up a complete test bed like BRAAP did and I think he was just running the EDIS with out the MS.
Ok then, I suppose it has to be a configuration problem. I am not sure what the scope will tell you that the EDIS page in the megasquirt form has not already said(also, I have no time to do it this week). Have you tried reflashing the firmware, then make a fresh msq incase there is a config problem?
Here is what we are assuming.
1.Megasquirt is working properly. (you had someone check the hardware out)
2.Wiring is not shorted
that only leaves a configuration problem imo unless the hardware tester did not test pin 36. If the signal was too messed up for megasquirt to send a reply signal then MS would not even pick up a tach, thus not firing the injectors.
EDIT: Seeing as I run MS2, not 1, I had not looked into what it would take yet. Here is what I have found. Is your LED closest to the serial port blinking when you run the car? If so then chances are your solder connection to the LED has come loose as it looks like it is used to control the EDIS module. If not, then do you have your system set up as http://www.msextra.com/doc/ms1extra/MS_Extra_Ignition_Hardware_Manual.htm#edis describes?
-
Car Stats:
3.1L
Mustang SVO 32# injectors
Lonewolf Intake
Header
60mm TB
EDIS
Head P&P
Stage 2 CAM MSA
MS1 V3.0 029y24
We had the car running fine for 10 months and one day the customer comes in with a bad exhaust leak, he had blown out the manifold gasket when he had a big backfire. We replace the gasket and the car ran but with little power. Like it was in limp mode.
Checked the msq and it was the same downloaded new firmware, checked all connections, in fact at this point the entire MS installation was taken apart and rewired.
Had the MS1 checked out by a third party MS repair shop and they said it was fine. Still runs like crap, get the scope out and check some things and find we are getting no SAW signal. PIP is there a 12v Square wave but no SAW. What I do seem to get is one pulse when we try to start the engine but none after that. I take the unit out of the car and check it on the bench with a stim. On the bench the MS gives an SAW signal but not in the car. At first I thought something may be suppressing the signal so I disconnected it at the relay board and still no SAW. I checked at the 37pin connector and no SAW even though it was getting a PIP. I did notice one thing, there is a difference in the waveform in the car vs on the bench. On the
bench the PIP and SAW are not a square wave form like it is depicted on the
MS site, they are more of a spiked signal. When the unit is in the car the
EDIS PIP is more of a Square wave like on the MS site.
On the bench the PIP and SAW wave forms stay at 0 volts and spike to 12v and 5v each. In the car the SAW sits at 5V not 0, so it is not shorted out to ground.
We have tried multiple ECU's and EDIS control units and coil packs with no success. So I decided to throw this out there hoping someone would know why the it works on the bench and not in a car that it worked on for ten months and suddenly stopped. What could cause the SAW signal to disappear, why is the waveform different in the car vs the bench. What should the signal look like. I don't have any other EDIS cars in the shop to use as a comparison, so if anyone does and has a scope could they look at their SAW and PIP and tell me what they look like in a running car?
Thanks
I have a multichannel scope and will take a look when I get a chance with my MS2/EDIS setup (mine will be slightly different as it will be a v8)
Something that strikes me as odd is, the board holding at 5v. Have you tried removing the megasquirt and see if the 5v is still present on pin 36? What about if you have removed the EDIS module as well, so that you only have the wiring harness? I just get the feeling that it is a problem with ether the configuration in megasquirt so that it is not sending the signal, or that the wire is shorted to a 5v signal.
Also, what happens when you bench test the EDIS and Megasqurt modules together?
-
Only the 77 and 78 have the bolt hole in the rear strut tower for the seatbelt. I suppose you could just drill out a hole and weld a nut...
-
Ok i see what true side pipes you guys r talking about but I dont want my pipes to run down the side of the car.Just want the ends to come out the side.I understand there may be a issue with grroung clearance but other than that it seem to work well.No worring about burning your leg or running a heat shield.
Wow, that is quite a car. How much of the dogleg needs to be cut away for that to work? Worrys me a bit because that is a very structural part of the car. (I see above car has a full cage so not a problem, but without a cage...)
-
Just a thought, maybe you should throw something over the inside of the doors just in case in some freak accident the glass shatters you won't get blasted in the eye with glass particles.
I got the impression from the photos that they where plexiglass.
-
Just got the BlackDragon harness in the mail and I'm a bit dismayed that the plugs are totally incompatable and there's only limited instructions on the back of the box.
I'm going to keep it because I don't feel like sending it back and waiting but I have no idea where to start cutting and splicing. Hell, I don't even know how to get the darn headlights OUT.
Does anyone know of a link with specific instructions or care to help a new guy out?
Under the fender there are 3(I think 3) screws (Phillips) that hold the bucket to the front of the fender.
Then there are (I think again) 3 screws that holds the chrome light retaining ring. Be careful as there are 2 other screws that if messed with will throw your headlight out of alignment.


repairing rusrty roof
in S30 Series - 240z, 260z, 280z
Posted
depends on how bad it is, and to what level/amount of cash you want to restore your car.
For me, I put fiberglass over pinhole rust. Anything that had a hole bigger than a dime was cut out and a new piece welded in.
Some people would say that I cheated by using any fiberglass, some people would say that I went overboard by not just using fiberglass on my floor pans.