

Geking
-
Posts
147 -
Joined
-
Last visited
Content Type
Profiles
Forums
Blogs
Events
Gallery
Downloads
Store
Posts posted by Geking
-
-
Mounting the V8 in the car does not need the plates you are talking about.
Jags that run makes a book and sells a kit that allows you to bolt to block (at the stock motor mount points) to the crossmember. I think I have pics of it in my cardomain ( I do, passengerside of the LT1 motor, first V8 pic http://www.cardomain.com/ride/3850338/2 )
Getting the bellhousing out without pulling the motor in this swap is tricky. I have to remove the passenger side exhaust manifold, unbolt the passenger side cross member, loosen the driver's side cross member, support the motor, jack the car up from the passenger side until you can access the upper passengerside bellhousing bolt. Also, if you go to the T5, look for the T5 pull type slave cyl thread.
Good luck
-
I have been looking into the camaro radiator swap from the JTR kit and I think I found something that will work. I came across a 1988 firebird trans am that has the 305tbi. It has a radiator in good condtition and was wondering if this would fit my needs. They appear to be pretty much the same cars but I could not find anything about them being the same so any help would be awesome.
I am no chevy guy, but the Firebird and Camaro where the same car, same frame at least (f body)
Notes I have found in my swap, 305 sucks, good cooling set up can use the stock datsun radiator if careful.
-
Where else should i be looking?
According to the 'How to restore your Datsun Z car' "anywhere metal"
The cowing box, behind that side effect/running board at the bottom of the fender, the inside bottom quarter panel where the muffler sits, the 2 little cross bar tabs on the floorpan frame rail, go ahead and give a good pull on them, most times they rip off, the corners of the motor bay TC rod frame rail, where they end at the rear of the motor bay.
I do the old screwdriver stab trick, just get under the car and stab away with a screwdriver, just hard enough that it does not dent the metal. The undercoating hides lots of thin/compromised metal.
Good luck on this one, no obvious rust in the picture.
-
Inquiring minds want to know.
Please give us any details on this, installation details, wiring changes, computer tuning, what's needed and were to get it?
How much more work is involved VS swapping out your Opt-spark every season.
I personally have not had any problems with my GM Opti with the MSD cap and rotor but I only have about 900 miles on it (Knock on wood).
My Son's Firebird is on Opti #3 but my friends LT1 Caddy has 180K and still running on the original Opti in New England weather year round
Ok. You need:
Megasquirt 3 board - $250- http://www.diyautotu...d-kit-p-59.html
Megasqurt 2 ECU - $90 - Same place
36-1 trigger wheel $30 - Same place
EDIS System $around 50-80 Ebay EG-http://cgi.ebay.com/ebaymotors/Ford-EDIS8-EDIS-8-Module-Coil-36-1-Wheel-VR-Sensor-_W0QQcmdZViewItemQQhashZitem439ecd642aQQitemZ290427069482QQptZMotorsQ5fCarQ5fTruckQ5fPartsQ5fAccessories
OPTIONAL: http://14point7.com/...W_7S/NAW_7S.htm - yes this interfaces to Megasquirt and alows Megasquirt to autotune.
to wire the Megasquirt ECU

For info on how to hook up EDIS to Megasquirt:
http://www.megamanual.com/ms2/EDIS.htm
Basic Tunes are in this thread
Also, How TO on tuning:
http://www.megamanua...begintuning.htm
I never swapped out my optispark, I assume it would be a pain seeing as you have to remove the water pump and crank (EDIT: PULLY) (or atleast it appears that way) to get it out. I am a student electrical eng and I found it to be VERY simple, but I do work in the computer/electrical field.
My feel is, if you where able to interface the GM wiring harness to your datsun and you know how to solder, you can do this.
EDIT: Ok, so not well under, but around. It is less if you do extra work to pay less like I did.
-
I have access to a BW49 that came out of a 95 camaro 3.8L. As far as I can tell its the only 5 speed for 95. Is that usable on a 94 lt1 with out mods? Or would I have to get a different bell housing?
I did a search and nothing came up for the BW49.
I am pretty sure that the V8 and V6 use different bell housings.
-
The starter freespools, like i put power to it and it just spins, doesn't engage. I will double check tonight and take some pics for you guys so you can "see" what i'm dealing with. I didn't go by atlanticzcars instructions, i just put a fuse in line from the starter pos to the white power wire on the frame rail, and hooked bat pos to that.
So if I understand you right, when you hook up the battery to the starter, while not turning the key, the starter spins but does not crank the motor. If that is the case:
There are 2 bolts and a blade connection on a L series starter. One bolt is the + from the battery.
One bolt is the + to the starter from the starter solenoid/relay
the blade is the trigger for the solenoid/relay.
Sounds to me like you are hooking up the battery to the wrong bolt on the starter, so that it is bypassing the solenoid/relay and going right to the starter motor.
The purpose of the solenoid/relay is to move the starter gear out to engage the flywheel then to provide power to the starter to crank the motor, so in your case the starter gear is staying in the retracted position and is not controlling power on/off to the starter motor.
EDIT: Your starter does not have a fuse between it and the battery. The fuse is between the +12 lug on the starter and the car's harness source for +12V
-
I hate to bring up something that I am sure you all are aware of, but my LT1 only uses the OPTI to cover the hole in the front of the motor.
I am using a 36-1 gear that goes to a Ford EDIS-8 Spark computer and Megasqurt.
Total cost is well under $400, so it is comparable to an optispark.
Advantages: better tuning, coilpacks, more open to work on, no optispark
Cons: more work to set up.
Just a thought.
-
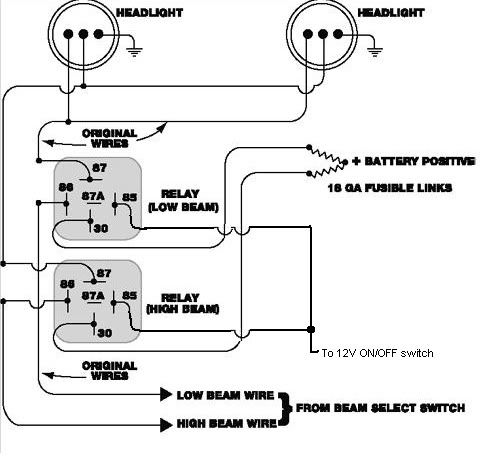
It's a Relay.
Use the diagram as a Guide. If you don't know how to wire it so it works.....
You need a basic education on electrical circuits.
Ya, I know. BUUUT I bet someone out there would try it and then say it does not work. There are some people that are completely clueless when it comes to electrical stuff. I have a friend who is a board certified Anesthesiologist who can not wrap his head around how to wire a light switch in his house.
So, I played with MS Paint
[/img]EDIT: While I am being so precise, I should point out the 12V on/off switch is the headlight on/off switch.
-
I don't know, I don't understand why people make roadster S30s, as it gets rid of the best visual part of the car. It just kills the lines and turns it into a brick in my opinion.
-
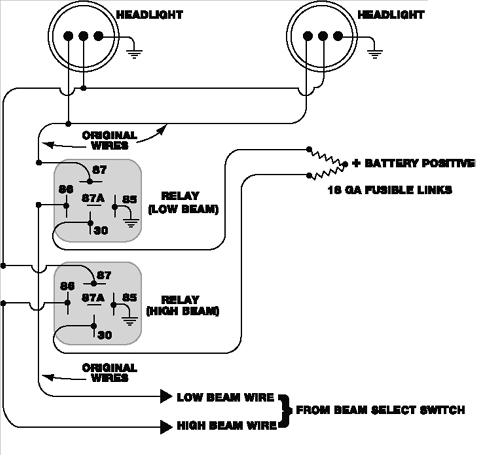
Get 2 bosch 30 amp relays and make your own.
A very basic and simple circuit.
That diagram will not work.
The 280Z headlights turn on and off the 12+ and switch the grounds for high/low, so you have a 12v input and 2 grounds, one for low and one for high. If you do that, the lights will never turn on because the relays need 12+ to activate and they only get ground.
-
I tried searching, but I just can't find the cheap ideas thread that describes how to modify cheap parts/where to get cheap parts for S30s. I am not even sure it is not in Zcar.com
If someone could kindly post a link to it that would be great.
Thanks.
Rob
-
I just pulled my front and rear bumpers. they are both in decent shape, but the moldings have some cracks and one of the front ends is broken.
I am not going to be replacing them. Are the rubber parts repairable and someone might want them? Are the bumpers in demand at all? I don't want to store stuff that is just junk...
I have not removed the bumper shocks yet. I was wondering if anyone has ever custom made bumpers that mount right to those? I thought if taking my stock bumper to a metal shop to see if they could using the stock mounts make something that mocks the 240 bumpers or something similar.
The swap has been covered before. Datsun Spirit (page no longer loads) sold brackets that made 240z bumpers a bolt on, both front and rear. The page is not loading any more, though.
As far as the parts, if you have the space to store them, why not. No point in throwing away good parts. I was actually able to sell the rubber end units of the rear bumper to a college kid that got rear ended. I ended up throwing away the actual bumper part, but it had rust holes.
-
OBX LSD - 395 (shipped)
Obviously I am going to need to make a little better of a list. Basically I need to figure out where I am at and how much it is going to take to get this thing on the road. I have wheels and tires so that is not on my budget right now, what I have works so what I have is going on. I will get some money back from crushing the rust bucket that dreams of being a car in the driveway. I need to post some stuff up for sale as well. Anybody need 280z interior parts? Cheap, don't care just need the extra money.
Good luck on getting it done in 2 months, alot of work ahead of you. What you have done so far looks great though. Nice rust free frame.
Hey, I have heard bad things about the OBX LSD, but only from Honda Guys, what is your feel on it?
Also, PM on the parts.
-
Okay, first it seems as though you have 2 seperate issues.
1.
Your starter is wired to run whenever power is applied, regardless of key position. There are 2 wire connections on the starter. One is the + directly from the battery, while the other is the signal wire (smaller with a blade type connector) from the ignition key. It sounds like both terminals are getting power, spinning and draining your battery.
2.
You are looking at the wiring diagram for a 71 Z, right? They had externally regulated alternators. My guess is, when the PO switched motors he upgraded to the internally regulated alternators. I beleve they had 4 connections, a + Lug that went to the battery(white red), some ground connections, then a blue and a white red in a little t plug, whitered also went to the battery. The blue (may not be blue for you) activation/charge light wire. The 2nd wire is keyed to run, so that when the car first starts up it draws power to get the magnetic field in the alt going. This pulls power and would turn on a brake light and a charge warning light in a 78 280Z (only S30 with that alternator, note, this information is FOR THE S30, NOT THE S130 Alt. I don't know anything about S130). As soon as the alt started to make power it no longer needs that electricity so the line goes back up to 12V(no load over a resistor means no drop) What you need to do is:
A: find out if it is the internally or externally regulated alternator.
B: if it is the externally regulated alt, put a 1 watt or more 4-15 Ohm resistor on the signal wire of the alt, and connect the other end to switched 12V Run only
More information would allow us to give you better feedback
EDIT. I THINK that the 78 alt is the same as the 280ZX alt, but I am not sure.
-
Kool thanks Geking you have pics of your install?
Yes, I do, but they are old early photos of a while ago. They also have alot going on in them, so I don't know what they are worth. (Bottom of http://www.cardomain.../ride/3850338/4 has 2 pics)
Let me know what you want pictures of and I will be happy to take them. Oh, some more LT1 notes, the gauge temp sensor(one with the bullet connector) can screw into the passenger head coolant passage between 6 and 8, just seal it up with a bit of silicone. Also, the Oil sender can screw right into where the Chevy one is.
You can make a power steering delete pulley quite easily. Just remove the pulley off of the PS pump, remove the 3 bolts holding the plate to pump. Now you can take a pulley from a serpentine belt tensioner and bolt it to the very left power steering pump to plate hole on the plate. You can adjust how far the pulley sticks out with washers, and move the pulley around a little because the bolt will not be as big as the hole in the pulley. You actually want to push the pulley in towards the center of the plate when you tighten it all down to make sure the belt won't rub. I used the same size belt with the power steering and this mod
The alt will be a CS130. It will have SFLP labeled on the connector and on the alt. You want to connect the S to the battery, and the L to a 250ish ohm resistor, then to a switched on 12V source.(I used the injector rail for mine. I tried to use the blue wire that is hooked up to the charge light in the volt meter and it blew out the alt as I tried.) Oh, and the big lug goes to the battery as well (obviously)
I had a hard time with the ac delete pulley. The first one I bought was not as labeled, 2nd one would not fit as the pulley was sticking down and out. so I had to flip the bracket over so it faced up and out and bolted the pulley to it backwards. This required a 1 inch shorter belt. (tip on belts, the last 3 digits on the belt number are the length eg 630 is 63 inches.)
The chevy's require different starters for the different sized flywheels.
The aluminum headed LT1s use angled plugs, Iron heads use straight plugs. Some heads will only will fit one spark plug style.
Let me know what pics you want, what info I can give you.
EDIT: BTW, are you Skittle from Zcar.com?
-
when you say all the other lights, I assume you mean the headlights/running lights/turn signals. The headlights and running lights are controlled by a switch that is on the top of the right cluster on the steering coloum. The turn signals would most likely be due to the hazard light switch being gummed up. If switches sit for a while the contacts get oxidized and no longer conduct electricity. You can try switching them on and off a bunch of times, and if that does not fix it you can take them apart and clean them.
-
a 71 CSB will have a two piece rear main seal. I believe it was 86 that they swapped. You can use a T56 on any chevy small block as long as you get the 92-97 LT1 trans and bell housing, no adapter needed. The one piece/2 piece deal differs in the crank, (I beleve block) and flywheel, not in the bellhousing mounting position. I am using a 70's LT1 Vette bell housing with my 96 LT1 and 87 T5. Runs strong, though without any sound insulation I can hear the 11" clutch start to feather and hear the trans spin up. I would recommend going with a 10" clutch for better ground clearance.
-
On that note does any one know where I can download a FSM for a 1994 camaro z28? That way I can start figuring out how to wire up my datsun harness to the stock lt1 harness.
May not be exactly what you are looking for, but I found the shoebox site http://shbox.com/1/4th_gen_tech1.html
-
I am finishing up my LT1 swap.
I used a T5 5 speed manual. (you probably want to get the tremmic 5 peed or the WC t5) - If you do this, look for the thread that has the pull type slave cyl writeup. Saved me a lot of time
I used megasquirt 2 with Ford EDIS so I did not have to mess with the evil that is optispark (the front mounted distributor)
when you fill the LT1 with coolant, make sure that you fill it to the top in the thermostat housing in the top of the water pump.(or drill some small holes in the tstat) otherwise the air bubble will prevent the tstat from opining. Oh, and you can also get away with the stock radiator as long as it is in good shape and you get something like the ford tauris (sp) fan. While we are on cooling, the tstat goes to the lower right opining in the radiator and the other hose goes to the top left. A ferio LT1 site has a good drawing as of how to hook it all up. (shobox or something like that has alot of good LT1 info)
be careful what ac delete pulley you get, as some on ebay are not as advertised and they hit the frame rail.
The throw to open your Throttle body and the throw on the stock gas pedal (at the little ball) are 1:1, just hook them up with a bicycle brake cable and adjust the pedal stop to match
pulling your bellhousing when the motor is in the car is a real bear and should be avoided at all costs. it involves jacking up the passenger side of the car over the motor
Look in the Megasquirt maps for LT1 thread that I started a week or two ago for some good maps. Thanks again Z32 guy!
-
As I see it, if you are running carbs, the SOB only needs to make sure the starter and the ign work, and they are both painfully simple. Why not slow the (expletiver) down with something like http://www.mico.com/.../81-620-016.pdf
Watch him tow it or drive it somewhere with the front wheels locked.
EDIT: May not work for overnight parking, you might need to get a mechanical one for that so it does not drain your battery.
-
Looks more gray in the picture because the flash fired, but it's black.
I need to get the dustbuster out to get some of the R/C airplane detritus out of the carpet!
Looks nice, exactly what I want to do with my Z when I get to the interior. Too bad you are not in NoVa we could go flying. I take my foamies out in my 300ZX due to the bigger deck aria.
-
On a 78' Z the FI relays are under the black panel thing that the fuseable links are mounted to. Not sure about the 77's, I would assume they would be in the same location.
Some may say that the spring in the AFM has gone soft with age and needs to be tightend. This is done by popping the black cover off of it and tweaking the screw in the upper left a bit. Also would be a good idea to make sure that the throttle switch is not sticking to the idle position.
Good luck.
-
I have one that goes to the gauge but what should this be hooked up to?
Depends. What is in your car? In mine my FI system uses the front water pump port, while the head port (rear passenger side, but same difference) is for the gauge. I just felt like setting it up this way, no real must be that or must be this way.
In other words,
If you are using a carb with a manual choke, then you only need one temp sender(for the gauge.) If you are using FI you must have a temp sensor for that.
-
anyone know how to make the stock gauges for 280z run with ls2 engine?
For the tach, you can take six of the coil packs and run the - inputs together like in http://www.megamanual.com/ms2/EDIS.htm at the bottom of the page. If you do six, you will not need to re-calibrate the tach. (Note, I would recommend going 3 skip 1, 3, skip one, not 6 skip 2. This will smooth out the input to the tach.)
Not sure on the speedo, I assume it is an electronic output, sorry.
Oil and temp sensors, see if you can replace the stock sensors with the Datsun sensors. On my LT1 the oil pressure sensor and temp sensor screwed right into where the stock GM sensors sat.


Full on resto mod of a 240Z
in S30 Series - 240z, 260z, 280z
Posted
First off, your car is beautiful... A complete opposite of my car, as I did my resto/conversion on about 4 grand and it shows.
Second, I thought Peter Brock died in 2006, is this the same guy? Forgive my ignorance.