8DC
-
Posts
62 -
Joined
-
Last visited
Content Type
Profiles
Forums
Blogs
Events
Gallery
Downloads
Store
Everything posted by 8DC
-
Thanks for the replies... Ah well, it looks like it needed to be cleaned under there anyway... :/
-
"I think the driver's door on the Z needs to be adjusted... that should be easy enough..."

-
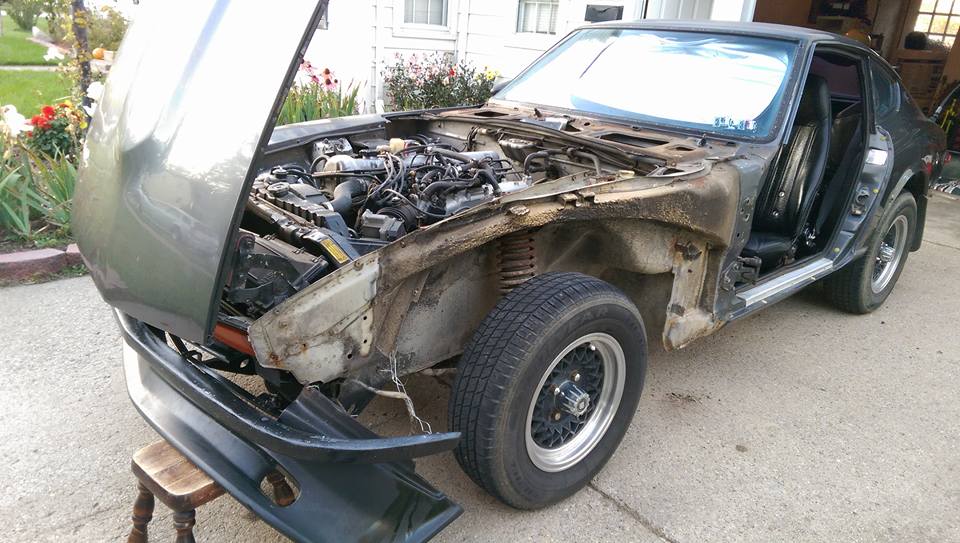
Tore the driver's door off intending to fix/adjust my hinges (the door was too low and dragging in the front corner) and now can't figure out how to get it back on and adjusted straight. Thread here if you can help: http://forums.hybridz.org/topic/123658-door-hinge-installationadjustment/
-
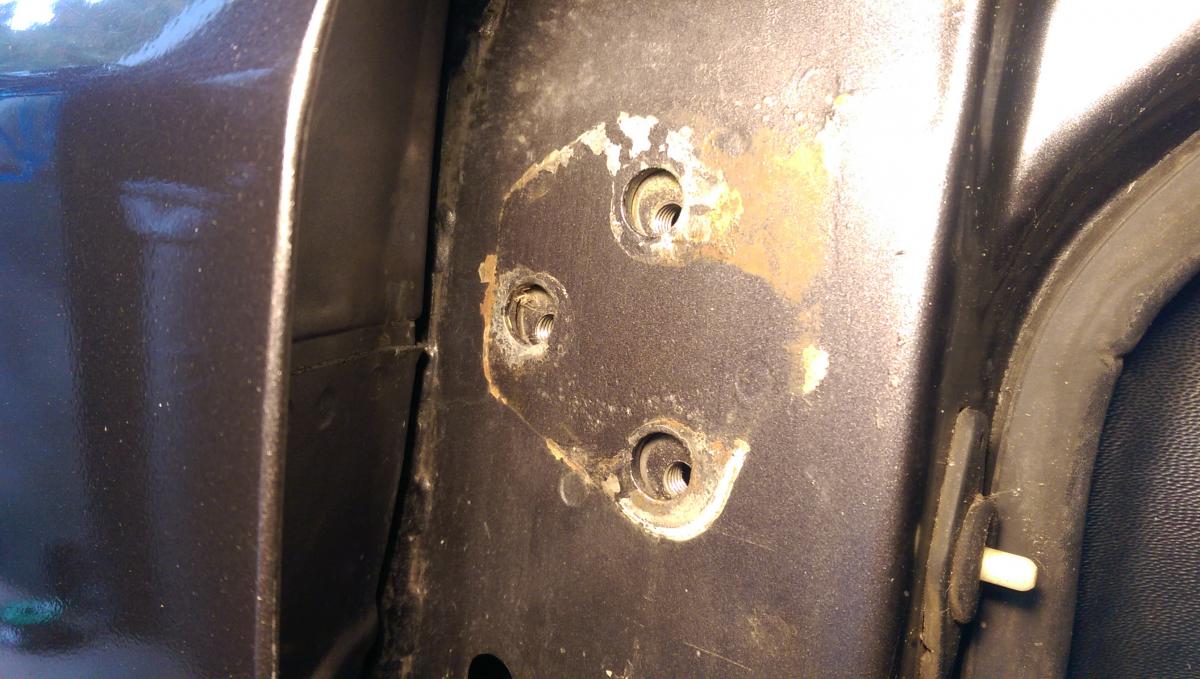
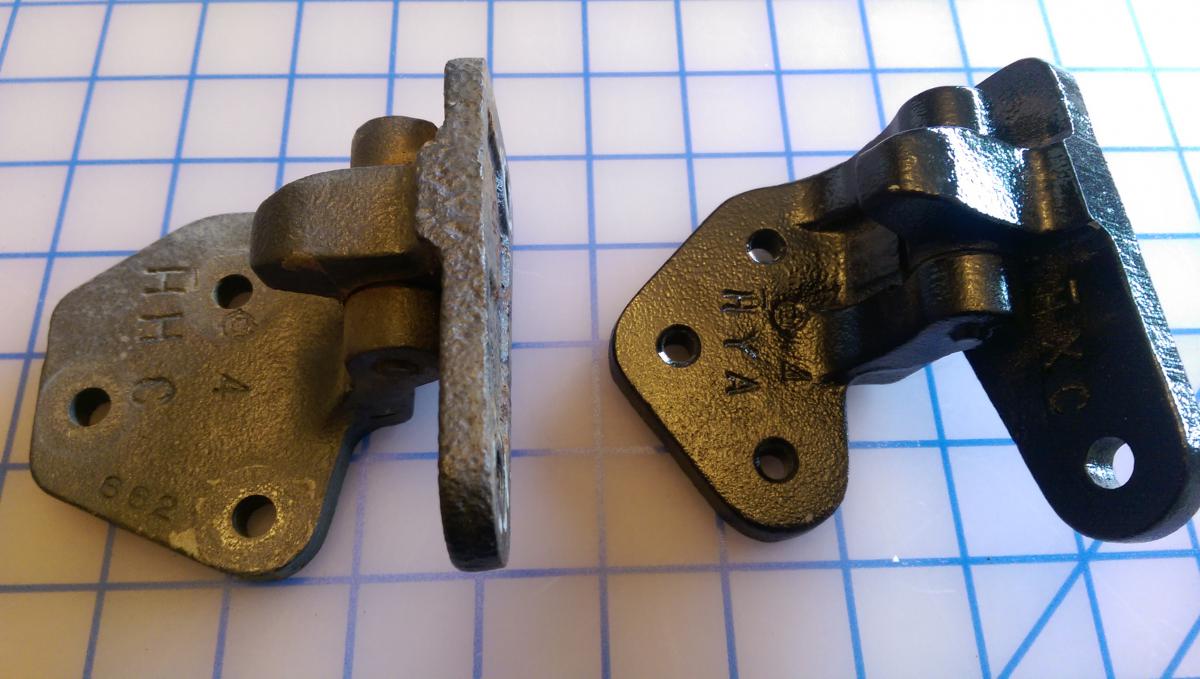
For clarification, here is the threaded plate on the car side: Left is the hinge that came off the car (unthreaded holes) and the right is the replacement hinge (threaded). Evidently 2 different designs (aside from the threading, the holes measure out to the same location in relation to the pin though), so my original ones are going back on for now but I need to know how to adjust them as the bolts seem to be unreachable with the door and fender in place.
-
How do you adjust the driver's door hinges if the bolts attached to the car run into a threaded plate? The only way I can figure out to get a wrench or socket in there would be to remove the fender (which means the headlamp bucket, vent panel under the wipers, etc. would need to come out as well) and that seems ridiculous just to adjust the door hinges. I see other door hinge topics mention removing the kick panel and going at them from the back side, which isn't going to work in my case because the threads go into the car, not into the hinge (like the replacement set I have and won't be using now that I see mine are reversed).
-
Thanks guys! Looks like my guess at them being some sort of interior fastener was wrong (hence why I put the thread here). ...and I suppose that would make sense as I also have fiberglass covers for the headlamp scoops in the box of parts that came with the car (a large box with all kinds of random bits and pieces)... not sure if I'm going to use them though. What do unpainted fiberglass covers typically sell for?
-
Have a small bag of 6 clips and matching hardware in a bag labeled "Datsun Z". They came with my '76 280... Does anyone know what they are for?
-
...so this happened today:
-

California versus Federal emissions? Distributor question...
8DC replied to 8DC's topic in Nissan L6 Forum
I would appreciate it, thanks! -
California versus Federal emissions? Distributor question...
8DC replied to 8DC's topic in Nissan L6 Forum
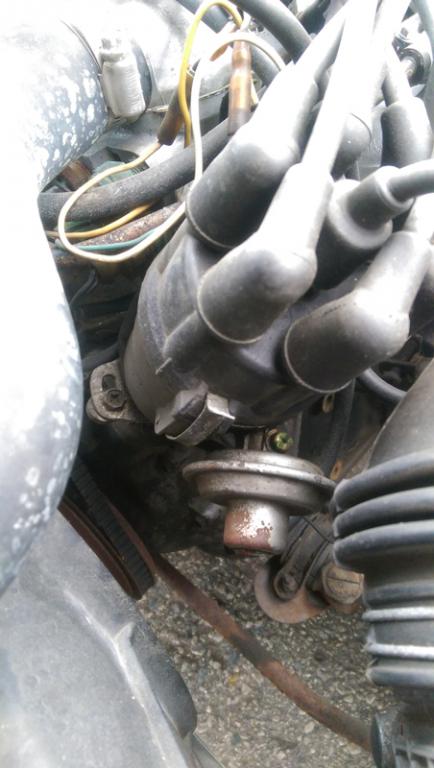
Ok, then how do I find out which ICM I have? ...and while we are on the subject, where do I find it? I thought they were supposed to be located on the side of the distributor in these cars, but mine isn't? Managed to get a shot of the stamping while I was out there too: I just want to know which distributor belongs on the car and where I can order it from.
-
How do I check if my car (76 280z, manual) came with California emissions? I always assumed that it was Federal emissions (no cats; spent it's whole life in the northeast and michigan), but today I went to replace the distributor and the one on it is stamped D6F4-03. Can a California dist. be run on a Federal car? ...and just to double-check: D6F4-01 = Federal Emissions, Manual Transmission, dual pick-ups D6F4-02 = Federal Emissions, Automatic Transmission, dual pick-ups D6F4-03 = California Emissions, Auto and Manual, single pick-up The shaft in mine is wobbly and needs to be replaced, the car also doesn't like to rev past 3500-4000 RPMs without getting really rough. I realize that is probably from the shaft, but could the wrong distributor also be a culprit?
-
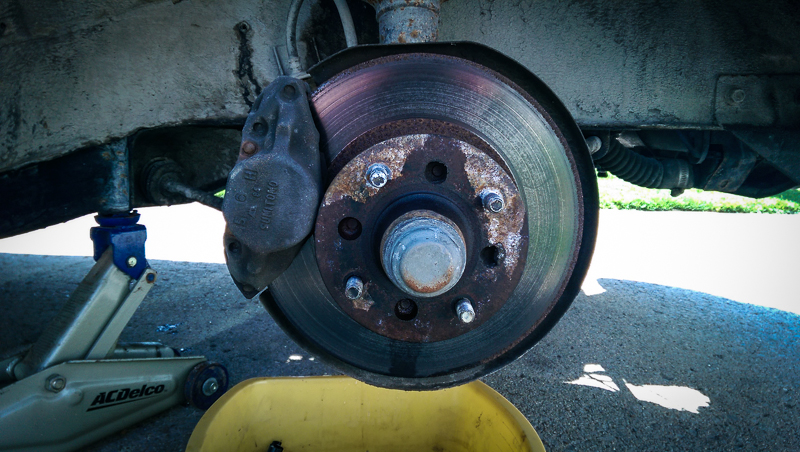
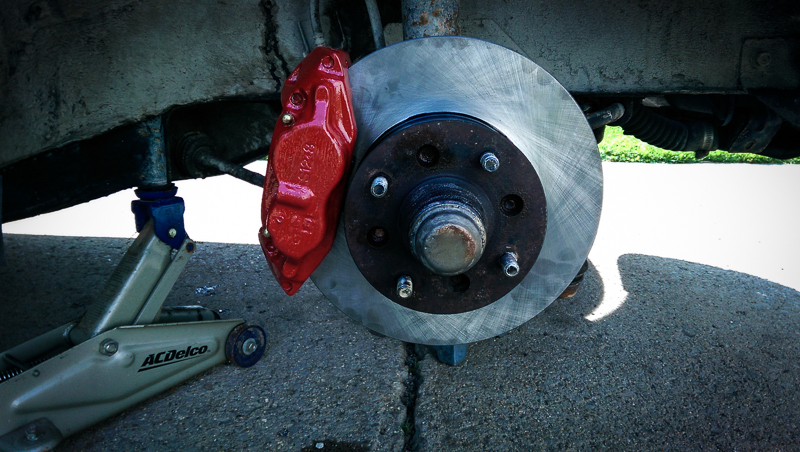
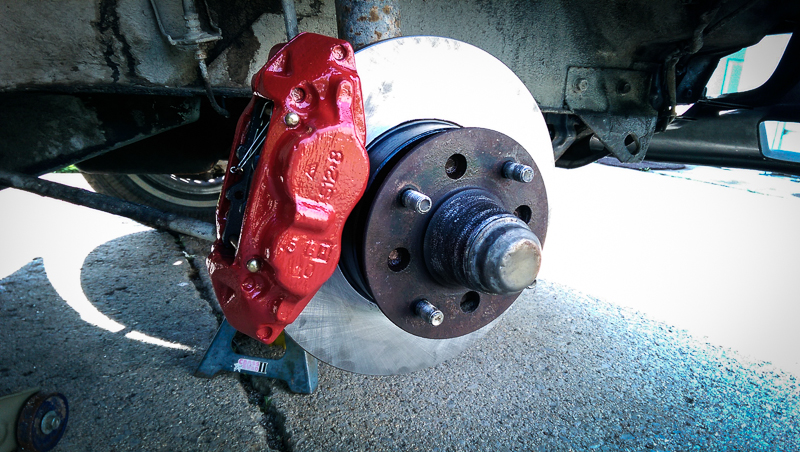
Updated the front brakes. Replaced the stock Sumitomo 2 piston calipers... ...with a Toyota 4 piston S12 8 set. Brushed them red with the Duplicolor caliper paint kit (more for rust prevention than any kind of style as they are nearly completely hidden behind my Shelby basketweaves. The Toyota brakes are a direct bolt on and I just replaced the old discs with what I was running stock. I think I may add some braided lines soon and while the pedal feel isn't terrible it does engage slightly lower than before, a master cylinder upgrade may be in order.
-
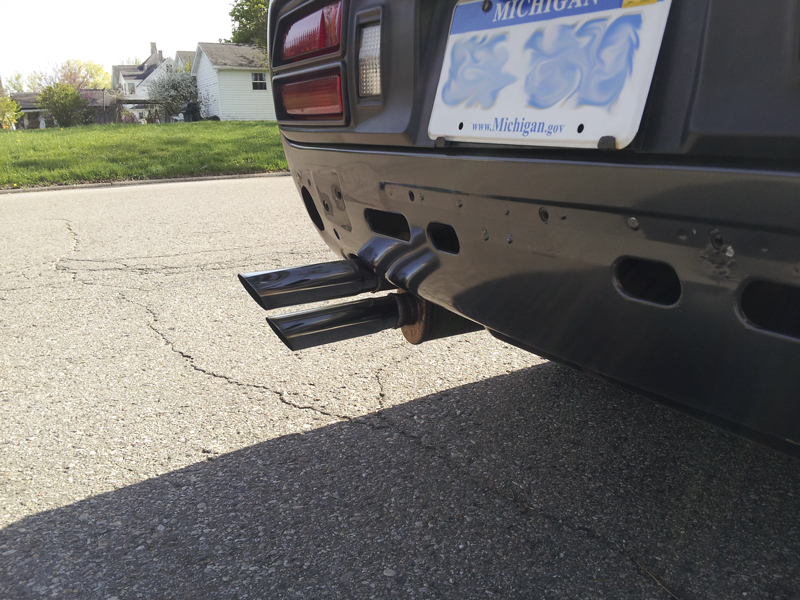
Had an exhaust custom made from the manifold back. 2.250" tube with a glasspack in the center tunnel and a small 1in 2out Magnaflow out back with packed vertical slash tips by Hedman's Hedders.
-
-
The pipes are 1.75", need to be modified to fit correctly, are made from common steel, exit the car horizontally so they don't match the stock cut out, drone at 2.5k rpm, and are loud enough to earn you an easy ticket in most states. ...but if you can deal with all of that, they sound pretty good and seem to be fairly popular around here...
-
A Magnaflow center in, dual out muffler turned sideways (part #11148) with Hedman Hedder's slant tips (#17120) may give you the look you want. I got the idea from "Arne" on one of the other Z forums and did this on my car, I'll try and get pics later.
-
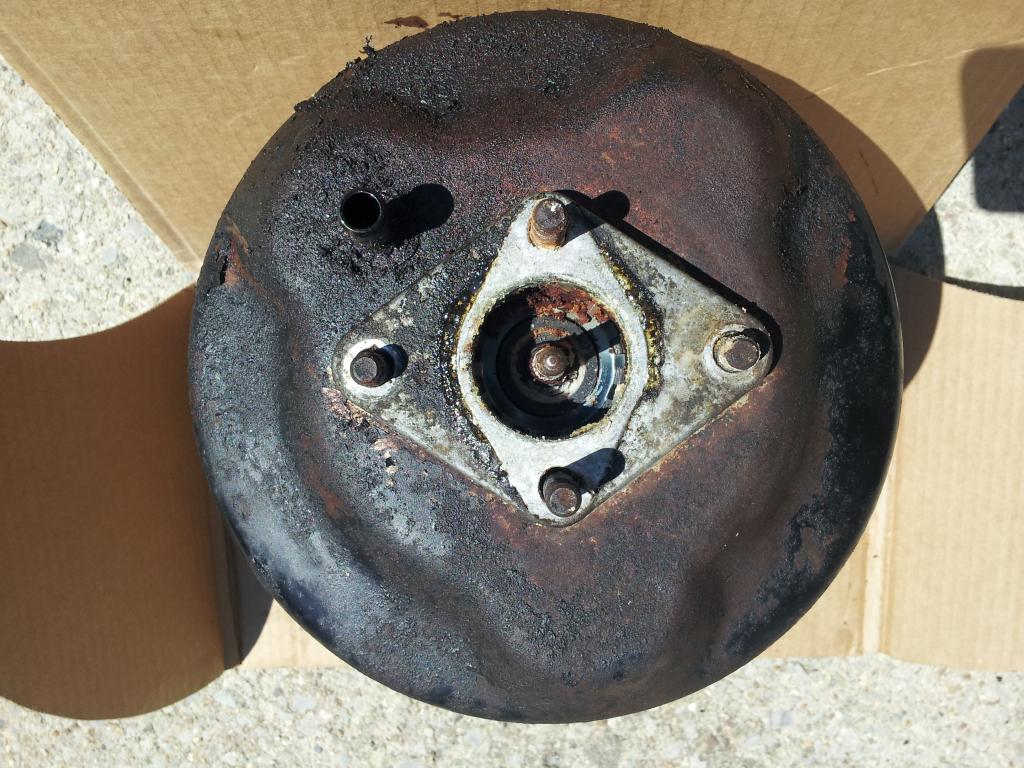
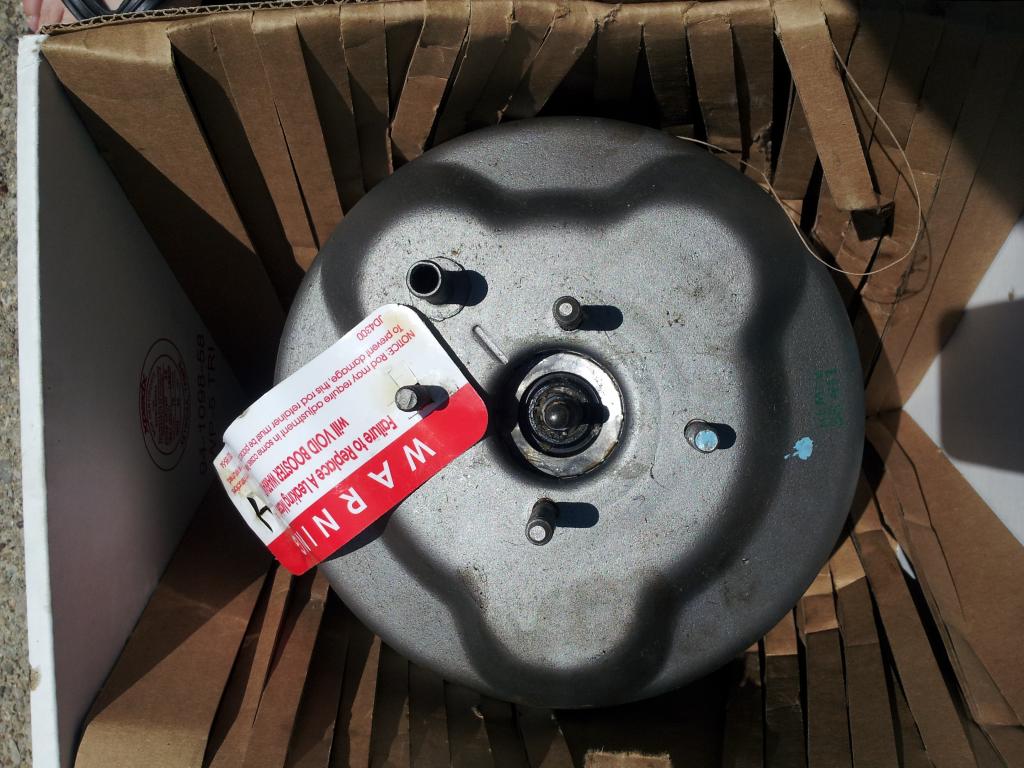
The power brakes had failed, so in my continuing quest to throw parts at this car, I replaced the brake booster. Old crusty part: New clean part:
-
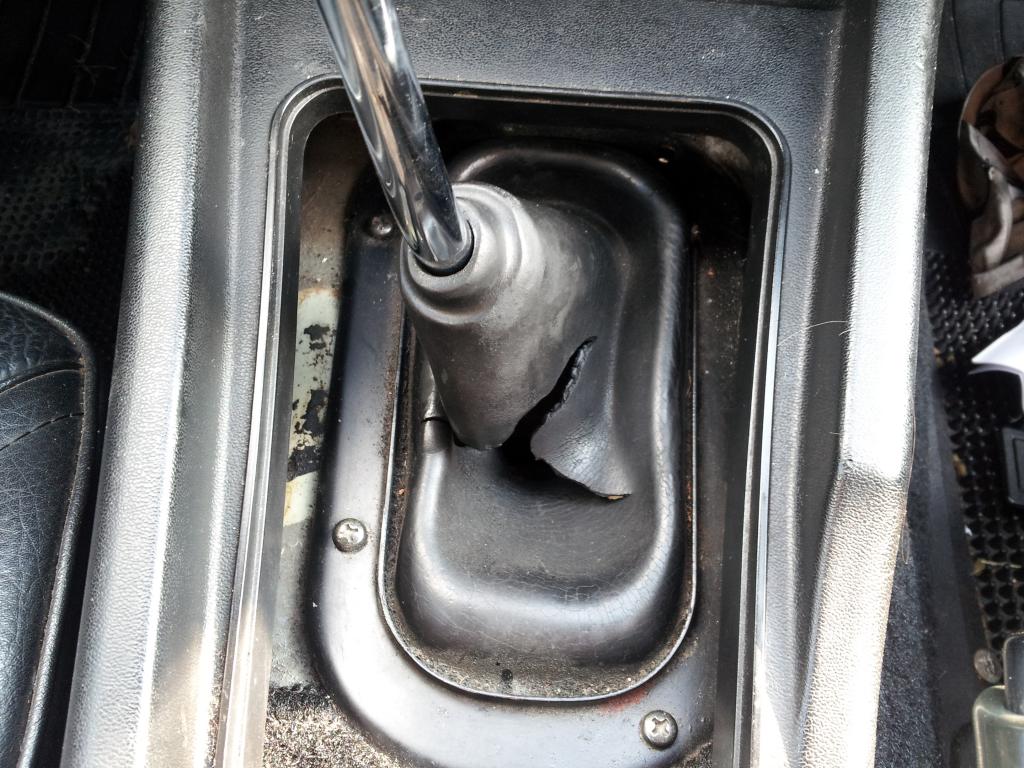
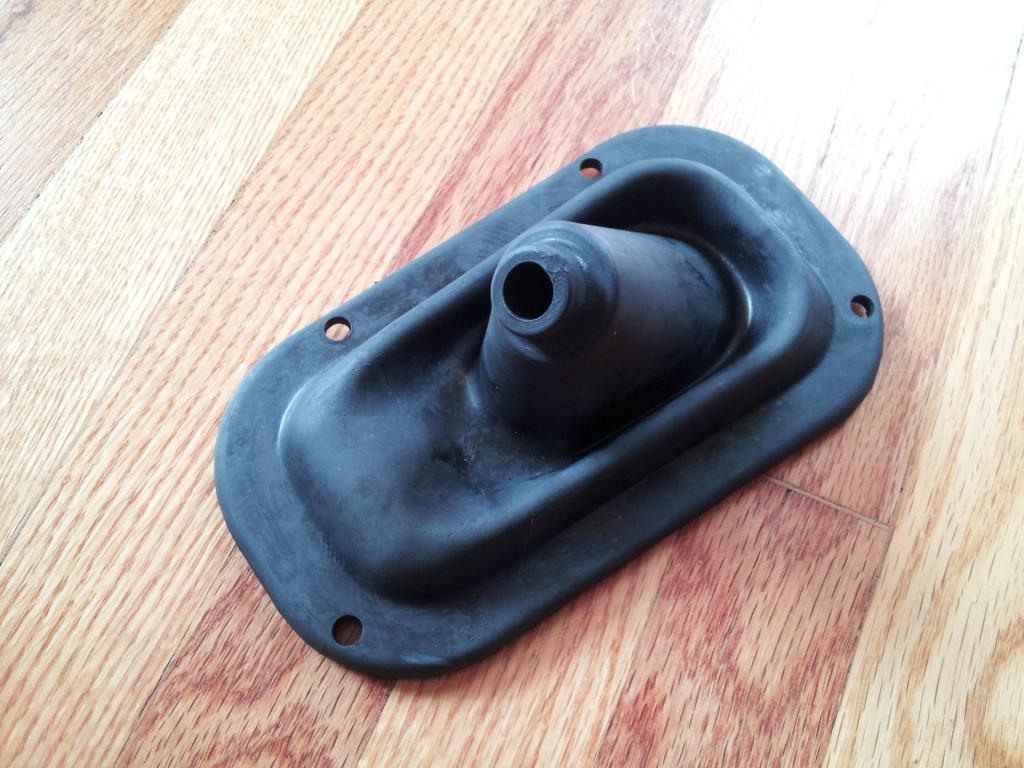
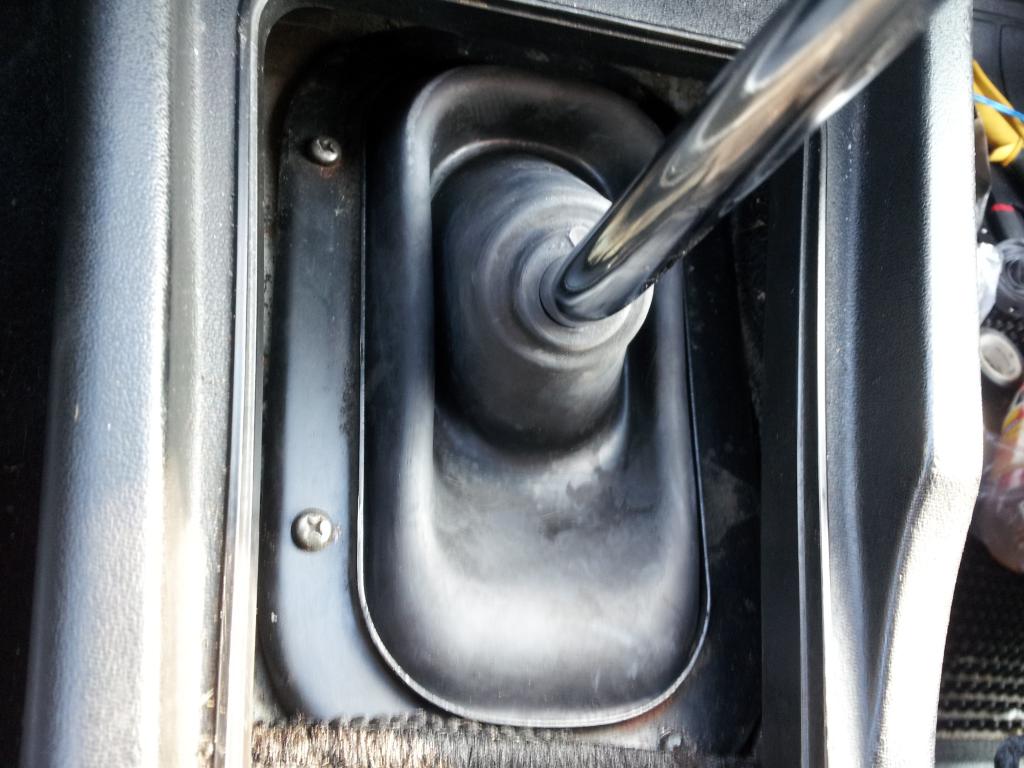
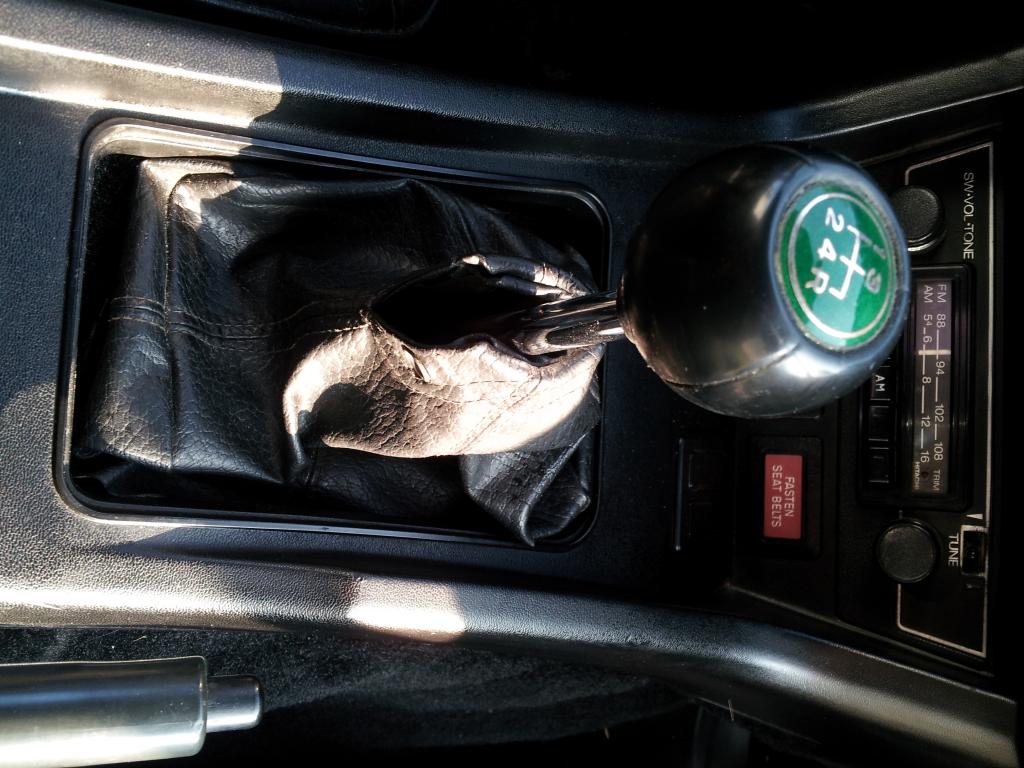
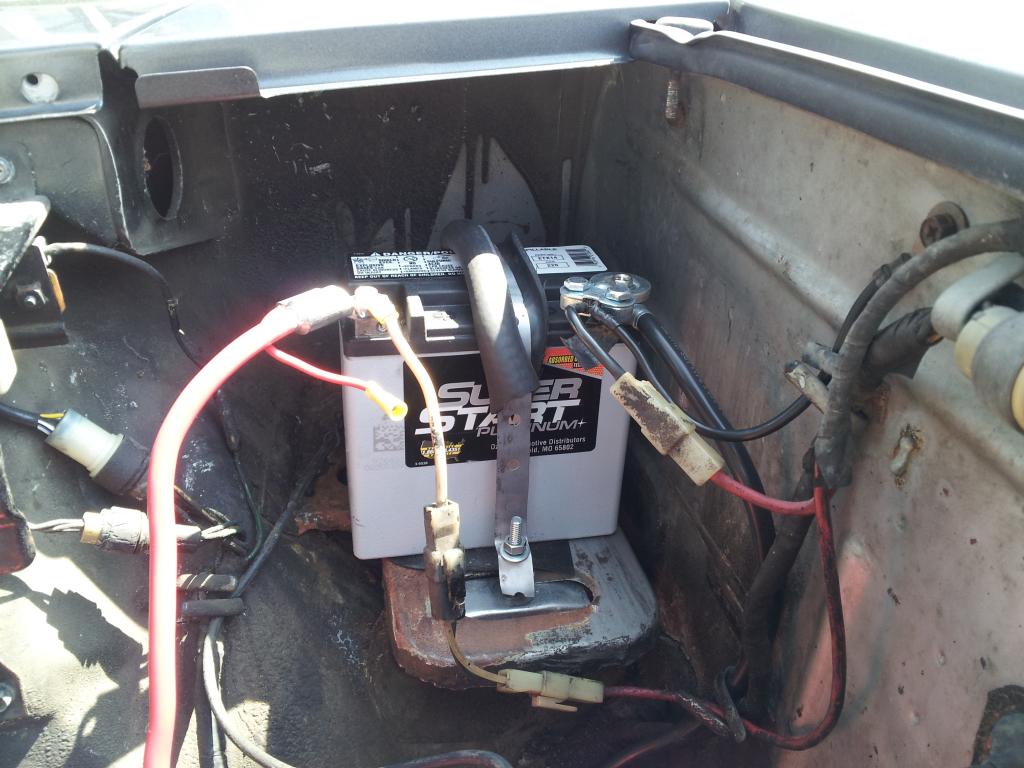
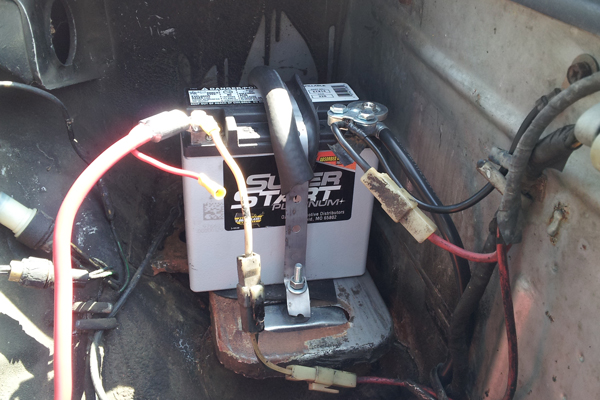
Left the car parked in the street in front of the house for one night last fall, and someone broke off the driver's side mirror and put a scratch on the front fender. >.< These are the replacement "racing style" mirrors from MSA, which is what the holes in the doors of my car had been drilled for. Nice looking mirrors, but the design of the passenger mirror prevents it from being turned far enough in to be pointing where I would like it... these seem to be more of a generic mirror rather than one designed for the Z. Ah well, they will get me by for the time being. The torn inner shift boot. Fumes kept entering the car through here, so it needed to be replaced. The new inner shift boot that I had bought off of eBay. The shift lever had quite a bit of play in it because the stock bushing had worn down to nothing. So while I had the inner rubber boot off, I decided that it was time to fix this also. Replaced with brass bushings which had to be pressed in. Shifter movement is nice and tight now. New shift boot installed. The center console had to be loosened and moved to get to all of the screws holding the boot in place. The shifter all back together. The old large NAPA battery died over the winter, so I replaced it with the ETX14 motorcycle battery (O'Reilly's relabel of a Deka/Braille). Removed the plastic battery tray to strap this down and found a rusty shelf (never ends, eh?). Ignore the cables and strap, which are temporary and cobbled together with what I had on hand. The ETX starts the car surprisingly well. Being light and sealed, it should be easy to disconnect and take inside when it gets cold or during other long periods where the car may not see use.
-
The old large NAPA battery died over the winter, so I replaced it with the ETX14 motorcycle battery (O'Reilly's relabel of a Deka/Braille). Removed the plastic battery tray to strap this down and found a rusty shelf (never ends, eh?). Ignore the cables and strap, which are temporary and cobbled together with what I had on hand. The ETX starts the car surprisingly well. Being light and sealed, it should be easy to disconnect and take inside when it gets cold or during other long periods where the car may not see use.
-
I'm trying to install an aftermarket headunit in my glovebox using the stock wiring. The Scosche wiring harness that I bought, which says that it's for this car ('76 280z) doesn't come close to mating with the existing wiring harness, so I'm trying to wire it up manually. Going into the stock headunit there are 6 wires. 1)solid white 2)white w/black stripe ^these two are the speaker wires that wire to the car's single rear stock speaker 3)solid blue that has constant power 4)solid black that I would have assumed to be a ground, but has power when the key is on 5)red w/blue stripe that has power when the key is on 6)green w/white stripe that has power when the key is on This does not include the antenna wiring, which is a separate plug on my car to a switch to manually raise and lower it (not sure if they used this setup on all years). Could someone who has done this before tell me what wires I hook up to where on the wiring that came with my Pioneer headunit? The manual is no help because it just details how to replace the stock unit (basically unplug the old and plug in the new) and the wiring diagram for this part of the car is incomprehensible to me.
-
The car sounded like an airplane taking off because the fan was locked up and would spin as fast as the engine. I took the stuck fan clutch apart, hoping the problem was just the 35 year old oil drying up, but the part itself had seized. I ended up replacing it with a new one from NAPA and the car runs much quieter now.
-
How about a smooth rear panel to replace the one with all the holes when we go bumperless? Maybe offer them with different exhaust cutouts or a rear diffuser (could reduce some of the fumes).
-
Would you happen to have the part # on an invoice, receipt or something? Or do I just call up MSA and ask for a 280z exhaust y-pipe (or whatever they are actually called)?
-
Yeah, I don't think I want to do that. lol I'm actually looking at having an exhaust system made with a 1in-2out Magnaflow muffler turned sideways for vertically stacked twin tips (copying something I saw on another site). Maybe I'll need to talk to the muffler shop about having this pipe made. Some of the 240z pics I have seen have the two pipes merge much further from the manifold... I'm hoping they can fab up something like that.
-
Looking at getting a custom exhaust built for my 280z, and I noticed this: Are the stock downpipes that pinched or is this someone's cobble-job? ...where can I get a good non-restrictive downpipe that will attach to the stock manifold? Or do I need to get the muffler shop to custom fab one?