

Atozone Tonine
-
Posts
110 -
Joined
-
Last visited
-
Days Won
1
Content Type
Profiles
Forums
Blogs
Events
Gallery
Downloads
Store
Posts posted by Atozone Tonine
-
-
-
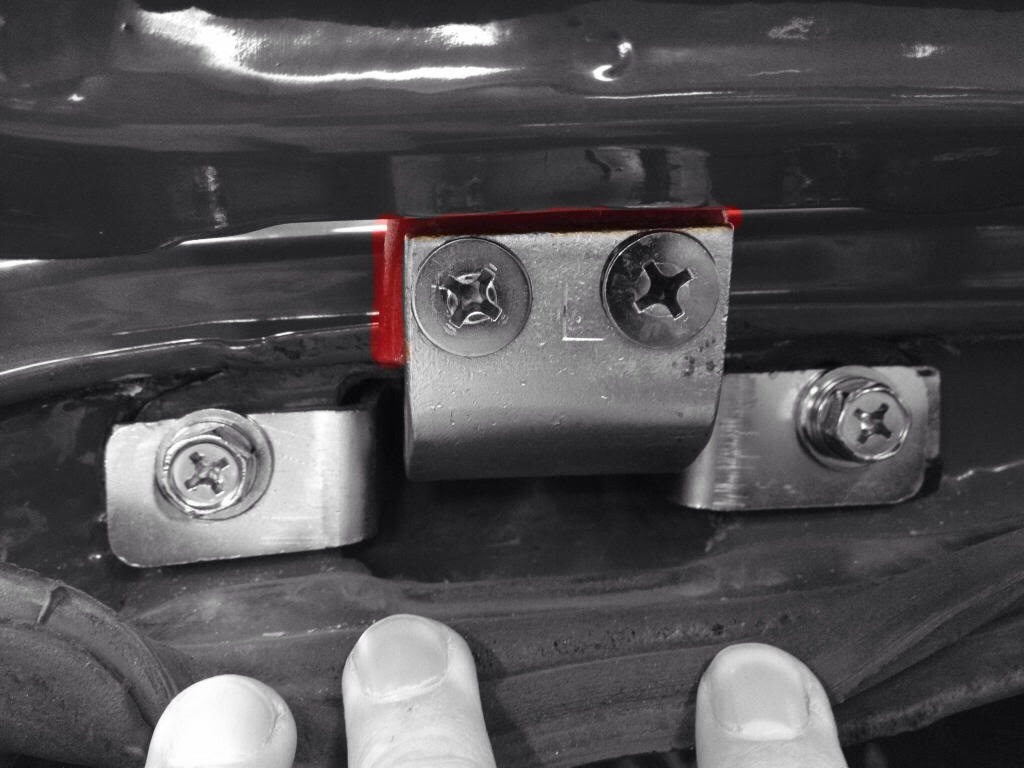
It is the piece shown behind the hinge in the photo

-
If you have your rear hatch off, the piece that gets screwed to the hinge is a small piece of bent metal that is bent and welded to the hatch.
I need to know the angle of the bend I that little piece of metal.
-
-
Can somebody do me a favor and measure the angle of the flanges that screw to the hatch hinges?
Either inside angle, or outside angle.
I am installing a fiberglass hatch and making the flanges myself. I just need that angle
I have attached the dimensions that I measured in case somebody else needs them
thanks!
-
What would happen, if I remove the rear window, and keep the aluminum louvers on a fiberglass hatch?
Would that create more or less drag?
(BTW, I don't drive in the rain... on purpose)
-
Wow... I was unaware of this incident.
Well anyways, I'm always interested in seeing any media content of s30's, so I would still watch the video.
-
-
https://mobile.twitter.com/TheSmokingTire/status/397096554860781568/photo/1?
Add your comments and let's make it happen.
-
Ok, thanks. I will try it.
-
I have 2 hood pins already mounted on the lip where the cowl panel meets the hood.
I'm not sure where to mount the front 2 pins. I have seen them mounted on the radiator support (a bit higher up), and also more near the front of the hood.
-
Yup... Took them off. Trying to decide whether to just use 2 hood pins and the hinges, or 4 hood pins and ditch the hinge all together.
-
I'm leaning towards refurbishing my own steering rack.
There is a plastic cap next to the dust boot cover inthe passenger side. I have seen this refered to as a breather cap.
Mine is In bad shape and I don't want to remove it without a replacement ready.
Is this a plug? Or is it a cover for a grease nipple?
If there is no grease nipple there, can I just screw one in? (If so, what size ?)
I have read in other forums that there is a screw under the dust cover boot, that you can replace with a grease nipple temporarily.
Is this an M7x 1.0, or 0.9? I have seen both sizes
-
yes, i will do that.
First attempt to transfer the pattern to 1/8" Black PVC went ok, but I cracked the sheet when drilling for the window crank.
Also, the PVC was not flexible enough to install the trim behind the door pull.
I think I will just use the template to cut out door panels in black rubber and be done with it.
after that, I will put the template on a black piece of paper and spray paint the pattern onto the paper, then scan it and upload it.
-
OLIVE/GOLD! but don't color match the flares.
I just looked up the color for this car:
and this is the color code:
http://cdb.shcolor.info/en/AdvancedSearch.mvc/grid?powerSearchKeys=%20olive%20green%20gold
It says it is a Nissan color.
-
Some of the manufacturers I've looked at have said to remove the torsion springs because it puts too much pressure on the hood and can cause bowing as you described. Keep the hinges but remove the support springs.
I just got a Hartman Fiberglass hood, and the front does not want to go all the way down.
I still have the hood pins, but no holes in the hood yet, so that is the reason the rear is not completely down.
However, I can still feel a lot of resistance when pushing the hood down.
Im thinking about taking out the torsion bars, but wondering if that will allow the front to pop up at speed.
It sure is ugly compared to stock, but hoping for improved air flow and heat dissipation.
Has anyone removed the torsion bars?
-
I've got a makerbot Replicator dual and a Relicator 2x, designing using Inventor
Awesome setup!
-
My plan is to remove all the controls from around the steering column. I have a push button start in the center console.
I will be putting my turn signals on the steering wheel. (yes I know its not ideal to have them turn with the wheel, but hey... Ferrari did it, so how bad can it be)
-
Ok, I discovered that my first attempt at the door panels was not accurate.
So today I used a piece of clear acrylic as a template so I can drill all the holes and draw where the door pull goes.
Seemed to work well.
Now I will transfer the pattern onto my black PVC door panels.
-
I personally would not spend that kind of money. You can disassemble your rack and if it isn't worn bad, clean out all the gunk and replace with fresh grease. Adjust per the Service Manual and add new boots, little paint and you are good to go!
chris
Thanks. I will look at the manual and see if it's something that I can handle.
Does anyone know if the new ones will have the same specs as original?
-
My steering rack is looking bad. Bellows are off, grease nipple has some kind of strange cap.
Does anyone have experience with putting a new steering rack in a 240z?
Will it change anything from stock?
Lock to lock?
I found this on eBay:
-
I have a coiled cable connecting mine, buttons on the steering wheel for the 2-step. Havent had any issues, though the car isnt tracked, just driven on the street.
good to know.what kind of coiled cable did you use? I was going to use a 16ga 6 wire 'SO' grade, but am concerned it might be too heavy.
-
This is what I had to do on an old British car once. There was no adapter kit made for it for the wheel I had. I went to oreillys and opened up all the grant adapter boxes until I found the one that looked like it was the closest to fit my wheel. I only was able to use the half that goes onto the steering wheel with the spring part that usually goes onto the clock spring. I had a piece of plastic conduit that happened to slide over my steering tube very tightly. I actually had to tap it on with a hammer. I got a big washer and drilled it out so the steering rod would fit through it without touching it. I put a screw through it where the conductor spring didn't slide around it so it wouldn't interfere. I connected the wire going into the car on the backside of that with a connector. Sort of a home made clock spring. That was for only 1 button though. You will just need to be creative.
Nice work. I wish someone made a generic clock spring with several wires, that would fit a momo. I will probably have to use the coiled cable.
-
I have mounted 2 buttons on my steering wheel and am not sure the best way to connect with wire.
I am thinking about using a coiled cable, as I have seen before, but I would prefer to use a 'spring clock', which is how most cars connect electrical to the steering wheel in a discrete way.
I am worried that a coiled cable could get caught up on the steering column when I turn the wheel all the way to one side.
The steering rack on a 72 240z should be 2.6 turns lock to lock, which mean a coiled cable would have to wrap 1.3 times around the steering column.
What do you think?


Hatch hinge flange angle?
in S30 Series - 240z, 260z, 280z
Posted
THANKS! thats great.