Boben
-
Posts
401 -
Joined
-
Last visited
Content Type
Profiles
Forums
Blogs
Events
Gallery
Downloads
Store
Everything posted by Boben
-
I was mainly looking to get a differential with a lock and capability to take a serious amount of torque. I was also intrigued by the more modern double wishbone type of suspension setup which offers very good adjustment options. There is also at least a theoretical benefit over macpherson in terms of keeping the camber gain negative throughout the whole suspension travel whereas in the macpherson strut suspension, the camber gain turns positive with larger outwards travel.
-
Yep, it is an R32 subframe. I went about the fitment by gradually cutting off more and more of the original sheet metal from the bottom. The task was quite tedious, due to the fact that I wanted to retain the original GTR32 suspension geometry with the control arm angles so it meant fitting the subframe quite deep into the 240Z body. I've seen others fit the subframe much more to the surface. The car will be RWD.
-
Jboogsthethug's 1971 240z build
Boben replied to Jboogsthethug's topic in S30 Series - 240z, 260z, 280z
About the feed through hole on your motor mount. The material thickness on the mount seems adequate so I would not bother to try and dimple it. Also, due to the thickness, it will be a pain to dimple anyway. I would maybe increase the diameter of the hole for a bit just to make sure that the sharp edge of the hole does not eat into your oil return line. If possible, you could even make the hole big enough to fit a through hole grommet in between. Your intercooler looks like a nice fit. Is that an off-the-shelf model? Are you able to run the 90 degree angled rubber piping through the stock openings or did you need to cut them bigger? -
Thanks for asking. I worked on the car quite regularly until end of 2016, but then life happened and the project was pretty much on hold until beginning of 2020. I am still working on it so I guess this one of those never ending projects. The progress is documented here:
-
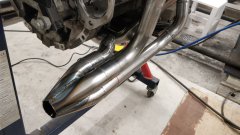
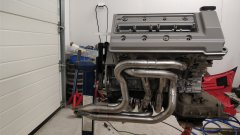
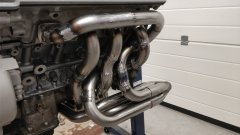
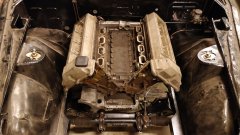
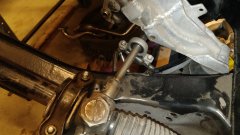
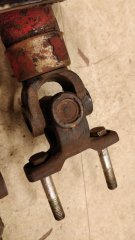
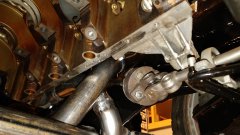
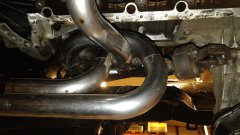
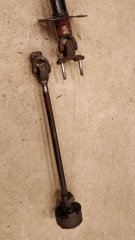
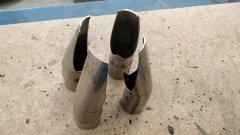
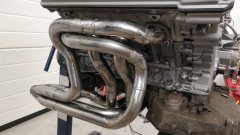
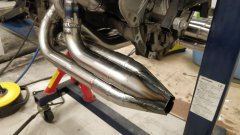
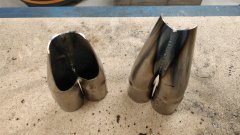
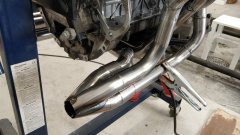
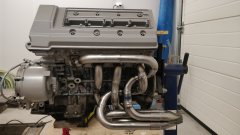
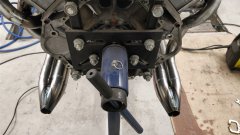
The BMW V8 with overhead cams and the 180 degree exhaust manifold is so wide that the steering axle rubber joint does not have enough room at the upper end of the axle so I decided to flip the axle the other way around and move the rubber joint to the bottom. This obviously meant disassembling the universal joints. Luckily I was able to source a new set of joints as they did not actually dismantle very easy, required the use of a hydraulic press and got damaged during the process. I am quite happy with the outcome although I still need to finish the parts off with some fresh paint. The first picture illustrates the situation where the axle has not yet been modified. It is quite evident that the rubber joint would not fit. Before dismantling the joints... Afterwards - everything back together with all new joints... This is how it looks like from the bottom with the engine and exhaust piping. Extension axle from the steering rack relocates the bottom joint to the other side of the motor mount. I also added an extra support with a bearing due to the remote location of the joint. The new configuration can be more easily viewed without the engine.
-
From the album: 240Z EgoBoost
-
-
-
From the album: 240Z EgoBoost
-
From the album: 240Z EgoBoost
-

From the album: 240Z EgoBoost
-
From the album: 240Z EgoBoost
-
From the album: 240Z EgoBoost
-
From the album: 240Z EgoBoost
-
From the album: 240Z EgoBoost
-
From the album: 240Z EgoBoost
-
From the album: 240Z EgoBoost
-
As the GTR rear hubs are 5x114.3, I needed a five lug conversion in the front. The plan is to also move the brake discs on the front side of the hub. As I was not sure about the rim offset measurement I finally want, rather than going all in with some billet aluminum hubs, I decided to make the first version by converting the existing hubs. I acquired a set of bolt pattern conversion spacers made out of aluminum. First thing to do was to machine a centered surface to the cast iron hub on a lathe to firmly seat and position the spacer. Unfortunately I do not have a picture of the machined surface. Then I sand blasted the hubs from the back side and painted the hubs in black. Getting everything to work required also machining some custom washers and nuts on the lathe. While I was at it, I assembled a set of new wheel bearings. The PO had customized the strut towers to accommodate some Tein adjustable coilovers a few years back along with other custom adjustable front suspension parts. I just sandblasted the parts and applied some paint.
-
It's been over a year since my last update. Here we go! Once the engine bay and bottom paint job was done I sprayed some rock guard on the bottom and ran the brake lines and fuel lines in the tunnel. Then it was time to assemble the GTR rear sub-frame, but only after renewing the bushings and sandblasting and painting the sub-frame.
-
From the album: 240Z EgoBoost
-
From the album: 240Z EgoBoost
-
From the album: 240Z EgoBoost
-
From the album: 240Z EgoBoost
-
From the album: 240Z EgoBoost
-
From the album: 240Z EgoBoost
-
From the album: 240Z EgoBoost