

Boben
-
Posts
401 -
Joined
-
Last visited
Content Type
Profiles
Forums
Blogs
Events
Gallery
Downloads
Store
Posts posted by Boben
-
-
Are the seats powered?
These are not powered. Your question got me thinking, where did you get that idea. Then I checked the pictures more thoroughly...
The wiring underneath the seat is for the side airbag most probably this is also a heated seat so the associated wiring is also there.
What is more interesting, is that these seats actually came from an E90 3-series as it reads on one of the labels attached to the seat bottom and not the E46. This means they are much newer.
Sorry for giving false information.

-
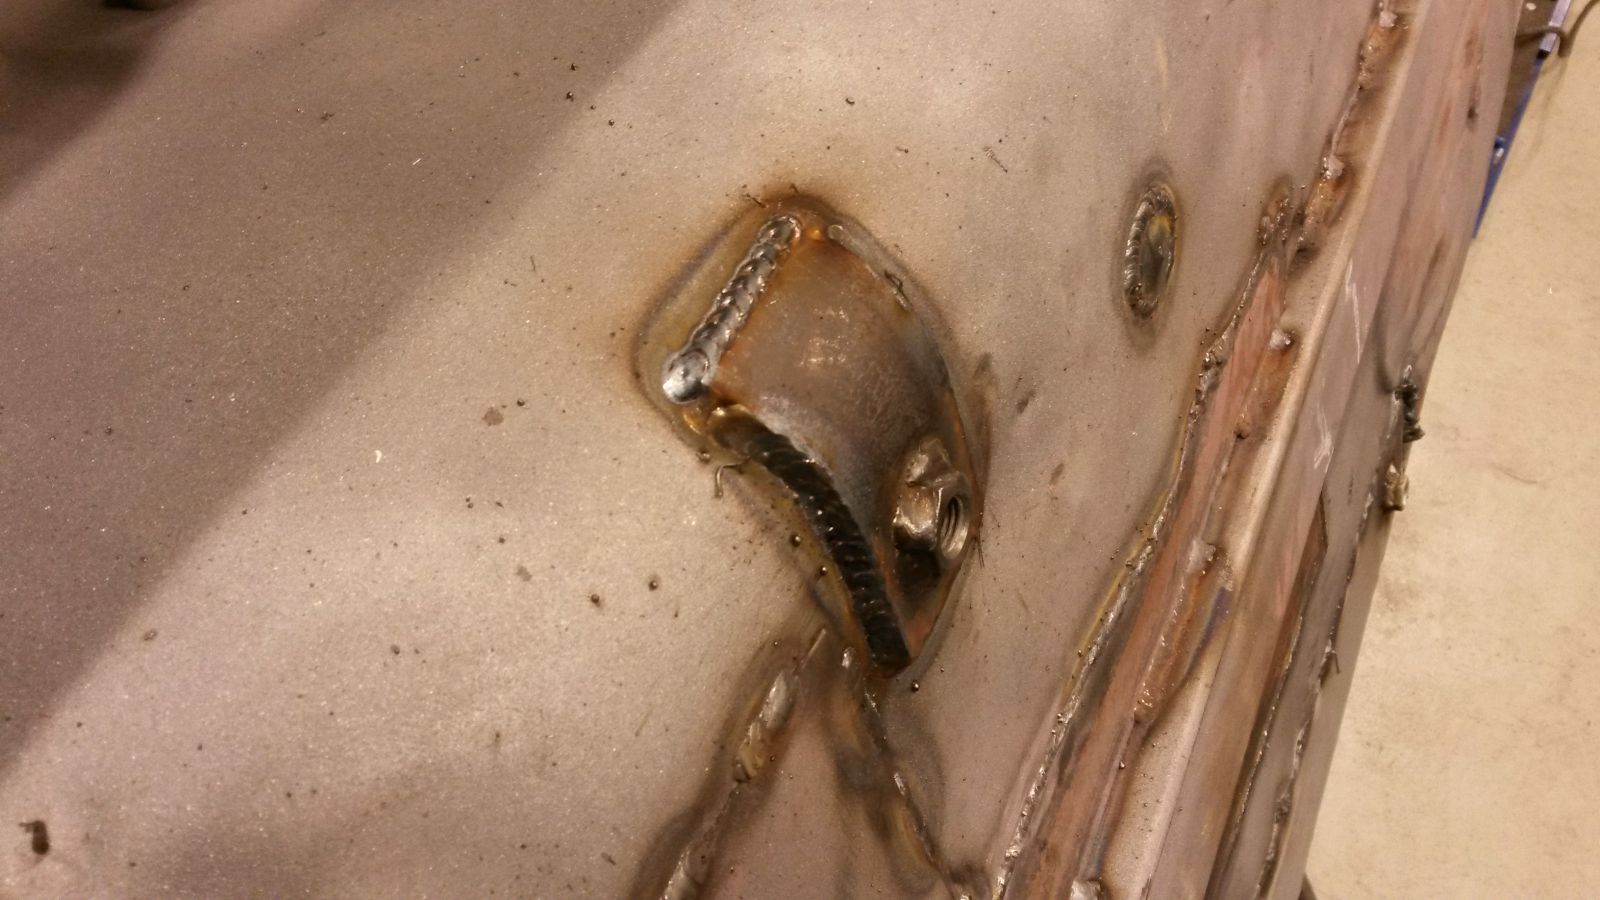
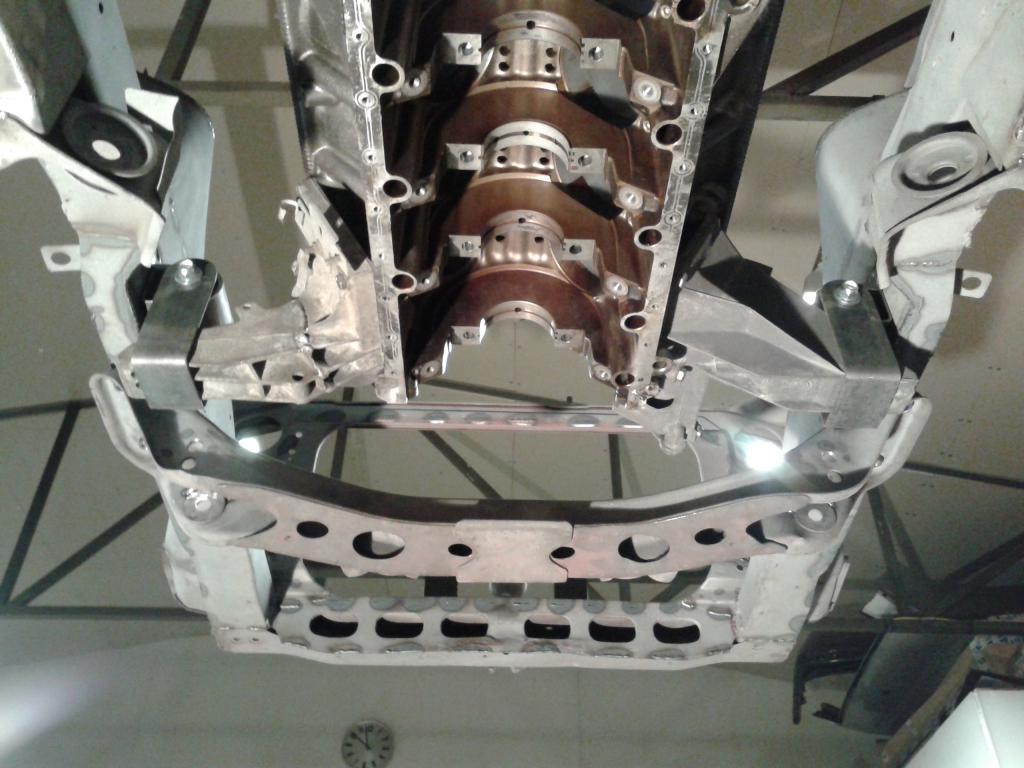
Awhile back I started modifying the floor pans around the outer longitudinal rails in order to fit the BMW E46 sport seats. To be more specific, the outer fixing rail of the BMW seat was hitting the curved shape of the floor and for this reason the seat was at an angle. To make the seats fit, I previously cut the curved shape of as necessary and just drilled the rail fixing holes to the floor pan. I finally got a round to finnish up the seat fixings. I made some reinforcement plates, which I welded on the bottom . I also asembled the parking brake lever to check clearance to the seat. The fitment is tight, but there is no collision in any position of the seat. Measuring from the surface of the seat to the ceiling at the up most position of the seat, the distance is 870mm and at the lowest setting the corresponding distance is 930mm. TeemuM measured 890mm with the stock seat, so I have to say I am quite happy with the outcome. I tried to position the seat as low as possible. For some reason there was an odd profile at the bottom of the other rail of the seat. This had to be cut off to allow the seat to sit level on the floor pan.
Here you can see the profile that had to come off.
After removal with an angle grinder, I applied some fresh paint on the rail.
The bolts I used are fine thread and made for the purpose.
This is the upmost position of the seat. The seat has all kinds of adjustments.
This is where I measured the distance to the ceiling.
-
That is really good. You have a link or year and vehicle info?
I purchased a Hella unit. The provided PNs for the unit are
- OE 17112227281 / BMW
- OE 2227281 / BMW
It will fit the following vehicle models:
BMW Z3 (E36) M 3.2 236kW 03.1997 - 06.2001
BMW Z3 (E36) M 3.2 239kW 06.2001 - 01.2003
BMW Z3 Coupe (E36) M 236kW 02.1998 - 06.2001
BMW Z3 Coupe (E36) M 239kW 06.2001 - 06.2003
DATSUN 240Z EgoBoost 4.4 350kW
-
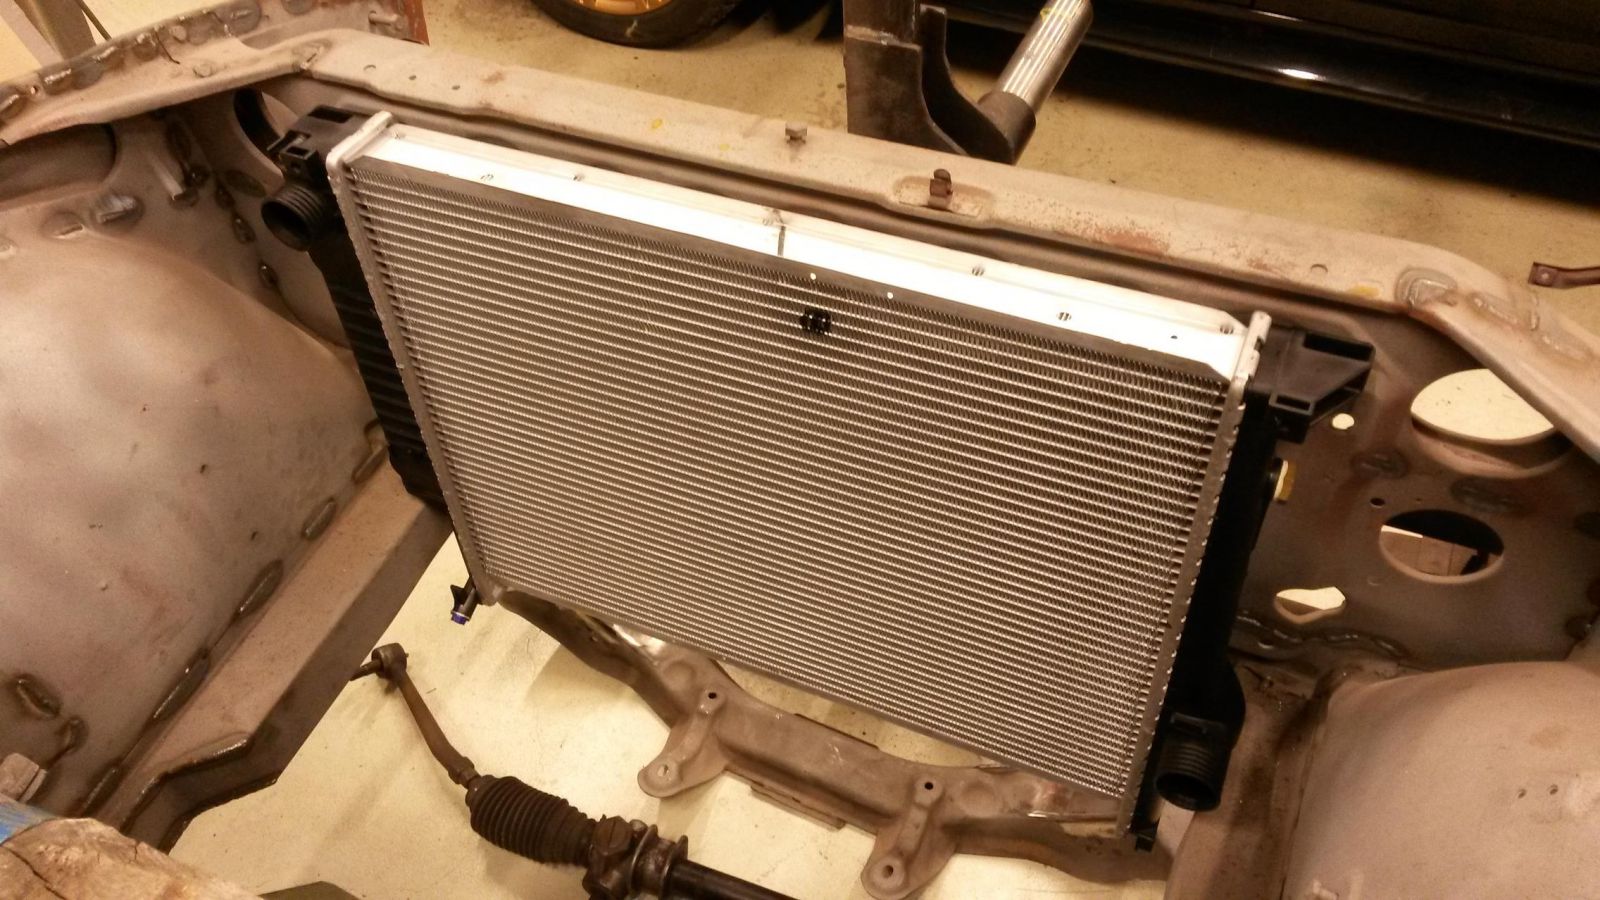
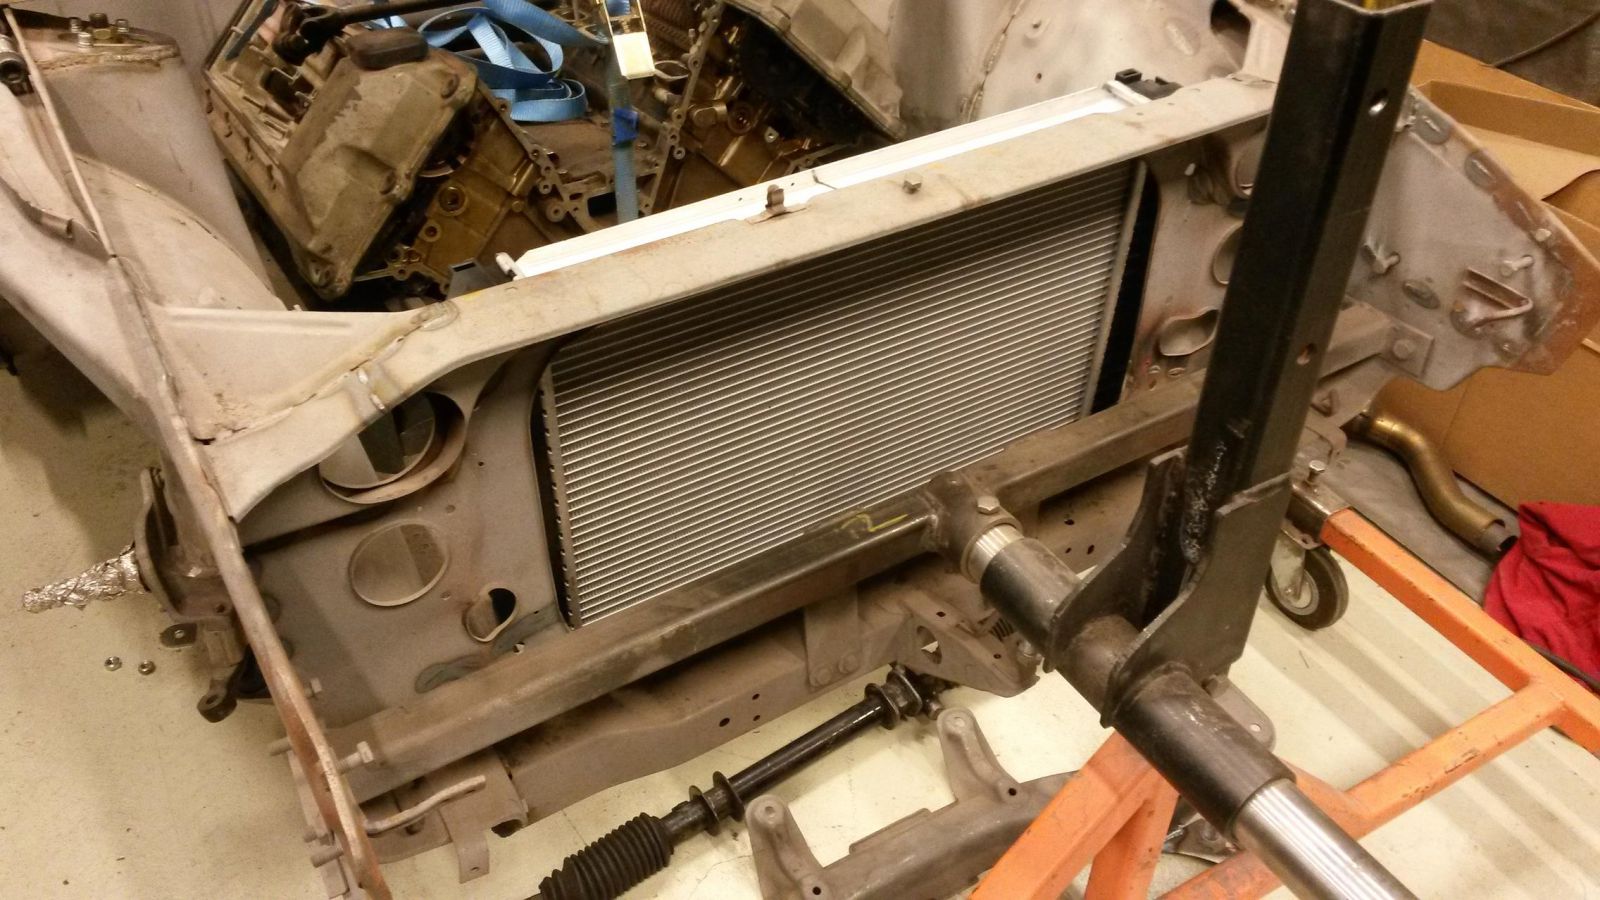
For a long time I've been searching for a suitable radiator for my car. There seems to be an amp offering of aftermarket aluminum radiators for the 240Z on Ebay, but the problem with these units is their pressure holding capability. The BMW V8 cooling system is a pressurized system designed for normal opeartion upto around 200kPa while the V8 swap radiators I found for the 240Z are only rated upto 100kPa. I finally settled for a Z3 M Coupe radiator which has the correct width and height. Also has a pressure release pressure of 250kPa on the cap. The fitment is surprisingly good.
-
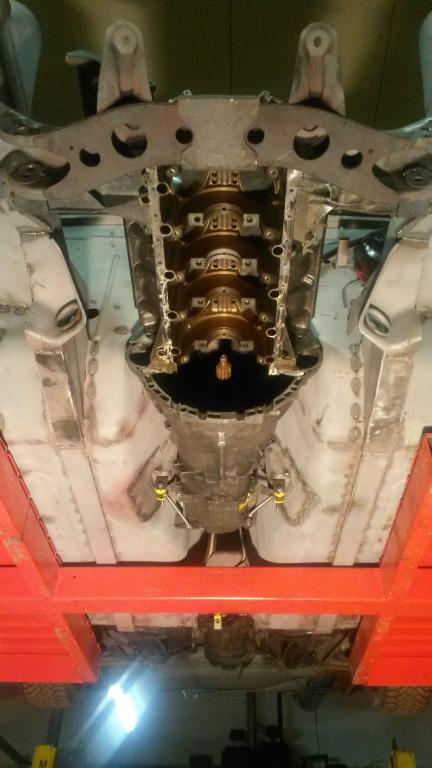
After redoing my engine mounts, I noticed that my transmission was sitting a little low, well actually quite alot. The lowest part of the bell housing was sitting 50mm below the longitudinal frame rails. Unfortunately the transmission can only be lifted up 30mm without needing to cut through the transmission tunnel, so this is what I was aming for. I might need to fabricate an aluminum base plate for the oilpan and bell housing just to be safe. The minimum legal ground clearance in Finland is 80mm so I am still good for adjusting the ride height to 100mm measured from the longitudinal frame rails. I hope the car won't seem too high with those numbers.
The whole assembly seems quite rigid. I have to admit it was quite daunting to flip the car sideways on the rotisserie.
-
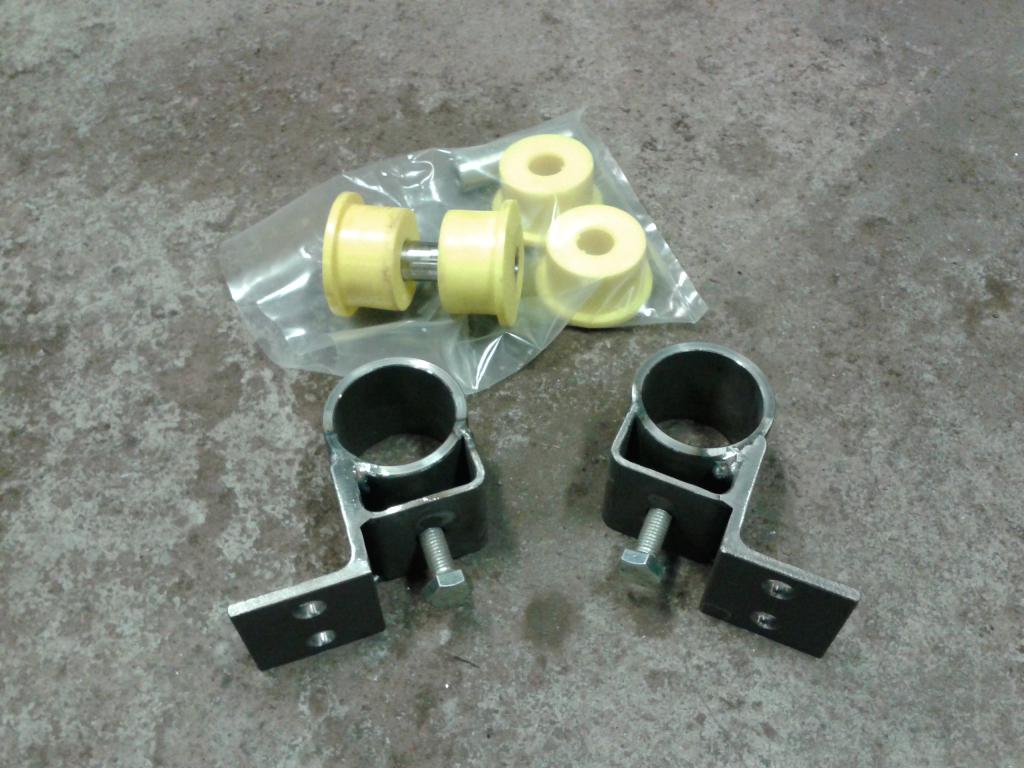
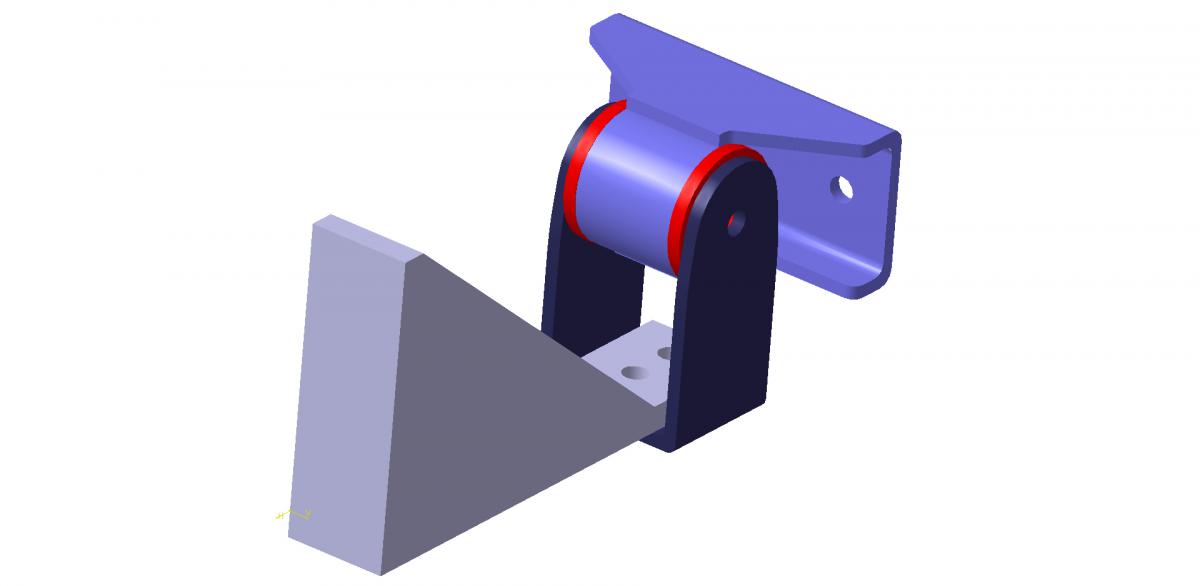
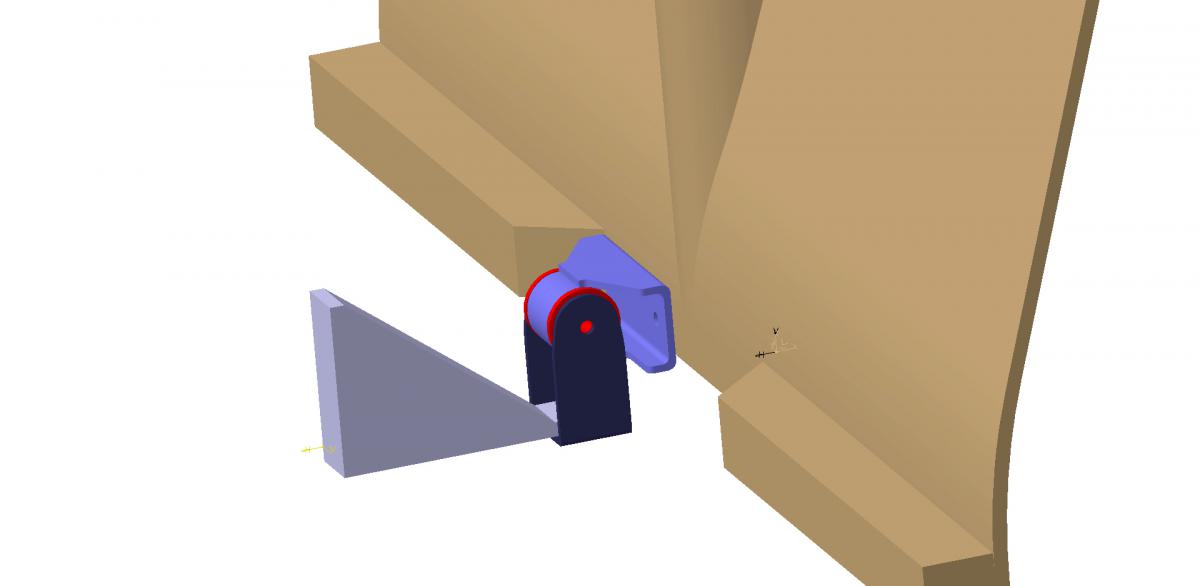
I decided to redo my engine mounts since the passenger side bushing was standing in the way of the AC-compressor. I was able to make full use of the original aluminum engine mounts without any modification. The bushing are from an E34 5-series BMW. The newer E39 model bushing was too big in diameter so this will do.
Now there is nice clearance for the compressor all around.
-
Your car has definitely come a long way. Impressive work with the body customization. The car looks familiar, it might have been this car that initially made me ditch the idea of ZG flares and going full custom.
-
Amazing, I have a S130, which I believe have more room to install the M62B44, how will you tackle the other stuff like the rear differential, suspensions and brake upgrade etc. will the same drivetrain be able to transform into the Z at the same time? Since the E39 is pretty cheap these days, I am very eager to see if a successful build is found here!
Also, are you planning to megasquirt the motor or using BMW original ecu?
I kind of climbed ass first to the three with my topics here at hybridZ, didn't I? The information of my build is quite scattered since I first started documenting my body widening project here: http://forums.hybridz.org/topic/117948-my-widened-240z/
Then I started this engine fitment topic that you are currently reading and only after this I decided I want to start a members build project since I am doing all kinds of other mods to my car as well. The build project where I plan to update my progress from now on can be found here: http://forums.hybridz.org/topic/120290-240z-egoboost-by-boben/
Turning now to your question. I propably would have installed the whole drivetrain from the BMW family, but ended up installing a Skyline GT-R32 rear subframe with all the stuff coming with it. Sorry for not documenting that in my project topic. Maybe I should make a post or two of that. It was a big task to fit it and I guess the E39 subframe could be fitted "as easy". In turns of width, I would probably look for something like a Z4 subframe of the like. I am using Megasquirt as the engine management.
If you are wondering how to climb a tree ass first. Here is how it is done... at least they tried: https://www.youtube.com/watch?v=YD5YBIKGeNU
-
That rust repair requires some mad fabrication skills but luckily you seem to have just what it takes!
Very interesting reading and footage. Good luck with the build.
How is the transmission tunnel height altered by this mod? When I did mine (definitely not finished yet!) I was also thinking of cutting into the transmission tunnel and raising it, but then finally opted for mounting the powertrain as low as possible without sacrificing the ground clearance too much.
-
This is definitely something else. Thanks for describing your progress in such detail. Keep up the good work!
-
@74_5.0L_Z, your exhaust pipe work looks fantastic. It does look tight also.
I've measured the engine bay and the engine up to the point where my head hurts, but I have yet to check the clearance for the collector. Based on your photo, it definitely needs to be double checked.
-
I cannot believe it has been over a year since my last update! Well, I have been too occupied with other stuff and the Z has gotten way too little attention.
I did however make some progress. I guess I could start by introducing my exhaust design, which unfortunately only exists as a 3D model for the moment.
The idea is to make 180 degree exhaust headers where the cylinders with opposite phase are routed to a common collector. Actually my design is a 4-1 collector so I guess it could be called 90 degree headers since an exhaust pulse is introduced to a single collector once every 90 degrees of the engine cycle. Two primaries have to be routed to the other side from each side and brought to the collector to realize the headers and the lenghts of the primaries have to be of certain length to tune for a resonance at a certain RPM. Equal lenght is quite hard and in my opinion not even the smartest move for a street car. I tuned the lenght of the primaries to get the best performance at the vicinity of the maximum torque point of the engine which is going to be around 4500 RPM. All of the primaries are within 7 inches in lenght. The slight difference in lenght will smooth the torque curve of the engine. Getting the primaries from one side to the other is obviously not trivial but luckily in the original placement of the engine in an E39 500-series BMW, the x-member is in the middle of the oil pan. In the Z, the engine is located behind the X-member so I can route the primaries in the "valley" underneath the oil pan - Lucky me! (I still need to make some modification to the oil pan, but it all should be doable.
Here are some shots from the 3D:
-
Another updated video, didnt have feedback in the video from the other post, this one you can see the feedback following the target. Could still benefit from a bit more PID tuning, but at least I have a solid start. Now it will just be up to the table setup in the ECU to send a PWM to the controller and operate this thing.
Nice work with the VGT controller!
I also had a similar setup in my previous car:
The engine was a 4-cyl BMW M42B18 hooked up with an Eaton M45 supercharger in series with a BIG VGT out from a Mercedes diesel.
The control strategy was the following:
There was an electrically controlled bypass for the M45 made out of a Prius electronic throttle body. When going lightly on the throttle, the bypass remained open and the car behaved like an NA. Once you stepped on the gas a bit more, the bypass was closed progressively and the M45 started making boost. With the added air flow, the seriously over sized VGT was able to start making boost.
For boost control I made a separate boost controller out of an Atmel microprocessor. This controller took the boost control output from Megasquirt as the control input and regulated the boost by means of two parallel PID loops controlling the M45 bypass and the VGT wings. Initially I did not have a waste gate, but I soon found out that at high RPM, the bypass and VGT wing control just was not enough and I had to include a VAG three way valve to open the waste gate under over boost conditions at high RPM. The waste gate was also controlled electronically by a PWM output from my DIY controller.
Looking forward to your progress on this one!
-
It's been awhile since my last update so here goes...
I ended up modifying the longitudinal frame rails to make room for the alternator and the AC compressor. It seemed like rising the transmission tunnel would not help anyways, because the next problem would be the intake hitting the hood. The original x-member will have to be lowered a bit to make way for the steering arm so my plan is to reinforce the longitudinals while a spacer has to be added anyway.
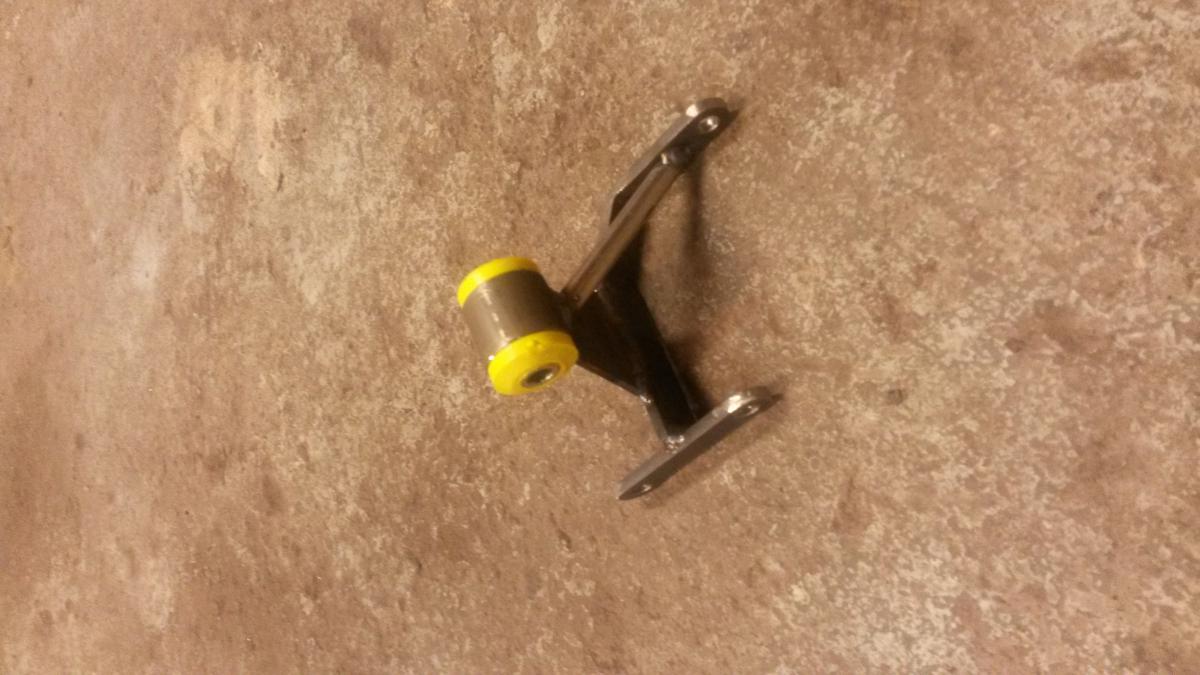
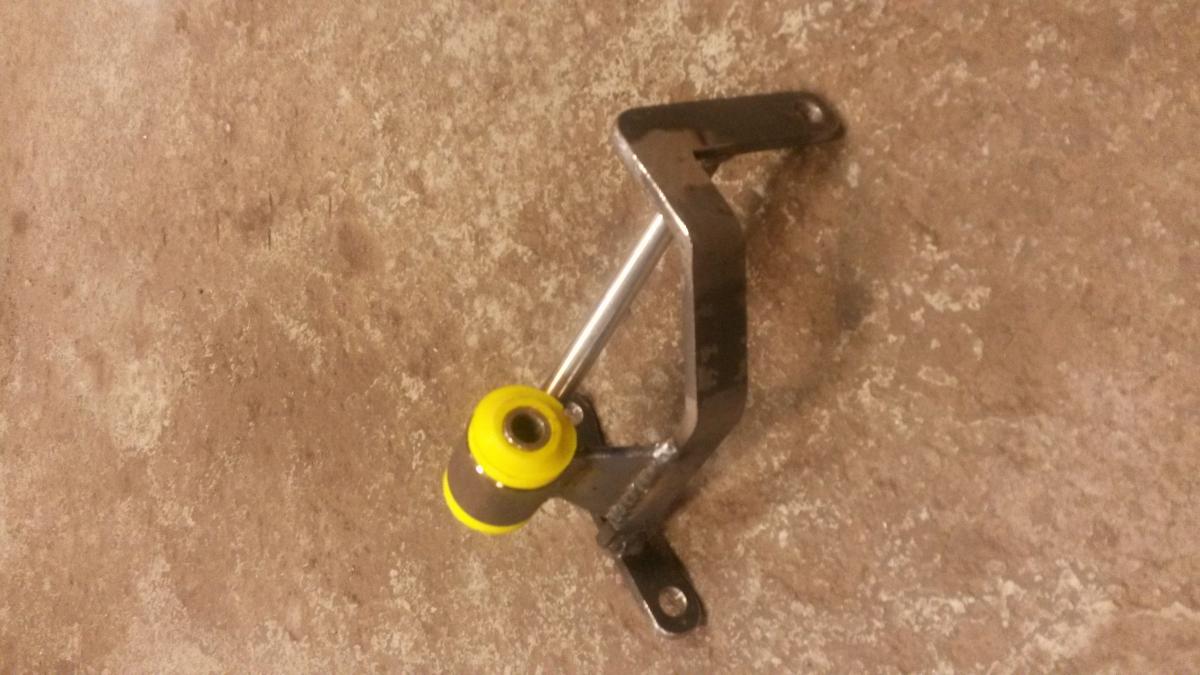
I acquired some poly bushings for the engine mounts and the transmission mounts and fabricated the mounts. The chassis mounts holding the bushings are sitting on what is left of the longitudinals. The forks connecting to the original engine mounts will probably still undergo so mods, but that remains to be seen.
The original transmission mount location of the 240Z sits too much to the front for the original Getrag fixing points so I made use of the transmission case connection bolts. The case is constructed of separate cases attached to each other and so I made brackets attaching to three case connection bolts on each side of the transmission. The mounts connect to the original 240Z transmission mounting locations.
The oil pan will need some customization but at least the oil pump will clear the x-member. The engine sits quite close to the firewall and the hood lock console prevents the installation of the stock intake manifold of the V8. I may need to make the console removable, but as the engine will be supercharged I will leave it for now. It might even work as is with the custom supercharger intake.
Here are some pictures of the progress:
-
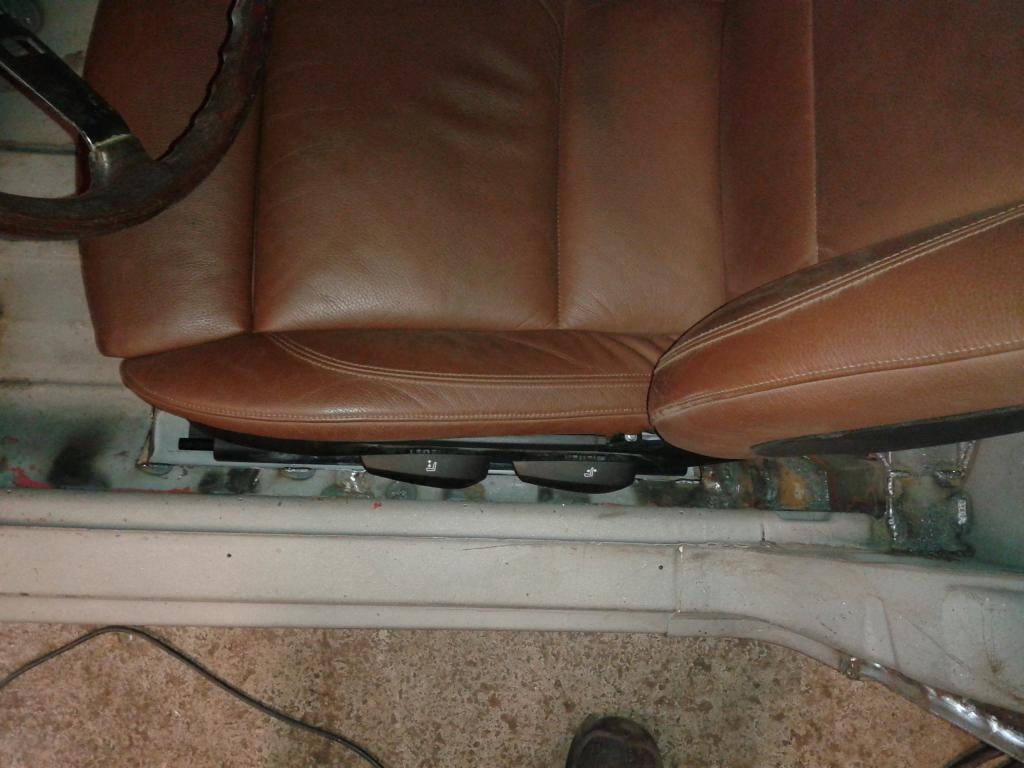
How much headroom are you losing with the seats. I was thinking of using S2000 seats but those are really nice.
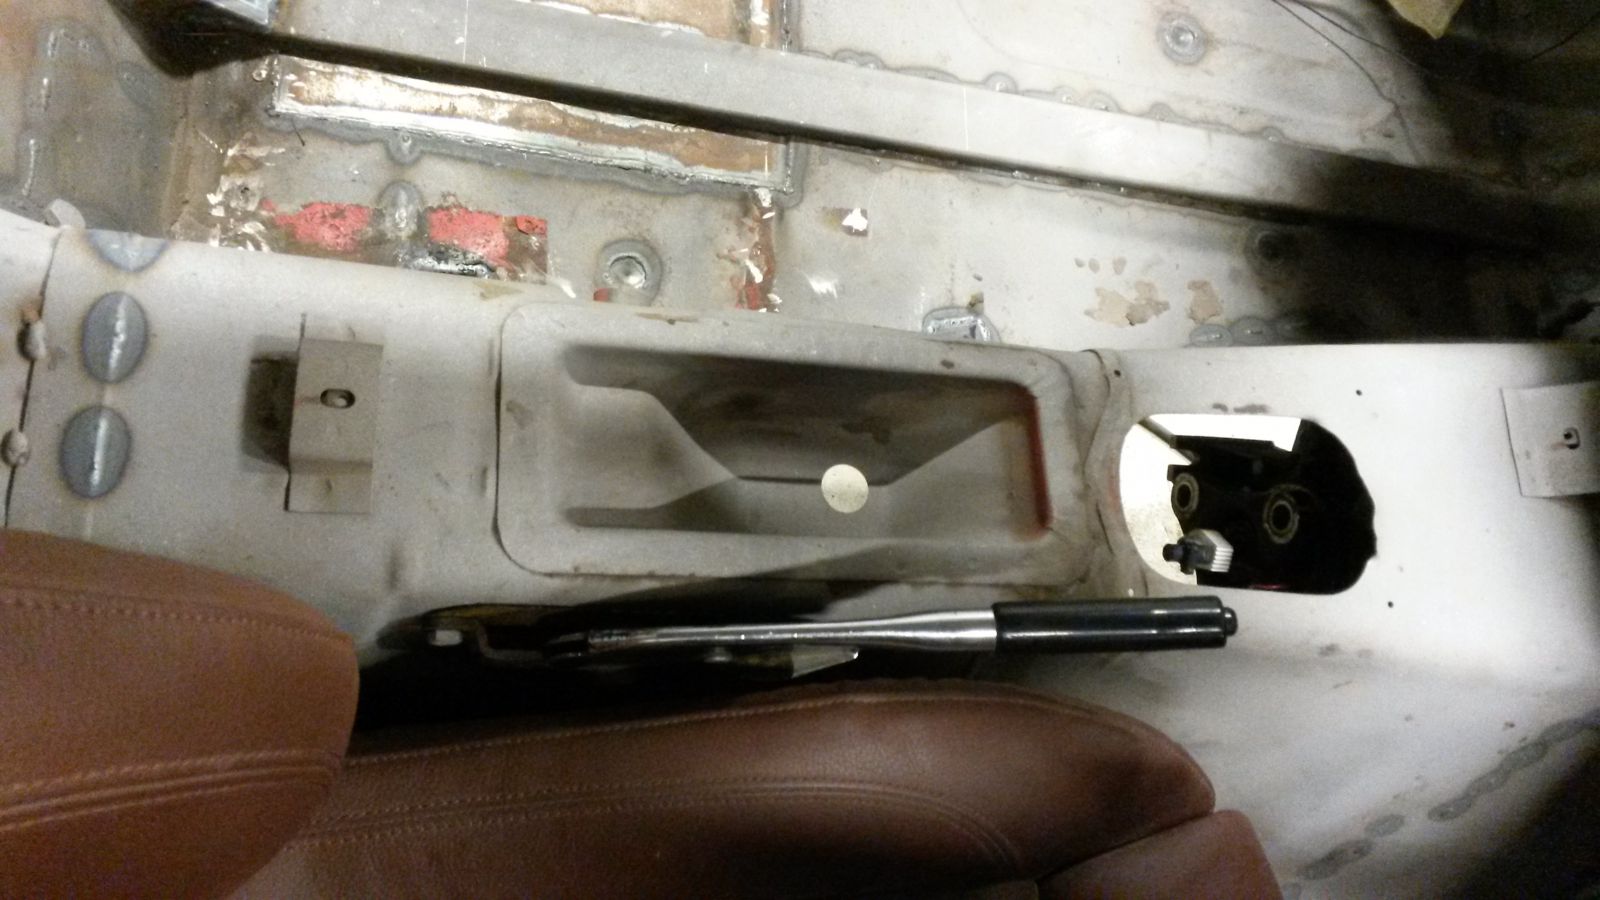
The distance to the ceiling is 92 cm with the seat at the lowest position. As you might gather, the ceiling trim is missing from my measurement. Can anybody tell me what the stock distance might be?
-
Looks like some engineering went in to that diff mount. Nice work!
-
How much headroom are you losing with the seats. I was thinking of using S2000 seats but those are really nice.
I really wouldn't know since the PO removed the original seat rail fixtures from the floor. I do have the original Z seats with rails, but the original mounting height information is missing. If somebody could make a measurement from the center of the seat to the ceiling we would have something to compare. The BMW seats are height adjustable, but I have them at the very lowest position in the pictures. I will measure the distance to the ceiling next time I go work on the car. At least for me the head clearance is adequate and I am not even hitting my head to the door frame when tilting my head and I am just shy of 6 feet.
-
Paint the dang car already! I check this section every couple of days to see if you made any updates lol
I hate to disappoint you, but paint will have to wait. The widening of the rear needed to be done because of the GTR sub frame. The sub frame was changed to get something beefier to the rear to cope with the added power provided by the BMW V8. As the whole car is undergoing some serious "hybridization" all around and it is conveniently taken down to bare metal, I plan to do all the fabrication work before coating. The progress of the work can be followed on the member project section.
-
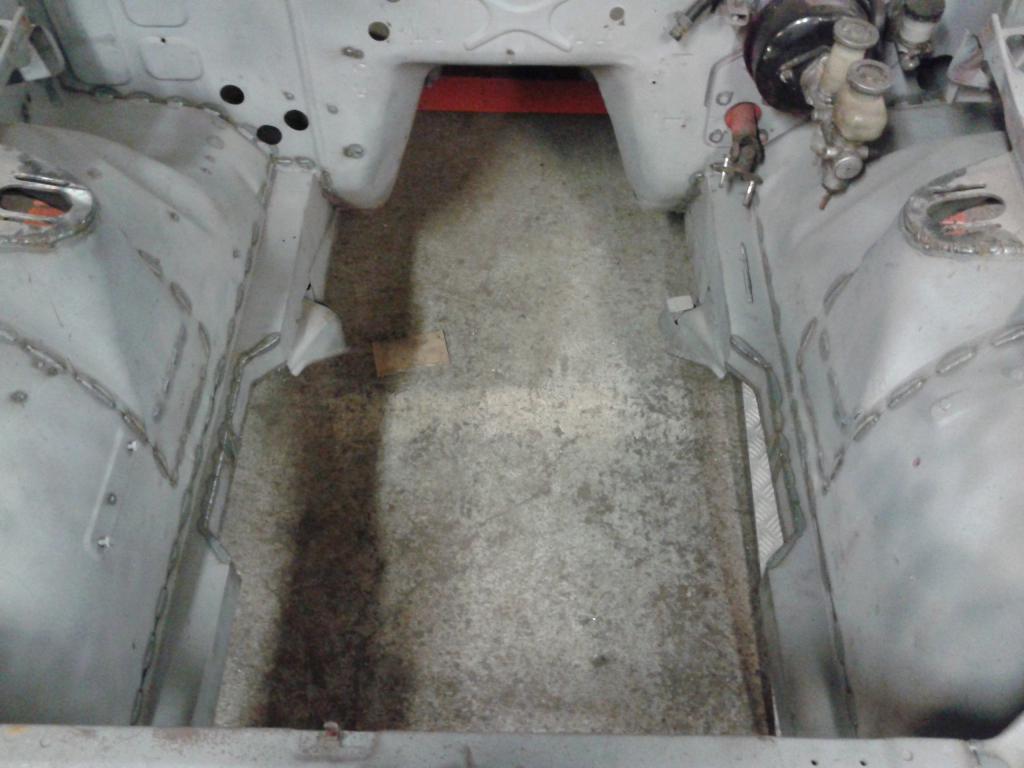
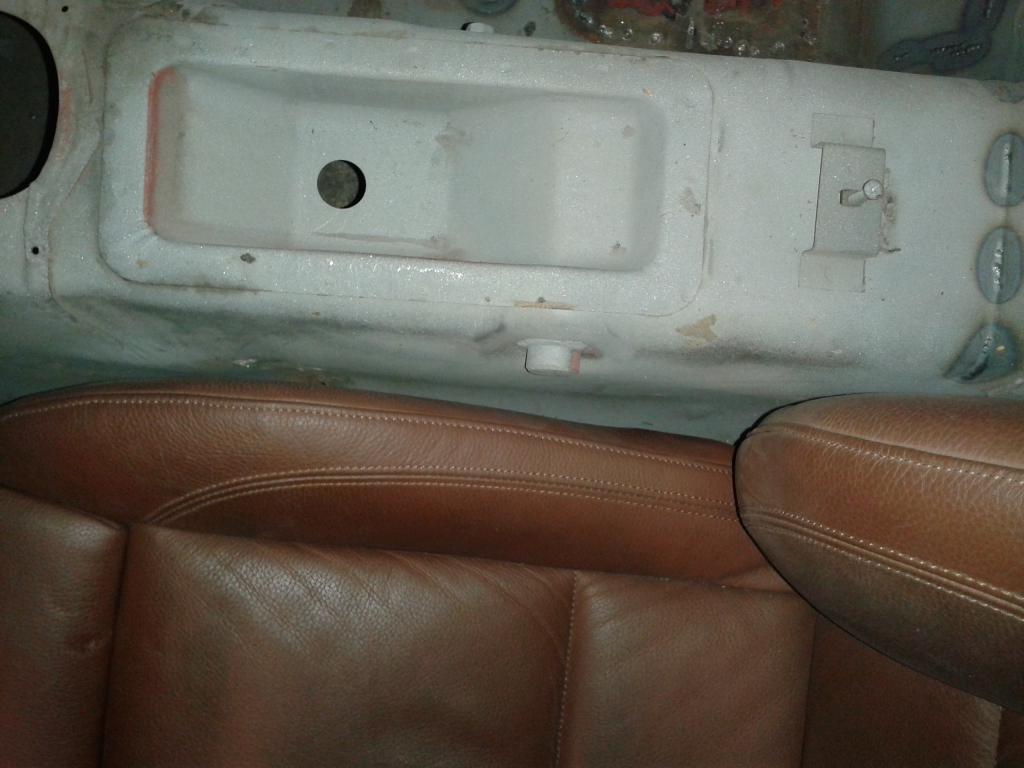
While I am waiting on my engine mount bushings to arrive, I decided to start installing the BMW seats. The seats are from an E46 3-series. They are sport seats with adequate side support for my application (Mostly street driving with occasional tracing), but boy are they heavy! I need to weight them so I can keep track of the total vehicle mass with all these modifications. Anyway, luckily the V8 will provide some decent power to move these seats.
The PO had already removed the stock seat mounts which would have been useless anyway. The BMW seats require to be mounted as low as possible to allow for adequate head clearance. In fact I needed to cut the floor a bit to get the seat leveled as the BMW original seat rails are bolted directly to the floor (with some reinforcements obviously). As of now, the floor is modified to get the seat in position. I still need to make the actual fixing points for the rails.
-
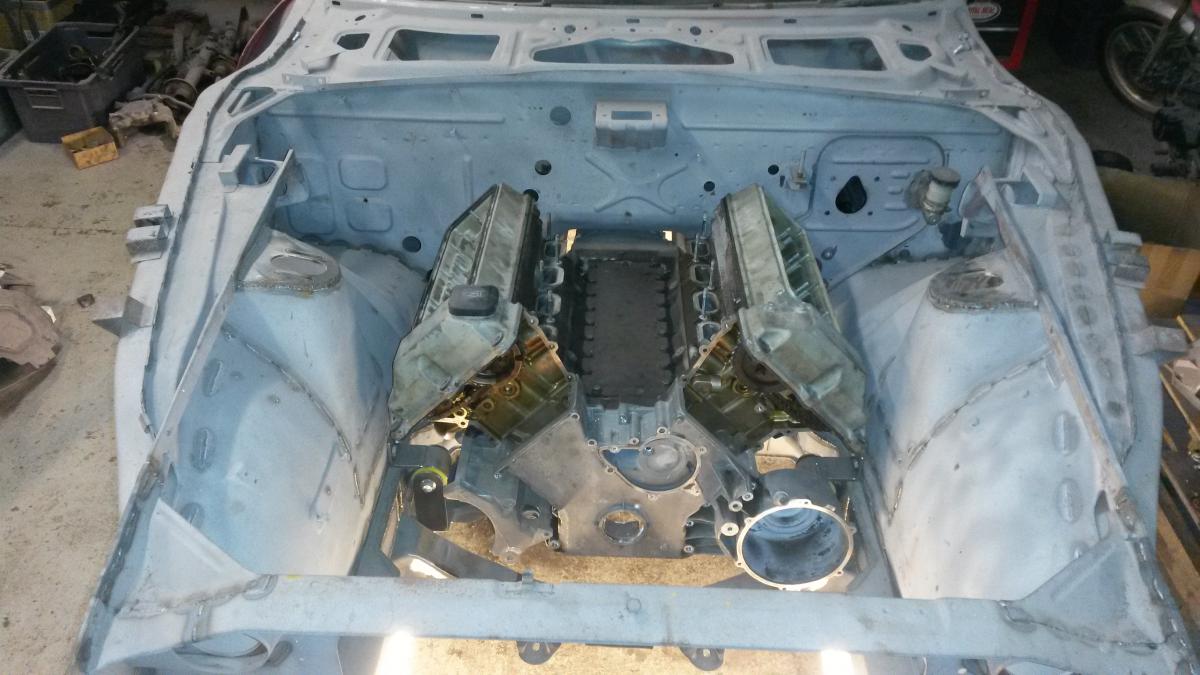
I built my mock-up a little bit further. I think cutting the frame rails to make some room is the way to go. I installed the steering rack, steering axle, brake booster, engine with heads and intake manifold. The exhaust is divided in two pieces per side and surprisingly on the driver side, even the front half of the stock exhaust manifold will fit and clear the steering axle. The rear part of the manifold will require some modification. On the passenger side the situation is not that good. The stock exhaust runs much further away from the engine because of the clearance to the starter and is hitting the longitudinal frame rail. On the top side, the valve cover is leaning on the brake booster, which needs to be moved closer to the clutch master cylinder. Luckily there is just enough room for the mod.
I started designing the motor mounting structure which will make use of the BMW engine stock aluminum motor mounting arms. I am not a mechanics designer by trade so go easy on me.
-
Found this picture from the web:
Does anybody confess this being from their swap project and mayby guide me to a write-up on the subject?
Anyways, this guy cut the frame rails and made some more room to assembly the engine lower. I was already pretty convinced that raising the tunnel would be the way to go, but then I saw this and talked to some mechanics design guys at work for initial design of the frame rail mod.
If I were to modify the frame rails, I would cut a piece of the rail at the strut tower and add a similar rail structure bend from sheet metal to the wheel well side. The cutouts on the rails in the engine compartment would allow me to assemble the engine low enough not to require cutting the tunnel. The engine would be positioned close to the firewall so that the AC-compressor and the alternator would slip into the cutouts at the strut towers.
The original x-member would be replaced by two x-members. one of these would be positioned in front of the cutout and the steering rack would attach to this from behind (opposed to the original placement in front of the x-member). The other x-member would be positioned behind the cutout. This one would include the engine mounts. The control arm attachment flanges would be cut out from the original x-member and welded straight to the new rail on the wheel well side. Any thoughts?
-
I have been trying to find information on other V8 swaps of whether people are able to preserve the transmission tunnel intact and still get the engine and transmission in without generating a huge angle difference in respect to the differential axle.
In my understanding they should be in the same angle and there should be a slight parallel displacement to assure proper joint movement.
Seems like in many cases the alternator is positioned quite high. Is there any other swaps that have been successfully finished, where the auxiliary devices of the engine are close to the longitudinal frame rails?
-
Neat project, in Scandinavia is that type of mill popular in sourcing like an LS1 in the US? . Keep us informed
The M60 V8 is quite popular with the BMW E30 gang. I am not sure if these engines have been transplanted into other vehicles that much. This is the first attempt on a Z as far as I know.
-
I Spend a few hours at the garage today. I found some cheap lazer alignment tools from the hardware store which I used to get the transmission axle and the differential axle to line up. Here the transmission axle is 30mm lower than the differential axle and the lines from the axles are aligned:
This is how it looks from the engine compartment:
The transmission is about 20 mm from the top of the transmission tunnel and the front cover of the has to be raised 50 mm in order to prevent the alternator housing from hitting the longitudinal frame rail.
I figured my options are to cut the longitudinal rails just before the cross member and make a tube frame in the front or to raise the transmission tunnel 50 mm and shift the whole power plant 50 mm higher.
I prefer raising the tunnel so I guess the Z is going under the knife once again.
Obviously the HVAC unit (or what ever that is called in these old cars) will not fit to the narrower space after the mod, but it seems as though the unit can be modified to squeeze it into the space. there is approximately 20 mm free space under the unit and the space under the heat ex changer can be made narrower with still preserving some airflow. I don't know how good the ventilation to the foot well will be after the mod, but alot of the other problems associated to the engine mod will be solved.


Stock Car Mafia's '78 280z LS2 Build
in S30 Series - 240z, 260z, 280z
Posted
The dash looks really good.