mr_han_solo
-
Posts
105 -
Joined
-
Last visited
-
Days Won
1
Content Type
Profiles
Forums
Blogs
Events
Gallery
Downloads
Store
Everything posted by mr_han_solo
-
Needing a brake line, driveshaft flange, and door handle.
mr_han_solo replied to mr_han_solo's topic in Parts Wanted
Brake line has been acquired. Zinpieces - PM Sent -
Needing a brake line, driveshaft flange, and door handle.
mr_han_solo replied to mr_han_solo's topic in Parts Wanted
What thread is the brake fittings on a '73 Datsun? SAE inverted flare or ISO Bubble flare? That's the question I couldn't get an answer to. -
Needing a brake line, driveshaft flange, and door handle.
mr_han_solo replied to mr_han_solo's topic in Parts Wanted
You must have a different brake setup. If you look at the picture I posted yesterday you can see the brake line coming from the passenger rear coming from the edge of the picture (it's a straight line). It goes into a junction box. Out of the center of that junction is another line that comes into the foreground of the picture, (it makes and s and in the picture you can see that its knicked). This line goes into a second junction box. -
1973 240z Hobby Car/SCCA Autocrosser
mr_han_solo replied to mr_han_solo's topic in S30 Series - 240z, 260z, 280z
This sounds like how mine is mounted. Then again I could be wrong. I've gotta drop the tank again tomorrow so I will double check how everything is routed. Yeah, I looked a mounting it both ways and that way is easier to get on and off without scratching all of the paint, plus it's less to handle putting it on that way. I found that the urethane scratches a whole lot easier than the headlight buckets. Here comes the paint. Okay, here goes. Since I'm trying to do things "different" on this car I decided to mimic this paint job. http://www.rickwrench.com/index79mas...llarpaint.html Okay, I know what your going to say, Rustoleum? C'mon man. Well I will be honest, I had my doubts when I started too. I just wanted to see if I could get the results that guy got, except I added a twist. Spray paint. Yep, I did my base with Rustoleum spray paint. Honestly, it came out better than I expected. The color is Satin Italian Olive, and it's $3.77 a can at the local Wal-Mart.The first thing I did was roll/brush on some Evercoat Dura-Build primer that I had left over. Wasn't that bad, and sanded like normal. Found out the hard way that you still have to wear a respirator when brushing it on though, don't even ask me about my headache. Anyways here is it with the base coat: Does it look splotchy in areas? Yeah, just stick with me though,and remember that this is mainly an autocross and track car. Since I'm putting a SBC in this car I felt it was only appropriate to put a bowtie on the underside of the hood: At this point the color coat was actually looking better than I expected so I decided to go the extra mile to protect it. I went down to the local auto paint store and bought a bunch of the two stage gloss clear in a can. They have a little button in the bottom that you press to release the hardener. Shot the entire car with these then I sanded with 600, 1000, and 200. Then I hit the entire car with a light hand buff with rubbing compound. Here is how it looked: Perfect? No, but I didn't expect it to come out half as good as it did. I can't wait to see how it looks once I move to a higher polishing compound/wax with my electric buffer. Also, the good news is that if I ever scratch or chip it, just gotta respray. -
1973 240z Hobby Car/SCCA Autocrosser
mr_han_solo replied to mr_han_solo's topic in S30 Series - 240z, 260z, 280z
Do you autocross with the Tennessee Valley/Huntville SCCA? I have been planning on joining the Birmingham Club (ALSCCA), but Hunstville is just as close. Is your 240 in the XP class? From asking on the Birmingham Board, and reading the ruels, it seems like that is where my car will fall. Do you know if that is a competitive class in the Huntsville division? I know from looking at past results with the ALSCCA it seems like only 3 or 4 cars compete in XP in Birmingham. -
Needing a brake line, driveshaft flange, and door handle.
mr_han_solo replied to mr_han_solo's topic in Parts Wanted
I am needing the line that goes after the picture you posted. After coming from the rubber line the metal line goes into a 3 way joint. Out of the middle of the joint is a 6 inch metal line in the shape of an S, it actually joins two of these junction joints together. That is the line I need. Hopefully this picture will explain better. The line coming in from the top is the one you posted. You an see where it goes into the T junction. Out of the middle and coming into the foreground of the picture is the 6" metal line that I accidentally nicked. -
Needing a brake line, driveshaft flange, and door handle.
mr_han_solo replied to mr_han_solo's topic in Parts Wanted
Yes, it's for my '73 240z. Sorry, just updated the original post. -
Needing a brake line, driveshaft flange, and door handle.
mr_han_solo posted a topic in Parts Wanted
Hello, I am needing a small brake line in the shape of an S for my 1972 240z. It's a hard line that is located in the passenger rear, above the half shaft. A picture of it, and the reason I need a replacement can be seen here: I am also wondering if anyone has the JTR DAT-110 Driveshaft flange. Aside from that, I am needing a exterior door handle, its for the drivers side, but just a handle will work. Thanks, Han -
1973 240z Hobby Car/SCCA Autocrosser
mr_han_solo replied to mr_han_solo's topic in S30 Series - 240z, 260z, 280z
I decided to go ahead and put new brakes all around, since this had to be done anyways. After much thought, discussion, and forum posts, I decided to stick with the stock drums and Toyota 4X4 front calipers. I felt like these would give me the most bang for my buck at the current time. This was also the time I decided to throw on some stainless steel brake lines. After the installation the UPS man brought me my new bumper. I then went to work mounting it. Now, it's not exactly the way I think it would usually be mounted. I wanted a bumper that could be removed and put back on very quickly if need be. I went to Lowes and purchased 6 stainless steel carriage bolts and wing nuts. After drilling the corresponding holes in the bumper I did a test mount. It's safe to say that the entire bumper can be unbolted and removed in less that 3 minutes. I haven't put my brake ducts in yet, but I'm expecting that to add a minute or two to the installation and removal times. Here is how she set just before a wipe down and primer: Next time, paint! -
1973 240z Hobby Car/SCCA Autocrosser
mr_han_solo replied to mr_han_solo's topic in S30 Series - 240z, 260z, 280z
Thanks man! No, unfortunately I dont. Honestly, it's pretty simple and straightforward. If your just wanting to replace the LED's you dont even have to take the gauges out of the dash. Just find the wire going to each gauge, (red/black i think) and it will comes to a plastic piece. Pull on this plastic piece, sometimes you have to pull hard, don't worry it wont break. once it pops out press and turn to remove the bulb. Do the opposite to install the led. I got my LED's from ebay. BA9S Xenon White High Powered LED bought them for like $10 and had them shipped from China. They work great, zero problems. The only issue is that they don't dim. I mean they will get dimmer, but not in the sense that conventional bulbs dim. -
1973 240z Hobby Car/SCCA Autocrosser
mr_han_solo replied to mr_han_solo's topic in S30 Series - 240z, 260z, 280z
Next I wanted to put some white face gauges in the car, I looked around and saw that it would be in the $45-$50 range to purchase the white face kits, so I decided to make my own. I still have the .PSD file if anyone wants a copy for their own gauges. I also LED the entire dash. I am pretty happy with the result. -
1973 240z Hobby Car/SCCA Autocrosser
mr_han_solo replied to mr_han_solo's topic in S30 Series - 240z, 260z, 280z
At yes, it does make better sense now. I thought you were talking about the tank vents you can get for a gas tank itself and fitting it to the hose somehow. I actually live near Gadsden so I'm not too far away from the Huntsville/Decatur/Florence area. -
1973 240z Hobby Car/SCCA Autocrosser
mr_han_solo replied to mr_han_solo's topic in S30 Series - 240z, 260z, 280z
Yeah, I may just end up getting a sole/vent thing for that line. However, I plumbed it just like it showed on the UK/Europe diagram, and it didn't show a sole/vent. Wish I would have saved that diagram. Edit: Found it! It was in this thread. Memeber by the name of Morbias talked about that face that UK cars didn't have it and what lines could be plugged. -
1973 240z Hobby Car/SCCA Autocrosser
mr_han_solo replied to mr_han_solo's topic in S30 Series - 240z, 260z, 280z
After the floor pans were replaced it was time to move onto undercoating them and the inner fenders. I should make note of the following: In a stock 240, (and i'm sure the same goes for a 260 and 280), the wires controlling the tail lamps, defroster, power antenna, fuel pump, and fuel gauge run along the passnger floorboard before going into the inner rear wheel well/B pillar. To change this I took a small hole saw and made a LESS than 1" hole in the front of the side frame. From all of the research I have done making a hole shouldn't be a problem as long as it's small. I ended up running these wires through the hole and into the rear of the car vie the rear wheel well/B pillar. Looks very clean. As I said before, I undercoated the floor pans and the inner wheel fenders. Here is the first coat: Inside if the actual fenders was undercoated as well. Here it is bondoed and hung: Since I was going with a carbed small block chevy, I wanted to trash the evap system. This would clean up the engine bay and the trunk area. Fortunately, I found a diagram for a Europe/UK S30 that showed how the tank lines should be routed without the evap tank installed. Here are some pictures for this portion of the project. Here you can see where the top two vent lines were cut, grinded and welded: This image shows the top vent line on the filler neck. This line exits the car through the existing hole and connects with the remaining vent line on the tank with a T connector. The third end of the T is just left open as a vent. I made sure that this t-connector vent was higher than the tank itself so I wouldn't have any spillage issues. That said, when I fill it up, I still don't know if I will be able to fill it like normal or fill it until the gas spills out of the vent itself. As I said before I modeled this just after the European system which didn't use an evap tank. I didn't inquire however, if it was still possible to fill the tank up to the gas cap or not. Time will tell. Here is my Holley Blue mounted: -
Putting Battery in Passenger rear compartment
mr_han_solo replied to mr_han_solo's topic in Fabrication / Welding
Sweet! Now I know the best way to run my wire. What gauge did you go with on the cables? -
1973 240z Hobby Car/SCCA Autocrosser
mr_han_solo replied to mr_han_solo's topic in S30 Series - 240z, 260z, 280z
Now it's time to replace those old rusted out floorpans. It was also during this time that my $50 used eBay spoiler came in: -
Putting Battery in Passenger rear compartment
mr_han_solo replied to mr_han_solo's topic in Fabrication / Welding
Mongo510 and EF Ian. How did you guys run your wires? I'm sure you ran the primary through the firewall. How about the negative? Did you just bolt it to a piece of metal in the compartment? Also, what did you do about your fusible link? -
Hello everyone, Although I have been posting on here for several months, I wanted to have a lot of pictures and progress on my car before I put up my build thread. I already have a third-gen Camaro that I rebuilt, and a 240z Autocrosser/Track car was next on my list. I started searching for a local car (Alabama) in August of 2013. After several craigslist ads I came upon a listing for a 1973 240z and a 1975 280z parts car for $400. The 1973 wasn't in the best condition, but car wise it was complete. The guy lived over an hour away, so I had to make two separate trips a month apart to get the two cars. At least the spare tire area is good right? After I got her home the first thing was to get it running so I could move it around the yard and in and out of the garage once winter came. After lots of struggle, and a PO who didn't know anything about wiring, I got her fired up. Gauges weren't wired right, and no lights at all, but that will be taken care of in the future. Then I had to work on the window hardware so I could actually get the window to roll up. It was during this time that I noticed the drivers side window was broken. Thankfully I had the 280z on hand by this time, and used it's door instead. The next step was to wash her and start the bodywork: Unlike what seems like a majority of S30 loved I liked the 280z taillights over the 240z style. I then began to fabricate the rear to accept the 280z lights. This started with a cardboard stencil cut to shape with holes in to so I would know where to drill and put the studs on the lights themselves. Don't get me wrong, there is still a lot of test fit and cut with the lights themselves! I think I will stop here for the day. Comments, criticisms, and questions are welcomed.
-
I recently did this (Fall 2013) here are some pictures of my progression. I found it best to make a cardboard template and get it to fit before you cut your sheet metal. Passenger side complete and how the drivers side looked originally: Cut what was left of the floor after I cut it out (also a better look at the passenger side) I should go ahead and say that you may want to replace your framerails depending on how rusted they are. I took so left over stock that I had and beefed mine up and boxed them before I put my floor pan in.: Cardboard template: Now is a good time to hit your frame-rail and remaining oil pan with a wire brush and rust encapsulator. Cut and bent the floorpan. Also cut holes to weld the frame-rail to the pan. Did a lot of research and found that spot welds were a lot more economical and just as strong as making a line weld. That said, you will have to lay down beads around the floor pan itself. Also, I should note that this custom floorpan isn't as "neat" as one you would buy. Not is it bent like Sunny Z's floorpan is above. Just a thought if you are wanting to go the custom route. After welding, grind down your welds to knock off any sharp points. Then fill seams with caulk. You can get automotive caulk at an auto parts store. On the drivers side (side pictured), I actually used latex caulk from Lowes. Just wanted to see how it worked. I also tested silicone caulk, but it didn't dry or adhere to the metal. I will say the latex caulk has held up so far. I dunno how long it will last, but that's what tests are for right? After the caulk dried I painted the floor and tunnel with John Deere Blitz Black. You will notice that the passenger side if a white/gray. That is some Rustoluem paint that I bought in a quart. I noticed that it would scratch and scuff really easily when applied to the bare metal. I had a gallon of the Blitz Black left over, to inform you Blitz Black is essentially a rock hard enamel for tractors. I think it's like $30 a gallon. The stuff is made for tractors and implements so it should hold up to a floorboard. I will apply the Rustoleum white/gray over it, hopefully it will stick better. Here is the only shot I have of the finished floor: All in all, I saved a lot of money. Think I paid about $60 for the sheet metal, $8 for the caulk, and $5 for the rust encapsulator. Pretty much had everything else on hand. I'm confident that you can do a much better job than I. - Han
-
Hello, I was wondering about something that I couldn't find in the JTR manual. I am doing a V8 engine swap with a T-5 transmission. I know that the JTR manual talks about a larger drive-shaft flange that goes from the differential to the driveshaft. Does this require a Camaro/Firebird drive-shaft, or can I use my 240z driveshaft. The more important part of the question is the T-5 Yoke. will it mount to the Datsun drive-shaft? If it does, then I may just forgo the differential flange. Thanks, Han
-
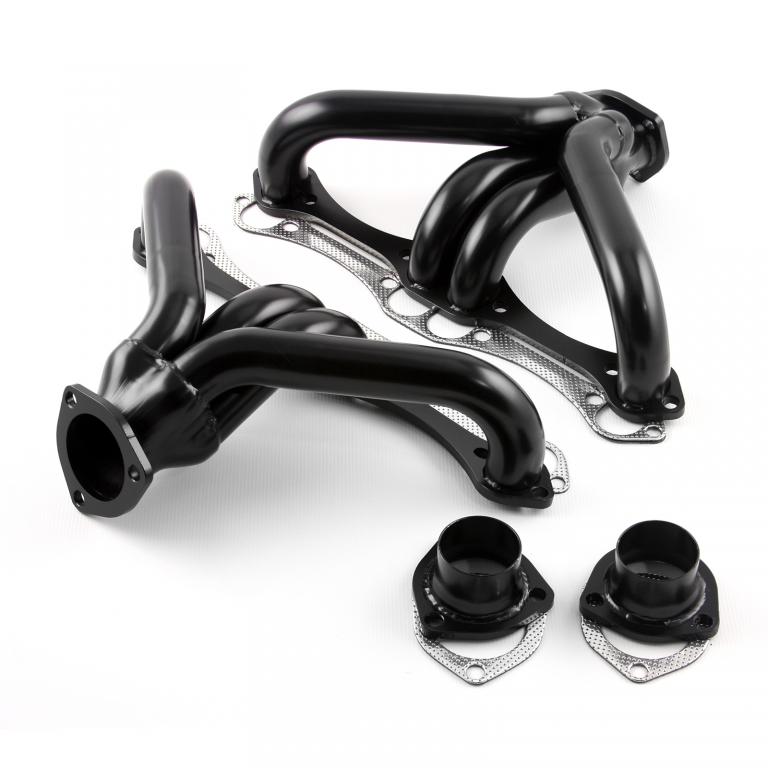
Looking for some headers for my car. It seems that everyone Is always talking about the cheap ebay headers that are a good fit. While there isn't a brand name, I was wondering if this was the headers that everyone speaks of: http://www.ebay.com/itm/Chevy-SBC-350-1-5-8-Block-Hugger-Black-Exhaust-Headers-Angle-Plug-Heads-/181319671485?pt=Motors_Car_Truck_Parts_Accessories&hash=item2a377e9ebd&vxp=mtr Thanks.

-
PM Sent
-
PM Sent!
-
I marked it and it is in one spot. I took the 5th driven gear off (the bigger of the two) and spun the little gear while it was still on the shaft. I could see it wobble with the naked eye. However, once I took it off and spun the shaft it looked perfectly straight. I also bolted up the tail-housing and put the transmission in gear to see if the output shaft had a wobble to it. It did not. This leads me to believe that the gear ma be out of round. Have you or anyone else ever heard of this happening? I know this is really against common sense, but I don't see how the shaft could be bent at the 5th gear area and be straight when it exits the tailhousing.
-
Well great. Are there any current commercially available longtubes that are compatible with the JTR conversion? How about hi-po block huggers that would fit the bill?