NylonAdmiral
-
Posts
50 -
Joined
-
Last visited
-
Days Won
1
Recent Profile Visitors
4185 profile views


NylonAdmiral's Achievements
")


-
Hi guys I've trawled the forum and found a whole bunch of different posts but they seem to be inconclusive, or they're so old that they're full of broken links. I've got an RB26 from an R34, it's currently at the engine builders and I'm trying to get the guys there to relocate the dipstick to the rearward position for me as it has a RWD oil pan on it. There seem to be a lot of posts saying that there is just a brass plug that can be knocked out, however this seems to be most prevalent on RB25 related threads. Whilst some people seem to have been able to do this on RB26s, there are other threads saying that some RB26 owners had to get the block machined. Unfortunately, most of the threads that have pictures are so old that the picture links are broken. By block doesn't seem to have any kind of brass plug that could be knocked out. Can anyone clarify this situation? Or does anyone have a thread documenting how they machined a 26 block for the rearward dipstick hole? Any pics would be a bonus too! Thanks a lot in advance!
-
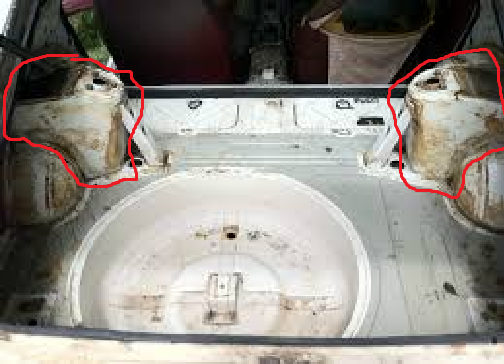
Hi, I'm looking for a set of rear turrets from a 240z. Perhaps you have a rusted out or crash damaged car? If so I'm looking for the turrets to be cut out out. I've attached an image highlighting the panels I'm after. Thanks.

-
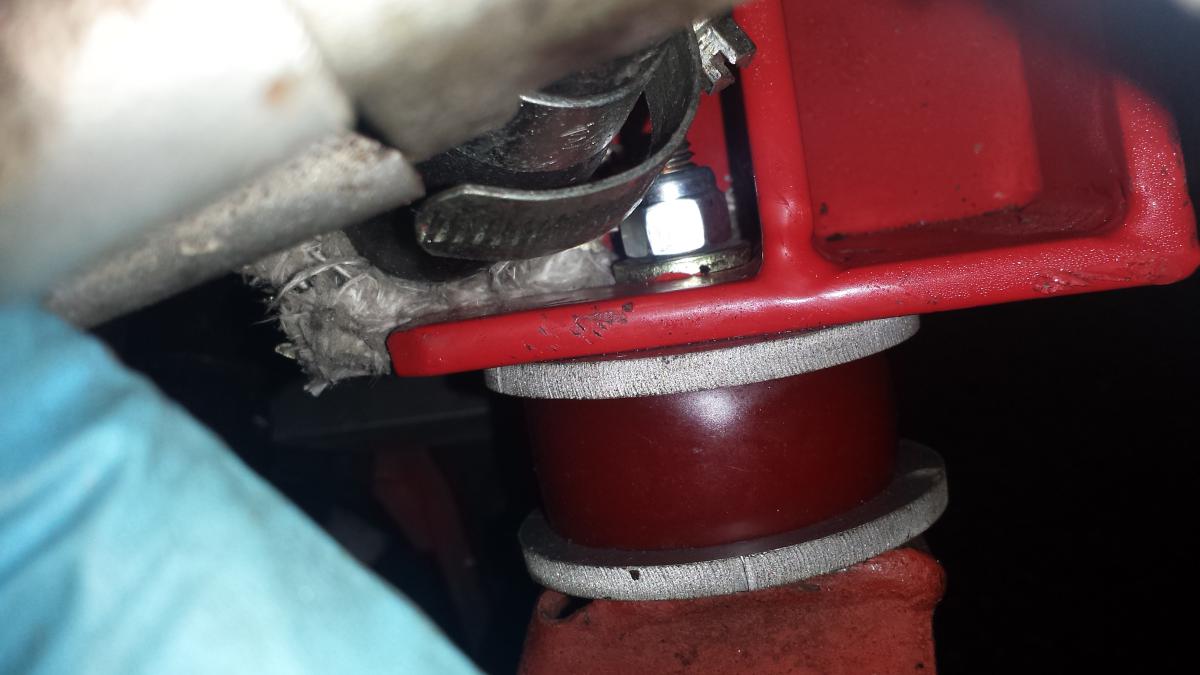
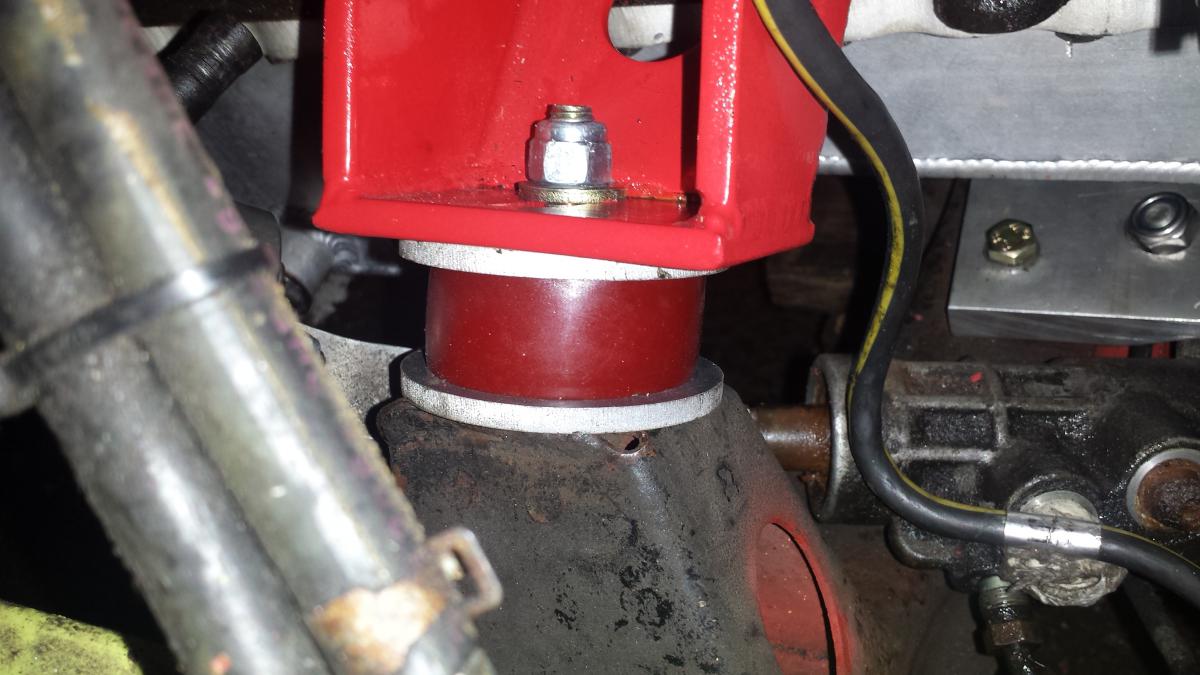
Hi guys, I'm trying to get my drivetrain alignment set and am finding that the tail end of my gearbox seems to need to be raised pretty high. Here's the setup: '71 240z, RB26 DETT mated to RB25 DET gearbox, McKinney engine and gearbox mounts, R200 diff mounted in T3 rear end, Because the T3 moustache bar is solid billet and the R200 is solid mounted to that, there isn't really any way of adjusting the orientation of the diff, therefore the position of the engine and gearbox need to be adjusted to give the correct propshaft angles. With the McKinney engine mounts, I have the poly bush on one side, then on the other side I have the poly bush plus two of the supplied spacers. This seemed to be the only way to get the angle of the engine set correctly. To match the angle of the gearbox output shaft to the same (or close) angle of the R200 pinion flange, I've set a digital inclinometer against each face and then looked to adjust the height of the gearbox, because the R200 is essentially fixed. Here's the bit that seems odd though. I have to lift the tail end of the box really quite high in order to get the angles even close. If I just bolt up the McKinney gearbox mount then the angle of the gearbox is about 5deg out. To get it close to being right, I'm going to need to make a spacer for the poly gearbox mount to space it away from the gearbox by about 20-25mm which will lift the tail end of the gearbox. I can't lower the engine any further because one of the bushes has no spacers already. If I take the spacers from the other side it will just rotate the engine without really achieving anything. Has anyone else come across this same issue? Is this just how this config sits or am I missing something? Thanks for your input.
-

Fuel Tank & Evap Design
NylonAdmiral replied to NylonAdmiral's topic in S30 Series - 240z, 260z, 280z
Thanks Bonk I think it would still work without the diverter valve if tube 13 were plumbed into the inlet? When the pressure is high, excess vapours would be vented into the inlet, when the pressure is low, the tank would draw fresh air down the same line? As far as I can see, the diverter valve is only actually necessary if you want to vent the fuel vapour to a different location, such as the crank case? -
Fuel Tank & Evap Design
NylonAdmiral replied to NylonAdmiral's topic in S30 Series - 240z, 260z, 280z
Thanks for the input. Tony D, it was actually your posts on other threads that had made me lean more towards keeping the evap system and incorporating the relevant fittings into the new tank. I've been mulling it over but was interested to see how other people have done it on here. At present, I'm thinking of keeping the evap system etc and making the new tank with the required fittings. I'm just working out what to do with "tube 13" now really and had thought about a couple of options. 1. I guess I could fit it with a remote vent valve in order to allow the tank to breath. 2. Would there be any issue in plumbing tube 13 into the inlet system? I guess the connection to the the crankcase is for environmental reasons so I could live with that? If I connected the hose straight to the inlet then the tank would still get the filtered air during fuel consumption, but the fumes from the hot tank would still be able to vent back into the inlet if they had to? I still have an almost complete donor R33 GTR sat in my garden so if there are any relevant parts that could be reappropriated from that to suit the newly installed RB26 then I should have them. Thanks again for your thoughts. -
Hi guys, I'm trying to figure out a few fuel tank/evap requirements. I know this has been discussed in a few different places on HybridZ but I haven't got a conclusive answer because most of the posts seem to discuss the pros/cons of deleting the evap system. Basically I have a US spec '71 240z. I've got my RB26 installed and am now just plumbing in the fuel system. I'm fabricating a custom aluminium fuel tank to sit in the OEM position and am working out the final requirements for fittings on the tank. As this gives me somewhat of a blank slate, I had considered designing out the evap tank and using a vent valve to vent the tank but a number of posts seem to advocate actually keeping and using the evap tank. Anyway, my question is, those of you that have installed RB's or other fuel injected engines, have you maintained the original evap tank? And if so, what did you do with tube 13 in the attached diagram? I believe in totally original trim, tube 13 goes to a small valve in the engine bay which is like a check valve that vents the vapour tank to either the air intake or the crank case? Any help would be appreciated. Thanks!
-
To be honest, I've found that the answers to most of your questions come down to three things: Time, money and skills. If you have very little free time, or don't have the skills to fabricate the parts you need, then you'll have to pay a lot of money for them, or for the services of someone who can make them for you. If you have no money, you can spend a lot of time researching what has been previously done, and searching out all the bits you need at the best prices etc. I know it's not really the answer you're looking for but there are a huge number of parts available for all the engines you listed from all over the world. Again, it just depends whether or not you want to spend the time and money sourcing them. When you say "realistic cost", this again is hugely dependent on how much time you can put into the project, and how much you can do yourself or fabricate yourself. As an example, I needed a custom inlet and exhaust system making which I got quoted about £5,000 GBP for (circa $7k USD). Instead I bought a TIG for £1,000 and learned to TIG weld. At the end of the project I could sell the machine if I wanted to but I probably won't. You can see that this decision alone reduces the build cost by about £4,000GBP. Its this kind of thing that happens pretty much every step of the way throughout the build so what you decide to do yourself, versus what you decide to outsource will massively effect the end cost of the project. I live in the UK where Datsun parts are far, far fewer than they are in the States. The cars themselves are much less well "supported" here than they are in the US so I've had to spend a lot of time buying parts from Japan, America, Australia etc but also a lot of time fabricating things myself. I didn't worry about how well "supported" the car was when I started the build, instead I just looked at all the great build threads on this site and useful guides, and asked myself "could I do that?", "could I make that?" etc. It may be a little presumptuous but my guess is that with three kids (shortly), they might be quite demanding on both your time and your wallet so you might have to resort to doing as much as you can yourself. In some ways thats a good thing because one thing I would say, is that when I started my build there was lots of stuff I'd never done before but the cars are easy to work on and if you're prepared to spend time learning then most of the skills you need are easily attained. I've learned a lot from the input of people on this forum which is why I in turn have tried to make a few YouTube videos etc whenever I've figured things out myself in case it subsequently helps someone else in the same way that I have benefited. If it were me, I'd make my engine choice on what I actually wanted rather than what was most commonly available, the parts can always be found if you're prepared to look. Anyway, good luck with your build whatever you decide to do!
-
McKinney Engine & Gearbox Mount Alignment Issues?
NylonAdmiral replied to NylonAdmiral's topic in Nissan RB Forum
Exlifesaver, I left the speed sender in place but notched the mount in order to clear it. You can see it in this short YouTube video I made to explain what I did. When I next take the engine/transmission out, I'll weld in some plate to tidy it up, then I'll also add some bracing around the mount in the tunnel. I've looked through so many build threads I can't remember which is which but I think ZT-R one did the notching, with no additional bracing on his build and it was OK? Maybe look through his build thread. -
McKinney Engine & Gearbox Mount Alignment Issues?
NylonAdmiral replied to NylonAdmiral's topic in Nissan RB Forum
I'm also trying to set the orientation of the engine correctly. I've found people saying that the engine should be angled over at a bout 10-11 degrees, although I can't find any info on where this angle is being measured from? Does anyone know? Also, I'm trying to work out the correct angle "nose to tail", my engine seems to sit quite a bit nose up. Does anyone know what the correct angle should be? Thanks -
McKinney Engine & Gearbox Mount Alignment Issues?
NylonAdmiral replied to NylonAdmiral's topic in Nissan RB Forum
Ah OK thanks, that makes sense. I'll work out some strengthening options around the mounting points. I have an R33 GTST box which is obviously more similar to the 34 GTT box rather than an RB20 box. -
Here you go. Here's a handful that I pulled from the people I'm following. Worldwide, S30 "build threads": https://i.instagram.com/sssrdub/ https://i.instagram.com/2jgreezy/ https://i.instagram.com/allthingspower/ https://i.instagram.com/redgst97/ https://i.instagram.com/fairlady_240z/ https://i.instagram.com/thegoldenturd/ https://i.instagram.com/mee633/ https://i.instagram.com/shawn_s30z/ https://i.instagram.com/datsmo280z/ https://i.instagram.com/dylan46_240z/ https://i.instagram.com/beau.b_240z/ https://i.instagram.com/s30garage/ https://i.instagram.com/jmoyetyt/ https://i.instagram.com/2jz_240zandrew/ https://i.instagram.com/s30_dom/ Some of the nice S30s which seem to be in the UAE, Kuwait etc https://i.instagram.com/ma7mood.90/ https://i.instagram.com/mi.alsalman/ https://i.instagram.com/qqxqq/ https://i.instagram.com/yuyu1400/ https://i.instagram.com/aboabdallah440/ https://i.instagram.com/hrby240z/ https://i.instagram.com/abullau/ https://i.instagram.com/240z00234/ https://i.instagram.com/abdo7878/ https://i.instagram.com/240z432/ Some more finished builds, worldwide. https://i.instagram.com/dakota_dmitrenko_wood/ https://i.instagram.com/emdatsun73/ https://i.instagram.com/hector240z/ https://i.instagram.com/tadashi.s30z/ https://i.instagram.com/hrby280z/ https://i.instagram.com/kevinhuth/ These are just the first few in my followers list, there are loads of nice S30s on IG if you look.
-
If you're actually on IG, click on the list of people that I follow and you'll be able to find a lot of accounts with people with nice Z's. https://www.instagram.com/adamhutchin/ There are at least a few HybridZ members on there I think. If you're not on IG, I'll pick out a bunch of accounts with nice cars and post them here so you can view them in your browser.
-
McKinney Engine & Gearbox Mount Alignment Issues?
NylonAdmiral replied to NylonAdmiral's topic in Nissan RB Forum
Thanks for the info ZT-R. I've been through 15 pages of your build blog and can't seee any pics of the mods you did to the tranny mount. Can you pount me in the right direction? Do you mean the McKinney mount bent or do you mean the mount inside the transmission tunnel bent? Also, do you know what the correct inclination of the RB should be? Thanks! -
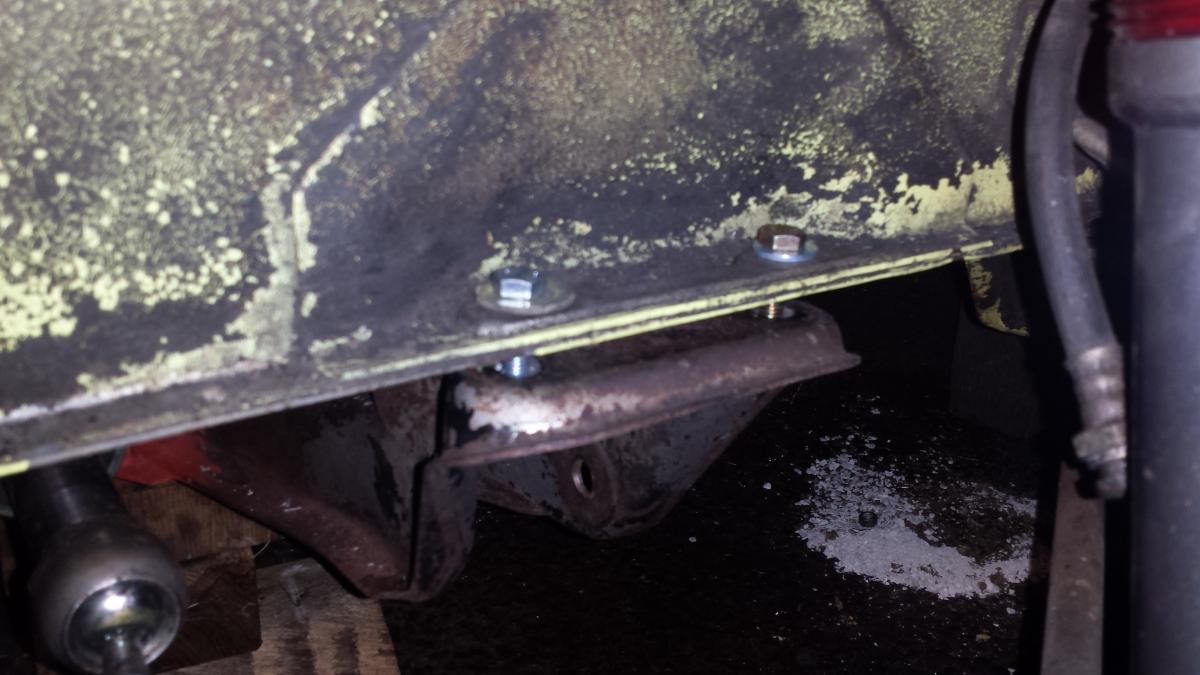
I've just spent some length of time trying to figure out the engine/transmission fitment issues I'm having at the moment and have hit a bit of a wall so I'm hoping someone on here can spot where I'm going wrong. Car is a US spec '71 240z, engine is a BNR34 RB26, transmission is from an R33 GTST (RB25), engine and gearbox mounts are from McKinney Motorsport. I fitted the McKinney engine mounts to the engine, then the McKinney gearbox poly mount to the gearbox, then bolted the engine & transmission together. I lowered the whole assembly into the car, and using an engine leveler I got it sitting roughly square and level in the car. I found though that I couldn't get the engine to clear the bonnet latch bracket. I thought it must have been something to do with a clearance issue; it kind of felt like the engine needed to go backwards for the mounts to sit on the subframe but it couldn't quite get "under" the bonnet latch bracket as the engine clashed with it. I struggled with this for a while so tried a different approach. I unbolted the subrame from the car and lowered the engine down to get the rear of the engine sort of under the bonnet latch bracket. I then bolted the subrame onto the engine and bolted the gearbox mount to the poly bush. This seemed to work pretty well as it was much easier to get the engine into roughly the right place. I then lifted the whole lot back up again so that the gearbox mount lined up perfectly with the bolt holes in the chassis, but somehow the problem with the bonnet latch bracket remained, it STILL clashed with the engine. I can't seem to figure out what's going wrong here? You can see from the pictures that the following all seem to be correct: The gearbox is pretty central in the transmission tunnel. The engine is pretty central in the engine bay. The engine mounts are adjusted so that the engine would be in its forward most position. The engine/gearbox mounts all seem to be fitted correctly. But somehow, the RBs breather still seems to be butted up hard against the latch bracket. It's odd, because the only way for the engine to clear the bracket would be to either move the engine forward or downward. I can't see that this is possible though because its position along the length of the car is somewhat fixed by the gearbox mount and it can't really go any further forward anyway without the front pullyeys hitting the anti-roll bar, that means the engine can only really go down and away from it. However, this isn't possible either. You can see from the pictures that the engine is fixed to the subframe, but the subrame isn't bolted to the chassis. This is because it can't come up any higher because of how hard the breather is butted against the bracket. I've tried everything. All the bolts are done up finger tight so that the whole assembly can be "jiggled" around to try and get it to line up right but it doesn't. Can anyone suggest where I may be going wrong? Any help would be much appreciate, I've been really struggling with this for hours!
-
CX Racing Oil Pan Review - RB26 into 240z
NylonAdmiral replied to NylonAdmiral's topic in Nissan RB Forum
Thanks stony, don't worry about the pics I ended up just making a different bracket.