
JTCN
-
Posts
60 -
Joined
-
Last visited
-
Days Won
1
Content Type
Profiles
Forums
Blogs
Events
Gallery
Downloads
Store
Everything posted by JTCN
-
Front brakes keep glazing and make noise
JTCN replied to JTCN's topic in Brakes, Wheels, Suspension and Chassis
Okay so I could order 2 sets of these shims and just break off the little tabs on 1 set to use for the "LH" side. I guess I might as well order new pads. But I noticed that thezstore has the OEM brake pads for $70 compared to something like this (http://www.thezstore.com/page/TZS/PROD/classic21o02/24-4960) which is $40. Is it really more worth it to go for the OEM? -
Front brakes keep glazing and make noise
JTCN replied to JTCN's topic in Brakes, Wheels, Suspension and Chassis
Thanks for the help. Had no idea a little thing like a shim might be the problem. I guess I'm going to order a set of those shims and try them out. Also last time I pulled the pads I took a razor and tried scraping most of the goop off the back of the pads. Should I order some anti-squeal stuff and reapply? Edit: Just noticed thezstore doesn't have the "LH" shims in stock. Anywhere else I could get some? -
Front brakes keep glazing and make noise
JTCN replied to JTCN's topic in Brakes, Wheels, Suspension and Chassis
If you're referring to something like this (http://www.thezstore.com/page/TZS/PROD/24-5450) then no. When I pulled off my pads they didn't have shims on the back, just a layer of anti-squeal paste or something right on the pad. No performance change that I could really tell. -
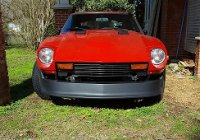
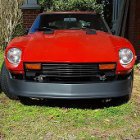
I've probably pulled my front wheels off 5 times messing with these brakes and now I need to ask for advice. The car is a '75 280z, all stock brake components except for maybe the pads. They're the same ones I bought with the car 1 and a half years ago. Every time I brake I get this HORRIBLY loud squeak/squeal/grind noise coming from both the front wheels. The noise changes depending on how hard I brake, sometimes if I brake really hard it doesn't squeal at all except maybe a little noise. The loudest noises come from light braking. All of my front brake pads have plenty of meat left on them. They honestly look new there's so much. Every time I've checked the pads and rotors they've been glazed. So I pull off the pads and sand them pretty good with rough sandpaper and do the same with the rotors. After I sanded the pads and rotors on both sides and start driving, it's great. Barely a peep out of them for the first drive. But the next day/couple days later they start progressively making the horrible noise again, and they glaze again. Also I found that if I spin my rotor with the pads and caliper on, I hear kind of a light scraping noise. It only happens on some spots on the rotor, rest is silent. I'm so over dealing with this I think it's time to just buy new rotors and brake pads. Maybe even do the toyota 4x4 caliper swap. But I don't want to spend money on it considering I believe both the rotors and pads have good life on them. I just replaced all studs on my drivers side front wheel and repacked the wheel bearings too, so I don't wanna pull off that rotor again. What do you guys think? Should I just bite the bullet and replace my brakes? Anyone else have similar trouble? My worst nightmare is replacing the rotors and pads to find out it still makes noise. I just want this embarrassing noise gone. Thanks
-
GOOD NEWS EVERYONE! I started the car just a minute ago and checked voltage at some areas and after I finished I decided to leave it for a few minutes for it to warm up. After I got back it was fully warmed up and I tried revving it to 4K rpm and I saw the ammeter jump up!!! I jumped out the car and checked the battery its getting 13.5v consistently at idle! Even with a bunch of accessories on! I have no idea why it finally started charging. I guess it needed a jump start. I tried revving it up before but this time it decided to work. Thank y'all for helpin!
-
Someone in another forum showed me a thread on testing IR alternators and I think I'll try that next. Here's the link: http://community.ratsun.net/topic/65156-testing-an-internally-regulated-alternator/ But first I'll need a test light. In the meantime I'll go check the ground on the case and do voltage tests with the car running Edit: By the way, I read from a guy that has the same year and build date as me that you can't trust the wire diagrams. He said datsun switched up their wiring colors and the placement of which wires constantly and that I should check and verify what each wire does before splicing. I was planning on doing that but I figured if I'm getting the correct voltage with key off and key on, wouldn't that mean my wiring is fine?
-
I charged my battery up fully and I started getting 12v at the "L" connection. But when I ran the car it still didn't charge the battery.
-
I haven't updated this thread but here is whats happened so far. Im gonna send this alternator back to the seller and while I was waiting I went ahead and ordered one from autozone. I got the new alternator (still a remanufactured one) and installed it. It's doing the same shit as the other alternator. 11.8v output from it. But I discovered something after doing more tests with the voltmeter. KEY OFF: 12.4v at car battery 12.4v at top of "T" connector. (also known as "Sense" connection) 0v at bottom of "T" connector. (also known as "Lamp" connection) 12.4v at alternator BAT terminal. KEY ON: 12.2v at battery 12.2v at top of "T" connector ("S" connection) 11.7v at bottom of "T" connector ("L" connection) 12.2 at alternator BAT terminal. So in the swap guide I mentioned it says this: "1. An "L" connection which goes to a "switched" 12V supply. By this I mean a 12V source that is active only when the ignition switch is in the ON position. I use the mnemonic "L" for "lamp", the alternator warning lamp (if used) is in series with this connection. This terminal also supplies the "excitation" current to the alternator field winding at engine turn on, allowing the alternator to begin producing voltage as the engine is ramping up to idle speed. Once the alternator rotor is turning fast enough, it generates it's own supply for the field winding and the current in the "L" connection stops flowing. The warning lamp (if used) goes out." So when the key is on, the "L" connection gets 12 volts, which gets the alternator to charge. My connection is only getting 11.7v. Could that be why it's not charging? I have the car battery on a charger right now in case it's not charged enough to supply the right voltage to this connection. But everything else is getting 12.2v when the key is on... What's the first place I should look to find out why it isn't getting 12v?
-
Boxed up the alternator and getting ready to exchange it for another.
-
Something else I wanted to bring up. What is the possibility of this just being a bad alternator? I took it to autozone to get tested and it passed but I'm not sure if I can really trust that right now. When I switched from my old alternator+voltage regulator the only thing I did was splice the harness together the right way and hook up this new alternator. Should I just send this thing back and try another? I'm conflicted because it passed the autozone tests.
-
Alright sorry I stayed at a friend's house last night and didn't get to try anything. Just tested with the car running, alternator is only charging 11.8v. (I put + on BAT and - on negative battery) Pulled the T connector and nothing changed. I wanted to compile a bunch of tests and suggestions to try out while I wasn't home, only had time to do half of your suggestions, my bad. I'll do that. Thanks anyway You're absolutely right I'm not experienced in electrics lmao. My dad talked to an electrician friend and he explained it. Pretty embarrassing lol Just tested with the key on, Top of the T was getting 12.4 and the bottom was getting 11.8 Key off the top of the T was getting 12.4, bottom was getting 0 Yeah funny thing, I was trying to test the bottom of the T plug and I had to seriously get the probe in there to get a reading. I've already sprayed contact cleaner on the T plug yesterday but maybe it wasn't enough. And don't worry I think I'm testing voltage the right way now lol... So we're still where we left off, alternator isn't charging (or at least not charging enough). I guess I'm going to charge my battery and look into what else to try. Edit: I also soldered all my connections this time.
-
If anyone else has ideas or tests for me to do please let me know and post them in the thread.
-
I'm going to undo my splices right now and see if i stop getting power to ground.
-
Just did some of the tests you suggested. Battery voltage is 12.58 Battery POS to Alternator earth is 12.58 Starter POS to starter case is 12.58 Starter POS to BATTERY NEG is 12.58 Alternator BAT to alternator case is 12.58 Alternator BAT to BATTERY NEG is 12.58 I did all these tests with the car off. I havent started the car since I found out about the car getting to ground, but it was running just fine. Just wasnt charging.
-
First, thank you so much for the long write-up. I didn't mess up any connections to the alternator itself, the charging wire goes to BAT, earth to earth, and the "T" connector to its connector. Yes, the BAT terminal has the plastic around it. I definitely didn't get the probes mixed up. Heres a pic of the back of my alternator just to confirm: http://i.imgur.com/fRSOvqZ.jpg The only wiring I did on this car was splicing the voltage regulator harness... Maybe it's just me but I don't see how that could screw this up so bad How can I check if my charging wire is connected to positive on the starter? Do I have to rip open the harness and chase it back? I don't understand how this is happening because to my knowledge everything is connected and wired correctly. Here's an album of some other pics I took of my wiring and the alternator. http://imgur.com/a/gM5pj One last thing, the condenser's wire on my alternator is connected to BAT terminal, is that correct? It's what it was connected to when I got it. Edit: I've also been getting small sparks when connecting the negative cable to battery negative terminal.
-
Okay so I just went out to check with the meter with my dad and we found out that the earth on the alternator is getting 12v from the positive on the battery. The BAT terminal is getting 0v from positive, and 12v from negative. Somehow this got switched up and my dad says he can't believe it hasn't fried anything. How the hell did this happen? I checked my fusible links and they're both fine, along with all the fuses in the cabin. Am I screwed?
-
Just got back from running all over town and getting the alternator tested. I took it to autozone and it passed every test. shit. I'm gonna try re-wiring the splices I made in case it was a crappy connection. How do I test the voltage output at the alternator? I know it's not reaching the battery if it is charging, so I can't measure it at the battery terminals.
-
Yeah I'm sure I can't expect good quality from autozone, but I'm just looking for a confirmation if I just got a dud alternator or there's a problem with my connections. Would honestly be relieved if the alternator is faulty, at least then I know I didn't screw anything up.
-
Yep I was revvin it pretty good while testing. Gonna check all my connections in the morning to make sure they're real good and test it one last time. If that doesn't work I'll pull the alternator out and drive to autozone and get it tested. Maybe I'll get lucky. Thanks for the help everyone, I'll update this post with what they say and what I'll do after that.
-
Just got back from checking the voltage at L on the "T" connector. 0v with the key off and I was getting 12.5 with the key on. I took the "Charging wire" off the BAT on alternator and tested the charging wire. ( Is this what I was supposed to check on?) With key off it was getting 12.5v, key on 12.5v, and when the car was running it was getting 11v. Where do I go from here? Could it be the wiring I have done to the voltage regulator harness? I think I got it right but I don't know where else to look. Edit: took a quick pic of what the back of my alternator looks like if anyone was wondering. http://i.imgur.com/fRSOvqZ.jpg
-
Okay let's get this straight. The blue wire goes to the condenser. When I removed the old alternator the blue wire came off of the condenser. I installed the new alternator and it has a condenser already installed. It's connected to the BAT terminal on the alternator. Now I'm left with this blue condenser wire coming off of the charging wire. So since I already have a condenser and it's plugged onto the BAT terminal, I don't know what to do with the old condenser wire. For now I think I'll tape it up and forget about it for a little bit. I'm going to test the voltage going to the "T" connector and charging wire.
-
Here's a better pic I found of the blue wire coming out the back of the battery cable. http://img.photobucket.com/albums/v337/cd1105/IMG00215-20130127-1535_zps87ef6ea3.jpg Not my pic just one I found on google.
-
The blue wire I'm referring to isn't tied into the regulator harness. It's literally coming out the back of the plug for the battery to alternator cable. This isn't a great pic but you can see it coming out from the rubber boot over the battery cable.It's the yellow wire next to the white/red wire. http://imgur.com/On5jBDJ Alright so how do I check the voltage a wire is getting? Do I set the meter to DC 20v and touch both probes to the wire? Sorry for the noob electrical questions. So... what do I do with it? Is it important?
-
Yeah I have a meter, I'll check L with it in a minute. The ammeter is connected. It goes down when I turn accessories on in the car. I've has the car for a year. Im switching to the internal reg. Because i was hitting 16v while revving the car and I was having dim lighting issues. I connected the earth wire to the alternator so I think its grounded. What should I do with that condenser wire? Its just dangling right now.
-
http://atlanticz.ca/zclub/techtips/alternatorswap/index.html this one.