

Jboogsthethug
-
Posts
1717 -
Joined
-
Last visited
Content Type
Profiles
Forums
Blogs
Events
Gallery
Downloads
Store
Everything posted by Jboogsthethug
-
From the album: Jboogsthethug's 1971 240z build
-
From the album: Jboogsthethug's 1971 240z build
-
From the album: Jboogsthethug's 1971 240z build
-

Jboogsthethug's 1971 240z build
Jboogsthethug replied to Jboogsthethug's topic in S30 Series - 240z, 260z, 280z
Ryan! Thanks for the advice I'll try that this next time! I'll probably upload everything into it as well just to get it together here! And I plan on getting them on not next week but the week after so wish me luck I don't screw it up! I'll post pics when I do, glad to see others with the same good taste in flares -
Jboogsthethug's 1971 240z build
Jboogsthethug replied to Jboogsthethug's topic in S30 Series - 240z, 260z, 280z
Also, How can I post the pictures and have them pop up on this site rather than redirecting you to photobucket when you click on them? sorry for the inconvenience, any help would be appreciated. -
Jboogsthethug's 1971 240z build
Jboogsthethug replied to Jboogsthethug's topic in S30 Series - 240z, 260z, 280z
I recently purchased the wide z flares from http://www.silverminemotors.com and they showed up in the mail yesterday night! so stoked, held them on my body and they look so good so I hope to install them sometime this week! more updates soon! justice EDIT: I am not sure if they still sell their flares, I can't seem to find them online anymore. -
this is looking great really quickly! props to the build, always interesting to see which hurdles other people tackle first!
-
Jboogsthethug's 1971 240z build
Jboogsthethug replied to Jboogsthethug's topic in S30 Series - 240z, 260z, 280z
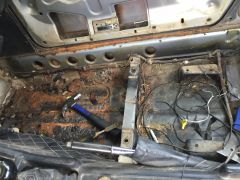
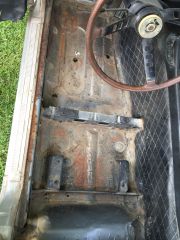
So this week I really got to work on the teardown of the interior in prep for paint. the paneling is all in pretty good shape out come the seat rails the metal under the sheets is in fantastic shape and I am stoked! dash started it's way out clean metal interior front bumper off anyone know where to find a new overfill? mine has a tip broken off the thing I'm most stoked on is the fact that this vinyl is in INCREDIBLE shape, it all peeled off very easily and I will easily be able to re glue it, I am stoked! the top of the fender is almost completely sanded down. I'm going to need to find a better sanding method. also, back to the carbs! so I finished cleaning and rebuilding them, here they are all polished up! during myself installing the new gaskets and the carbs my uncle went to town to change the battery terminals for the new battery! (the next day I had to cut some off of the terminals to fit these better, turned out pretty good. he also installed my new fuel filter, the other one was bollucks and disgusting here are the carbs mounted in, definitely the cleanest part of the engine. so I installed them up and we had ourselves a good go at trying to get them tuned up but for whatever reason we couldnt dial it down. I hadn't messed with any nternal adjustments but to be sure I pulled off my float cover and started checking things out. first: the new jet looks identical on the outside in comparison to the old jet, minus the 2.0 on the side. but further digging in I find this: definitely not the same as the stock jet. Not only are they obviosuly different mechanisms, (the new one has a spring loaded internal piece whereas the old one was spring loaded in the middle, not sure if that makes a huge difference) but if you look at the tips you can see the slimmer cone of the old one in comparison to the new one. This might be for performance reasons, if somebody has input let me know but we were having no success with the instructions that came with the rebuild kit. either way I just cleaned up the old ones as they were working fine before and I reinstalled them. I also adjusted the float height as per the directions that came with the kit. It says 10.31mm gap, I think mine was more along the lines of 10.5-10.75 mm but it was way better than when I began (15mm??). hopefully these directions are good! more updates soon as I go! justice -
Jboogsthethug's 1971 240z build
Jboogsthethug replied to Jboogsthethug's topic in S30 Series - 240z, 260z, 280z
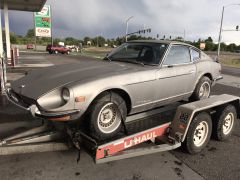
alright, finally got some photos uploaded, still looking for a better method but for now this will do. so here are a few pics of my babe when I got her and when I got home. THe body itself, for being out of idaho, is almost 100 percent rust free, other than the rear fenders. Luckily those will be cut out for fender flares and life will be much better then! I was happy to find out that the original jack, tools, and wheel stops were still with the car. I was told an old man had the car in his garage for years (1st owner), a second owner bought it then later on sold it to a kid who I bought it from, with nothing really being done by either of those two to it, as far as I could tell. I immediately began doing the prep work to get this bad boy painted, starting with sanding down the front drivers side fender and the rear spoiler, just to get things moving. I have a short attention span so I move fromthings to things in a pattern to keep me going engine all intact and runs great, new alternator was a nice find also began taking off the bumpers, at least the front one as I hear the rear is a pain so that will be soon enough. I also have already ordered the flares (silverline motors - the wide zg flares), a performance odyssey battery, and a carb rebuild kit from the zstore. the carb rebuild kit came in the mail so I got to work on removing the carbs thoe hoses in case I get confused putting them back together haha no more air filter box cover this thing was interesting to figure out. its the throttle bracket thing, couldn't figure out how to remove it but then figured out the answer. my friend said it would pop off if I pulled hard enough but I wasn't brave enough to try the answer: unscrew the end bolt things and after a bit I have this: removed from the panel good ole engine degreaser (does anyone know if the degreaser harms the gaskets in any way? wasn't sure but wasnt too worried as I would be replacing them anyways, just for future info?) a bit dirty, better than I expected dissassembly old vs new: finished product battery showed up as well as the flare mount bolts, I got a special kit from Pegasus auto racing, they actually bolt the thread inserts into the panel rather than screwing into the panel, I figured it'd be a bit cleaner. so far this is where I am, I'm about to start on the second carb and then continue the tear down soon, although I plan on getting a few really cool shots for a video before I do to show the before and after. I have a guy who will be painting it a gunmetal dark grey metallic paint, very sexy. soon to come hopefully. will post more later -
so about two weeks ago I tracked down my first 240z, I found her in the bushes in Blackfoot Idaho, a bit of a drive but she was a great deal and for whatever reason she has almost no rust on her, considering she's an idaho car. I am shooting to be done with this by September, as far as aesthetically is concerned. I have a bunch of photos I've been taking along the way and I am uploading them now, will post soon. EDIT: here is a direct link to all my photos, rather than photo bucket links http://forums.hybridz.org/gallery/album/1589-jboogsthethugs-1971-240z-build/