
Stealth-Z
-
Posts
392 -
Joined
-
Last visited
-
Days Won
1
Content Type
Profiles
Forums
Blogs
Events
Gallery
Downloads
Store
Posts posted by Stealth-Z
-
-
If anyone is interested I can post up pics of what they look like and diagrams of what pins do what on the R33 speedo/tach.
I am definetly interested. Nice work!
-
purchase booztd3's os giken setup that he's selling only because his sponsor has provided him with another clutch. it still has most of its life left into it, and survived many 700 rwhp launches.
none of which slipped, and the clutch was never the weakest link, causing various other things to go bonkers because it held up so well.
he's dropped the price considerably, and the unit is 2000 new, so give him a holler, or look for the thread, it was semi-recent.

To late on the clutch. I remember seeing it up for bids on ebay.
http://cgi.ebay.com/ebaymotors/ws/eBayISAPI.dll?ViewItem&item=330175143528
-
Very nice find.
I really miss Okinawa. How did you go about finding a non-military position?
-
so today I got a complete (and running great but BONE stock) 180SX with red top SR20 turbo / 5 speed for....
$300
Someone PCS and have to dump their car?
-
hasnt anyone tried or considered this?
http://forums.hybridz.org/showthread.php?t=100696&highlight=L28
-
you paid san man for a Z? that's less than 300 dollars. or was it san ju maybe? a little less than 3000 dollars.
This was in 1986. It was in a shop on Hwy 58. The hood (bonnet) was missing and it was originally white in color. I put a battery in and it fired right up. This is what it looked like after a little body work and paint. The photo was taken at the shipping port in Okinawa. My friend Roy was shipping back the 73 Camaro.
The G Nose and hood were found at a wrecking yard near the sea wall. This is the Fairlady Z that got me interested in Z's. It also spoiled me because it had no major rust cancer. For a 73 it still had intact floor boards and body panels.
When I purchased this one the Yen rate was around 152 per dollar. We were joking that some day 1 cent would equal 1 Yen.
-
Hey Yasin,
Your garage looks to clean from the angle of the photos. What is being hidden in front of the cars?
-
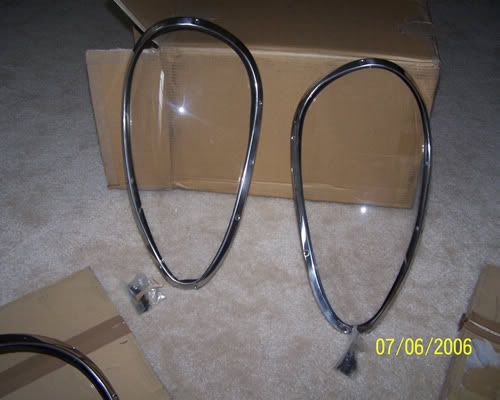
Probably a stupid question, but what sort of headlight covers are those on the red car? They look to have a screwed down metal frame. WAY better than the goofy metal tab/tape set up! (Probably big bucks too!)
They are factory G Nose covers. Here is a photo z-ya posted in this thread.
http://forums.hybridz.org/showthread.php?t=118028&highlight=nose+cover
-
No.
89 'man' Yen = 89 x 10,000
Price is 890,000 Yen.
Yeah, I did some more research. Used babelfish and it mentioned 10 thousands.
I still remember purchasing my first 73 Fairlady Z for San man Yen.
-
89,000 Yen for the white one next to the VW? or is it 8,900,000. It has been a while, I forgot how they price cars.
-
If you are refering to this one...it will fit in a 75 280Z.
-
http://www.works-y3f.com/m_cars/3_jpn/nissan/Z/S30/240ZG-1/240ZG-1.html
wonder if we can duplicate...looks awesome...
Terry
The attention to detail is fantastic!
-
Anybody?
Could you pull the vacuum before the turbo inlet? The turbo will be sucking it in for the most part. Even when the recirc or blow off valve is in action there should still be some vacuum.
-
Nice drawing. What program did you use to make it?
You should add the 6 ohm resistors are for the low impedence injectors.
-
No motor at the moment, hence the large wheel gaps:
Great work! Love the attention to detail.
-
It is a 2+2. The thiefs left the stereo according to the seller! The commercial does not show very often.
-
Just use one from a fuel injected L28, wiring will probably be slightly different but it should work the same.
You brought out my curiousity about the L28 FI resistor measurements. The L28 fuel injected resistor pack has two ceramic resistors. There is one white wire and two black wires. A resistance check on them measures out at 6 ohms.
Now here is the perfect junk yard fix as I see it. Take three of these packs, connect the white leads together and attach the remaining six black leads to the injector harness.
-
I bid $41.00 for it because I wanted an uncut plug. I have a resistor pack with the plug cut off. Resistance from the one white wire to all the six black wires is 6 ohms.
.....................<-------////-----------Black Wire
..................<---------////-----------Black Wire
................<----------////-----------Black Wire
White Wire<------------////-----------Black Wire
.................<----------////-----------Black Wire
..................<---------////-----------Black Wire
Sorry for the crude drawing. Basically connect one end of the 6 ohm 6w ceramic resistors all together. This end connects to the white wire. The remaining 6 leads go to the injectors. Not to difficult of a circuit to build.
-
Interesting belt setup they are using. Wonder what belt it is? Idler looks smaller than stock RB2xDE(T)'s.
-
This 75 280Z was to good to pass up. It was on the Sacramento craigslist described as a 1977 280Z in May of 2007. The bumpers were what caught my attention. They were not the 77-78 style. For some reason I figured why not go take a look. The Z was actually located in the town of Cool. Cool is south of Auburn California. Kind of a remote location. Upon getting to the location I discovered that it was infact a 1975.
Here in California 1975 and older cars do not have to submit for bi-annual emissions testing. No one in California seems to want the 76-78 S30 Z's because of the required emissions testing. Technicaly you are still required to keep all emission equipment functioning and intact. Potential to do other things with it made it to difficult to pass up.
This one was parked in 1992 for failing emissions. The previous owner never bothered with it again. 2006 rolls around and the neighbor of the Z's original owner shows some interest in getting it up and runing again. He has the fuel tank boiled out, replaces rubber hoses and installs a new fuel pump. In the engine compartment he replaces the fuel injectors and all rubber hoses. He managed to get it to start but it only ran for a few minutes. For all his time and effort on the Z the original owner gives it to him.
Durring 2006 the interior is partially removed. For years the Z sat in a covered enclosure. Unfortunetly the last 3 or 4 years it sat outside exposed to the elements. The original white interior was soon destroyed. All the plastic interior panels nearly disintigrated when pulled out. The tops of the door panels looked like they had been on fire. The carpet was completely dry rotted.
Once it got to my home, the wife guted the rest of the interior while I started on the mechanicals. There was suprisingly little rust to be found. If any it was surface rust everywhere. A little rust mort cleared it up. Nice thing about this area, rust is not a major issue if the car has been here all its life. New struts and springs were installed. This was necessary because of the rubber mountings for the original struts had rotted apart. It was amusing to jack it up and the rear wheels kept falling and falling.
The 280Z front ends have never been to appealing to me. So on this one I decided to change it to the 240Z style. A while back I saw a photo of one of the BRE track cars. The paint style looked neat so I decided to paint this 280Z in a simular style. I removed all the chrome, glass and other accessories from it before painting. For some reason I do not consider a full paint job to be taping around door handles and rubber seals. In any event, all the rubber seals needed replacement anyway. The windshield is laying in the sill.
August 2007. Reasembly is a bit slow. Changing to the 240Z front end requires some modifictations. It is not a bolt on setup. The front spoiler ads to the BRE like appearance. 280Z's have alot more metal in the front end than the 240Z's do.
September 2007. The new black MSA carpet kit is installed. It goes in quite well. It needs some cutting here and there but other than that it goes in smoothly. The newly repaired seats are in. The dash has a full cap cover installed along with a protector to cover it as well. The fabric dash piece was one that came with another parts car so why not protect the dash cap?
The tires on it were new when it was parked in 1992. They still had the new tire flashings. While there were no cracks on the sidewalls, there were cracks on the inside between the treads. No use taking chances. Might as well get new tires. The wheels are Caroll Shelby branded. Probably made by Western and sold under his name. Not sure and really do not care. They look good to me. As long as the wheels were off I went ahead and replaced the brake drums & shoes and the front rotors & calipers.
Upon lowering front end the jack slipped off the front cross member. Of course it went right into the front of the oil pan. It dented it enough that the rod made a nice thunk thunk sound when the motor was started. Oh well, might as well pull the motor to replace the pan. As long as I am there may as well do the clutch as well. Plus a 5-Speed would not hurt either.
As of September 29, 2007 this is how it looks now. At one time I was going to install a 240Z rear bumper. After remembering a guy bumping into my 78 280Z at a gas station I decided to put on the larger style. Of course many say it is ugly. I think the 77-78 style looks okay.
The red strips down the side are decals. Most likely they will be removed and painted on instead. The 240Z grill still needs to be installed along with proper brackets for the front bumper. There are other small details that need finishing but for the most part it is now presentable.
-
Just went to the garage to look at mine. Yours look like it might have been a weak casting possibly? All the flashings around mine smoothed up well. There were no crack-like appearances.
I was going to take a picture for you but the camera's battery is dead.
Takes some time grinding the flashings doesn't it? I forget how many hours were spent on mine.
-
zcarguy07 posted this find in the "Other Engines forum" Thought the other 2+2 guys would like to see this one as well.
-
Very cool. I am going to post this in the 2+2 section in Miscellaneous Tech as well.
-
I knew it would be gone quick. So I made a quick PDF file. Look close at the front end. The Twin Turbo's had those ducts. Someone got a deal. I had no room for it.


R33 Tach and Speedometer into S30 Pods
in Nissan RB Forum
Posted
ebay.
They show up from time to time on http://www.nicoclub.com. Generally they go for under $100.00.