

Meph
-
Posts
251 -
Joined
-
Last visited
Content Type
Profiles
Forums
Blogs
Events
Gallery
Downloads
Store
Posts posted by Meph
-
-
lookin good:icon14:
-
Point taken.
So how happy are you with the results? The pictures look good, but it's not easy to tell the real quality of a paint job from just a relatively lo-res picture online. Is it just "good enough", or is it something that only you would ever know only cost $165?
Tons of people tell me it looks amazing, Im the biggest critic and notice the faults right way. The only issue i have are a few fish eyes, and a tiger stripe effect from spraying the pearl on poorly, my mistake first time using a large amount of pigment, If i Had used less or had a darker base, it would not show, live and learn. Pearls and pearl selection is tricky and deserves a thread of its own . I Really like how i have a shift from blue to purple in low lighting conditions on all the contours .
Id say for $165 my paint job is in a another class... another galaxy than 95% of the attempted $50 roll on tremclad ones.
-
I'm really curious as to why you would use tremclad (or rustoleum) if you have access to a sprayer? I thought the entire point of the "$50 paint job" was a decent job without needing a spray gun setup?
I understand that rustoleum is a lot cheaper than a decent automotive paint, but aren't there still cheap paints available that are made for cars, don't require intense amounts of wetsanding, and don't require the car to be completely stripped before repainting?
I've used cheap Duplicoulr paints and they are only dry slightly faster than tremcald. WIth the lacquer thinner used to thin tremclad will level out pretty nicely. It needs some sanding but it will come out killer as a base coat(were talking maybe 3 hours sanding tops).
And for me.
using tremclad as a base to spray my candy (pearl) clear onto its a big savings in the overall cost.
Tramclad base = $30
Automotive base = I was quoted at $350
Clear cloat = $115
Mixing peal pigments into my clear = $20
Buying premixed candy (peal ) clear = $Thousands$
Doing it Treamclad no clear = $30
Doing it Tremclad with clear : 30+115 = $145
Doing it Treamclad Pearl and Clear: 30+115+20 = $165
Ding it Real base and Clear + pearl: 350+115+20 = $485
Doing it all legit no candy coat : 350 + 115 = $465
Doing it all legit with candy coat : 350+1000 = $1350 Min! vs $165
By cutting out the expensive base coat you can drop the price from $485 to $165 and still protect your car with automotive finish.
Note: Im doing this all with a cheap compressor, 5 Gal 3 peak HP oil lube motor. 125 MAX PSI. 5.1 SCFM @ 40 PSI and 4.1 SCFM @ 90 PSI. Twin stack design
Go on kijiji and you can find compressors cheap, getting all you need is an investment, but pays for itself the first use. I think ive done 9-10 of these now
EDIT
Tremclad is also VERY forgiving to new painters. screw up, sand it to an even finish,your good, always. Many real automotive paints will contain pigments and flakes that are more, get it right the first time, no second chances
-
As requested by several people, so to save writing any more PM's I wanted to make a thread (hopefully sticky) on how its done to make it look good.
I'm only covering how to spray it on, the roller method is a waist of time. This works for more than just tremclad, any kinda of single stage paint applys
What you will 100% need to get good results (if your missing any of these, it wont come out well)
- Respirator, for paint. (less than $30)
- Lacquer Thinner or Acetone (not mineral spirits or anything else)
- A garage or similar
- Decent Lighting
- Compressor w/ water seperator
- Spray Gun (Cheap ones work fine)
- Paint
- Buffer (not and orbital)
- Wetsand Sand Paper (400,600,800, higher if you want)
- Patience
- Paint thinner
- Latex gloves
- Foam sanding block
- Squirt bottle
Optional
- Primer
- Clear coat
- Pearl Pigments off ebay (25grams should be enough for your first job)
- Rubbing Compound
- Wax and grease remover
- Air brush
Steps
0. Do your body work, nows the time to put the primer on if your going to, sand it smooth with 300-400 grit
1. Get your current top coat ready for paint. Sand it all off or spray over top, it really wont make much difference in a tremclad paint job. Use 300-400 grid and get it smooth, take as much time as you can here if your paint is rough to start with, if its already smooth and nice you can do a quicker rub down.
2. Tape up the car, windows ect. Masking tape and newspaper or 3m and wax paper, again, up to you and your budget.
3. Wipe the car down, wax and grease remover would probably come in handy, but Ive never used it. You can use some solvents to wipe down (paint thinner), avoid using acetone or lacquer thinner as they may start to strip off your old paint and ruin your finish. If you skip this you'll probably end up with a lot of fish eyes, like i often do... so dont, take some time.
4. Mix your paint, I use a 4:1 ratio with lacquer thinner. Wear latex gloves from now on, the extra dollar for them is worth it.
5. Set your psi around 40-80 and do a spray test with your gun on something other than your car. You want to set the flow low to start with, increase it till your getting coverage without runs or dripping. Make sure you have a door open, leave the garage part way open to allow air flow.
note: if you decide to not listen to me and use paint thinner to thin it, you will 99% of the time get runs.
note: If you decide not to listen to me and use lacquer thinner but not wear a respirator and die, also, not my fault. Stick to the rules
6. Start painting! You don't want to lay it on to heavy, you probably wont get full coverage till the 2nd or 3rd coat, if you get it on the first, your applying it to heavy.
Note: If something falls onto your paint, hair, bugs, in-laws, ect. for the love of god just leave it, Ive tried in the past to remove the foreign objects, and i know you will want to too, but DONT things will end up worse. Sand it out later.
7. Let the paint get tacky between coat, 10-30 minutes. Touch your masking with your glove and if the paint sticks to your finger your ready for the next coat.
8. More coats, if your planing to use clear, 4 should be fine. If not, try 5-7 light-medium coats
9. Let the paint dry, days, months, years. It can take a while, but lucky you listen to me and used lacquer thinner so it wont take that long.
10. A few days later
11. Get that wet-sand sand paper out, grab your trusty 320 grit and a foam sanding block of sorts, not your hand
12. Sand the orange peel out. Use some soapy water to lube it up. If your lucky, you wont sand down too far exposing the origianl paint, if your think you might go down to far, stop and leave it... No-ones perfect right?
13. Hit it with 600, then maybe 800-1000
No Clear Coat
14. Grab your buffer and compound. Start with a cutting/rubbing compound or head straight to the polishing. Use a quarter sized amount per 2 ft^2. Dampen your buffing pad, smear the paste around at the low speed that crank it up, your goal is the buff away all the compound. Shoot a bit of water on the panel if you need to. Your done!
Clear Coat
14. Mix your clear to the instructions specs and spray it on, you can do light coats or heavier. Start off light and see how it feels, you will buff it to an even shine later or if its not uniform dont fret.
15. Sand the orange peel out. Use some soapy water to lube it up. If your lucky, you wont sand down too far exposing the original paint, if your think you might go down to far, stop and leave it... No-ones perfect right?
16. Hit it with 600, then maybe 800-1000
17. Grab your buffer and compound. Start with a cutting/rubbing compound or head straight to the polishing. Use a quater sized amount per 2 ft^2. Dampen your buffing pad, smear the paste around at the low speed that crank it up, your goal is the buff away all the compound. Shoot a bit of water on the panel if you need to. Your done!
Hope this helps you guys!
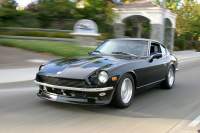
Blue Base, Pearl+Clear

-
This is like the 1jz swap I should have done, your wooks looks great. Makes my swap look like the ugly duckling, live and learn it was my first time doing alot of things
-
Also look into a toyota based swap, as i know you can get a 1jz for around 1K. 280hp stock, can handle 500 hp in stock form. Just another idea
-
-
the stock intake manifold wraps over the top of the engine, id assume it would cause clearance issues in a z as my 1jz is shorter and id question the ability to run the piping over the top
-
I got a set of the cheap clones from the ebay guy in Thailand, it was 220 CAD with shipping, trying to get ones from the states is almost double that price. If your in Canada, they arnt bad, little thin, not a great conture so they need to bend into place. If your on a tight budget, go for it.
-
Ive got a 1jz swapped in, but ive only ran it for maybe 30 minutes total with the one filter. Ive got hard lines running the entire length to the engine, so would I be able to place the filter right after the pump?
Also,is there any real specifics for filters or can I head to the auto store and get one with the right size fittings thats specified for an EFI car?
-
Hey guys, curretnly I have a mesh style 1.5" ish diam. fuel filter coming off my tank. I plan to drive the car regularly and would think this filter woudl let contaminants through to the injectors. I have an MSD pump, likly cableable of flowing much more fuel than I need so would there be any harm in install one of the simple in-line $10 steel canister fuel filters before the pump?
-
Ive got some zg's coming and would like to know a good offset. I ahve about 2.5 inches of tire stickout out the back and probably a few mm's of tire sticking out past the fenders in the front.
Will adding a 1" spacers up front give a good look or would I need more?
Thanks
-
get the one with the best body, you'll end up spending more then the difference between a running vs non fixing rust and doing body work.
-
fuel pump/ lack of fuel could would be a reason for that to happen too. Check your lines, make sure there isnt a pinch, check your filter. You chould pull your return line off and put it over the filler on the cell and cycle the fuel pump, make sure its feed fuel nice. Injectors could be clogged, they have a little screen filter on them too if you take them off and clear it out.
-
Ive got a 1JZ in my car run on an after market ecu, r154 trans with a r200 3.545
2316 RPM @ 100 km/h. Aiming to crack 30 + mpg and 300+ hp
-
Sorry, as of 11 pm yesterday Ive got a buyer for the air dam.
-
jump the switch thats on the pedal assembly and see?
-
bump, Jon still interested in your set if you can ship them USPS.
p.s. Im willing to pay, not just trade if that was unclear.
looking for this style or similar
http://www.datsunracing.com/albums/240z/2003-10-18zpics.highlight.jpg
-
Thermostat issue, Water pump, air pockets. Those are the things Id check frist, make sure it's all plumed right. If your running too lean there could be an issue too i guess but I assume its pretty close. 220 wont have cause any issue in a short amount of time.
-
check your battery voltage with the car off, and then running at idle and 4k. See what the numbers are and that should start you on your way to a diagnosis.
-
Is it possible to get a stock 240z tach to communicate with my aftermarket ecu? I have a positive 0-5v or 0-12v trigger wire I can connect but Im not sure how it should wire up to the existing gauge. I think there are two versions of tach's aswell, so if you have any ideas im all ears.
Thanks
-
that 4 CFM is probably average (say 25% running time) its continuous is probably like 16 or something huge. Air tools require a lot more than 4 cfm usually. I have a similar compressor and I can barley count on it to power spray guns. Id be weary of it
-
did you check compression with the new HG to make sure its alright and not leakin? Its possible theres a crack in the head/block i would think
-
Hey guys,
Im look into installing my rear sway bar, I got this one with the car, but Im missing the hangers, some bushing and all instructions. Its green in colour, similar to this setup
My setup looks as follows
Will I be able to mount it with my current setup? or will it require modification? Are there any write-ups out there?
I also have an annoying squeak in the rear end. sounds like its coming from the lower control arm bushings, I read something about a proper assembly order, or it squeaks. Any more info on this? (bushing are all new so im told)
Thanks a lot
Meph


How To: Paint With Tremclad The Right Way
in Body Kits & Paint
Posted
rear was ust trimmed away with a shear, nothing special. wanted to run dual muflers on each side but that didnt work out.
check pictures out here
http://www.cardomain.com/ride/3241776/6