Roberts280Z
Members-
Posts
23 -
Joined
-
Last visited
-
Days Won
1
Roberts280Z last won the day on July 5 2020
Roberts280Z had the most liked content!
Profile Information
-
Location
Houston
Recent Profile Visitors
The recent visitors block is disabled and is not being shown to other users.
Roberts280Z's Achievements
-
Has anybody done this? My 280Z will initially start and run fine for a few minutes. The fuel pressure will rise when you goose the gas as it should. But after a few minutes, the pressure drops under load. I suspect the pump, which is indeed a little noisy. Many years ago, the pump would get 'stuck' if the car sat too long, and I would take apart the pump to free the stuck bits. And I acquired 2 additional pumps along the way - one new and one rebuilt. The rebuild was from MSA for $99 with a $40 core charge, and I think I just kept the core. I see that a rebuilt is now $389 with a $600 core charge, while new pumps are $1150. So now I have 3 pumps, and I would hope I could make a working one out of these. The only mention of rebuilding that I could find anywhere was on an old Canadian forum, where they cautioned about using the proper O-ring (https://atlanticz.ca/zclub/techtips/fuelpump/index.html). Thanks in advance!
-
So yesterday I began to remove the diff, and while trying to wrestle the half-shafts off, I noticed that the diff would move. Indeed one of the nuts holding the diff to the mustache bar was loose enough to allow the diff to move, and with an audible clunk, which is cause #5 in Jon M's authoritative post. About twenty years ago, I did remove and reattach the mustache bar when I replaced the isolators, so I guess I didn't torque it back properly. Note that this required much greater force than I had been exerting on the wheels in my prior clunk tests. So I will just put the diff back and after I get my new shifter bushings from MSA (or whatever they call themselves now), I'll drive it around the block to see if the clunk is gone. I am still curious about the total backlash that I can see from either side-flange while holding the opposite side-flange steady, with the half-shafts removed, and without visible movement of the companion flange. There were some visible shavings on the drain plug when I removed it. I don't know if some amount is expected. I guess I'll worry about it if there is still a clunk.
-
Thanks for the replies. I had indeed immobilized the drive shaft yoke at its input to the diff, so that should eliminate driveshaft u-joints. And yes, I had read JM's definitive post several times. But I do suspect that this is one of those 5% of situations where the diff is indeed the problem. BTW, I did perform a similar 'wheel-rotation-slack' test on another car I happen to have currently on stands, and it had less that 1/4 of the slop I saw on the Z, and the other car has an LSD which I suspect adds even more slop. So I assume that I've got excessive backlash either between ring and pinion, or side-gear to pinion-mate. Or the pinion shaft is wallowing around in the differential case. I'm sure I'll need more help once I get in there.
-
1976 280Z - has not been driven in a decade or more, and is now nearing the end of a multi-year restoration. Stock 4-speed and stock diff. When I first tried driving around the block, I had a loud clunk under several circumstances, such as letting off and giving gas. I've spent hours reading through this forum and I do understand that most such clunks are diff-mount related. I've jacked up the rear and placed the outer edges of the lower control arms on jackstands. The clunk is quite obvious when rotating either wheel back and forth. You don't need to be violent about it to hear the clunk. That rules out diff mounts. When you rotate either wheel, the corresponding inner-most hub at the diff moves in lockstep with no slack. That should rule out splines and CVs. Also note that I did replace all bushings during some previous restoration (I am the original owner). I can measure about 0.75" of back-and-forth rotation at the tire edge before I feel resistance or see the beginning of motion of either the drive shaft or the opposite wheel. That's about 3.5 degrees of wheel rotation. I don't know if that by itself is abnormal or not. I don't think the clunk is normal. The only comparison I have is to some old GM A-bodies. So guys, does this indicate that the next step is to remove the diff for further investigation? Thanks in advance!
-
My clock did not 'tick'. I replaced a transistor and some capacitors, and carefully oiled it using proper clock oil. So, if yours ticks, take it apart and see what's wrong with the gears.
-
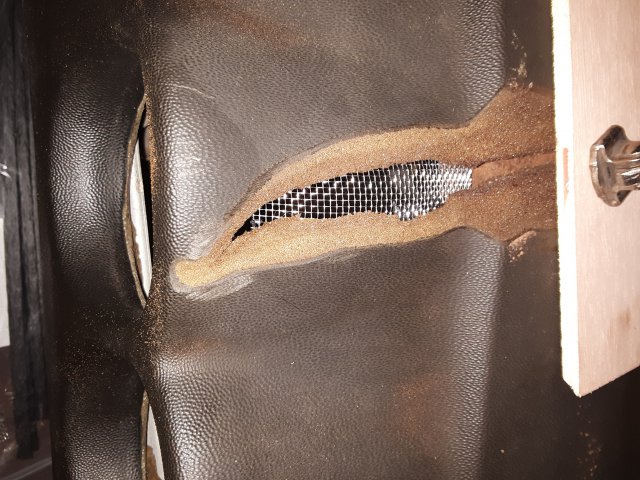
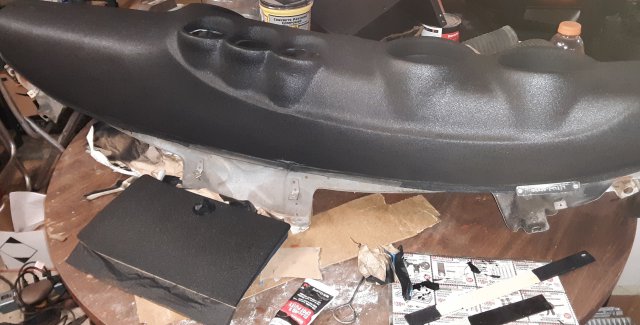
After having previous poor satisfaction from a dash cap, I decided to try the Polyvance method. I had three crack areas: The middle area went all the way through the foam. I followed the exellent instructions as given in the Polyvance video, and in their step-by-step instruction. I widened all the cracked areas, and in the large middle crack, I used their FiberFlex to weld in a mesh backing plate. This shows one of the smaller cracks after filling with FiberFlex: After sanding the filled areas, I applied their passed dash filler, which is a bondo-like product: I then primered the entire dash, sanded, and applied their Flextex VT texture spray: I also retextured the glovebox door so that it would match. I'll need to do the center console as well. This was all done back in July, but I have not yet reinstalled the dash since I am still painting the interior.
-
Yeah, well a rottisserie is next on my shopping list after a lift (I wish...). I just love welding on my back. It looks like to me that the caulking failed around the bottom of the pocket liner. With the failure of the outer hatch weatherstrip, that allowed water to pool on the inner hatch weatherstrip rail, and then seep under the pocket liner into the pocket itself. Also note that the spare-tire well was nearly full to the brim with rainwater, but there was absolutely no rust there!
-
I guess I'll try to weld in some sheet metal there. I've avoided glassing this far (rusted fenders, rockers, floor panels, door bottoms, etc., etc.). And if I could talk to myself 10 or 20 years ago, I would have told me to keep it in the garage!
-
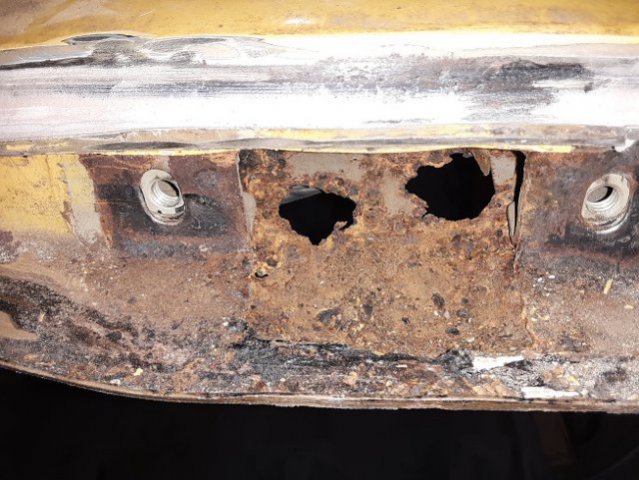
After I noticed rust on the interior at the rear part of the roof at the hinge pockets, I removed the hatch hinges and saw this mess. This doesn't look like an easy area to weld in, and the replacement pocket would not be an easy fab job. As an alternative, I'm thinking of just cleaning it up, applying POR, and then lining the pocket with fiberglass. The other pocket is not quite as bad, but is also rusted through. Has anyone else dealt with this area? Thanks in advance, Robert
-
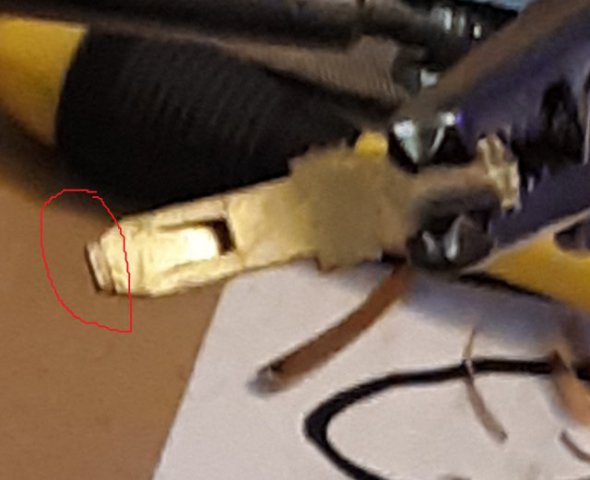
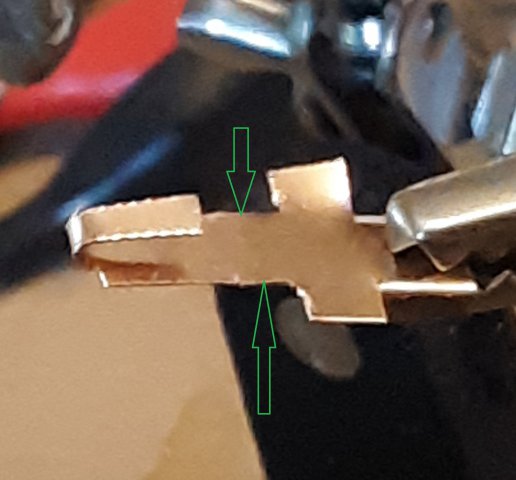
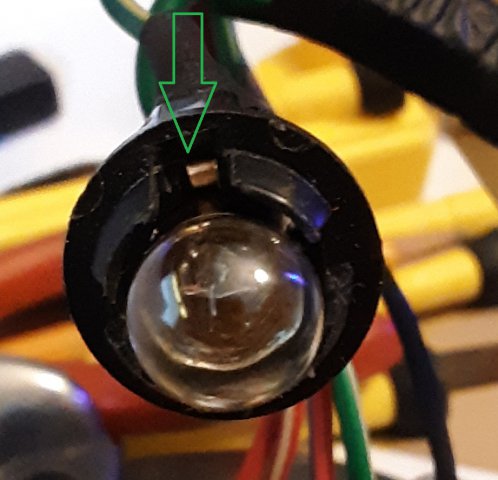
While I have my dash out, I thought I would tend to the many non-working dash lamps. I'm replacing all the bulbs, but in fact I have found only one bad bulb (cigar lighter lamp). All other problems are caused by poor connection between the outer contact (i.e. not the base) and the bulb. Most of these can be fixed by cleaning or tweaking. But in one case, I got too agressive with the tweaking and broke off the contact. Using tin snips, I cut out some 0.008" phosphor bronze to match the original. I didn't attempt to create the original 'retention tang', but instead chose to rely on a snug fit by filing the sides to fit. I hope this helps somebody else with this problem. R
- 1 reply
-
- 1
-

-
I think this is a vacuum solenoid, used to interrupt the vacuum to the vacuum advance on the distributor. The vacuum line on the right of your picture goes to the vacuum canister, via a T fitting that would be in the lower left of your picture. The unconnected fitting goes to your vacuum advance on the distributor. I can't find any direct discussion of this in the FSM, but I've looked at mine, and at related items in the FSM, where it is described (I think) as a 'vacuum switch solenoid', or 'vacuum cuiting solenoid', and is used in M/T non-CA models.
-
My tach was erratic and sticking. I removed it and cleaned it up so that it no longer sticks. I've tried to test it before re-installation with a square-wave generator, but my results are inconsistent. Does anyone have a schematic of the internal workings of the tach? Thanks, Robert
-
Rocker panel - replace all, or just what is needed?
Roberts280Z replied to Roberts280Z's topic in Fabrication / Welding
Fortunately, mine wasn't nearly that bad. Yours looks a lot like the photos from tim.d, mentioned in his earlier post. I've moved on to my doors and liftgate, which are rusted in their lower areas. I'll be starting another thread concerning how best to fix the rusted lip surrounding the liftgate opening. -
Windshield/hatch glass seal with or w/o metal strip
Roberts280Z posted a topic in Miscellaneous Tech
I'm replacing all the original rubber, and was considering black-powder coating window frames, drip rails, chrome strips, etc. Then I saw that I can buy the windshield/hatch rubber without the lips for the metal strip ("Cal Style"?). Also, the prices for the rubber are all over the map, from $50 to $180 ea for windshield or hatch. I found a 14-yr old thread on here about this, but wondered if anyone had more recent experience they would comment on. -
I have a Northern Tool 135 MIG. Don't even try the flux-core around the Datsun sheet metal. Find a source for the shielding gas - it's not as common as you might think. Airgas near me won't do the small bottles anymore - I go to Praxair. Find a source for the metal. I use 18 ga. which is slightly thicker than the original metal. So far, my patching is mostly butt-welding. Practice that on the metal you bought, leap-frogging until the stitches are continuous, then grind it down to see if it looks like one, solid bit of metal. Get a $50 grinder rather than a $15 grinder. Watch every Youtube that you can, and watch the Velocity shows where they do similar work. I couldn't readily find any local 'hobby' training; the community college stuff is more career-oriented (have you seen what they make?!!). If you read my other posts, you'll see I actually have no experience at all, except on my Z. But I think you may be in the same position as me. There is no way you can cost-justify professional welding.
- 10 replies
-
- entire car
- mig welder
-
(and 3 more)
Tagged with:


