twoeightythreez
-
Posts
358 -
Joined
-
Last visited
Content Type
Profiles
Forums
Blogs
Events
Gallery
Downloads
Store
Everything posted by twoeightythreez
-
MSII installed running in 78 N/A 280z stock wiring
twoeightythreez replied to twoeightythreez's topic in MegaSquirt
I just found out today that the ship has pushed the first workup underway back a few days. I'll get me a disposable digital and take some pics. Also will take some of my old dyno charts from Motorsport '05, it'll blow your mind. I must have one L28 that's FEELIN' GOOD....oil burning and all put down 166whp and 179lb ft on the stock EFI thru the stock 3.54 R200. The MS made it feel even TORQUIER if not any more powerful, I can't wait to see! Then...turbo swap coming after the 1st workups underway (they'll give us a week or so inport so I'll be wrenchin after working hours!) -
MSII installed running in 78 N/A 280z stock wiring
twoeightythreez replied to twoeightythreez's topic in MegaSquirt
Going turbo soon! Just have to get all the workups underways out of the way and I can continue wrenching on my Z! -
MSII installed running in 78 N/A 280z stock wiring
twoeightythreez replied to twoeightythreez's topic in MegaSquirt
I know I know, plenty o time to get another...but I'm spendin it all on the wi....I mean Z..I'm not married...to a human anyway...just to 1.5 tons of steel...and even that's cheating on my contracted one....95000 tons of US steel called the USS Nimitz! 8o) -
MSII installed running in 78 N/A 280z stock wiring
twoeightythreez replied to twoeightythreez's topic in MegaSquirt
all ya need is pics and everything is 100% perfect!! If anyone on this board lives near San Diego they're welcome to come over with thier camera and take some pics..my digital was stolen about 3 months ago ;( -
oops messed this one up....but wrote up a new one in a brand new post. "MSII installed running in 280z stock wiring"
-
So does anybody want to know what a stock 280Z dyno's!!!!!
twoeightythreez replied to a topic in 6 Cylinder Z Forums
I can't wait to dynotune this motor ,megasquirted. It feels like it has even MORE torque now. -
So does anybody want to know what a stock 280Z dyno's!!!!!
twoeightythreez replied to a topic in 6 Cylinder Z Forums
I know you guys will be reluctant to believe me but I really peed a guy off at the 2005 MSA dyno day with my 78. The dyno might have been reading high but I also can run consistent 15.2's at 90mph at the time and my eighths were in the neighborhood of 9.8 to 9.9 with 2.1 60' on 225/50R16 Kuhmo street tires. Here were the specs at the time for the motor L28E with who knows how many miles (Odo says 44K but judging by the wear on the steering wheel, shifter knob (it popped off in my hand it was worn so much) and bare pedal pads (I have since replaced) I would venture 244K but I might be lucky and have 144K. Head is the stock linered N47, I have never so much as popped the rocker cover to adjust valves. Compression is 160 160 110 155 160 160 at 300rpm rear at the time was stock R200 3.54 Tranny was '81 280zx N/A out of a car with 250K (since rebuilt, 2nd gear blew shortly after at the dragstrip) Clutch is centerforce stage II Flywheel is fidanza lightweight 60mm MSA TB with (at that time) NON PORT MATCHED INTAKE Stock EFI with the AFM spring richened up (since been Megasquirted) Stock Ignition with timing advanced by ear MSA 3-2 header with custom 3" exhaust, 3" cat and turbo muffler Stock injectors fuel pump and FPR I'll fax the sheets in if I can get to a fax machine at kinko's tomorrow. Here's the numbers MINIMUM Torque 144ft/lb@2286rpm MINIMUM HP 66hp@2286rpm AVG Torque 166ft/lb from 2286 to 5356rpm AVG hp 127hp from 2286 to 5356rpm PEAK Torque 179ft/lb at 4800rpm Peak Hp 166hp at 5356rpm I know my sig has said # a bit higher but I couldn't find the sheets at that time. I was still genuinely suprised by the output. I actually had the highest N/A 280z hp until the guys with the big swingers showed up. (V-8's)(out horsepowered a guy that had a cam in his 280 by 3hp...man he was FURIOUS) For another suprise, the little L that could also lit people's eyes up when they let us do a simulated 1/4 on the same dyno. My first run was a 14.3 at 97.2! The operator came up to me and started asking me what I had done to it and I opened the hood, shrugged, and said "it must be having a GREAT day8oP)" Naturally, I couldn't repeat it but got consistent 15.1's at 91 until second gear started going out. Then just for fun they reset my weight to 1700lb (as I had them set the dyno weight at 2700lb for all the other pulls) and pulled a 13.9 at 103. Hmm wonder how I can get that thing to lose 1000lb? -
MSII installed running in 78 N/A 280z stock wiring
twoeightythreez replied to twoeightythreez's topic in MegaSquirt
Oh yeah, forgot to explain the stock transistor ignition module. It's mounted on the right hand side kick panel, under a relay board which contains the horn relay, intermittent timer (wipers), primary ignition relay (there is another under the underhood relay cover) seatbelt timer, etc. Don't be fooled by the look of the wiper timer, it looks like the fuel pump relay in the service manual (that's supposed to be on the driver side dash) the actual fuel pump relay looks nothing like that at all. It actually looks like a regular relay. Oh one more thing on the factory FPR....it draws .2 amp, as in 200 milliamps. One hell of a relay! (If that sucker ever sticks man it must be REALLY bad...the click shakes the car) Ok back to the task at hand. If using MS-II you don't need this thing. If using external ign. why not use this thing? It ran as good as any HEI I ever drove and it's already there! Looks pretty heavy duty too. Hey my Z ran near 14's with stock EFI and ignition. It can't be that bad. All you would need to run a V8 with it would be a dizzy with 8 poles in it. The red and green wires come from the distributor (variable reluctor)...I used my wires for MS stuff later. The power wire is the L/W that comes from the Ign relay right above it. the black wire is ground, and the B/W wire is the negative coil input. It's about half the size of a megasquirt and looks a hell of a lot more durable than the HEI module. Just my two cents. -
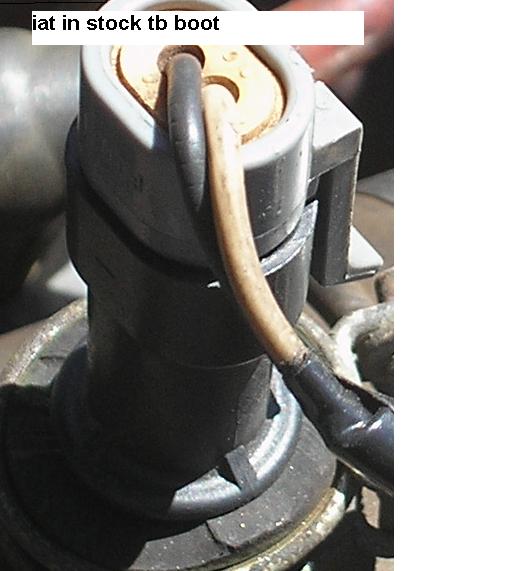
First, a big shout out of thanks to HybridZ and Mobythevan. Still got a lot of work to do but without this site would still be scratchin my head. I apologize outright...don't have any pics but still worthwhile as I'm gonna give you my VE table and ignition map. Will get you running with torque. How much? How about being in a .75 5th going up a steep hill at 800rpm and actually feeling acceleration sound? If interested read on. The tables aren't perfect but low rpm rocks (though my brakes hate me now, I burned them up as the L28 with dialed in timing makes TONS OF TORQUE, actually more than the brakes can hold. Seriously.) My accel wizard hasn't been touched yet, so you'll have to figure that one out. First, the install into the car. I used my stock wiring harness so I'll detail the install for those who would like to know. The stock ECU connector is an AMP and can be easily disassembled. There is also another 4-pin connector that ties the ECU harness with the body harness. If it's a cali Z then there is also the altitude switch 2 pin connector. Lotsa tape and u see the wires. They are numbered every few inches just like the MS wire harness. Here's the pinout/color/purpose in a 280z. 1/B/Coil (actually goes to the 4-pin connector, more on that later) 2/B/TPS #2 3/B/TPS #3 4/G/Start signal to stock ECU not used in Megasquirt 5/B/ Ground 6/B/ AFM #6 7/B/AFM potentiometer 8/B/AFM 9/B/AFM 10/L/Switched 12VDC from ignition relay...more on this cluster later 11/not used 12/B/to altitude switch-not used in megasquirt 13/B/H20 temperature sensor signal...2500 ohms at 80 deg F 14/B/Injector #4 switching pulse 15/B/Injector #1 16/L/GROUND..has a bit of yellow paint on the end 17/L/GROUND..has a bit of WHITE paint on the end 18/B/TPS middle wire (I put this to ground on MS-II) 19-not used 20-not used 21-G/Cold start injector 12VDC comes from 4-pin connector Can be reutilized as in my install 22-not used 23 thru 26 also not used 27/B/AFM 28 and 29 not used 30/B/Injector #5 31/B/Injector #6 32/B/Injector #3 33/B/Injector #2 34/G/Air regulator 12VDC lead I reutilized this (without the 12VDC naturally) 35/L/ GROUND..has a red mark on the end by the "DB-35"(datsun-bullcrap 35pin) connector Ok those pins are installed (in my install) to these DB37 pins on the MSII, pins I relocated, etc. I'll explain since I have no pics. On my preassembled DB37 pigtail, pins 1-6 and 10-16 are not used. 7,8,9 goto one ground wire. I put the all the datsun grounds together, plus some others I'll explain as it comes up, to these wires. Basically all the underhood grounds go to my megasquirt. I also made sure I put lots of extra ground straps to the body to make sure. 17,18,19, same thing, all the grounds go to the datsun grounds. 20, IAT sensor. I used one of the AFM wires to go to this pin, another went to the common ground. The IAT itself was a push-in unit from a 89 grand prix, fits in the stock TB boot like a glove, just have to trim 1/4" off the nipple so the IAT is exposed to the moving intake air. 21- to datsun wire #13. the other side is already grounded. No worries. Just don't make my mistake and hook into the thermotime wires instead. The temp sensor has the white bosch connector and the thermotime has the brown one. It took me an hour to figure out why no temp signal was getting to Megasquirt! Sometimes the problem is right in front of ya. 22- TPS signal to Megasquirt- I used datsun wire #2 for this 23-o2 sensor input. Naturally you have to install an O2 sensor and wire. I used one of the altitude switch wires (since my car is a CA smog special) so it would be a nice clean harness, plus I can disconnect it and plug a wideband into the ECU when the real tuning starts. Free connector, too. 24-power to the optical dizzy I used. I just tied this into datsun wire #10 25-IAC 1B wire. I put this onto datsun #34 (air regulator) No 12V on it anymore. This wire used to supply 12v ign power to the regulator. 26-5VDC reference voltage. I put this one on Datsun wire #3 (TPS) 27-IAC 1B- I put this on datsun wire #21. Another power wire this one for the cold start injector. Not anymore, now that I have a stepper motor for cold idle 28-switched 12VDC to Megasquirt. To Datsun wire #10 29-IAC 2A- This wire comes from the 4-pin connector that come from the right side of the car. It's the only connector that plugs into the ECU harness. Hope you're good with a multimeter. If you don't use IAC just leave it disconnected. No harm done. 30-FIDLE "-" output. I didn't hook this up yet. Plan on using it for electric fans. Need to run a wire across the inside of the car and connect to one of the VR wires (to the stock IGN module..more on this later) 31-IAC 2B same as 2A. Trace wire on ECU end of 4-pin connector, hook it up. If you use these you have enough wiring, I didn't add a single wire. 32and33-Injector bank 1- I hooked these to datsun pins 15,33,32 (injectors 1,2,and 3) 34 and 35- Injector bank 2- to datsun wires 14,30,31 (injectors 4,5,and 6) 36- coil negative wire. MSII can run a coil. To datsun wire #1 This wire goes to the 4-pin connector. If you wire it up the way I did you have a nifty anti theft device, as once you're done you can just disconnect this 4-pin connector (which will only have two wires left if you used IAC) as once it's disconnected you will have no fuel OR spark. Neat. 37-fuel pump relay trigger. There is a little bit of re-wiring involved here. On the 4-pin connector, find the G/L wire. Make sure your battery is disconnected and make a long jumper wire for your multimeter, hook to this wire. Then go under the hood, passenger side and unbolt the metal box the fuse links are mounted on. Underneath this box you'll see a bunch of relays. Unplug the one farthest left. It's the ignition relay after the first ignition relay. The wire is in the middle of all the blue and blue/white wires. The one you get continuity on with your jumper is the one you cut and label. Now find the fuel pump relay, it's the small one with the 12-gauge L/G wires on it. Cut the black wire (ground) and splice your other wire to it. Cut the W/B wire going to the other side of the field coil of the FPR and splice it into the fuel pump power wire. (You'll have to plug in the battery to test for which one has power all the time.) The reason for this is the white/black wire is a START signal, and don't be tempted to just tie into the white/black that's on the 4-pin ECU connector, as it's powered from the main ignition relay. I didnt want to find out what would happen to MS if 12v got applied to the fuel pump turn on. Probably not good. OK almost done here. Now, unplug your voltage regulator and have an assistant cycle your key on and off till you find the 12volt switched power from the alternator. Splice into this wire and connect it to the wire you cut first for the ignition relay. If you don't do this you'll be scratching your head for hours because your Megasquirt will have no power but everything else will. It was annoying. Ok hope you heatshrinked everything as these wires are outside and under the hood, the worst place imaginable. Button it back up, test your pins, and it's time to hook up megasquirt! The unit fits nicely where the stock ECU once resided. The factory ECU cover will even fit over it for a stock look. Now you're done in the car, time to hook up the stuff under the hood. The TPS red wire (240sx or stanza) is the Vref. THe White wire is the signal, the black wire is ground. If you're using an optical dizzy the red wire is the 12VDC, the white wire is for Megasquirt, and the black wire is ground. Don't use the green wire. While you're wiring this up you might as well put the pullup resistor in. Just get a 1 to 1.2K ohm resistor and connect it between the Red wire and the White wire. Hooking up the IAC motor Make sure you labelled your datsun wires so you can hook this up. The MS manual details the wiring of the IAC, this write up is how to install IAC onto a 280z manifold. 1) You're gonna have to mod the throttle body and intake to make this work right. It's actually really easy. Since you're gonna get shavings all over you might as well renew the intake gasket and buy a 60mm throttle body. My mods detail the MSA bolt-on stock-style TB if you have a 240sx piece you're on your own. This mod naturally will also work with the stock TB. On the TB, remove the stock idle bypass screw, and drill and tap the seat to accept a 1/8 NPT pipe plug. Use epoxy on this so it never comes out (at least if it does you have a leak it'll never fall into the motor) Drill out the threads for the bypass screw and tap it for a 3/8 NPT. Screw in a 90 deg nipple into the modified passage. Now you can hook a hose to the one end and the other already has a nipple on it from the stock IAC set up. Since mine was messed up I tapped that hole for 1/8 NPT pipe plug and installed a 1/8 90 deg nipple on the cold start injector location. However you want to do it is up to you. If you have the IAC air go back to the TB you'll have to seal up the cold start injector location with a 1/8 NPT pipe plug. The DIY autotune enclosure I bought fits perfectly where the A/C idle vacuum break mounts. Remove the vacuum break, and install the DIY enclosure to the bracket with two bolts. It bolts right on if you reverse the bracket. I also had to modify my Jeep IAC motor a bit, apparently the DIY enclosure was fitted for a Jeep IAC but the seat inside was the GM size! Luckily the GM Pintle was the same thread and diameter as the Jeep one, just had to hog out the plastic on the end of the Jeep IAC so the bigger end of the GM pintle would screw all the way in. It works perfectly. Can't wait for the updated closed loop idle code to come out! Use the vacuum tee that was previously used for the vacuum advance (since you won't be needing that anymore) to tap off the feed to the vacuum canister (if you have an A/C 280) to supply the MAP. I mounted my TPS with shelf hangers. I filed down the TB nubs a bit and it fits tight and won't move ever. For a better look I'll eventually get a Q45 TPS, as it has the wider spacing. Ok you should be done! You now have a Megasquirted 280z and it looks stock. Cool. Now it's time to program the MegasquirtII...Here's my advance and V/E tables and such to help you along. I'm using 437cc.min ford TBI fuel injectors. Easily found in any junkyard, a hacksaw to the top of the TB and they're yours in 2 minutes. Need to find three cars, though. OH well. The bosch number for these blue (but probably the fuel will have bleached them green by now) top injectors is 250-180-400. Happy hunting! Here's my specs. Injector open time (ms) 1.0 Correction (ms/v) 0.20 PWM limit (remember you're still using the stock drop resistors) 100% PWM time 25.4ms Injector PWM 66ms REQ Fuel- 7.0 (assuming 437cc injectors on stock motor) Speed Density Algorithm injections/cycle-2 stage: alternating *Displacement in cubic inches for L28 is 168cid Cranking RPM 300rpm Trigger advance 48deg (I turned the crank to 75deg but I must have put the dizzy in a tooth off, ain't megasquirt cool?) Cranking Pulsewidth Prime pulse 1.0ms Pulsewidth at: -40F--16.0 160F--4.6 Flood clear threshold 70% Warmup enrichment at coolant temp: (thank you mobythevan) -40F 180% -20F 150% 0F 140% 20F 135% 40F 130% 60F 125% 80F 118% 100F 110% 130F 103% 160F 100% Stock 280z coolant temp sensor (not the gauge sensor) values -40F 30-33000 ohms 80F 2000-2500ohms 160F 360 ohms Afterstart enrichment 100% enrichment 250 cycles I haven't yet set my acceleration values, still fine tuning the VE Ignition Table still working on it but will get you driveable (lots of torque here, and even on crappy cali gas it only lightly pings when going uphill floored at 800rpm, and it goes up that hill like the devil is after it) KPa| Advance in degrees (------denotes same value------) 100| 28 |28.6 | 29.5 | 30.5 |31.6 |32.6 |33----------------------33 95 | 27 | 27.7 |29.5 |30.9 |32.4 |33.8 |34.5-------------------34.5 85| 27 | 27.3 |30.5 |32.5 |34.4 |36-----------------------------36 80| 26 |26.7 |30.7 |32.5 |35 |37.1 |37.5--------------------37.5 70| 25 |26.2 |31.5 |34.5 |37.2 |39-----------------------------39 65| 24 | 24.5 |31 |35.5 |38.5 |40.5--------------------------40.5 60| 23 |23 |31.5 |37 |40 |41.7 | 42-----------------------42 50| 22 |22 |33 |38.9 |41.8 |43.5---------------------------43.5 45| 21 |21 |34.5 |40 |43 |44.7 |45-----------------------45 35| 21 |21 |36.5 |43 |46 |47.8 |48------------------------48 30| 21 |21 |38.1 |44.5 |47.2 |48.6----------------------------48.6 20| 21 |21 |40.7 |46 |49 |51------------------------------51 RPM 600|1100 |1600 |2100 |2700|3200|3800|4300|4800|5400|5900|6500 VE Table KPa|% 100|92|92|92|92|91|90|89|95|99|96|96|98| 95 |90|91|88|90|87|87|88|94|97|96|96|98| 90 |89|88|84|86|87|86|88|93|95|96|96|96| 80 |83|84|82|85|87|86|88|92|93|96|96|96| 75 |75|77|76|81|84|88|89|92|92|96|96|96| 70 |71|72|73|79|81|86|87|93|92|97|97|97| 65 |70|69|71|77|79|81|84|89|84|89|90|90| 60 |67|68|69|74|75|75|80|85|80|83|83|83| 50 |65|66|66|73|73|76|79|83|79|82|82|82| 40 |64|64|64|68|73|74|73|81|74|82|82|82| 30 |64|64|65|71|74|71|72|76|74|82|82|82| 20 |63|65|65|70|75|69|69|73|73|80|81|81| R x|5 |8 |11|14|20|26|31|37|43|49|54|60| P 1 M 0 0 Ok that's it man my hands are sooooo tired. Hope this helps someone.

-
Hey all, just thought I would post my VE table and Ignition map for all to see, still needs some work (don't have a dyno) and I still have to figure out the acceleration enrichment, but I'll give thee fair warning, the filename lives up to it's name. (Got torque? I literally smoked my brakes just trying to optimize the LOW RPM parts- this L28 can overpower the brakes in 1st now. The car will pull smoothly from 700rpm in FIFTH, a bit of ping, but not much, and at about 1800rpm will start sinking you into the seat) Here's my car until I get the turbo swap done 78 280z Stock L28E motor with MSA header 3-2 Ford TBI 437cc/min injectors JSK fuel rail barbed hose type Extensively modified 60mm MSA throttle body so it works with the DIY remote IAC enclosure, I drilled and tapped the factory idle bypass screw hole and blocked it with an 1/8 NPT pipe plug after the Throttle Plate, the air goes out a 3/8 fitting to the enclosure, thru the valve, then back into the intake which was tapped for a 1/8 NPT nipple where the cold start injector used to be. I then adjusted the base idle screw for 650 rpm. Remote IAC enclosure with 94 jeep IAC motor modified with GM IAC pintle (for some reason the enclosure was sized for the jeep valve but the actual pintal was the GM size...WTF) 81 5 speed with fidanza lightweight flywheel and stage 2 c/f clutch 4.11 non lsd R200 from 80's 200sx 89 stanza TPS (same as 240sx) mounted with shelf hangers...not goin anywere...but eventually will get one from a 95 Q45, these also have the 5-wire connector (two on top, three separate) and appear to have the Z TPS bolt spacing 8o) 83 ZXT optical Dizzy with 1.2K ohm pullup in wiring (a 4 pole trailer connector, nobody had anything else that was waterproof) Installation: Mounted right where factory computer went. The factory cover will still fit! Used the factory wiring harness with the following modifications: Re-wired fuel pump relay to have power all the time instead of ground all the time (on the 78 it's under the underhood relay box, has two green/blue wires for the fuel pump, the white/black wire from ign relay under right side of dash and the black ground wire) Physically, it's sandwiched inbetween ign relay #2 (i don't know what else to call it) and ign relay #3 which is behind the voltage regulator The wire that originally went to the ECU to power the fuel pump relay in the 4-pole connector under the dash-it plugs into the ecu harness (which has the white/black, green/blue, black, and green wires, but don't think they go the FPR nissan wasn't that logical, remember) is green and I traced it out, cut it out from the ign relay #2 and then spliced into the voltage regulator for the ign relay #2 turn on voltage (otherwise you won't get power to the ECU!) THis way I could put pin 36 onto that to run the fuel pump. The other two wires went to the cold air regulator and the cold start injector for power. They now are the 4 wires to my IAC valve. The AFM wires went to my distributor and IAT sensor, respectively, as the 78 z only had five wires to AFM (since they had the weird fuel pump relay circuit)...the fuel pump pins on the AFM are not used on a 78 I also removed the Factory Transistor ign. module, looks like it could be used for MS if someone wants to try it (My buddy sal wants MS now maybe we'll try it on HIS car) My tach still works fine, the resistor for the tach is spliced somewhere else in the wire harness. (in fact its actually accurate to within 100rpm!) The red and green wires from the VR distributor now are power and switch ground from the FIDLE pin on the MSII. (Going to use it to power a fan relay eventually, as the plastic connector under the hood is in the perfect spot!) The wire colors to the factory ign module are: 1) blue/white- factory ecu pin 10 wire sw. power from ign relay 2 and 3 )green and red from VR dizzy 4) black/white-negative coil terminal-goes to 4-pin conn by the ECU,so now a cool side effect for me, I can disconnect that connector when underway, won't have spark OR fuel, nobody's driving my car away! 5)black- ground That's it, that's all I did to use factory ECU wiring for MSII! Settings: I marked the damper and turned it to 75 deg BTDC but for some reason the most trigger offset I can get and still get the timing on MS to match the light is 49 deg must be a tooth off My accel settings are crap I won't even post them, the car pulls great as long as you don't drop the hammer (if you set the hammer down you're fine) Still working on that Dwell is 2.1ms req fuel is 8 or so but I don't need to tell you when the calculator will do it for you! (put in the cc/min, displacement of motor (L28 is 168cid) and estimated hp and torque...I put 160hp and 178lb ft at 4800 and 3200 respectively) cold start settings are from the sticky thanks mobythevan! IAC settings are 0 to 300 steps the JEEP iac uses the full range 120 is the 80F opening point, idles at 700rpm that way only idles fast if it's colder than it gets in southern california Ok here's my lists (if I figure out how to stick them in here!) EVEME 1.0 UserRev: 1.00 UserComment: Date: 08-19-2006 Time: 20:58 Page 0 Scale 0.100000 VE Table RPM Range [12] [ 0] = 6 [ 1] = 11 [ 2] = 16 [ 3] = 21 [ 4] = 27 [ 5] = 32 [ 6] = 38 [ 7] = 43 [ 8] = 48 [ 9] = 54 [ 10] = 59 [ 11] = 65 VE Table Load Range (MAP) [12] [ 0] = 20 [ 1] = 30 [ 2] = 35 [ 3] = 45 [ 4] = 50 [ 5] = 60 [ 6] = 65 [ 7] = 70 [ 8] = 80 [ 9] = 85 [ 10] = 95 [ 11] = 100 VE Table [ 12][ 12] [ 0] [ 1] [ 2] [ 3] [ 4] [ 5] [ 6] [ 7] [ 8] [ 9] [ 10] [ 11] [ 0] = 210 210 407 460 490 510 510 510 510 510 510 510 [ 1] = 210 210 381 445 472 486 485 485 485 485 485 485 [ 2] = 210 210 365 430 460 478 480 480 480 480 480 480 [ 3] = 210 210 345 400 430 447 450 450 450 450 450 450 [ 4] = 220 220 330 389 418 435 435 435 435 435 435 435 [ 5] = 230 230 315 370 400 417 420 420 420 420 420 420 [ 6] = 240 245 310 355 385 405 405 405 405 405 405 405 [ 7] = 250 262 315 345 372 390 390 390 390 390 390 390 [ 8] = 260 267 307 325 350 371 375 375 375 375 375 375 [ 9] = 270 273 305 325 344 360 360 360 360 360 360 360 [ 10] = 270 277 295 309 324 338 345 345 345 345 345 345 [ 11] = 280 286 295 305 316 326 330 330 330 330 330 330 ign map soon
-
Fuel Injector Upgrade List (L28 Turbo)
twoeightythreez replied to Arif's topic in Turbo/Supercharger
Roggaman, I believe that full part # is 280-150-036 -
Fuel Injector Upgrade List (L28 Turbo)
twoeightythreez replied to Arif's topic in Turbo/Supercharger
For people looking for a bolt in slighly higher volume injector Jag XJ6 injectors use the barbed fitting, are low impedance, use the bosch connector (injector part #280-150-153) and flow 238cc/min @36psi I have a set I can give away if anyone wants them (I went with the Ford 5.0 TBI injectors- 280-150-400 438cc/min@36psi) I also have a set of 7MGTE injectors that need a home. I was gonna just take the covers off the end of the ford injectors but I decided to just make the hole in the intake bigger instead. Had an exhaust leak anyway. Drill bit of 10.3mm works fine (for some reason I forget the standard measurement but a 3/8 drill bit is 9.5mm) I do have a question....Can you use hoses on the end of the ford injectors? THe TBI units had a tiny little o-ring for sealing and the top is "stepped" -
Now all that's left to get up and running on ms is to install the 83 CAS dizzy, modify the TB so I can use the remote IAC enclosure (If you have a 78 Z with factory A/c remove the A/C idle actuator and bracket and bolt the DIY enclosure to it, it bolts right on...I just need to get some angle fittings to plumb it and a jeep IAC valve) Oh...and wire up the Megasquirt. Forgot that little detail. 8o)
-
Rontyler, Thank you for the info. I did some more searching and found some 280-150-400's out of three fords (a t-bird, an LTD wagon, and grand marquis, all with 5.0 TBI motors) I tested them, cleaned them, and installed them into my intake after removing it, hogging it out a bit (the ford injectors are slightly bigger O.D than the nissan ones) The nissan O rings still work, using lots of lithium grease and care. I hope I can get the hoses to work, though I do have a JSK fuel rail and am wondering if I should just get the fittings that will slide on top of the ford injectors? The ford injectors apparently flow 437cc/min@37.5psi fuel pressure. Wow! Good price, too (I got six for free in my pocket and paid for two that I did experiments on....didn't want to enlarge my intake holes unless I had to....and I had to, plus tried to take one apart to see if I could swap the barbed ends on....I was a miserable failure at that...still dont know how these things come apart, but still have six good ones. I still have the six Jag injectors or the 7MGTE ones if anyone wants them.
-
never mind, after much searching on other web sites i STILL didn't find the specs for the Bosch #280-150-153 injector. But considering the -158 injector that is listed for JAG 4.2L is only 230cc/min I guess I'll keep junkyard hopping. Maybe I'll get lucky and find some -601 injectors (514cc)
-
Hi, just wondering if anyone knows what cc/min the Jag XJ-6 (258cid, 4.2L) fuel injectors are? I tried the search function and only a few posts with jaguar anything come up, none of which describe them. I found 2 89 XJ-6's in the yard and pulled eight injectors, as the Jag has the L-jetronic EFI, and the injectors look identical to the Z ones. The 3 digit number on the side is "088" I'm sure they have to flow quite a bit more than even the turbo Z injectors, as the Jag inliner is so large. If these work it looks like a good swap option for use with megasquirt, as it takes 10 minutes! to pull the injectors out of the Jag.
-
I want to use the 77 power/ fuel relay... Possible?
twoeightythreez replied to olie05's topic in MegaSquirt
Welp the install is still going...I pulled all the cold idle crap off the intake, can actually see the intake now! Amazing. I pulled the TB and realized that there is no way to get the GM IAC in there. So I bought the DIY autotune remote IAC enclosure. Still have to modify the TB so it will work. Planning on drilling/tapping it for a 1/4 NPT pipe plug to block the opening aft of the throttle plate, then putting a nipple where the idle screw goes. Then it will double back into a nipple where the cold start injector used to be. I'll put a another nipple where the bypass hose used to mount to the TB and use it for the BOV. The enclosure itself at 2.25x2.25x1.75" should fit where the stock cold idle bypass went. This way it'll look a lot cleaner than the miles of hose with the stock setup. I have to run to the yard to try to find some plugs for the thermostat housing (where the coolant line for the EGR cold-shutoff solenoid nipple mounted) It should be the same size as the one in the front of the Z housing. I also need to find a nipple without the extra nipple for the heater hose connection. I also need to find some injectors that bolt right in to the nissan intake with no mods (I hope I can find that elusive 450SEL) The cooling fan idea fell through....will have to use MS to activate the fans, the sentra temp sensor has bigger thread diameter (but same pitch) by a hair then the thermotime switch. Doh! Still have to remove the stock fan and shroud, mount the sentra fans, and install the '83 CAS dizzy. Then the fun begins, hooking up the MSII. I have to get a camera so I can take some pics. Oh well thanks for all your support! -
How much did everyone spend on their V8 Conversion?
twoeightythreez replied to a topic in Gen I & II Chevy V8 Tech Board
71 240z-1400 I wrecked it 78 280z to replace 71 from J/y 1200 (very little rust and ran) 81 ZX 5-speed from pick part 90 bucks (250,000miles) cost to rebuild said tranny after blowing 2nd gear at the strip-700 New stock clutch-60 another stock clutch-60 Centerforce stage 2 clutch-250 (for some reason my L28 has too much torque for the stock clutch...and tranny for that matter) Fidanza lightweight flywheel (I turned my old one to steel due to stock clutch slippage 8) 60mm MSA TB-165 Ebay short ram&K and N-120 new windshield-150 MSA weatherstrip kit-295 MSA carpet kit-295 MSA new OEM center console-65 MSA full dash cap-120 Period 16x7 OZ wheels-500 New 225-50R16 tires (Kuhmo) 295 3" muffler shop exhaust-350 new front rotors-50 each total 100 new drums 160 both new brake linings front rear 45 AUtozone slave cyl. 35 another autozone cyl free 3rd autozone slave cyl free Nissan OEM slave cyl 90- and worth it MSA 3-2-1 header 285 Couple it to my exhaust 50 Replace flowmaster with super turbo cuz header made car too loud-100 Recharge stock A/C-100 works great K&N recharge kit-25 Two good used door panels-75 Ford dark blue paint for door panel insets-8 Paint job (FBI Blue) 2500 76 bumpers to replace dented original 78's-40 Labor to install all parts-free, i did it myself Speedhut EL glo gauge faces 125 Speedhut afr gauge 110 bosch 1-wire O2 sensor-20 have shop install sensor bung into header-40 5-gal quietcar sound deadener-200 WORKS! industrial roofing foam-200 Over 10K and counting...... Now I'm going turbo so lets keep going 68 510 wagon 500 trade wagon for L28ET and rebuilt turbo, plus lotsa parts such as 4.11 R200 MS-II unassembled w/ 4-bar MAP, GM IAC 400 88 sentra electric fan-45 stanza TPS-35 7MGTE injectors-free "pocket" discount (they charged me 70 bux for a stinking fan and TPS!) 280z tach 12 bucks (mine broke-fixed now) So now 12K and counting STILL HAVE THE RELIABLE OL' STOCK MOTOR THAT WAS IN THE CAR WHICH WAS IN THE J/Y 4 YEARS AGO...hilarious. I'm married to that car...but I wouldn't have it any other way. Kinda goes like "rattlin bog" ...and in this bog there was a yard, a rare yard and a rattlin yard and in the yard there was a car a rare z and a rattlin z and in the z there was a branch and on the branch a twig on the twig a leaf on the leaf a bug on the bug a hair on the hair a germ...u know how it goes so the germ on the hair the hair on the bug the bug on the leaf the leaf on the twig the twig in the car the car in the yard the yard in the bog and the bog down in the valley-o -
I want to use the 77 power/ fuel relay... Possible?
twoeightythreez replied to olie05's topic in MegaSquirt
I'm slowly beginning my MSII install in my '78. I'm gonna go turbo but I want to get the install done and running on the motor I have now. (L28E) I did find some interesting things in the J/Y today that I'm pretty stoked about...I'm open to suggestions/improvements on my ideas for this. 1) An electric fan from an 88 sentra coupe seems to line right up to the edges of the Z radiator (there was a '78 Z right next to the sentra) The bottom mounting is "slide in" so I can make up some angle iron brackets to the rad support, and for the top it bolts in (will have to figure that out) It seems to move a ton of air with both fans and the coolest thing is that the sentra rad has a temp switch for the fans. Talk about cheap way to get a self-contained electric fan! I'm gonna run the fans through a relay and the switch appears to be the same thread as the thermotime switch on the L28 stat housing. I'll find out for sure tomorrow. I know MSII can be used to control fans but this is cool, too. (Fans will run with the engine off this way if the coolant is hot enough) 2) The Stanza relay box I got I'll use to run the fans, and I also might use it to trigger the fuel pump relay I have. (or should I just replace all that crap on the r/h fenderwell with the stanza relay box?) 3)I got a GM IAC Valve and am trying to figure out how to incorporate it into my TB...will do a remote set-up if I have to but I want it to be clean. I'm wondering I I can drill out the stock idle screw on top of the TB to match the GM unit? (I'll adapt a mounting provision, probaby will hacksaw the seat and such from the GM throttle body) I want to keep my MSA 60mm if possible. 4)The '89 grand prix 3.1 that donated it's IAC also donated it's IAT press-into-rubber type sensor. The coolest thing about this is it fits right in the boot at the TB where the stock cold-air bypass hose goes. I just had to trim 1/4 inch from the nipple so the IAT sensor is in the airflow. 5)The Stanza TPS I'm going to mount to the stock TPS back plate after I smooth it out. This way I can use the stock adjustment screws with no problems. 6) The AFM, naturally is going away. I'm thinking for now I'll use an 8" piece of 3" exhaust pipe section to bridge the gap. 7)I got some 7MGTE injectors from the yard today. Is it worth it to change out connectors or should I get some with bosch type connectors? Thank you for your inputs (if you give any) -
No, I'm not talking about the looks, the miata has that....I'm talking about the british reliability. Everyone, and I mean everyone I've ever known that had an eclipse has had to have me pick them up, help them fix the eclipse, and when they REALLY blew it up, I lent them my Z, which never let ANYONE sit. But they ARE fast.
-
Yes, they are fast, for about 2 minutes, till you have to work on it again. The Eclipse...the japanese answer to the classic british sports car.
-
DSM=driveway show-mobile
-
ppl just hate DSM's.. because you can make them super fast for super cheap, and plus there hard to beat on the street... can never tell if a dsm is just lightly modded or full tilt race car. god i love dsm's!!! I do, too. If Nissan or Toyota had built the Zero we would still be fighting WWII (kidding)
-
anyone else doing a 4.6 4V into a 240?
twoeightythreez replied to PnyPwr's topic in Ford V8Z Tech Board
dang the z looks so good as a roadster -
And, nobody is saying don't do the FE swap, they're just telling you that you will kill the weight distribution, unless you do extensive mods to the body. I'm sure everyone here can't wait for you to start the project, and see pics!