A to Z
-
Posts
1167 -
Joined
-
Last visited
-
Days Won
53


A to Z's Achievements
")


-
07-29-2026 ATLAS Z UPDATE: I went ahead and ordered up some 4" pipe from Silicone Intake Systems (SIS). marked out where I wanted the turn down and the filter to sit behind the grille and jumped in and cut the path! I then cut the 45 degree offset piece into the shape needed. I ran out of time today and material actually also....I need some straight pipe, but good progress. Next is the sweeper 90 and some straight piece to put the cone filter right where I want it. You can also see I began the process of a new layout for my electric panel. Once the piping is laid out, I will once again, have it welded , sanded smooth and polished. PICS:

-
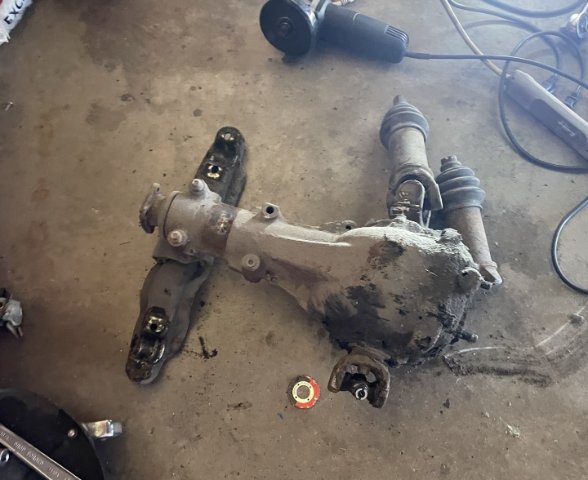
07-26-2026 ATLAS Z UPDATE: Today I switched it up a bit and worked on some other items first. I cleaned up and interior painted my rear view mirror with the SEM Landau BLack interior paint, then started the install on the Snow Water-Methanol pump in the back. I have it loosely hanging there for now as I have a few other items to finish before final install. Then I decided to install the Dealer option fluted aluminum rocker trim. I had it powdercoted in flat black, and now was the time to install. After getting it on the way I wanted and getting the bottoms of the fenders tied down, I decided to try out the serpentine belts I got to see which one will work. Well, my measurements were off, and I decided the best way to fix the problem was to just cut the belt I had on there and pull and measure it to get an accurate measurement. 78 1/4" with the tensioner relaxed. I think I will try a belt at 78" length and see how it goes. After doing all of this, I decided to push the rear diff under the car and get an idea of how much work was waiting for me.....well, it went right in! very nice to have it done and glad Jesus let me have it go well! PICS: SportsCars
-
07-25-2026 ATLAS Z UPDATE: Today was brutal. Some days on the car go easy, some so so and some bad. Today was a tough one. I wrestled and wrestled and finally got the R180 to come out amidst scraping and banging fingers, etc. and leaving bruises. I then had to do a cleanup of the area, and the 50+ years of dirt, dust, grime, you name it left me with a black face like a coal miner.....but I got it cleaned up and ready to stick the R200 in. After I get it in, I will then do some detailing. When putting the mustache bar in for the R200, you have to put it in a certain way, and in my case it required unbolting and lowering the factory "box" of steel bent pieces to get it in. and I ended up having to do it twice, because the rubber pucks that go on before the mustache bar goes up and on the end before the nut....the hole diameter is not the same.......the stud is TAPERED, and the top puck MUST be flush to work....after the second attempt I was finally able to get it all up except the last puck wouldn't go....I finally opened up the hole a tad and then everything went back together. That leave me with putting the main differential carrier in later. At any rate, once the old carrier was gone ...cleanup of the entire area began........some cutting and chopping brackets etc. off......some wire wheel cleaning and some light angle griding to get it to where it can be finished after center diff install. I bought Techno Toy Tuning axle shafts (Porsche 930 CV's) earlier, and they will go in at a later date.....but it is ready to proceed. I was also able to take some measurements and drill and cut some 3/16" thick steel plate to mount the pump for the water methanol system and got it painted. PICS:
-
fresh coat of flat black powdercoat on my rocker trim for the ATLAS Z:
-
Well, this car is akin to an AC Cobra. Sunny day only....around town hot rod. I want it as open air as possible. Mostly gutted out except for some interior bits to make it look nice. Also the exhaust exits right behind the front wheel!
-
07-20-2026 ATLAS Z UPDATE: my rocker trim I got from Ace King arrived and another ATLAS Z badge I ordered showed up as well. Z Car Depot sent me a set of hood spacers as well. PICS:
-
07-19-2026 ATLAS Z UPDATE: I started by color sanding and buffing the tops of the fenders and the sail panels with 2000 grit, 3000 grit and 5000 grit and then used Meguires Premium Polish with my foam pad on the buffer at medium speed. Then I re-installed the side view mirrors, and re-installed the emblems and plug for the antenna hole. Then I finished the door panels by putting the latch surround trim under the door release latches on both sides. Then I took some rope and measured out the length for the serpentine belt and the remaining brake lines, which will also be PTFE braided line form "Finishing Lines". All of this took longer than it sounds. PICS:
-
07-18-2026 ATLAS Z UPDATE: Today was Doors Day. I put this off for a long time, because it is just no fun. I deleted the windows for the car to lighten it up and keep it in the mindset of being basically a 4 wheeled motorcycle. I gutted the doors out except for the door handle mechanisms, leaving the locks in....and then vacuuming the bottoms of the doors out and then taping the holes off, and then I installed my repro door "cards" I got from Hung Vu. the Arm rests I got from Ebay and the holes left for window crank and door lock I filled with some push in plastic plugs I got off of eBay as well. I then started on the layout for the rear window. I am replacing the glass with Clear Polycarbonate from a company in England called Plastics4Performance (.com). I am getting the rear window in clear, with the special hardened coating, and making it a custom order, having slots cut into it like they do for the Ferrari 488 cars (see pic). The weight will be easily half of what the heavy glass weights, and I will lay down a layer of rubber int he window well, drop the glass in, and then with holes already drilled, bolt the window down into the hatch itself. It should look great! I also installed the door weatherstripping and the threshold plates. Seems to have made a big difference looking at it after I was done today. PICS:
-
07-15-2026 ATLAS Z UPDATE: Today I finished sanding the first coat of gloss clear and then prepped and applied a second coat of poppy's patina. Now 48-72 hours of cure time before color sand and buff. I also finished the work on converting the hatch lock pushbutton to a hood pin setup. PICS:
-
07-12-20206 ATLAS Z UPDATE: Well I started today by wiping down all the sections to be cleared with the Poppy's Patina Wax and Grease Remover. Then I went ahead, got my mrespirator ready and glove for my wiping hand and mixed the gloss clear and started wiping. It goes surprisingly quick...and I found that I was sicking the applicator into the paint and then then I LIGHTLY squeezed it out so that I had a lot of the applicator, but not dripping as much. As expected, there is a learning curve. After I was done and the hours went by, I could see spots I had missed. Normally you want until it is completely dry, at least 24 hours, but since I know I am sanding and adding a second coat, I mixed up, a small amount and went over the spots that were missed. Sure enough, it changed the appearance......so don't do it unless YOU KNOW you are adding another coat, which means sanding or at least using the grey scratch pads they send you to rough up the surface a hair before laying on a second coat. I wanted to get a coat of the stuff on there so the second coat later will be a true second coat everywhere. But, I am impressed. It is my intention to get a second good coat on, let it sit 24 hours, and any spots missed to then add where needed and let it sit for awhile....maybe a full week, before I sand it with 2000, 3000, 5000 grit sandpaper, and then use my buffer with the foam pad and some compound to bring it up to a smooth shine......then a good coat of wax. PICS:
-
07-09-2026 ATLAS Z UPDATE: Installed the intake piping. You can see the inspection door covers on the car from ZOCIETY, still just laying there I haven't bonded them down yet. Time to finish caulking in the carbon panels and then clear coat over the blue patina paint. PICS:
-
07-08-2026 ATLAS Z UPDATE. I picked up my intake pipe and MAF Meter cover plate from my polisher, J&S Polishing here in Colorado Springs today. int he pics, I just laid it in place, not installed yet. His ability to take my cobbled together crap and make it look fantastic is true magic. PICS:
-
07-07-2026 ATLAS Z UPDATE: I picked up a set of carbon fiber covers for the hood inspection doors from ZOCIETY. Many ways to attach them, I will try silicone first. Since my inspection doors are powder coated, I will do a light scuff and then bond them on with pure silicone, taped down overnight. By the way, they are TOP QUALITY. $360 bucks.
-
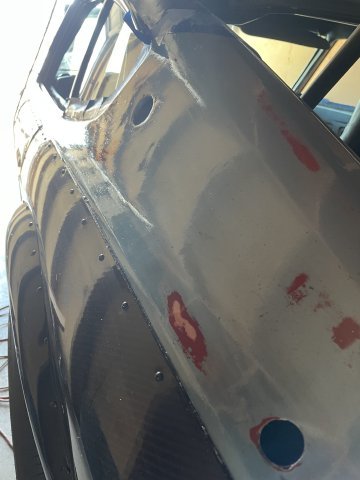
07-05-2026 ATLAS Z UPDATE: I finished feathering out the remaining blue paint, got it nice and smooth, then blew the car off and taped up the front fender and went ahead and caulked the seams. 260Z Fender Badge placement on the fenders looks good. Poppy's Patina Gloss arrives tomorrow, so we continue on! PICS:
-
07-04-2026 ATLAS Z UPDATE. HAPPY 4TH OF JULY! I removed the front bumper and traced out and cut some spots in the carbon fiber to allow it to fit properly and re-installed the bumper. The edges will be hidden under a thin line of black silicone caulk. I also cut some aluminum stock I had and placed it under the intercooler and Tek screwed it down. it is basically just helping to support the weight. The 260Z fender emblems are on, taped to sit overnight and let the silicone cure. The rest of the day was spent fixing the other Z car I have. PICS: