

CarJway
-
Posts
227 -
Joined
-
Last visited
Content Type
Profiles
Forums
Blogs
Events
Gallery
Downloads
Store
Posts posted by CarJway
-
-
-
Yes, if you're running coilovers...
-
I am currently running a 17x8.5 +20mm in the rear with a 2.5 inch spring and it clears. This is with no spacer; its a very close fit, but it does fit. I had to cut a section of the weld on ring to make this work, and clears fine with regular old lead weights too.
-
For the "release bearing"; do you hear a chirping, gravel/rumbling coming from the center of your car? Does it go away as soon the bearing begins to make contact on the pressure plate? Not sure why the spring would have fixed your issue, and think there is something else here. I am also in the SS area, i'm in Rockville.
-
You could also go with the 13" rotors, and keep the 4 piston calipers vs 6 piston calipers. Dave at Arizona Z has the brackets to do this, and is the setup I went with. I haven't gotten to take this to the track yet, but I assume it should work fine as others have noted with the 12.2 setup.
-
I ran into the same issue; I purchased inner tie rods by a company named 'Rare Parts'. They only have the inner driver side, but that isn't an issue since I am running custom outer tie rods. Part# is 26575
I have put less than 100 miles on them, so no real comments on their durability.
-
I personally have had issues with external Walbro 255l pumps; I have had two fail on me in less than 1000 miles. (I run Aeromotive filters prior to the pumps) I have run them internally for years without an issue, but externally I have had no luck. I have switched over to the Bosch 044 fuel pump.
-
The post is a "Sticky" in the drive-train section. My car is a 78.
-
I had binding issues with the Z31 axle swap, and is why I went with Jon's axles. I drive a 280z; in my install thread you will see some rough measurements of what is now available after the axle swap. I never took measurements of the originals, but I recall my driver side axle, with the cage being flipped was a rough/tight fit.
-
TTT has Tie-rod ends for our cars. Call and speak with Gabe; you will need to have right hand thread inner tie rods for them to work. I replaced my inner tie-rods anyway, and just purchased two passengers side tie-rods.
-
I went to fix the oblong holes in my tension rod buckets today; started the car up over 12 times with little to no actually driving to let the alternator charge, and the battery held up just fine. (moving the car around the shop) I also have the car rewired with a painless harness, and I am sure there are no electrical draws on my battery when the key is pulled out. This could be another reason why this battery has worked so well for me.
@getoffmyinternet: By continuous; initial start up to build oil pressure after a rebuild, then crank to get the ignition map going, etc. I would crank for some amount of time, stop, crank again. Either way, for what it is, it held up great. (but did die after that exercise) Currently there is no radio in the car, but I do plan to put one in. In dash screen, with newer speakers but the car will not have a sub.
@texis300: the battery comes with automotive posts that screw into the battery. I believe there are a few versions of this battery, and just make sure you get the one for automotive use. The only difference is the posts included.
-
I run an Odyssey PC680 in my car. The car has seen less then 3 miles in 14 months, and still starts great. I don't unplug the battery for the winter or keep it on a trickle. The one time the battery did die, was after cranking for 35+ seconds continuously. I gave it a quick charge, and the battery cranking performance has been as new since.
If your car is hard to start, or you plan on listening to your radio with the car off, this battery isn't for you. But at less than 15#, for roughly $115 it was great weight savings.
Specs can be found here:
-
First real drive in over 5 years... Still need to put on the bumper, and wrap up loose ends.

-
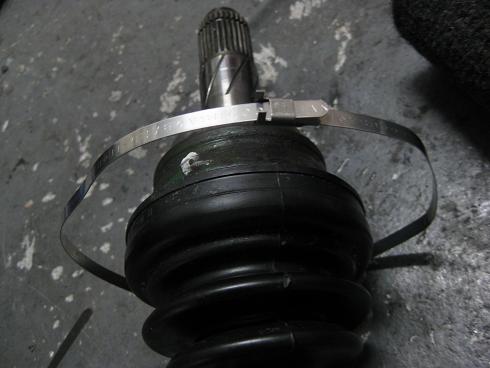
For the boot clamps, I used the two sizes available from CarQuest. (Brand: Band-It) All they had was medium, and large; but it worked out great.
Taking the clamp, and wrapping it around the boot. Slip one end into the clasp.
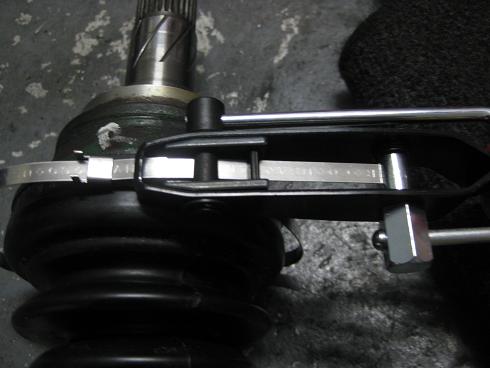
Using the following tool from KD, (#3191) slide the end of the clamp into the tool. This will go into a slot on the tool, that will be used to hold the clamp during the tighten process.
Once you have gone hand tight, use a 1/2" socket to finish applying a bit more pressure. You will see the clamp slightly sink into the rubber, and shouldn't take much to do so.
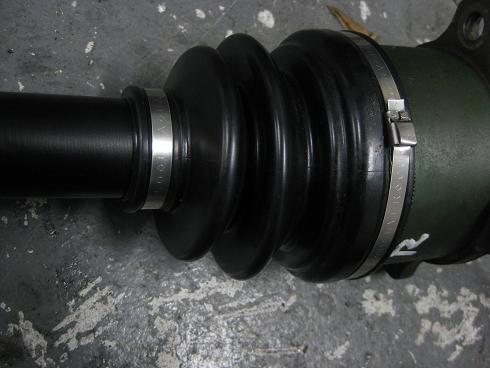
Once satisfied with the tightness of the clamp, hold the lever that apples tension, and bend the tool over towards the clasp. When you have bent the clamp over, use the cutter integrated into the tool to cut the band. When doing this, be sure the bend you made doesn't come undone due to the pressure of the clamp around the boot. I had to catch it a few times... BE CAREFUL THE CUT END IS VERY SHARP!!! Ask my thumb, as it decided it wanted to donate blood all over my shop floor.
The finished product; take a punch/hammer and bend over the tabs that will hold the assembly all together. I took a dremel after I was all done, and grinded down the edges of the cut clamps. Mine were sharp, and didn't want to donate anymore blood later down the road...
-
Well, their are numerous threads concerning the binding of the stock Turbo Z31 axles when placed into an S30. This is when swapping a R200 CLSD from a Z31, with the billet adapters from Modern Motor Sports. Some say they are doing just fine, while others can barely get the axles in with the cages flipped. Well, I wasn't comfortable with the tight fit of the axles, and Jon pulled through with a set of axles that sits great in the S30. The length of the axles puts the CV in the middle of its travel, and doubt I will ever have enough power of coming close to breaking them! (stock length control arms) Discussion thread here... Overall, the construction of the axles is great. The splines fit into the Nissan CV’s with no extra play or backlash. Just what you would expect, as if these were the OE shafts. I haven’t driven on them yet, but I will be sure to update this thread once I do.
To some, swapping the axles might be common knowledge, but the pictures below might aid anyone doing this for the first time. This will also show how stout these axles really are. If you have any other methods, or pictures I may be missing, please let me know and I will adjust/add them.
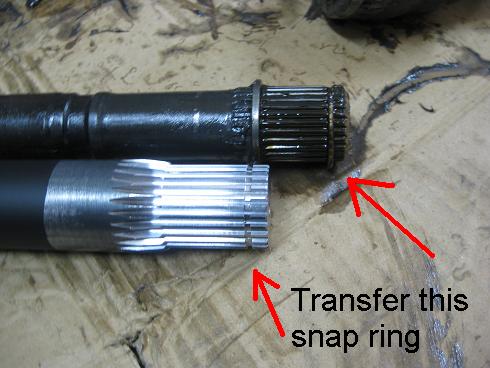
Side by side comparison. (I painted the axles flat black)
After taking off the clamps.
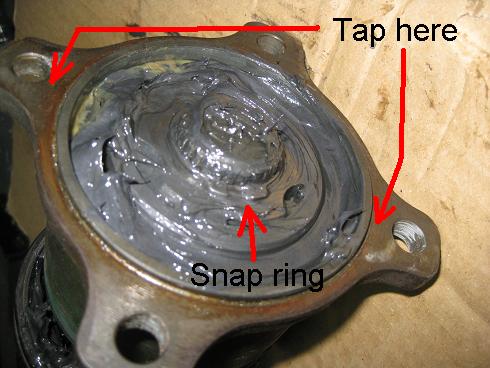
Start with the outer portion of the axle. There will be a white/silver cap covering the inner portion of the CV. There is a snap ring you need to remove. I used a rubber mallet to tap the outer flange. It doesn't take much to get the cap off, so no need to get the sludge hammer out.
Once you have removed the snap ring, you need to remove the outer CV assembly off of the shaft. Again, using a rubber mallet will do the trick. One slide off by hand, and the other need a few taps. This will leave you with the inner snap ring. You can skip this step if you are using new boots. I already had new boots on the shafts, so I needed to get them off. Once you have taken the inner snap ring off, go ahead and slide off both CV boots.
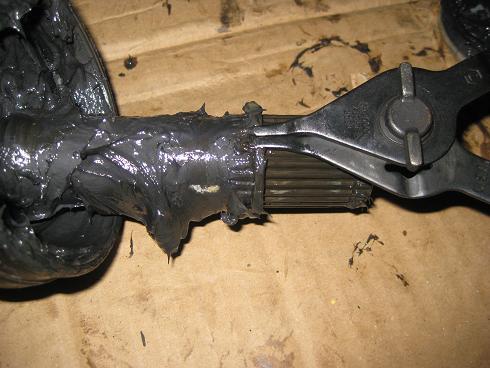
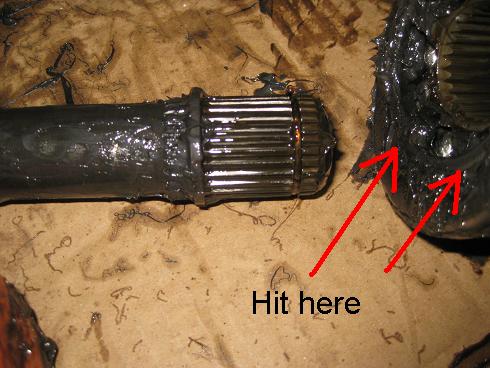
Getting the inner CV off; this can be accomplish in a few manors. Using a pipe, and placing the axle in the pipe, and slamming the CV assembly down into the pipe OR using a dead blow hammer. Using the dead blow hammer, took 4-8 hits to get the inner snap right to give. Mind you I am 145 lbs, so with me holding shaft and hammering, I think this method works great. When taking off the inner CV, be sure to hit the inner portion. Otherwise, the outer cage will shift, and you will never get the snap ring to give.
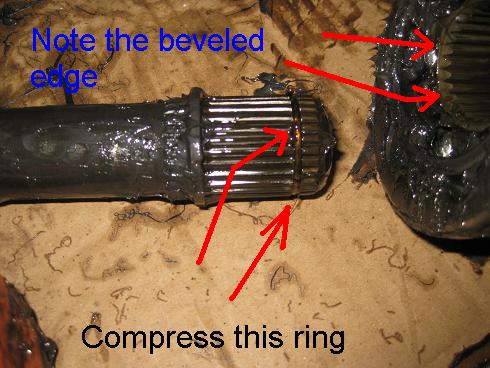
You should now have both CV assemblies off the original axle. You should start with the inner CV; I wouldn’t put any boots on at this time, as they will get in the way. I didn’t take any pictures of this step, and it was probably the trickest step. You will need to take the snap ring off of the original inner CV, and transfer it over to the new shaft. I placed the inner CV facing the ground, and then inserted the new shaft into the splines. DO NOT just hammer away; the snap ring did NOT just give. My snap ring actually bent, and had to order new ones from Nissan. Once you have sat the shaft into the splines, use a small screw driver and push the snap ring into the groove of the axle. It has a beveled edge, which aids you to get it started. As you’re pushing the ring into the groove, apply pressure to drive the axle into the inner CV. You will feel when the axle has entered the splines. At this point, you can hammer the axle into the CV. It didn’t take too much to drive it in, and used a 2lb dead blow hammer to get it accomplished.
Before sliding on the boots, this would be a good time to add more grease. I used CV grease from Car Quest, which came in sealed packets. If you want to use some high performance grease, Redline makes a specific grease for CV’s I believe. Once the boots have been slid on, you can work on the outer CV. I did not find it necessary to flip the outer cages. I put my shafts back together with the cages in the original position. After tapping the outer CV assembly onto the new shaft, you will need to place the outer snap ring on. Once the snap ring is on, you can take your rubber mallet, and tap the white/silver cap back on. Again, it doesn’t take much to get it on, so don’t use your BMF hammer here.
You can now slide your boots on all the way. You will need new clamps for the axle side. (since these are decently thicker) I haven’t had a chance to put my new clamps on the boots, but will update the thread this weekend. Before setting the clamps on, I test fit the axles to ensure the boots weren’t being over stretched at my static ride height, and adjusted as needed.
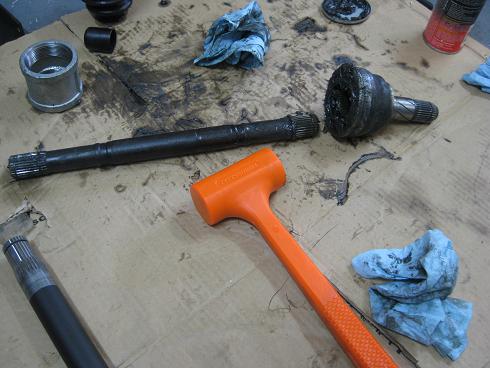
Here is a visual comparison of the new vs. old.
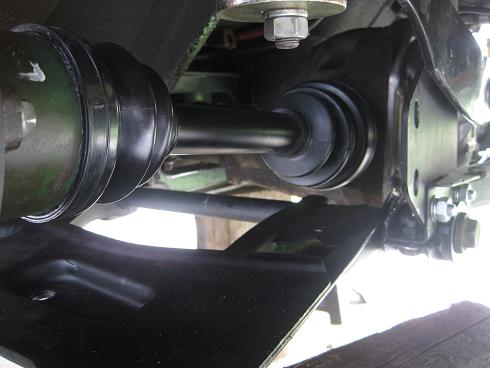
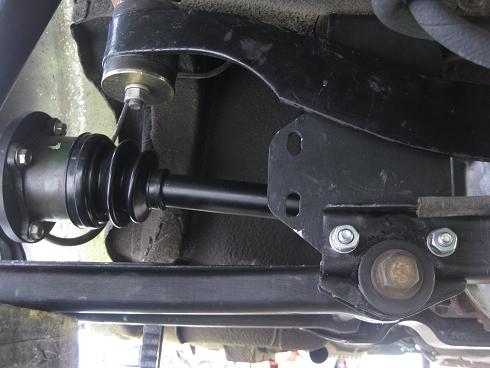
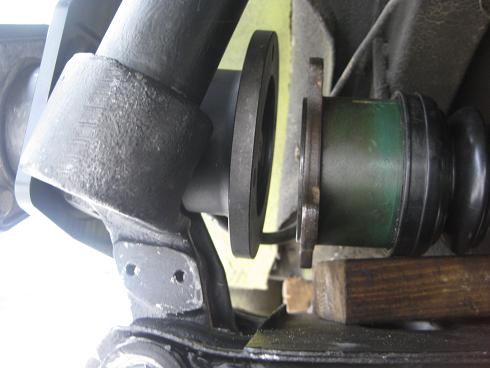
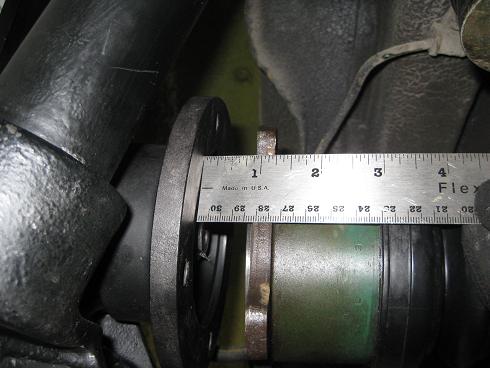
Now, onto the axles in the car… A few shots of how they look, but most importantly the amount of travel now available. Since it is kinda tight back there, I tried to measure this as best as I could. With the CV fully compressed, we have about 7/8†to 15/16†of travel from the mating surface of the adapter. Since these housings have roughly 1 11/16†of travel, this leaves us with another 13/16" of travel outboard. On a stock control arm car, this places us somewhere in the middle of available travel. So if we do go with adjustable control arms, we should be able to adjust either way comfortably.
-
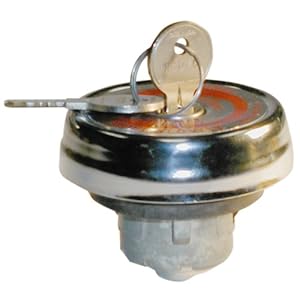
Did you try your local parts store? I bought a locking 'Stant' gas cap for under $15 a year ago. The part number for the cap is: 10583
-
Jon, I know you were waiting on the axles to be shipped... Any new updates? I am eager to get my hands on a set, once you confirm the prototypes are good.
-
When available, I will buy a set. My car is awaiting the last bits to be drivable, and the axles are one thing that is holding me back!
-
I read through all 6 pages of that thread, and they are not even sure if Rota makes these wheels. Or if they are even called 'Fast Forwards'; have you found any sites that actually sell this wheel yet?
-
I also would be interested in a set of shortened 300ZXT shafts. At the stock ride height, they were already a tight fit and now that I have lowered the car, they certainly bind. I am looking locally for a axle shop to solve the issue, as this is holding me back from getting back on the road.
-
Well it looks like Creation Z has shut down, along with my strut housings, struts, etc. I stopped by last week, and the stop was empty and I can no longer reach the owner David anywhere...
-
I am actually going to get my struts sectioned at Creation Z. As I do have access to a welder, but would want someone who has done this before to do this. (Not me)
Has anyone else in the Northern VA/MD got their struts sectioned by a shop? Otherwise, I will let everyone know how it goes at Creation Z.
-
Saw this video today... Good song.
And the only way I knew about it, is a friend that said “they have 3 of your kinda car’s in itâ€. Friend still doesn’t remember the it’s a Z.
-
Wow... That color is sexy...


Rear droop limiters
in Brakes, Wheels, Suspension and Chassis
Posted
If you were only looking to fix that dreaded bind when lowering the car, a helper/take up spring may have been another option.
Helper Springs = http://pitstopusa.com/c-133004-springs-coil-spring-accessories-take-up-springs.html
Spring Spacer = http://pitstopusa.com/c-133219-springs-coil-spring-accessories-spring-floaters-spacers.html