
sweetride2go
-
Posts
313 -
Joined
-
Last visited
Content Type
Profiles
Forums
Blogs
Events
Gallery
Downloads
Store
Posts posted by sweetride2go
-
-
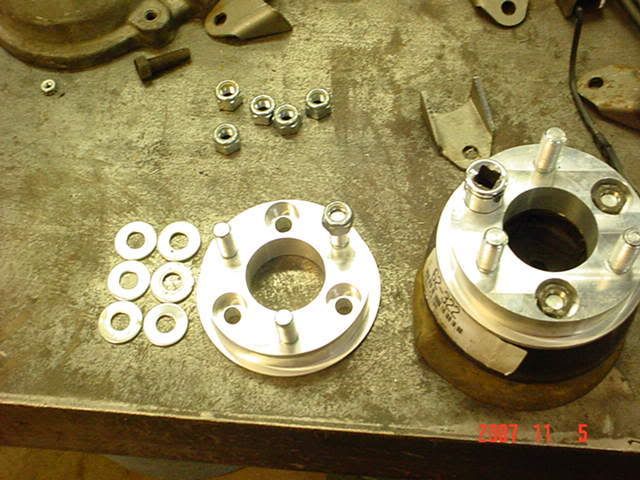
ya, they came out better than i would hav hoped, to bad u cant see them after they hav been installed, lol... it was easier designing them than machining, luckly i hav a couple of friends in the buisness so i gave them my bluprints.. i was a lil concerned w/the OD of the spacer, but after trial fitting it, i had room to spare...
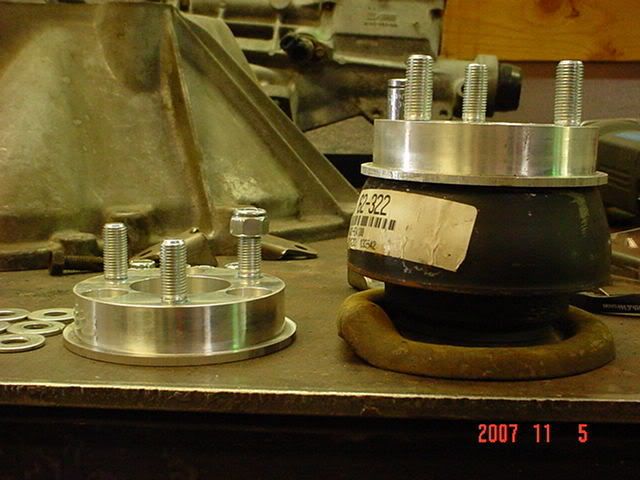
the only catch to mabe others is that the minimum thickness would 3/4" due to the length of the isolator studs... of course, one could always shorten the isolator studs, but then there would be a marginal gain... these were done at 1", i figure i need at least that much to keep mytires from rubbing the flare...
cheers
-
meh, i dont think i could get a descent photo of the overall length since its all sealed up, and that new inner tierod boot was a PITA to get on.. but ill get a pic of the installed version, haha...
i had no clue that it was for a toyota, but ya, it all threaded together quite nicely... the toyota inner(now that i know) threaded right into the suby rack, and didnt bottom out the threads, so all was good there...
my suby outers look just like the one 78lt1z has pictured, its kinda a short, stubby tie rod end...
i havnt thrown dial callipers on it to verify, but the taper seems the same, no slop, no noticable difference...
the hardest part was changine the inner tierods, and getting a secure hold on the suby rack while trying to break loose the original suby inners...
ryan~
-
hey, another NW Z...
Moog EV167
i got mine from napa, someone else aquired them from car quest... i actually got the part# from another Z guy here locally... ive changed them out, they fit great... only thing is they dont hav the slight bend to them like the stockers do, so there may be a possibility of bumpsteer, mabe *shrugs*?... but it is a "bolt in" installation in regards to the tie rod assembly... then thers the whole fabricating mounts for the rack and making lines and such, lol...
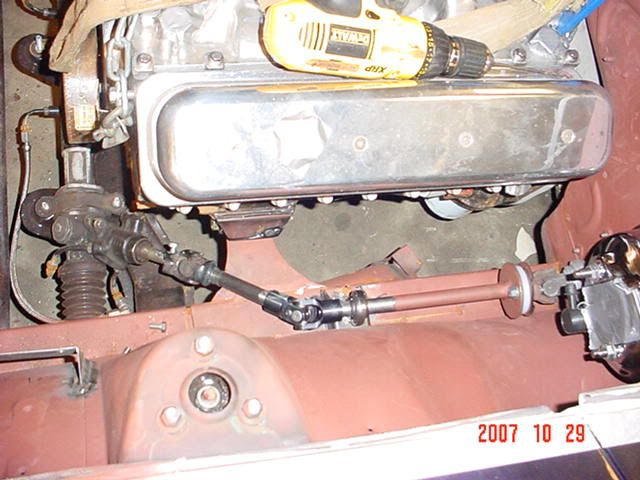
u must mean the middle U-joint?... i didnt want to route it that way, but no matter how i ded it, it wasnt gona fit w/ the 1-3/4" block huggers... sooo, in goes the center joint, then the support, gah... its tight, but no binding... i still might modify it again (this would be the 3rd time)and try to get some of the angle out of it... i made a polyurethane rag joint for it, iits the white disc in the assembly near the firewall/collum...
this might be easier using the JTR style engine mounts, but the shaft out of the suby rack wanted to go right through the datsun mount on the crossmember... nuthins been easy on this build,
 haha, guess thats the challange of fabrication...
cheers =)
-
mine has the coarser spline as well, but its out of a 95 impreza... i just canabilized one of the factory suby ujoints for my new steering shaft, tig welded it together... the factory suby fittings i cut and welded -4AN fittings onto, then ran to the tubing place and had some SS braided lines made...
and if u use the right inner tierod, u can use the stock suby outers in the z w/ zero modifications...
cheers =)
-
im pretty sure itook a pic, but i think its on my brothers camera, ill hav to get back to ya on that... its quite simple really though, its just shaped like a C with the back side flattened out kinda like [ but w/rounded corners... this im hoping will keep the fuel from runing away from the pickup in a low tank, in corners... but in hindsight, again, lol, i would hav cut a small section out of the bottom of the tank and installed a proper sump setup...
cheers
-
we used laquer thinner, lots of laquer thinner, and lots of sanding... oh man, sanding tube chassis suks...
heres a pic of the chassis, the mini diagonals are just above the seat on the left, we didnt use many of them actually, more or less just on the "main" cage, lol... just after paint to btw, and i must hav spent prolly 16 hours sanding onthat stinkn thing...
cheers =)
-
we did a chassis for a drag car, but we didnt use gussets, instead used mini diagonals at a lot of the critical right angle joints... of course, the gussets are quite functional, prolly a lil cleaner looking and a bit more compact... =)
-
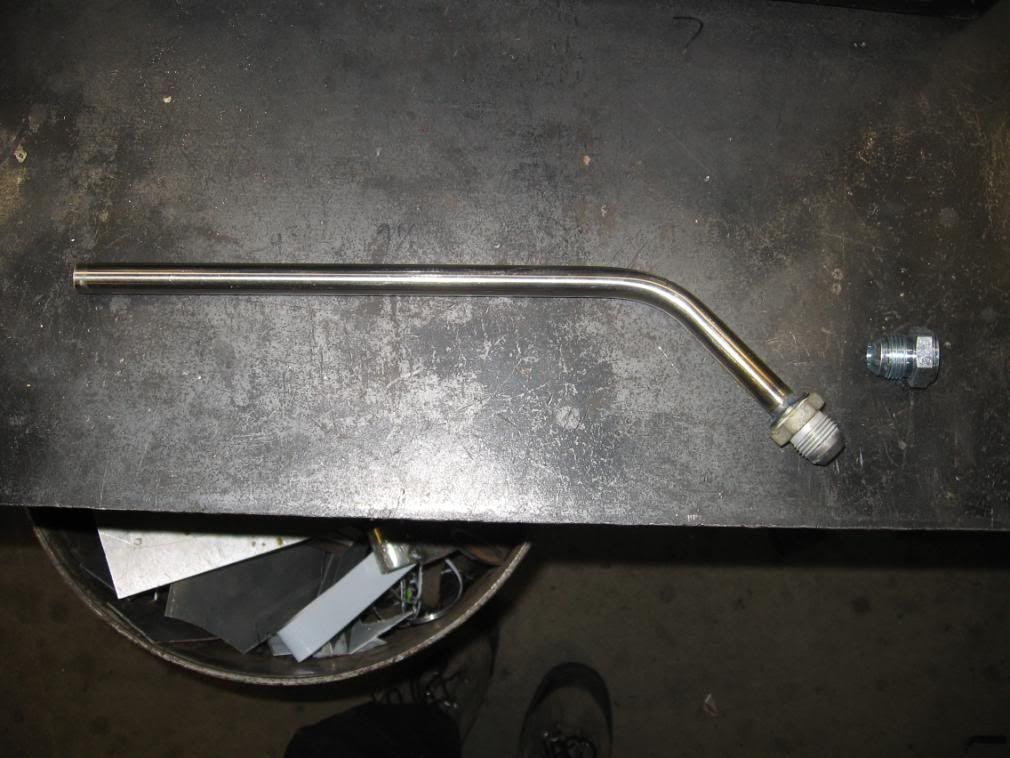
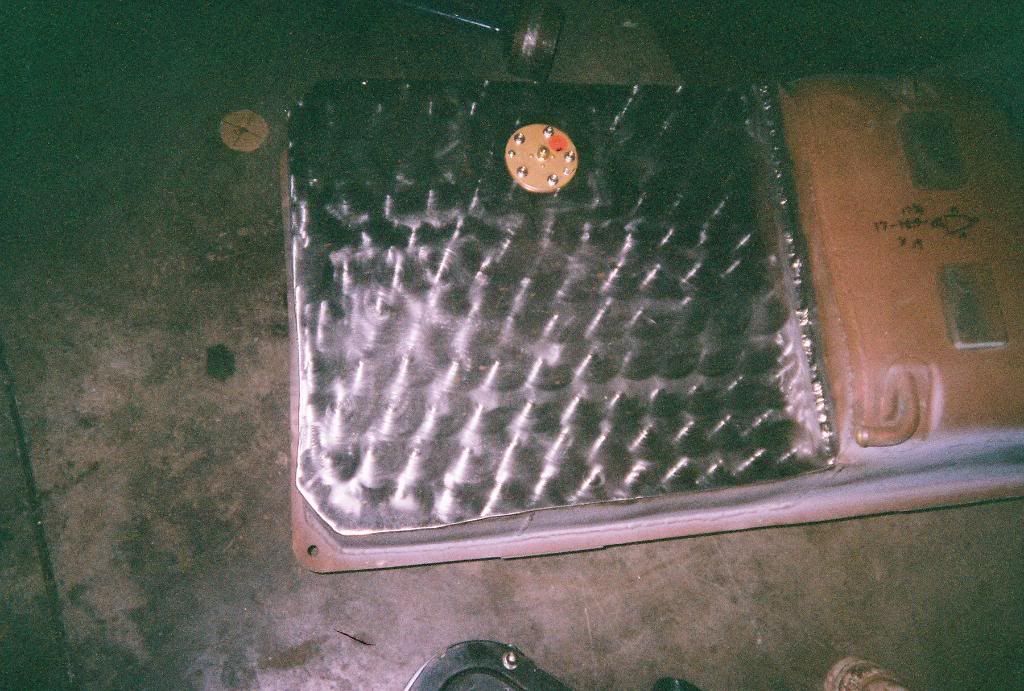
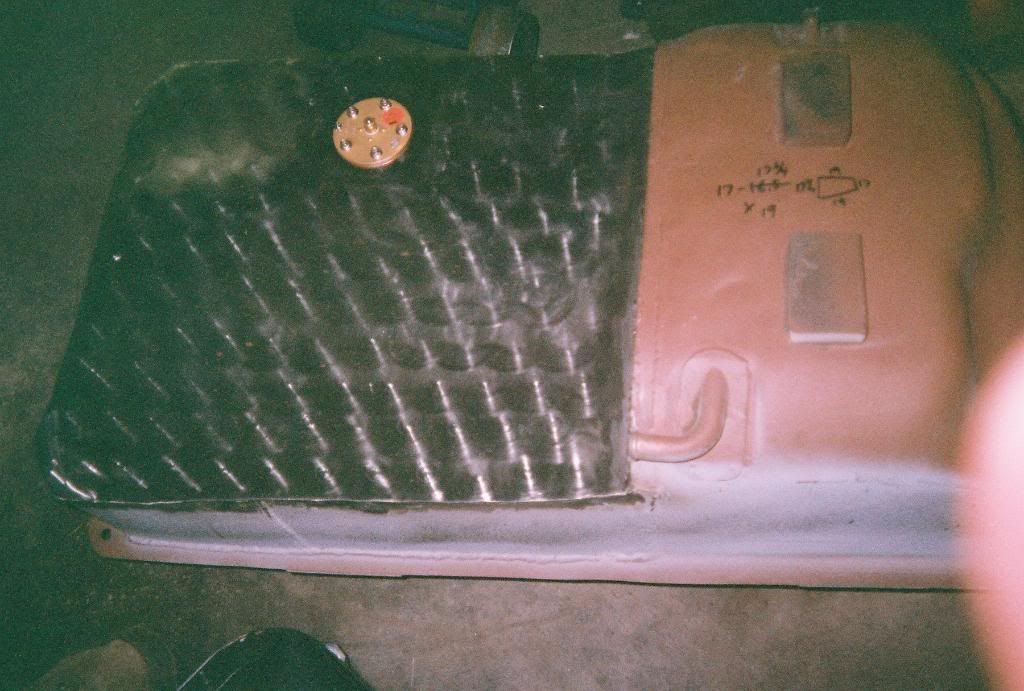
all righty, well here we go,
first pic is of the new fuel pickup line, wich is 1/2" SS tube, tig welded to a -8AN steel bung, wich is later welded into the side of the tank...
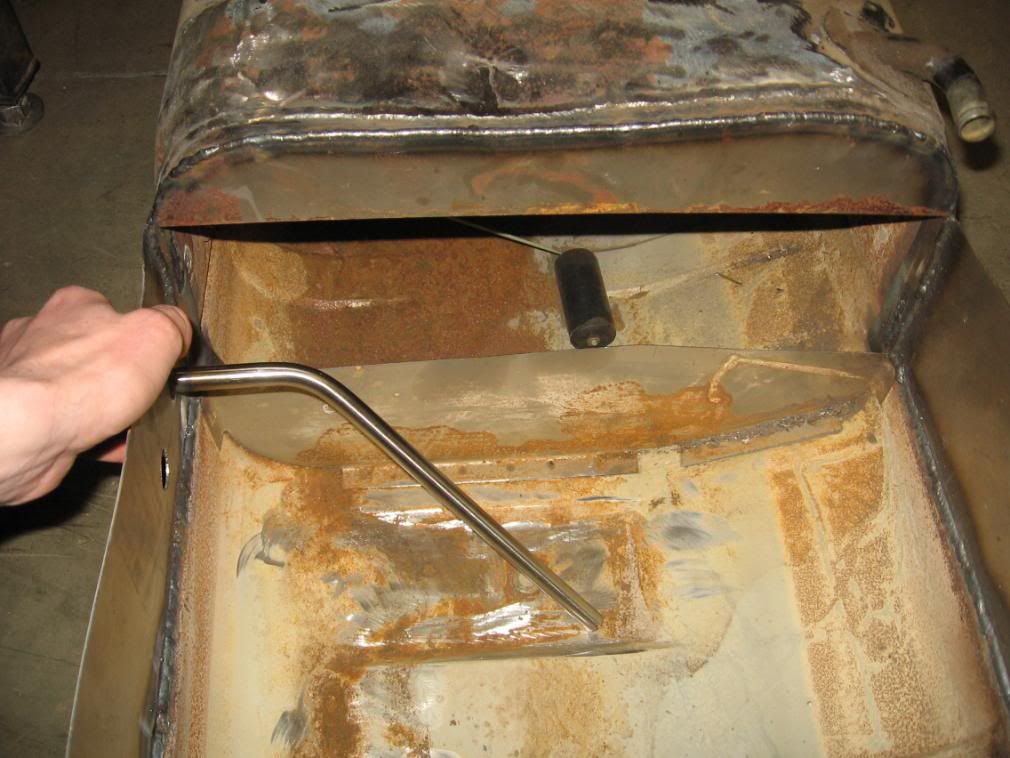
new pickup tube held into place, i later on built a baffle that mostly surrounds the pickup area on the bottom of the tank...
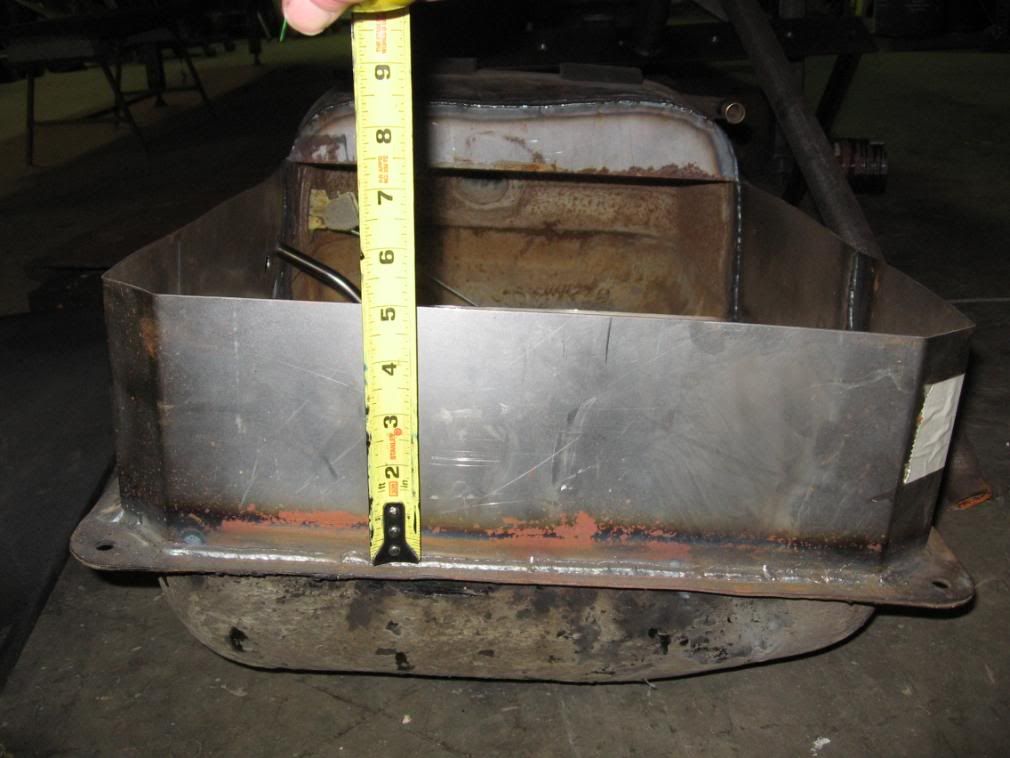
here is where i added 5" to the tank, most of the way around... later on i found out how criticle ur welding is to a leak free enviroment...
and here is the tank sealed off, new sending unit installed, and i got a lil carried away w/ the 2" sanding wheel, and played around w/ the top of the tank just for kicks, lol...
lots of warping in some areas, big learning curve on welding on a tank, haha...
cheers
ryan~
-
steering modification: 95 suby impreza rack, custom engine mounts, and 1-3/4 rewarder headers...
-
finaly went and got a photobucket accnt. here is the finished strut spacers... i needed to counterbore the isolator holes a bit deeper, you'll notice that only about 2/3 of the isolator nuts are holding the isolator in... it was a bit of a hindsight deal, but at the shop im working at i needed it back onthe ground that day, so some locktite and thats the way they went in... least till i ever get bak to the rear suspension
cheers
ryan~
-
i also hav personal experience w/ world products heads and their crooked bolt holes/stud holes... yep...
-
chassis is yes, no problem, but i dont know about the stock steering as i hav retrofitted mine(i hav pics even, but dont know how to post them, bah)... it would be tight cause it was tight w/ the first engine i had in ther using the 'JTR style mounts' and usings hooker 1-5/8 blockhuggers, course i didnt hav the luxury of having the factory mounts still on the steering crossmember, so my engine may not hav been in the same place as most other 'JTR" setups... i looked at sanderson, but they seemed more expensive last i cheked..
-
oh, well i didnt know that, but i also have brand new isolators... that and i can design the spacer and get it made for nuttin but my time... i was just curious if there was much in the way of linial strains put on the isolator, and if i would creat an issue w/ the spacer... i dont know much in regards to suspension design...
-
eh, nice work jon!! just for kicks and the sake of curiosity, how many lenial feet of tubing do you have in there???
cheers
ryan
-
eh, Rewarder Headers makes a blockhugger in the 1-3/4 primary, but theres much discussion on how blockhuggers flow, and that they arnt much better than a iron manifold, but ya, dig around... i hav a set and they seem to be built well, thick flanges, ceramic coated, and not overly expensive...
cheers
ryan
-
so i need a lil more clearance between my tires and the fenders(early 74 260Z), and instead of installing a coilover setup(cause im cheap lol, and i need the money for the fuel system), i can make a spacer(1" aluminium) that will install above the rubber isolator that sits atop the strut (in the rear)... my question is does anyone forsee a problem w/ this regarding the suspension??? essentially im just pushing the whole strut assembly down an inch...
thanks
ryan~
-
this is a bit of a resurection, but heres my .02 for this peticular thread....
i had a similar problem on my 95 lt1, with a high ilde and low power... we chased it down to the 'idle air control valve'... after changing that and a broken spark plug(the doner car was wrecked) it ran like it was sapose to... for 6 months anyhow, haha, now i got a new problem...
ryan~
-
i havnt checked fuel pressure in a while, but it was good last i checked... and sometimes it throws codes, but this last time i got a new one, an 'ignition grounding code' ? or therabouts... ill hav to go trough and check all my grounds...
-
this is a carryover from another thread, but here is a quickchange in a IRS setup... i dont know how well it would work, but looks interisting enough, ha...
-
wow, still struggling w/ this one eh??? well its interisting, cause i hav the same problem w/ a LT1 in a '67 camero.. and ive done much of the same, changing parts n sensors, w/ no or little gain, and the stumble comes back again and again, and sometimes its not there... gahhhh!! but im thinking it mabe a ground issue mabe??? and i dont hav the MAP on mine... stupid thing of it is that the car ran perfect for the first 4-6 months... and sometimes it throws codes, and sometimes not... so frusterating... i still need to come up w/ another ECU and see if that solves the issue, one test i havnt done yet...
ryan~
-
CWI makes vary nice stuff, well engineered and a lot of CNC work too... ive been to their shop, since its just a half hour up the road, and seeing their product first hand... however its quite expensive, and i might question its ability to really be 'strong' enough, even though they offer setups w/ a 'quickchange' diff, and a chevy diff... although the guy w/ the 510 is putting a lot of power down on a jag style rearend... it would be great to find out if CSI's rearend would hold up under roadracing and or dragracing... anyone care to sponsor me w/ one??? lol
the guys there are pretty kool to deal w/ to, and didnt seem to mind us just droping by their shop, wich was kool...
ryan~
-
nice writeup!!! i just got new joints for mine...
-
yes, u can get one from Billet Specialties (BSP-12120 @summit), and i beleive Summit offers one as well, along w/ a universal mounting kit for the pump...
ryan~
-
'the GM type II pumps have a flow rate of 3gpm @ 850psi, whereas the ford racks are closer to 2gpm... the GM power steering pump exceeds recommended "flow" for a ford rack resulting in quick turning, and a "twitchy" feel while turning'... this is for ford racks in general, not necessarily ford racks in Zcars...
although i believe (if memory serves me correctly) the GM pumps relief pressure was closer to 1300psi +/- (caprice interceptor LT1, camero LT1), depending on model... this was a concern for me when i started the project 3+ years ago, since the subaru's relief pressure is at 1067psi... but what the heck, its only almost 300psi rite?? lol... the pressure differences was my initial concern, as i was afraid that seal problems might arise from excessive pressure... but since then, several others have been using the type II pumps along with the subaru rack w/out any problems… or at least not that im aware of… haha..


LT1 and Subaru Rack
in Brakes, Wheels, Suspension, and Chassis
Posted
hmm, interisting... when i initially researched going to powersteering, i found some threads in here, and they wer using the mid 90's suby racks, hence mine... however ive talked to a couple other and they are using late model forester racks... my 95(course i got it from a junkyard) looks identical to the one 78ZLT1 has pictured... now u hav me wondering if theres any discrepencies, ill run by the shop on the way home tnite and take some measurements on overall housing length and see if i can feel through the boots and get the rack length, and then overall length from end to end, wich will end up being similar to the datsun overall obviously since im rolling it around like this... NAPA PN 269-3389 is for the outer, i had to replace one, and it says this fits all impreza's 93-06, and some forresters and legaceys of different years inbetween... course the computers at parts stores hav never been known to be completly accurate, haha..
this pic prolly wont help much...