

Chino 240Z
-
Posts
50 -
Joined
-
Last visited
Content Type
Profiles
Forums
Blogs
Events
Gallery
Downloads
Store
Everything posted by Chino 240Z
-
 112* Temp at Buttonwillow.
 -
 Buttonwillow track event.
 -
 PIT Camp at track event.
 -
 NASA event at California Speedway
 -
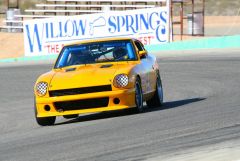 Mrs. Chino at Willow Springs.
 -
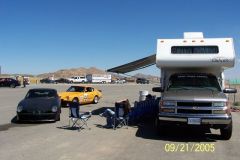
 Family at the track
 -
I would think Most Z cars using an MSA type III front air dam would probably be lowered and more worried about going under another street car these days. The honeycomb idea or a light weight bar can easily epoxied on the inside of the front piece for extra protection. Thanks Mayolives, it's a 71, 2.4, dedicated track car we have fun with. Okay, there ya go, put a bunch of old and new pics in my photo album.
-
MSA Type III-Front Stay away from curbs, speed bumps and animal road kills... no supports, light weight, but works. The fiberglass has done well taking stones and rock impact on track for about a year now. Test fit, trim and prep before painting then bolts right on. I'm happy with ours. Additional sheet metal tin work required inside if "aero" is a concern.
-
If it's loose it's not right, if it's tight you may mar the crank or push out the key, either way don't trust mfg. to give you something perfect for your application. Green loctite is also given in the package of the BHJ product for a Z application. Well if the manufacture doesn't make are perfect fit, you can see if you can correct it, just don't rush the job.
-
This is some info from BHJ about installing one of their products, but you can see that each manufacture may require different install techniques. I would think any quality balancer shouldn't be hit with a hammer or overheated. I found this a good reminder after reading.... http://www.sccoa.com/faq/bhjdamper.pdf
-
Last year I had trouble with a new BHJ-Dynamics racing pulley. After much time trial fitting the pulley only, I found couple high spots on the pulley edge and the crank end. Little very fine emery paper cleaned them up and made for a smooth combination. Cleaned the keyway up with a tiny thin file, and smoothed up the key by using fine emery paper on a hard bench surface and they key fit perfect into the keyway. Once each surface was smoothed and clean to fit, just a gentle tap of the rubber mallet made for a perfect fit then torqued to spec with the bolt and spacer intalled. If the 3 components are too tight it is easy for the key to pop out the back of keyway and when you are tightening and well.... ooooooh what a mess they can make of the pulley, key and keyway; but they are repaireable if not to badley damaged. If it doesn't feel right or look right it probably isn't, remove and start again. Good Luck.
-
After having problems with those blue colored damper we went for the BHJ. This one is made strickly for Rebello Racing by BHJ. BHJ Dynamics 4" Racing, Single Groove Harmonic Balancer # NIS-REB They need to be clear coated or painted to keep from rusting. Larger sizes available too.
-
LOL... no body is rich any more once you start tinkering on these cars, there is always one more item you would like to change or add! I will say the vents do work good. After a 30 minute session at the the track, we don't remove the hood any more (getting lazy), just turn on the electric fan for about 5 to 10 minutes and it pushes the heat right out. I understand about the big C word... Mrs. Chino (second driver) works at City of Hope in Duarte as an RN, glad to here you are doing better!
-
And you built that crazy red twin turbo Z monster? Impressive and beautiful! You say a buck-twentyfive is too steep...... You're suppose to ignore the price tag if you really want something. What's one more receipt on that mountain of purchases.
-
For those who where interested in the hood vents in this thread, I just got an update from Steve. Another batch has been made and are now up for sale. With all the aerodynamics talk lately, perhaps this can help some? Here are his comments... "Just wanted to bring you up to date with regards to the hood vents. We just received our first shipment from our new supplier and we are now able to offer them back up for sale. I've already listed them again on Ebay - Datsun Z Hood Vents. . People can also contact me directly if they are not Ebay users and wish to purchase a set. - grndfx@pacbell.net. I'm also hoping to have a website up and running soon that people can go to as well. I had to put the price up a bit as our cost have increased with this new supplier." Z-ya Craig
-
Got word back that the Hood Vents may be available in the near future. Got a nice email saying... "I can say that we are currently in the process of having more made and should have them available within the next couple of weeks (we had hope to get them at the MSA show, but couldn't quite swing it). I'll let you know when they become available and perhaps you could then pass the word on." So sit tight and perhaps more will be up for sale soon. Then save them for installation after more testing may give heads up for best placement. Craig
-
For vents not yet installed good idea, but also make sure you check the vent shape with the normal curve of the hood in the area you plan to install before you make the first cut, might not fit the ideal areo location.
-
Yes it was GRNDFX I got these from. I just sent email to him and hope we here from him.
-
I'll see if I can dig up the receipt in the huge pile of receipts.... I picked them up from a guy that had only a couple left last year but he said he was getting ready to order up some more, or run another batch through the molds or something like that. Over the weekend I'll look for the contact. I don't think it was much over about $100 or so. You can prep them to be painted too, I just left them in the raw rubber/plastic state. I think they can directly drop into a 280 hood vent and couple screws into the bottom, trim the metal screen and done.
-
I found a set of them on ebay and they worked for us. We had to use longer installation screws since we had a fiberglass hood. Helped let the air out and kept the hood from bowing up so much at high speed.
-
Yep! We be one of those cars and proud of it. LOL A well prepped 2.4L, some suspension work, track tires and you will have more fun at the track then you can shake a stick at!!! And watch the other drivers mouth drop when they find out what's been running down their $30K to $50K rides lap after lap. he he he It should be illegal for the amount excitement you can get for the dollar you spend on a Z car. It's not that bad when you plan it in stages and break down your project into small achieveable goals. You'll need to plan some of your money for track time to learn to use it too.
-
I second that! Get the cars suspension to work with the HP you got now, then when you do go stroker you'll get your $6-7K's worth.
-
Never had squeal using race pads once shims installed with stock calipers. For track car used Porterfields R4 compound for many years. 5 hrs per event, never chunked, and were easy on the rotor. Be sure to bed pads in properly per mfg instructions. I have screwed that process up once and messed up some new pads. Good idea to consider a street pads that will warm up quick to working specs for daily driver. Race pads need to heat up to to temp to start stopping properly, or they may give you a big surprize in street traffic. Slotted rotors are weak but would probably be fine for normal street use. We put 3 years of track events on a set of stock solid rotors and never had issues, they were just having to work too hard. Recently jumped to the Arizona extra thick 12.2" rotors, Wilwood calipers & race pads for the track.... just did event at Calif speedway and these things are incredible! (but so was the price too..yikes)
-
If they were stock brakes, check to see if there is brake / pad shims on the back of the pads. Someone may have forgot to reinstall or didn't see them on the old pads and tossed them. New brake shim kits are avail. from MSA for around $20 if I remember right. Includes new pins and clips too. I had same problem with the old stock front brake system... shims were missing. That was an insane squeal. Brake grease and chamfer the leading edge of the pads is always done here too. Good luck.
-
Hello, new to the site and thought I'd toss in some front end shots too. These are current photos, but soon to get freshened up with new air dam. Cheers, Craig