
het976
-
Posts
114 -
Joined
-
Last visited
Content Type
Profiles
Forums
Blogs
Events
Gallery
Downloads
Store
Posts posted by het976
-
-
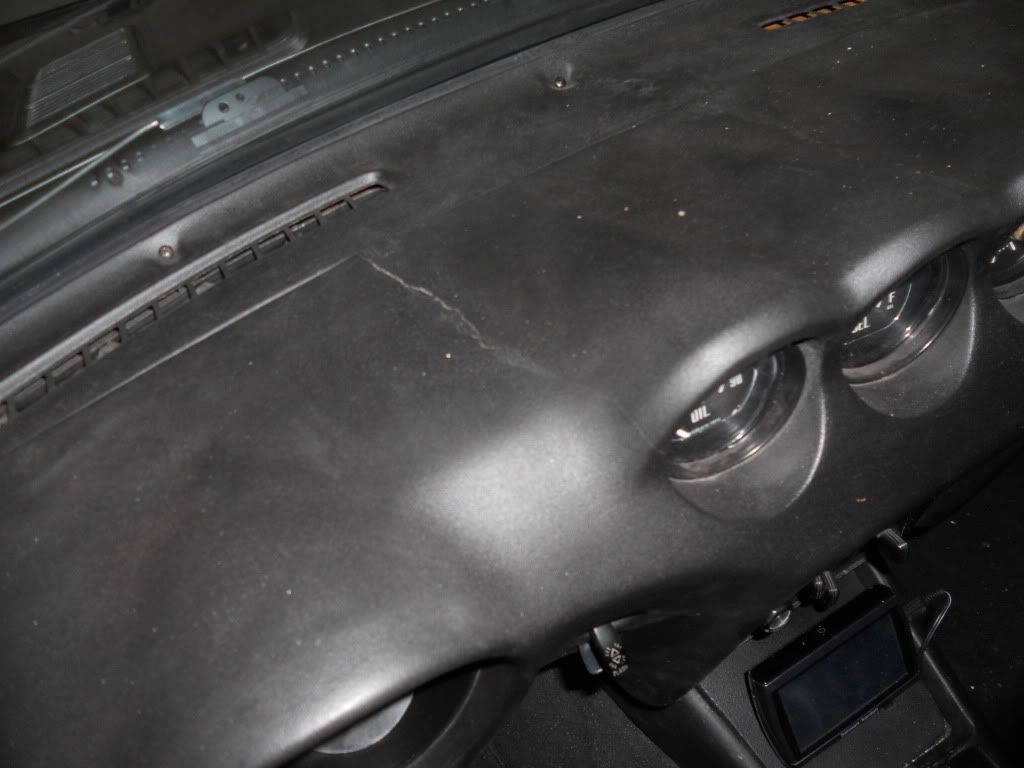
I did mine using the process that has been discussed here and on ClassicZcar.com; using spray foam, SEM bumper repair products and SEM interior paint. Looked great when done, but started cracking shortly after I installed it...Still better than what I started with, but not perfect. I will admit, I may not have done it correctly and others may have better results, but one guy’s experience.

-
Here is mine...Finally got her on the road this past summer after 4 years...built up from a shell. I did the flares back in 1980...
-
Yes, I put it back together with all the screws. I will go pull a couple and see how it progresses. I have a new dash with no cracks, but it is a lot of work to switch them out. Thanks for the tip.
-
I did this repair...it started cracking almost immediately and gets worse daily. I may not have done it correctly, but I followed the steps and used all SEM products. It looked great when finished. Having said that, the cracks are hairline, but growing, but still MUCH better than the starting point which was as bad as the dash in the first pictures.
Worth doing and maybe you will have better results, but don't be surprised if your results are like mine.
In retrospect, I would put more of the flexible filler in and less of the foam. Like make a channel so the filler can be thicker. Reality is there is a lot of flexing that goes on with these cars. One crack started while we were installing the dash.
Picture below is after about 100 miles of driving.
-
And to think I pucker when I have to bunny hop a curb
-
If this has been posted before, I apologize. I searched and did not see it. Not my car, just FYI...
-
Mine fit OK on the studs, but I had to notch the raised area around the access hole for the nut on top of the strut. The clearance hole in the bar seemed to be off by 1/4" or so. I installed it with the car on the ground, so maybe jacking it up would have helped some, since the issue was on the inside on both sides.
-
Thanks John, I have always wondered what the heck that thing was for. The early Z's were a collection of kluges (I know it is a computer term, but it fits).
-
Looking really good. Nice color. I've got to get to work on ours.
-
so you laid out the RaaMat all over and double layered the floor area and rear quarter panels, then used spray glue to lay a single layer of that sound absorber stuff?
I did double layers on the floor and in the doors. Single layers in the quarters.
I did the floor since it was a large metal area and I had some left over.
I did the doors because Rick at RaaMat suggested it; if I was going to use the doors for speakers. I also did two layers of foam in the doors (again rick's suggestion). Rick also suggests putting a layer of the Dynamat like material over the door next to the door panel. It is too sticky and messy for that (if you have to remove it), but I am going to put a layer of foam between the door and door panel.
The is foam put over the RaaMat material using the spray glue he sells.
The idea with RaaMat is the sticky Dynamat like material kills the high frequency vibrations and the dense (and it is dense, you can not blow through it) foam kills the drumming low frequency noise.
-
Mine is not on the road yet...but install wise it was and is great. Has good reviews, really sticky. It passes the beat it with your hand test/comparison. Everyone is impressed... LOL
-
I purchased 2 rolls of the Raamat and 5 yards of the ensolite and 3 cans of his spray glue (inexpensive and the best - buy it!). This allowed me to do the Z from the firewall to the rear lights (double thickness on the floors and in the doors), inside rear quarters. I did not do the roof.
-
I did mine in RAAMmat as mentioned by Cruez. I did both the dynamat like material and the dense 1/4" foam over the top. This stuff flat works. It adds weight, I would say 75 lbs, but for me it is worth it. Goes on easy and stays where you put it, very sticky. I have not had it on the road yet, but just sitting in the car with the stereo on, it is amazing. Doors close like a vault. Rick is easy to work with...highly recommended
-
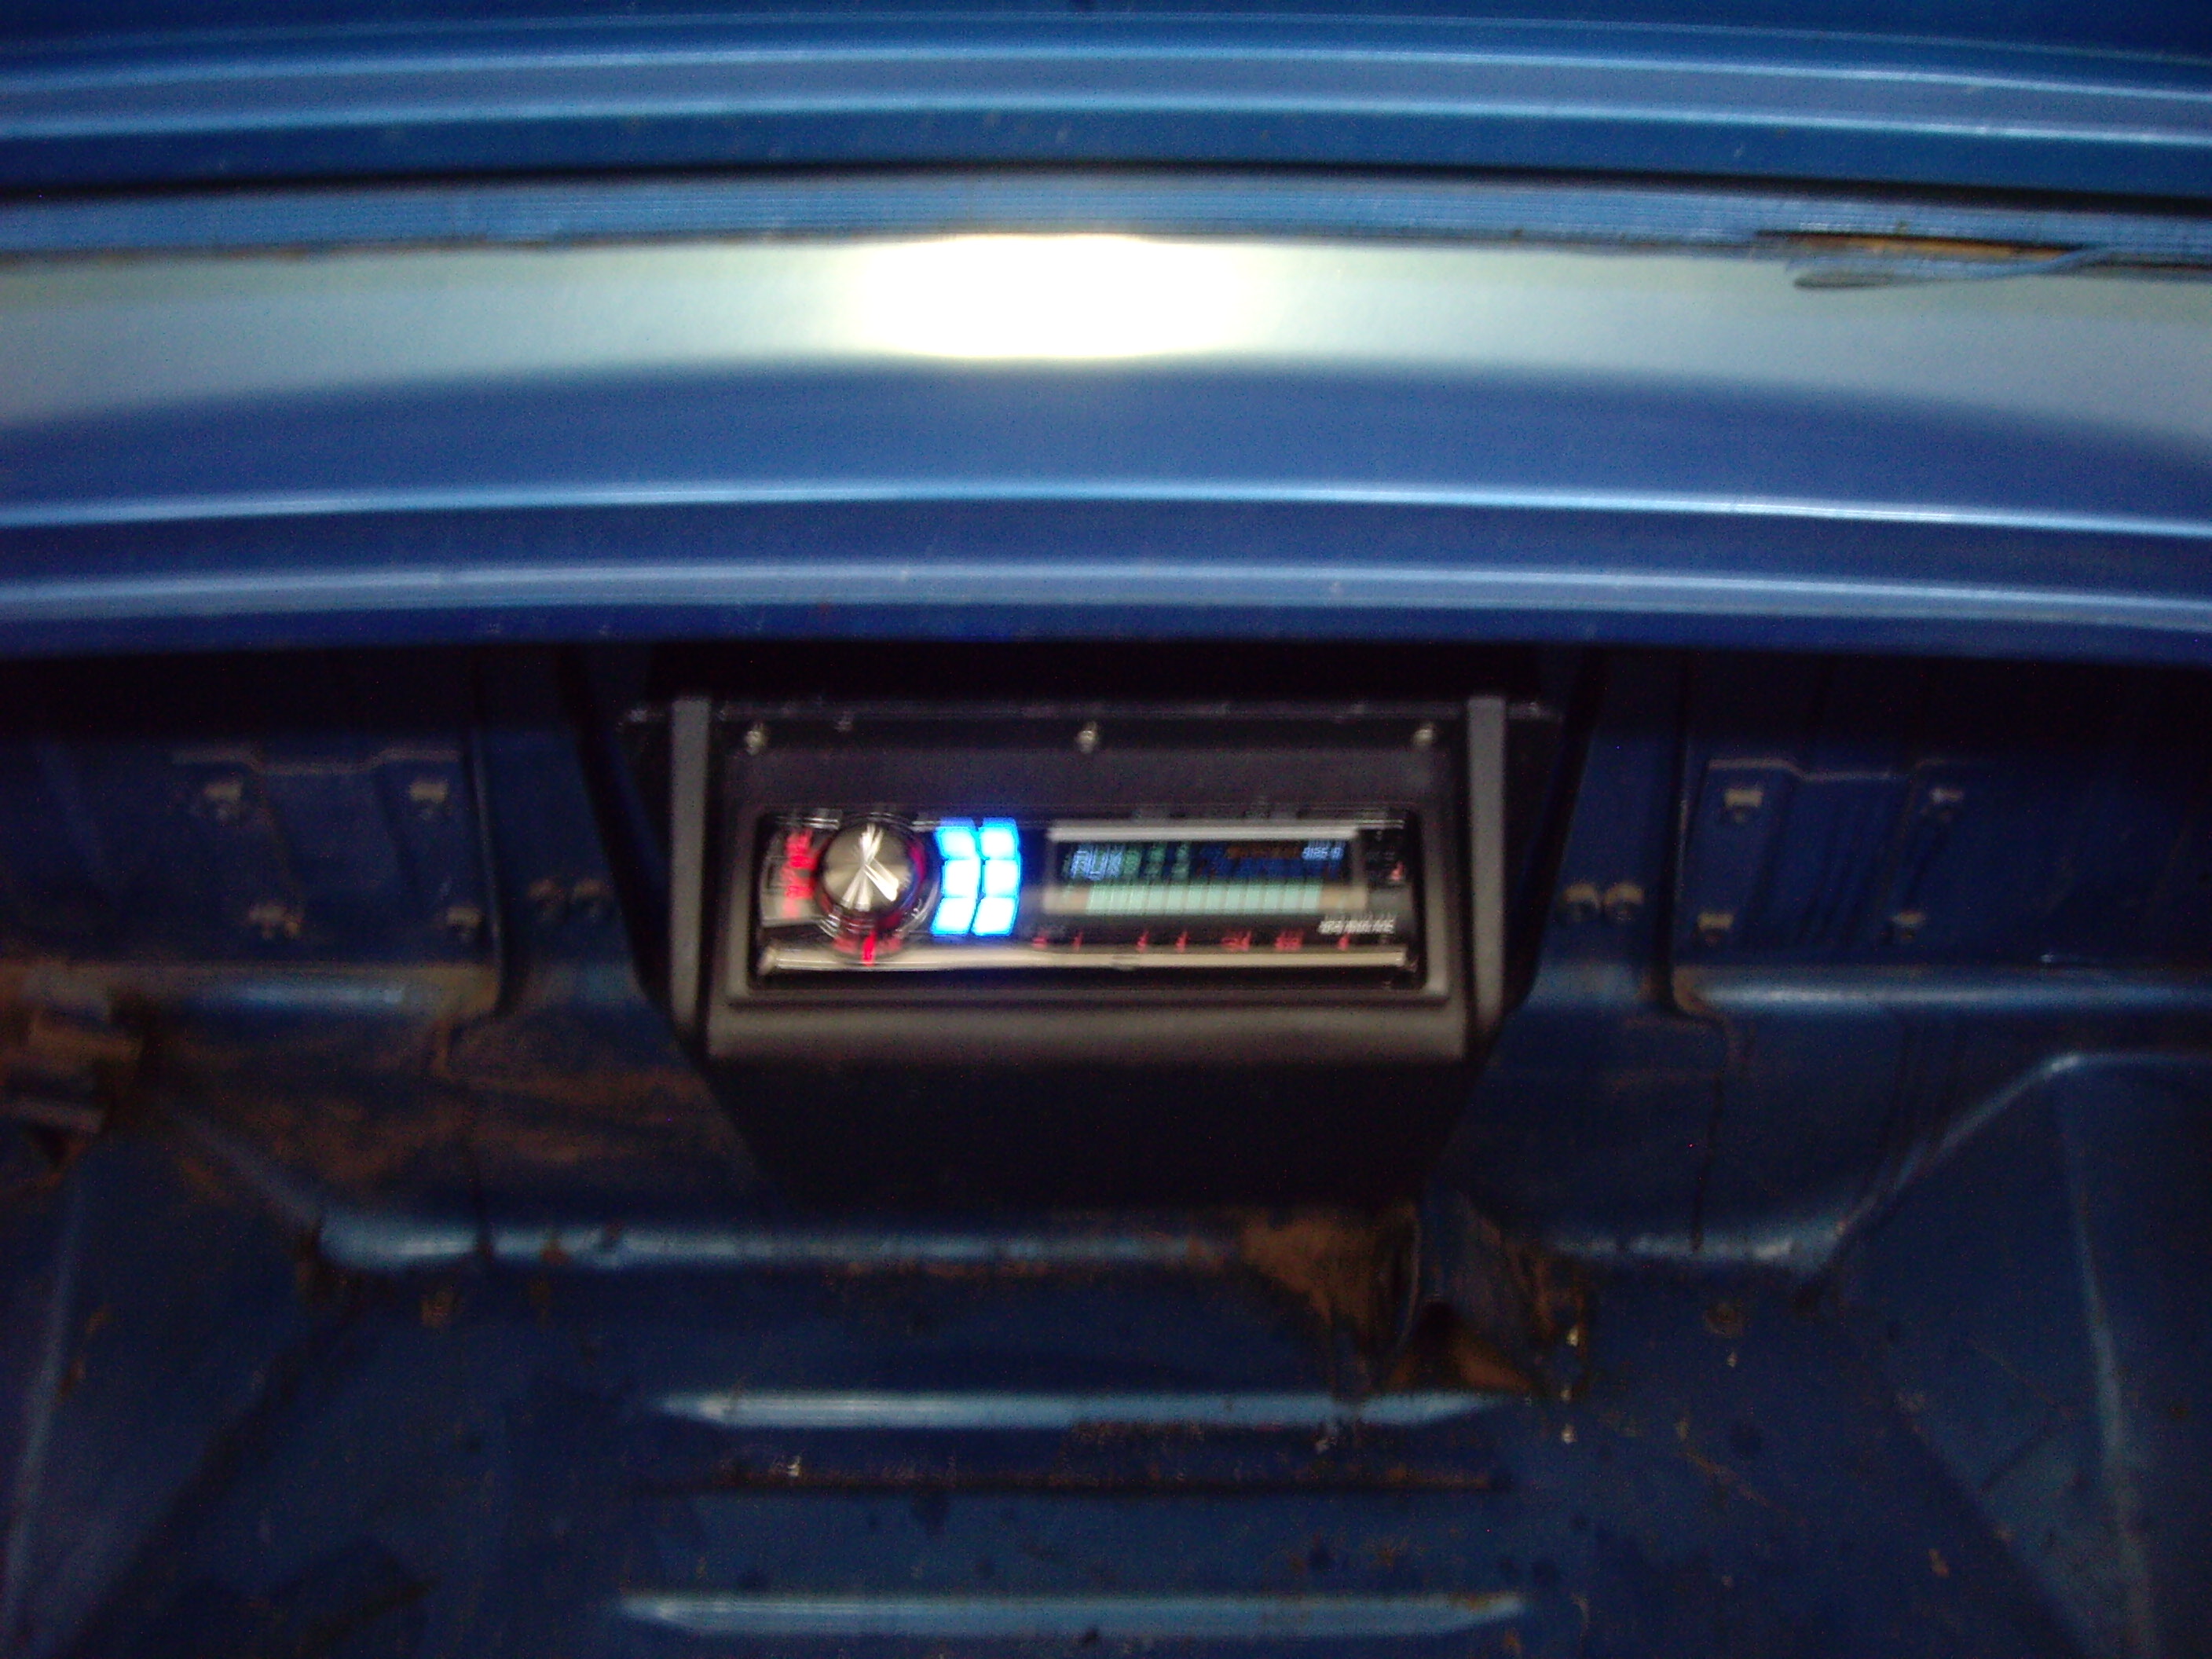
Here is how I mounted mine...
It is pretty basic.
I bought a a stand alone enclosure for a boat and built an angled mounting bracket so the face would be past the trunk lip and I can load CDs.
I only really use it as head unit for the iPod, but it will play CDs just fine.
-
Good looking car.
I have a 1968 roadster that I mounted the stereo in the trunk, along with a Harmon Kardon iPod controller. Everything is hidden and the stock radio is still in place.
They are a fun drive.
Do you know this site:
-
Here is one on one has mentioned. This has to be one of the ultimate sleepers in a while.
http://www.hotrod.com/featuredvehicles/hrdp_0803w_1929_model_a_touring_car/index.html
-
The 280 I parted out had one. Maybe you can find one in a JY. If you get stuck I can get mine out of the storage unit and get come pictures/dimensions.
-
I am the owner of a 1969 Datsun 1600 Roadster with a JDM Toyota RG18 2 liter twin cam motor and 5 speed. I got if from someone here (A.G. Olphart). It is really slick, pretty fast (160HP) and a blast to drive.
Toyota RG18 http://www.geocities.com/motorcity/lane/1231/18rg2.html
I also have an MG that I plan to put a GM 3.4 V6/T5 into. There is a kit for that, much like the Z/SBC here. http://www.classicconversionseng.com/
-
To my limited knowledge (I have owned the car off and on for 30 some years), the early cars did not have an electric pump from the factory in the US (it is pre-wired for it, so they may have been stock on JDM cars). You could buy one from the Datsun dealer that bolted in and looks stock. It was a pretty simple plug and play (I know, I did it). You should get some type of a cut-off switch (Datsun offered it as an option) so if you are in a wreck and a line breaks, the pump stops.
Some guys added the electric one in addition to the stock mechanical one. Some guys took out the mechanical one, which required a block off plate. As I said, it was done to deal with "vapor lock" back when the cars were new. This is the same reason you see the fuel rails wrapped in insulation of various kinds.
According to this: http://www.autozone.com/az/cds/en_us/0900823d/80/1d/1d/80/0900823d801d1d80/repairInfoPages.htm
It should be a green off the pump and black/white off the car. I think the Nissan pump is self grounding, but I am not sure. Hope that helps.
-
Get a manual so you can sort it out, but yes there are wires in the back for the stock electric fuel pump (I think mine are b/g). The e-pump was a dealer installed option used to help solve the notorious "vapor lock" the early SU cars had.
You will also need a harness or make one of your own for the under the dash connection. The one under the dash has an in-line fuse.
This is how my 71 is and I am making the assumption it is the same for your 72, but that may not be the case.
-
I have the Cebie Zs on my Z now. They are nice now and in the day, they were the best.
-
I have the 4 to 5 adapters on my car. I have not driven it yet (soon...very soon...) but I can say they are very well made and look to be plenty stout. Mine are a total of 2" thick.
-
They may be steel (several write ups list them as fiberglass). They look a lot like the ones on my car, which I know are fiberglass. I think mine are the same as MSA used to carry. Mark's are close - but not exactly the same, which probably means they are custom. You could come close to his style starting with a set like I have. The problem is where to get them. There does not seem to be a source, except the odd eBay listing. Don't say Showcars (do a search if you don't get the reference). I bought mine nearly 30 years ago from my local Datsun parts department.
-
I have the 880 for the same reasons. You can even customize the display/menu if you have unique things you want to control.


Project Finally Leaves the Garage!
in S30 Series - 240z, 260z, 280z
Posted
Congratulations....I have "watched" your progress here over the years. Having built my car back up from a rolling shell, I can share your excitement on sitting behind the wheel for the first time after years of hard work.