cnunes
-
Posts
15 -
Joined
-
Last visited
Content Type
Profiles
Forums
Blogs
Events
Gallery
Downloads
Store
Everything posted by cnunes
-
jmortensen's "while I'm at it" roadrace/autox project
cnunes replied to JMortensen's topic in S30 Series - 240z, 260z, 280z
Jon, Great to read this update and hear the start-up. I don't post a lot, but you, your car and your epic, detail-oriented build have been an inspiration for me! My two daughters are young, so I'm in no rush, but I'll be following in your footsteps eventually... Chris -
Spindle-Pin-Puller Loaner program
cnunes replied to Dave's topic in Brakes, Wheels, Suspension, and Chassis
So...I'm crashing this party a little late...apparently mere hours too late, and I missed the boat on the last batch of pullers! Anyway, I'm not quite ready to pull my spindle pin (one last autocross in September before winter hibernation), but I was wondering if any of the proud owners of jtburf's awesome tool might want to pay it forward? Maybe after you're done with your puller, you post here and anyone else who needs it pays $30 (you recoup half of what you paid) to allow you to ship it to them and then they post when they're done and so forth? Seems to be a one time use tool, am I right? Not looking forward to this job, but this pay-it-forward protocol seems like a win-win for everyone. Thoughts? -
Custom Wider Rear Sway Bar?
cnunes replied to cnunes's topic in Brakes, Wheels, Suspension and Chassis
Fixed! Sorry about that... -
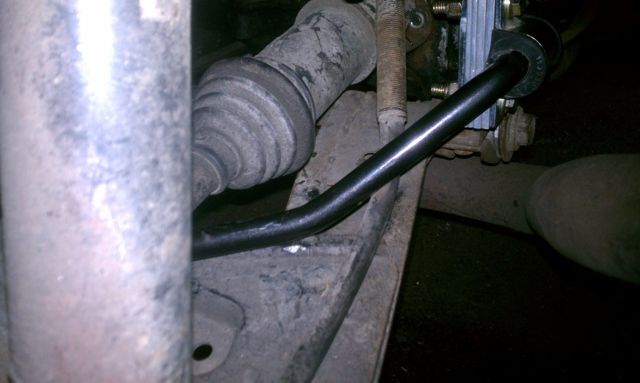
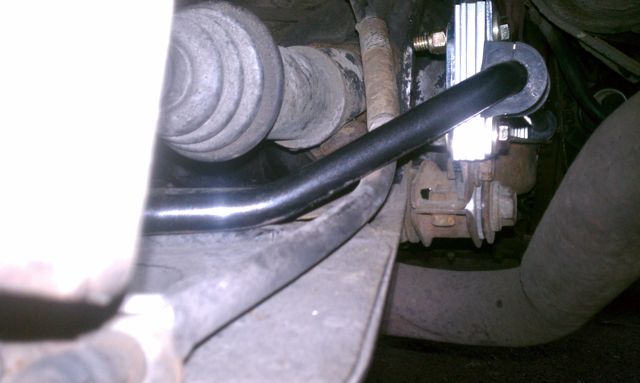
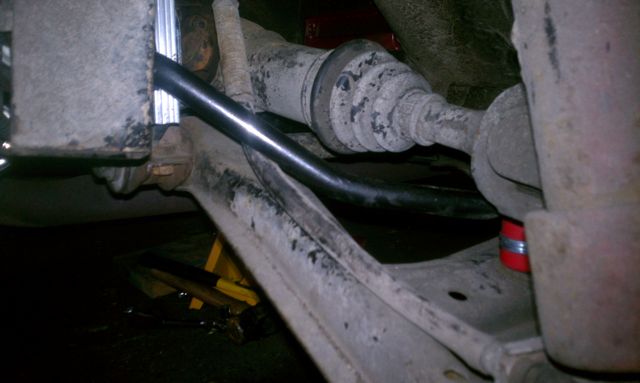
I have the Suspension Techniques rear-mounted sway bar that wraps around the back of the differential between the mustache bar and the lower control arm crossmember. Per recommendations here, the sway bar has been spaced back about 3/4" using a stack of aluminum flat stock to prevent bind by keeping the end-links vertical at normal ride height (AZC springs). Also, to maximize axle clearance in anticipation of a CV swap someday, I'd used shorter grade 8 bolts for the end-links and foregone the tubular spacer so the cup-washers sandwiching the poly were just stacked back to back. This allowed me to route the sway bar underneath the parking brake cables but the secondary bend in the sway bar (before it goes horizontal) had barely an 1/8" of clearance to the control arm on the driver's side, making it rub during bump travel (left a nice shiny spot on both the LCA and the sway bar). For some reason, the clearance on the passenger side was over 3/8" and didn't appear to rub (no shiny spot), but that could just be machining differences within my stack of aluminum flat stock? Adding the tubular spacer and routing the sway bar over the parking brake cable seems to have cured my LCA clearance issues, but the bar is still squishing down the parking brake cable where the bar swoops down and the cable swoops up. The sway bar and the cable just seem to want to occupy the same space. One idea is to run a longer e-brake cable, which would give it enough slack to droop under the sway bar, but replacing e-brake cables is a pain, and then I noticed the e-brake cable runs much lower toward the outboard side of the LCA. That gave me an idea: Wouldn't a wider sway bar with a sharper bend clear the e-brake cable? The extreme of this idea would be a 10" wider bar such that each side curves in 5" farther outboard which would necessitate a 90 degree bend to tuck under the half-shaft between the boot and the U- joint where there is the maximum amount of clearance. This would clear both the e-brake cable and halfshafts with ease! I can't imagine it would cost much at a machine shop to put two almost-90 degree bends in a tube, press the ends flat and drill holes through them? Or am I missing something? Is there a reason why I don't see a lot of custom sway bars other than the expensive splined deals with separate arms? So what are the pitfalls to this idea? First, this shouldn't limit wheel/tire selection because all this is inboard of the shock/springs. Second, my guess is that a sharper bend will result in more leverage applied to the bar as it pivots which would act like a stiffer bar given the same material thickness and tube diameter. If that's the case, the problem could easily be remedied by simply using a smaller diameter tube stock to maintain proper balance, but is this how the geometry works or is the leverage the same as long as the pivot locations and end-links remain unchanged?? Pictures are worth a thousand words, so here are some pics of my clearance issues (taken before I added the tubular spacers into the end-links): Here you can see the shiny spot on the control arm where the sway bar was rubbing... Perhaps a better angle of the clearance (or lack thereof). And this is the passenger side which has plenty of clearance but is still touching the parking brake cable. There appears to be plenty of room for such a design; I don't see why the curve has to start so close to the pivot bracket...Thoughts?

-
OBX Differential Inspection and Installation
cnunes replied to TrumpetRhapsody's topic in Drivetrain
Just an update on my problem: My mechanic removed the differential again and opened the OBX to find some shiny spots on the helical gears inside, but no damage. (Good thing I was clutching it on decel to prevent the grinding noise of the sun gears collapsing against each other.) Apparently when I rebuilt the OBX, I didn't put enough washers between the gears, so there was enough play inside the center to prevent the driver's side stub axle from engaging without the bolts interfering with the case (big gears could move 1/8-1/4"). When they had it on the lift, turning the driveshaft moved the axles visually moved in and out of the case! Originally, I'd used the count the number of turns to fully clamped down, taking it apart over and over again to add/remove from the washer stack. I think what fouled me up was that the machining tolerances on the OBX were so loose. I couldn't really tell whether I had the correct preload, because the case didn't sit flush UNTIL I started clamping it down with the bolts which screwed up my count. I recommend a vise to anyone else who might have a similar experience with their OBX, because it needs to be fairly tight. (I wish I knew how to calculate the size of Jon's spacer idea to hold the gears apart enough not to grind on decel, but not large enough to keep the diff always locked up...and this spacer would be a different size for each OBX due to lack of uniform quality control.) Anyway, I had finally opted to leave out the two bigger washers and thought I finally got it right...but i was wrong. My mechanic added all but two washers (5 total, I think, including the two big washers in the center) and now I have no problems at all! The diff is quiet and operates great: both wheels lock under straight line acceleration and no more burnouts when taking a turn; it just hooks! Also my driveline clunk is gone thanks to the R/T mount and poly mustache bar bushings I installed at the same time. Love it! I'll be testing the new LSD more thoroughly at "Icebreaker" Oregon's earliest autocross tomorrow afternoon (supposed to be nice and sunny). Even though I doubled the cost of OBX due to having to pay labor, I still spent less than a Quaife! Thanks everyone for all your help! -
OBX Differential Inspection and Installation
cnunes replied to TrumpetRhapsody's topic in Drivetrain
Jon, neither/both. I was getting static interference with the diff case while coasting. Was unable to spin the wheel by hand, because the bolt heads were contacting the side of the diff in their static position until I pried the flange out a bit...but I doubt that the circlip is properly engaged now. What if that stub was never engaged even before I started this project? Maybe they're already stripped and that's why I have the slop? Why would I be able to feel slop on driver's side but not the passenger side? I know you said this not a good test, so you're saying it's normal to be able to feel the slop I'm describing on one side but not the other...? I guess I'm just missing something about how these gears engage, sorry. Is there a stub axle maybe from a different car with the same (or slightly different but worn) spline count that would slip into the driver's side of an R200 but is slightly too short (groove cut 1/8" too close to the flange) to clip in without interfering with the case?? I really don't think this is an issue with the OBX unit itself (guess I should've started a new thread?), because it feels like I'm discovering a pre-existing issue that I didn't know was a problem. The only way the OBX could be at fault is if I got the preload way wrong, and therefore the washer stack isn't spreading the sun gears apart enough to locate the stub axles correctly... -
OBX Differential Inspection and Installation
cnunes replied to TrumpetRhapsody's topic in Drivetrain
Swapping the stubs did the trick...well, sort of. It solved the passenger side issue (shop was saying stub was too short to reach the circlip groove in the diff) but now the driver's side stub (shorter one) is engaged way too far into the diff (opposite problem). Test drive was cut short by loud clunking as the heads of the halfshaft flange bolts contacted the differential case. I pried the flange out a bit and it popped into what looks like the correct position with plenty of clearance between the flange and the diff, but I don't think it's engaged with the circlip anymore, because when we noticed this problem before installation, popping that stub out to where we thought it should be left it loose enough to easily withdraw by hand. I don't think this is a problem with the OBX itself, because I seem to recall a bit of play on that side as we were removing that halfshaft and I didn't check the stub for looseness after disassembly, because I thought the play might've been in the U-joints on that side...but they're solid so now I'm wondering if this was a pre-existing problem. Furthermore, after popping that stub away from the diff, I now get no catch when turning the wheel by hand, BUT while doing so, I noticed some rotational play coming from WITHIN the diff; I can hear the gears clunk as I rotate the wheel forward and back as if there's play in the splines (always felt this clunk while letting off clutch before the LSD install)...is it possible the driver's side stub was replaced with the wrong part long ago and has been wrong all along!? This would explain both issues... I can't even test the OBX, because I'm afraid to drive the car hard with all these potential issues...I was so excited for donuts. Anyone have a hypothesis? This install isn't supposed to be this complicated! -
OBX Differential Inspection and Installation
cnunes replied to TrumpetRhapsody's topic in Drivetrain
Tank, I searched by part number before ordering and I *think* I recall verifying the part number on the box when it arrived, but I'll have to wait 'til Monday to check the part number on the actual unit itself to be sure... And Jon, I was not aware of that slight 3/8" difference in length of the stub axles. I knew the halfshaft lengths were different, but I personally thought the stubs were symmetrical. Not sure if my mechanic is aware of this difference, but I think that might explain our problem. I'll be crossing my fingers until Monday! I really appreciate both of you for chiming in; I've been wracking my head trying to figure this out! -
OBX Differential Inspection and Installation
cnunes replied to TrumpetRhapsody's topic in Drivetrain
Sorry to resurrect this old thread, but I'm having some issues installing the OBX LSD into my '75 280z's stock open R200. I rebuilt the OBX using the instructions posted here with rbryant's deluxe kit. I did not have to swap gears but I did flip over the top gear to ensure BOTH c-clip grooves were toward the center/inside of the case. Sent it with my R200 diff to a reputable shop that even specializes in Z cars. The owner has installed many other carriers including Quaifes but not the OBX. He installed fresh carrier bearings and c-clips from Nissan, but he tells me that although one of my stock stub axles snaps into the OBX just fine, the other side was too short to engage, but the 300zxt CV shaft snaps right in. First of all, I've searched and searched but I've never heard of the stock 280z stub axles not fitting the OBX. Secondly, both sun gears should be identical so I couldn't have them reversed. Thirdly, why do 300zx CV shafts fit fine? I thought they had similar tolerances, but is the c-clip groove on those closer to the tip?? I was prepared for the easy task of rebuilding the OBX, but I wasn't prepared for this complication...anybody got any ideas? I feel like my mechanic and I may be missing something simple...and the first autocross of the season is coming up in less than 30 days! Please help! -Chris -
I'll go ahead and third the Eastwood welder. I have the 175amp 220v version which is more expensive but also comes with a spool gun in case I ever decide to go turbo and make my own intercooler piping or something. Honestly, I didn't really need the 220v right now, but I also didn't want to have to upgrade later, plus I thought it'd be fun to wire up a dedicated 220v circuit straight from my breaker box...very carefully! It's a good welder for a novice like me with surprisingly high quality for a cheap "off-brand." Plenty of power on tap and I'm not afraid to admit, the infinite voltage and wire-speed adjustability often comes in handy to compensate for my lack of skill! Very good value! http://www.eastwood.com/mig-welders-175-amp-mig-welder-w-spool-gun.html
-
Sorry to hijack, but John, can you please explain your point a little more? I understand that increasing track width will reduce weight transfer across that axle, but I was referring to the effect of changing rear track width in relation to the front track width. Front to rear track width differences should have an effect on oversteer/understeer. The way I picture it in my head is a three-wheeler with the single wheel in the rear (narrowest rear track width possible). In this extreme example, during a left-hand turn, the front right tire will be taking on more of the lateral load than if the car was square. If the same car had an equal width rear track, some of that cornering load would be distributed to the right rear tire, allowing for more overall traction available thus faster cornering. However, I think I had the effect on balance reversed: wider rear track width compared to front promotes understeer and wider front track width yields oversteer. (The opposite example would be a tricycle which will understeer.) So since the OP has oversteer, you DO want to increase rear rear track width by adjusting the arms out to induce some understeer, correct? John please chime in again if I am incorrect!
-
Just wanted to throw out there that I've always heard the track width is usually greater in the front than the rear to reduce oversteer (rear breaking loose) or promote understeer by placing more load on the outside front tire. Therefore, adjusting rear track width just to affect camber may not be advisable? A wider rear track width could cause oversteer, right? However, if the loose rear problem is indeed related only to trailing throttle or braking, I second the rear toe-in comment...but as RebekahsZ said, I try to get most of my braking done in a straight line, because my car used to oversteer (and spin out) in sharp autocross turns unless I was on the gas as I turned the wheel to shift weight over the rear tires. That was greatly reduced by the 1" sway bar you have, but I'm still running the stock rear bar so my car presently has a very different balance than yours. As a free test, you could try removing the rear bar altogether and see if that helps predictability? The car will feel slower (more understeer) but it may be easier to drive which sometimes results in faster times. And if disconnecting/removing the rear bar helps, you'd know that in order to use the rear bar you have, you may need to step up to a stiffer front bar like the 1 1/8" deal that Stepan has. Yes, increasing spring rates will reduce body roll but tuning the (anti)sway bars can have a substantial effect as well without dramatically affecting the ride quality. Just my two cents... P.S. That is a indeed a beautiful Z you have there!
-
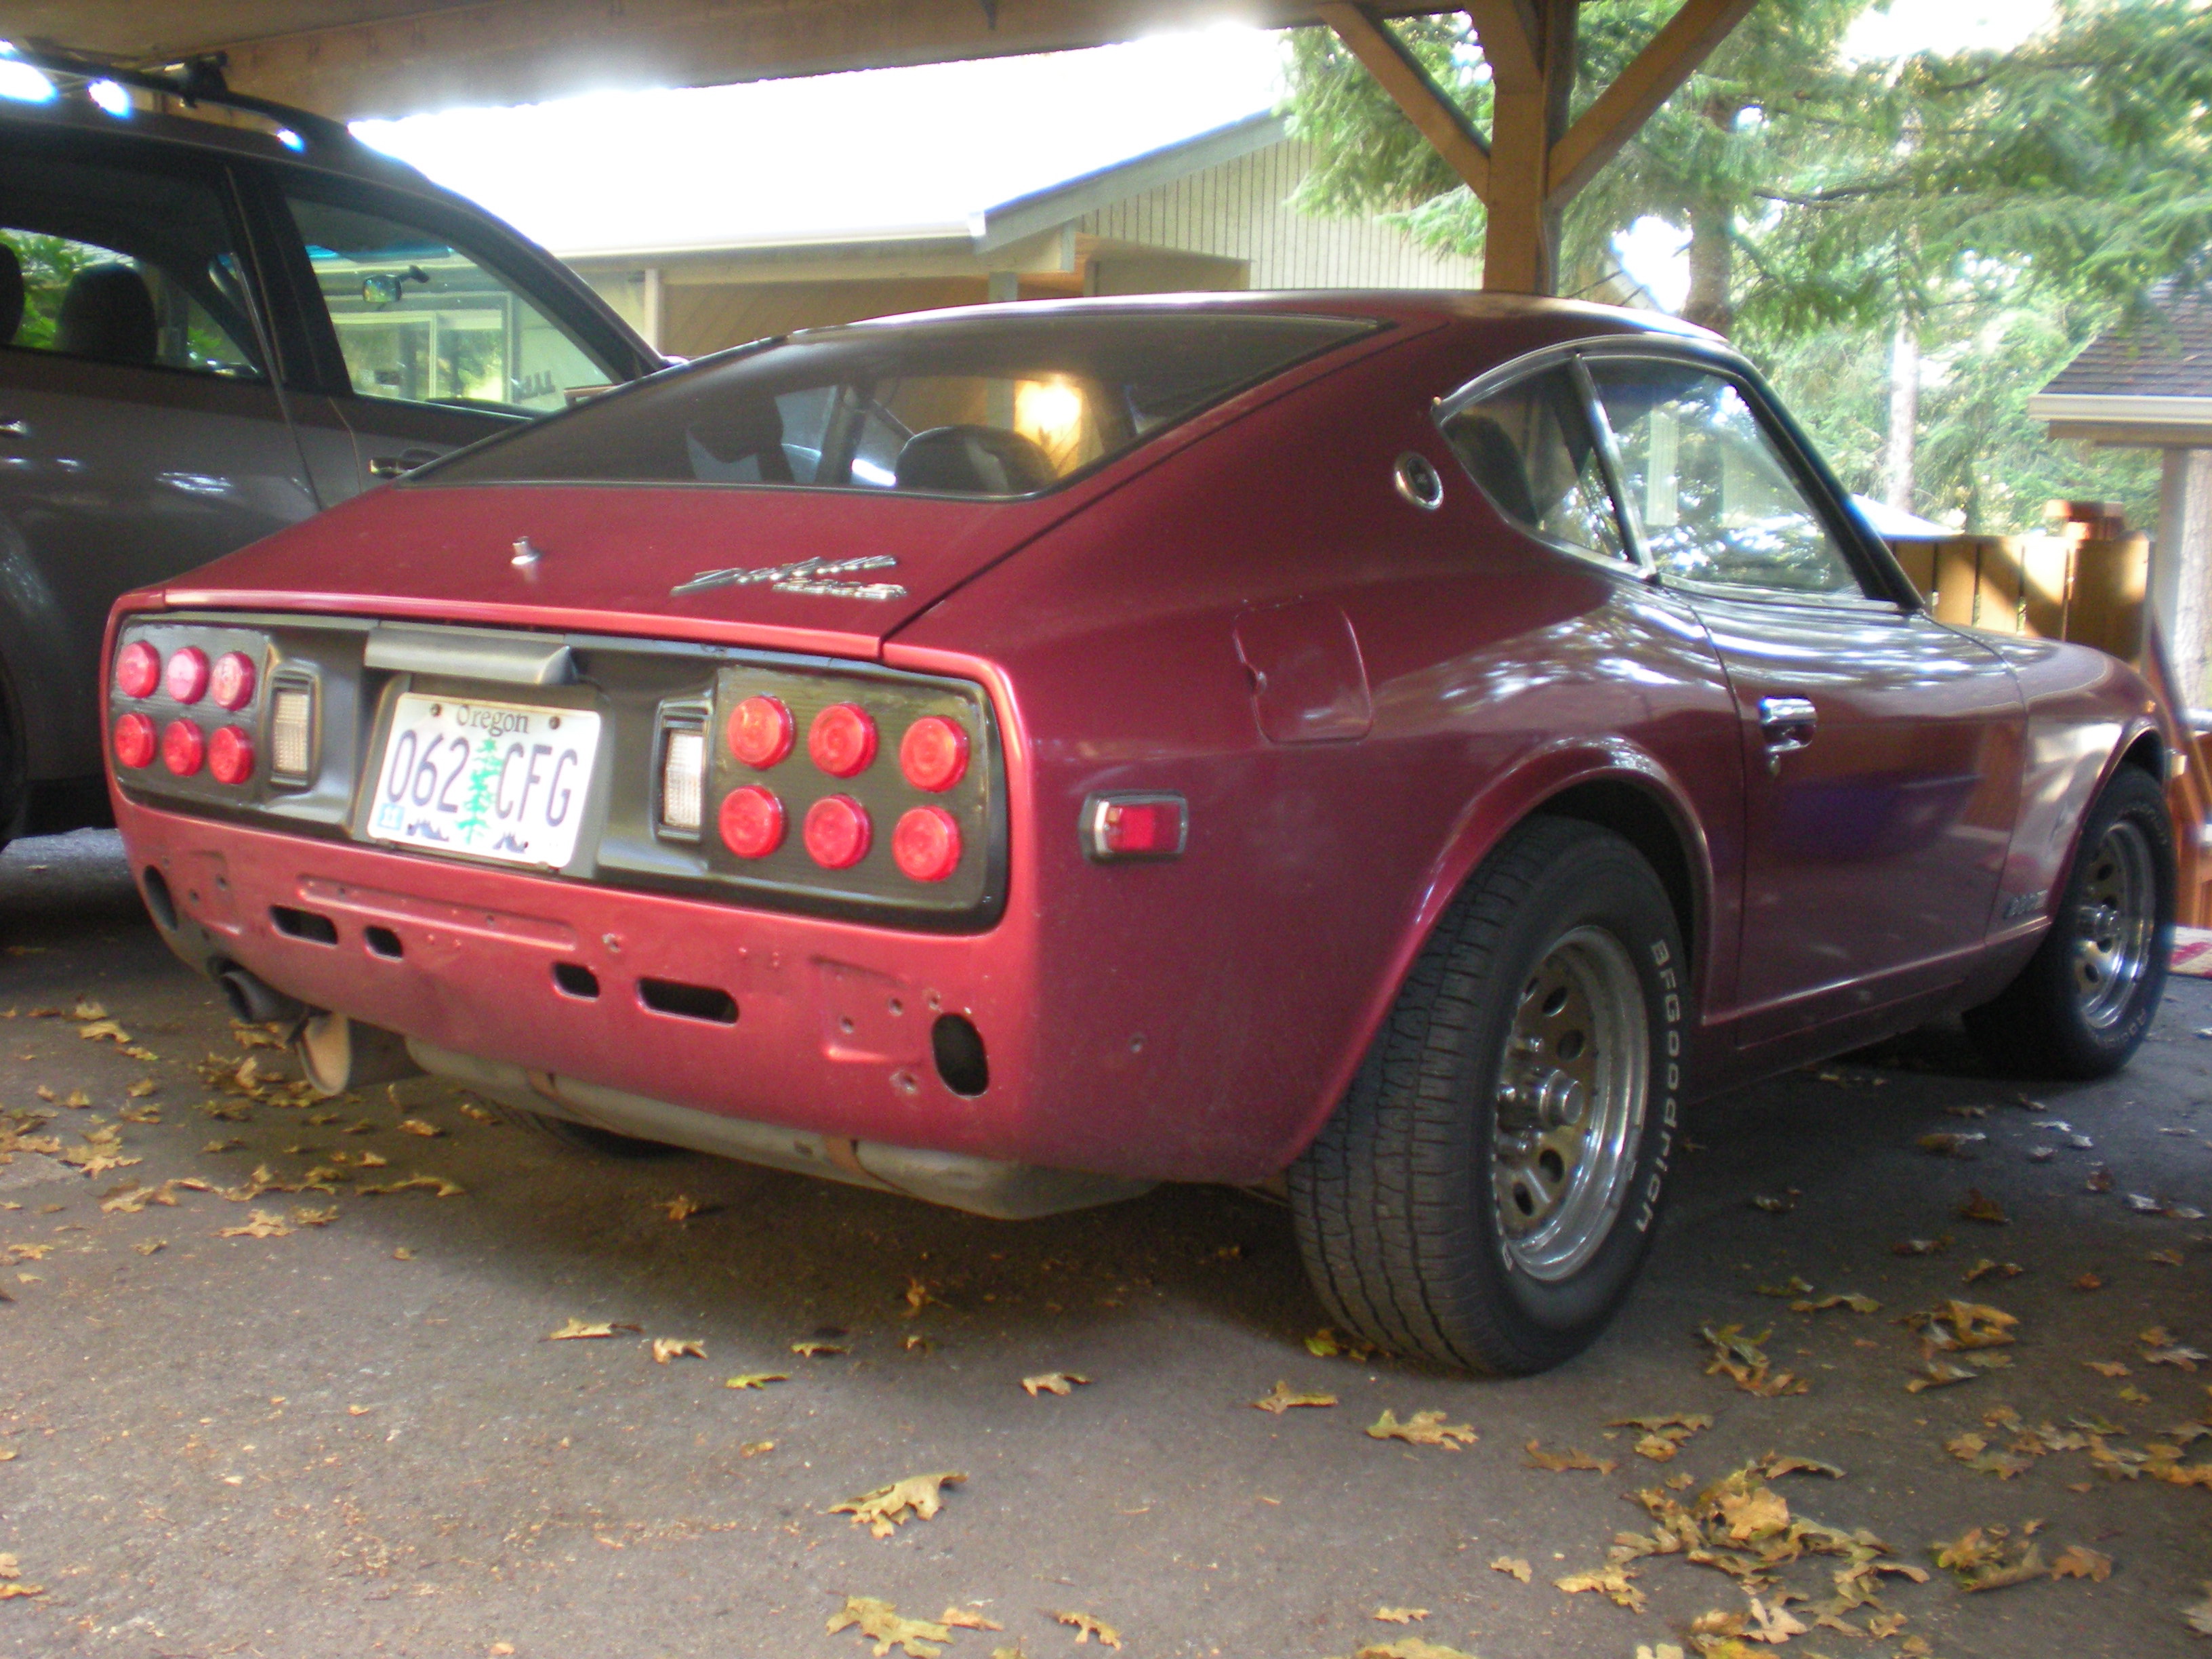
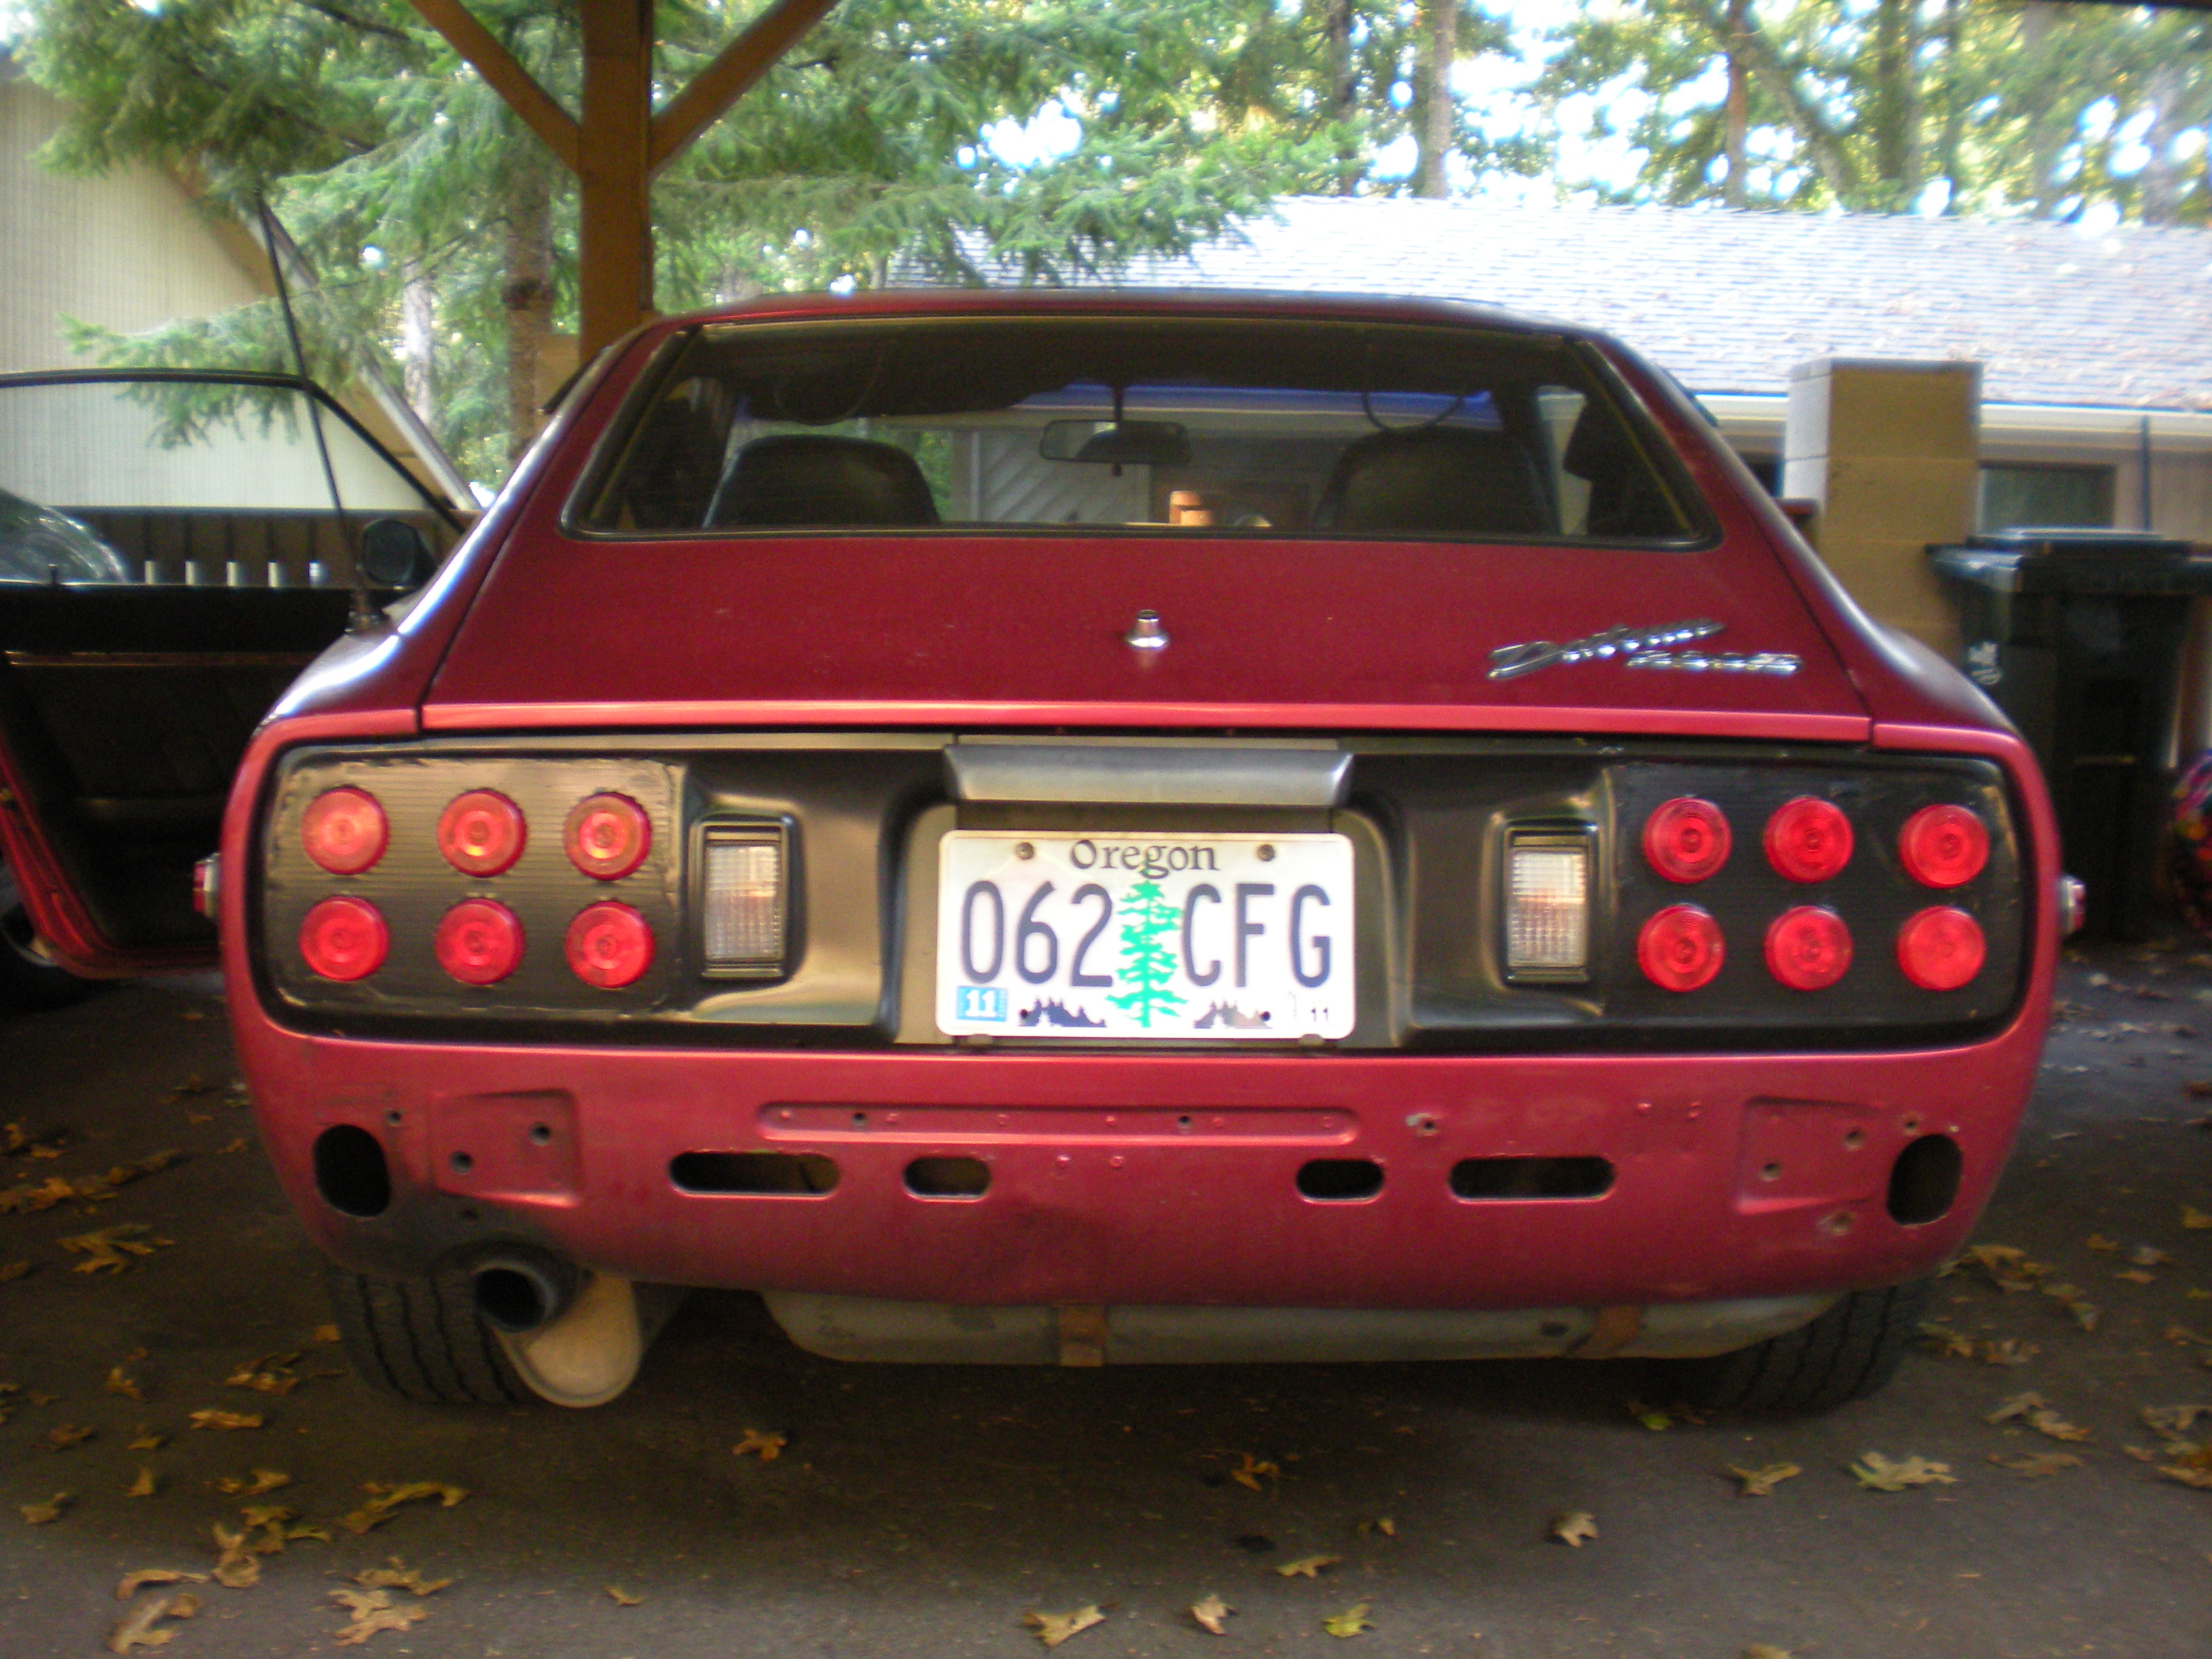
Thanks again for the replies and B00STDZ for the great tip about lens removal. Why didn't I think of that? The heat should soften the glue sufficiently... xShodaimex, I'll have to get a video of the turn signals for you; I'm pretty proud of how that simple rewire turned out..uh, no pun intended. Even if you have stock taillight lenses, you can then light up twice the area of the brake lights which to me is a huge safety mod. After I shave the rear, I'll probably bust out the hole saw and cut out spots for reverse lights. And zsteelman, the centercaps on the wheels have an "A" if that helps, but I don't know the brand. They're heavy steel and I hate them. They're lug-centric and since the holes are larger than my studs, you kinda have to lift the wheel a bit to get the lugs to slip into the holes which is a pain on Autocross days when I swap on the race wheels and R-comps. I do like how these wheels look on the car especially with the white letter radial BFGs, but I'm craving some 16x8 Sportmax XXR 002's some day when the budget allows.
-
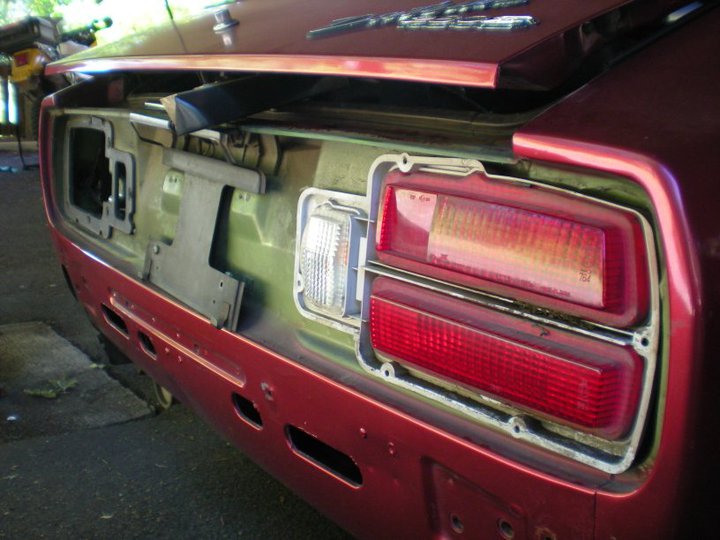
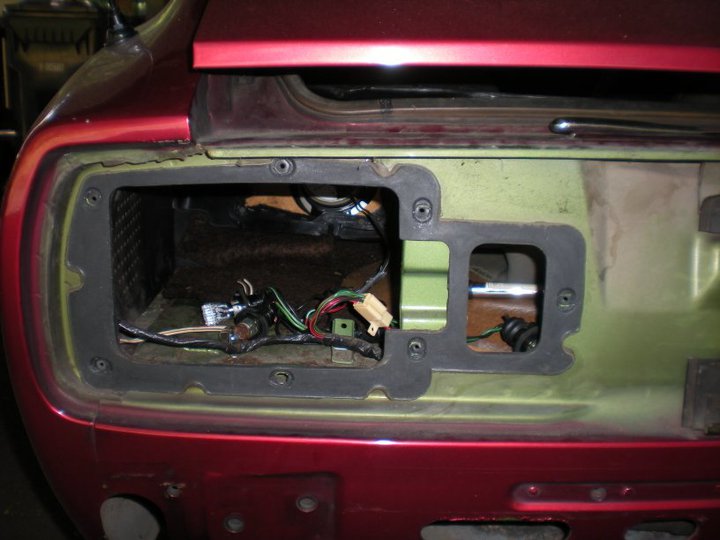
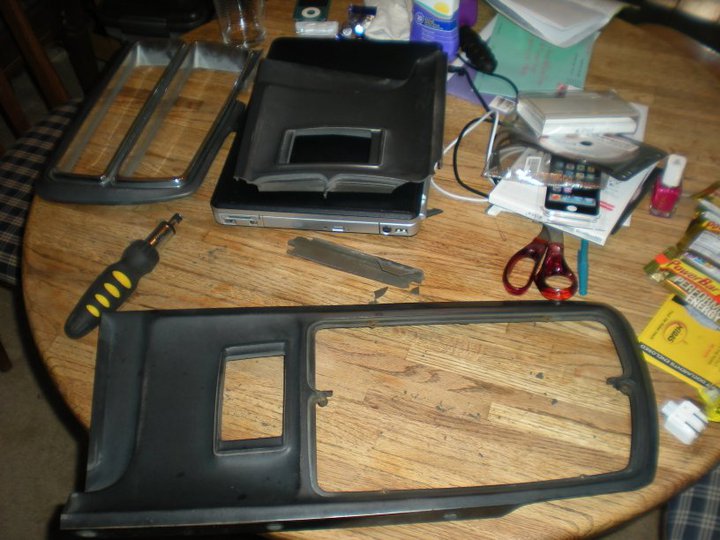
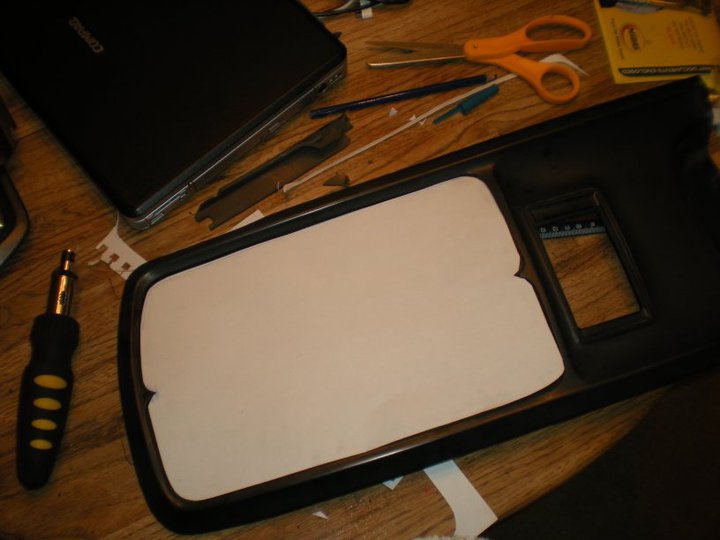
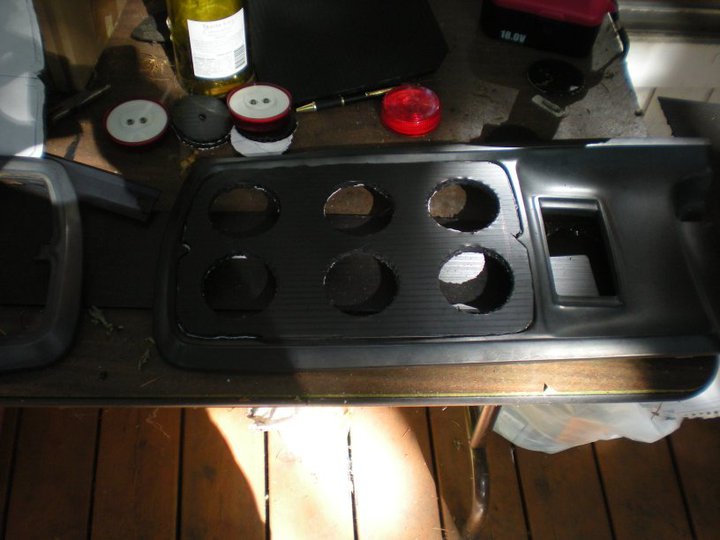
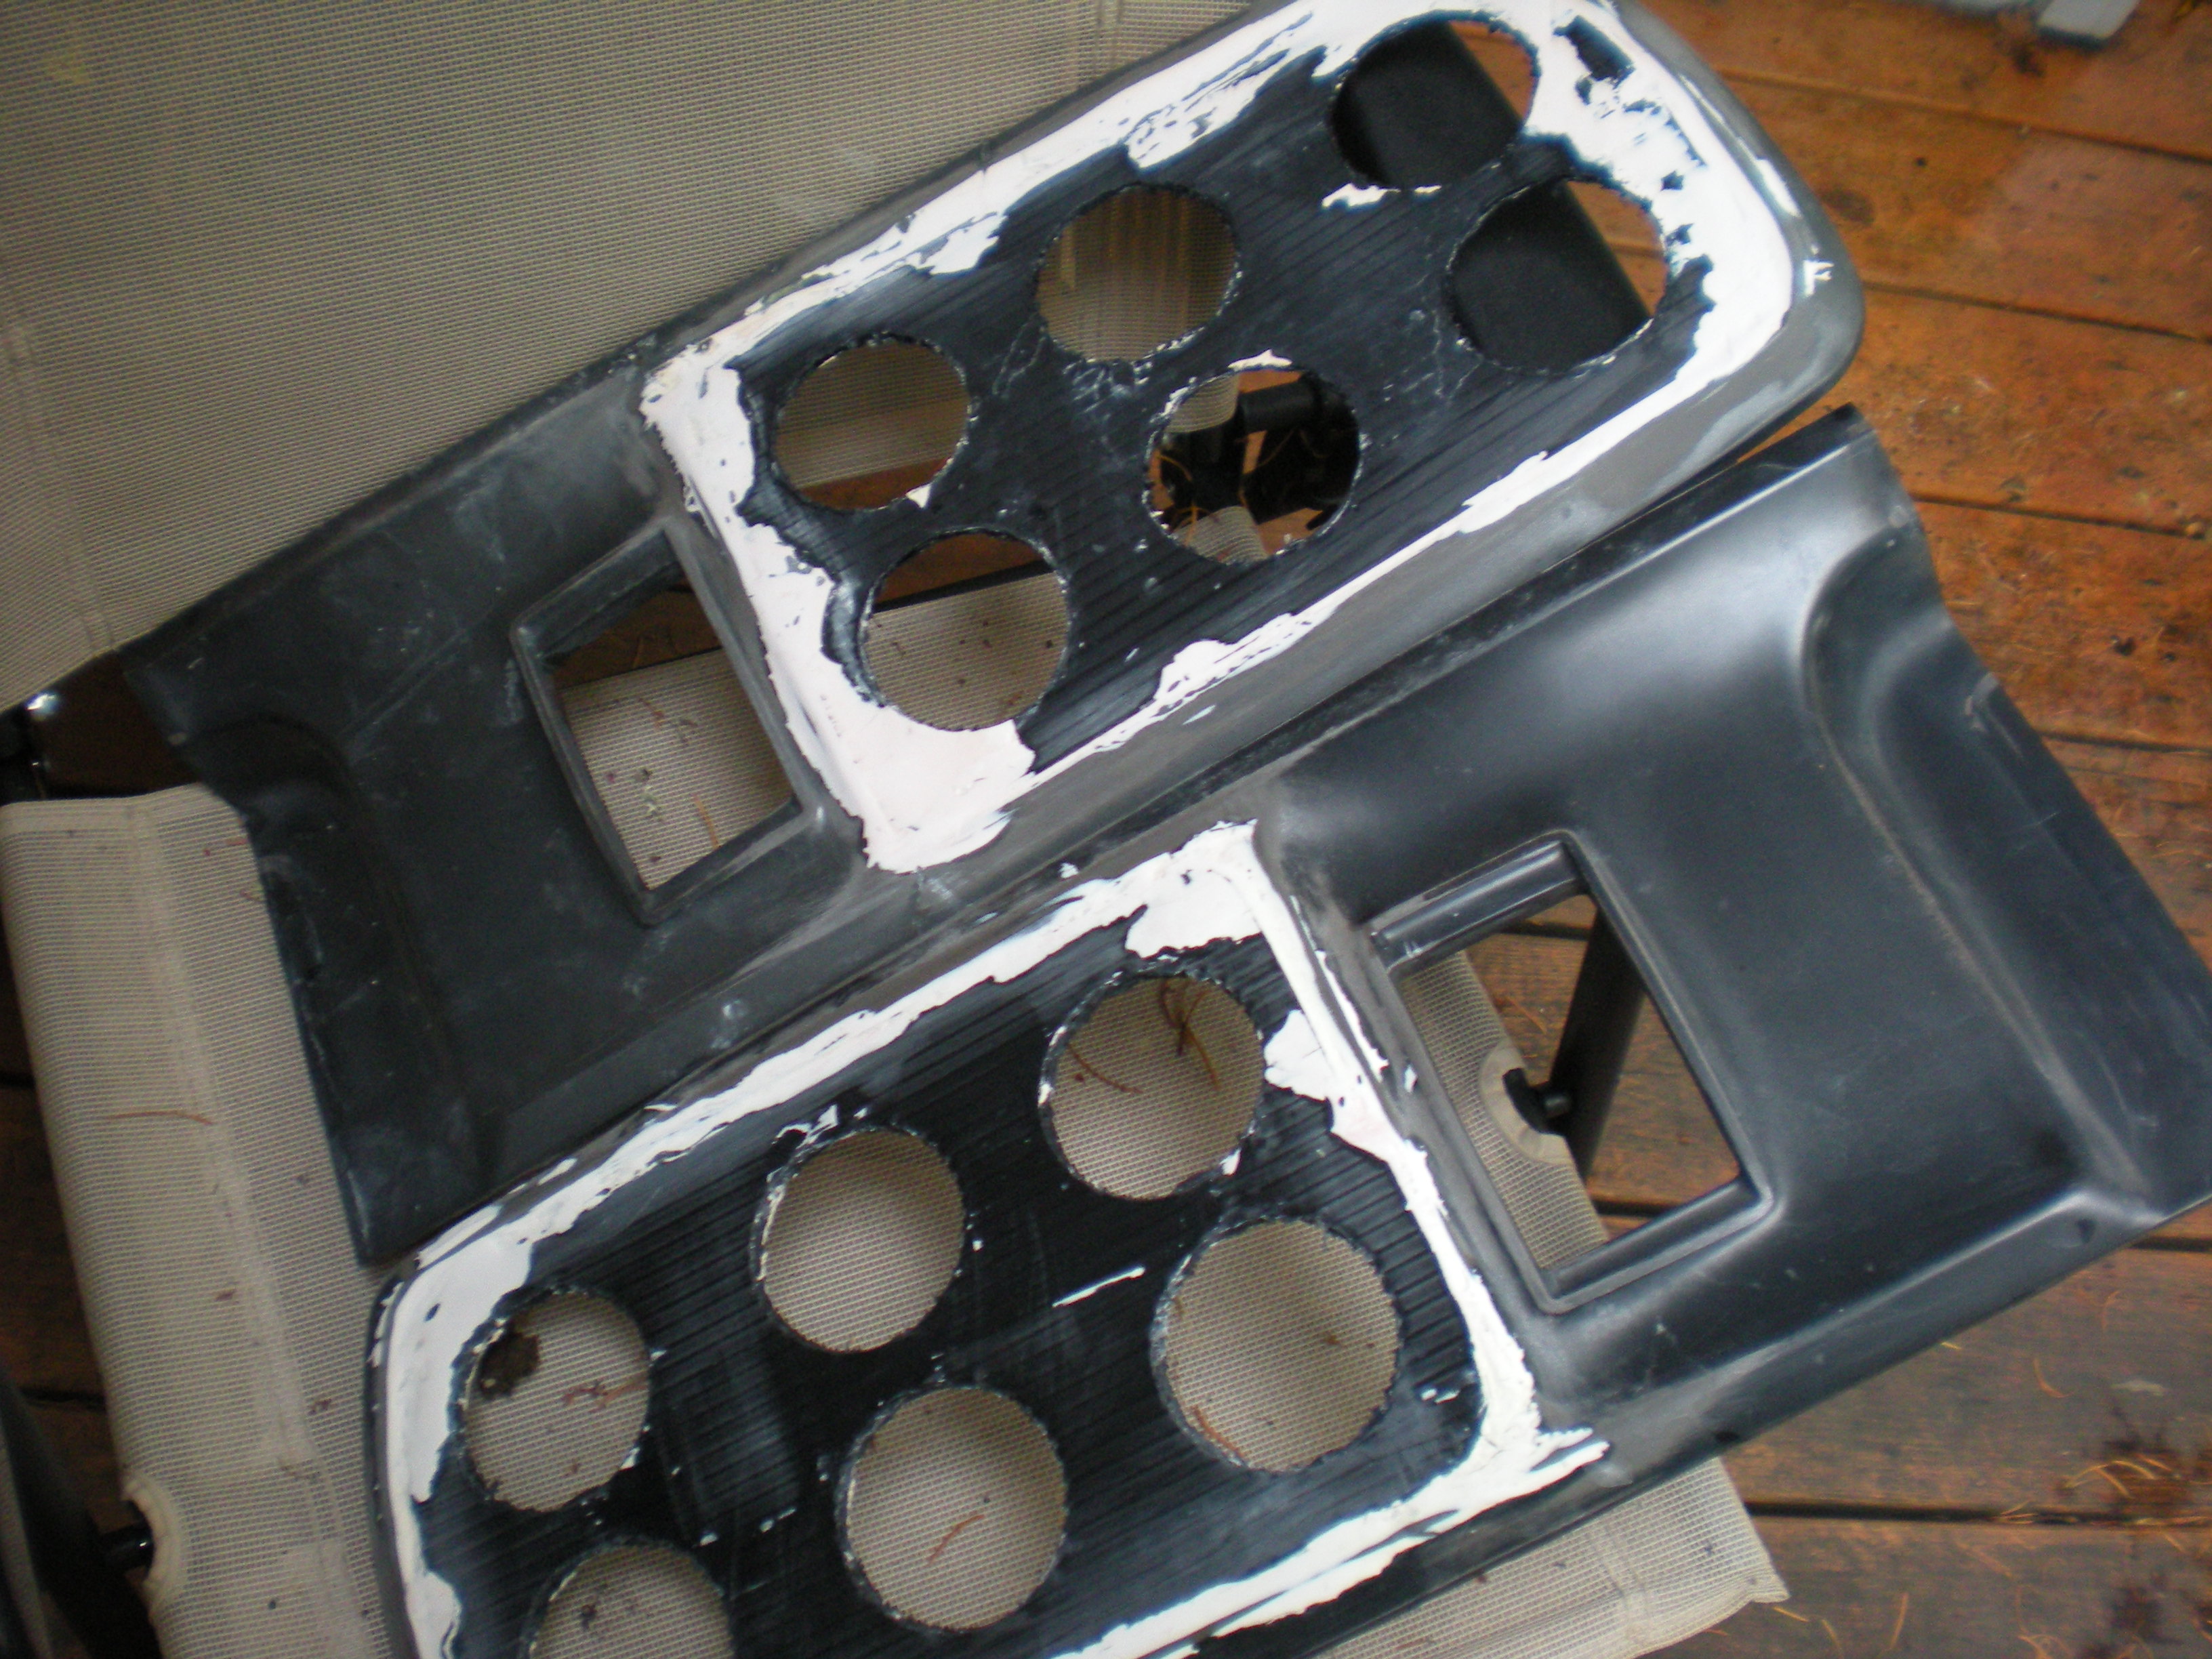
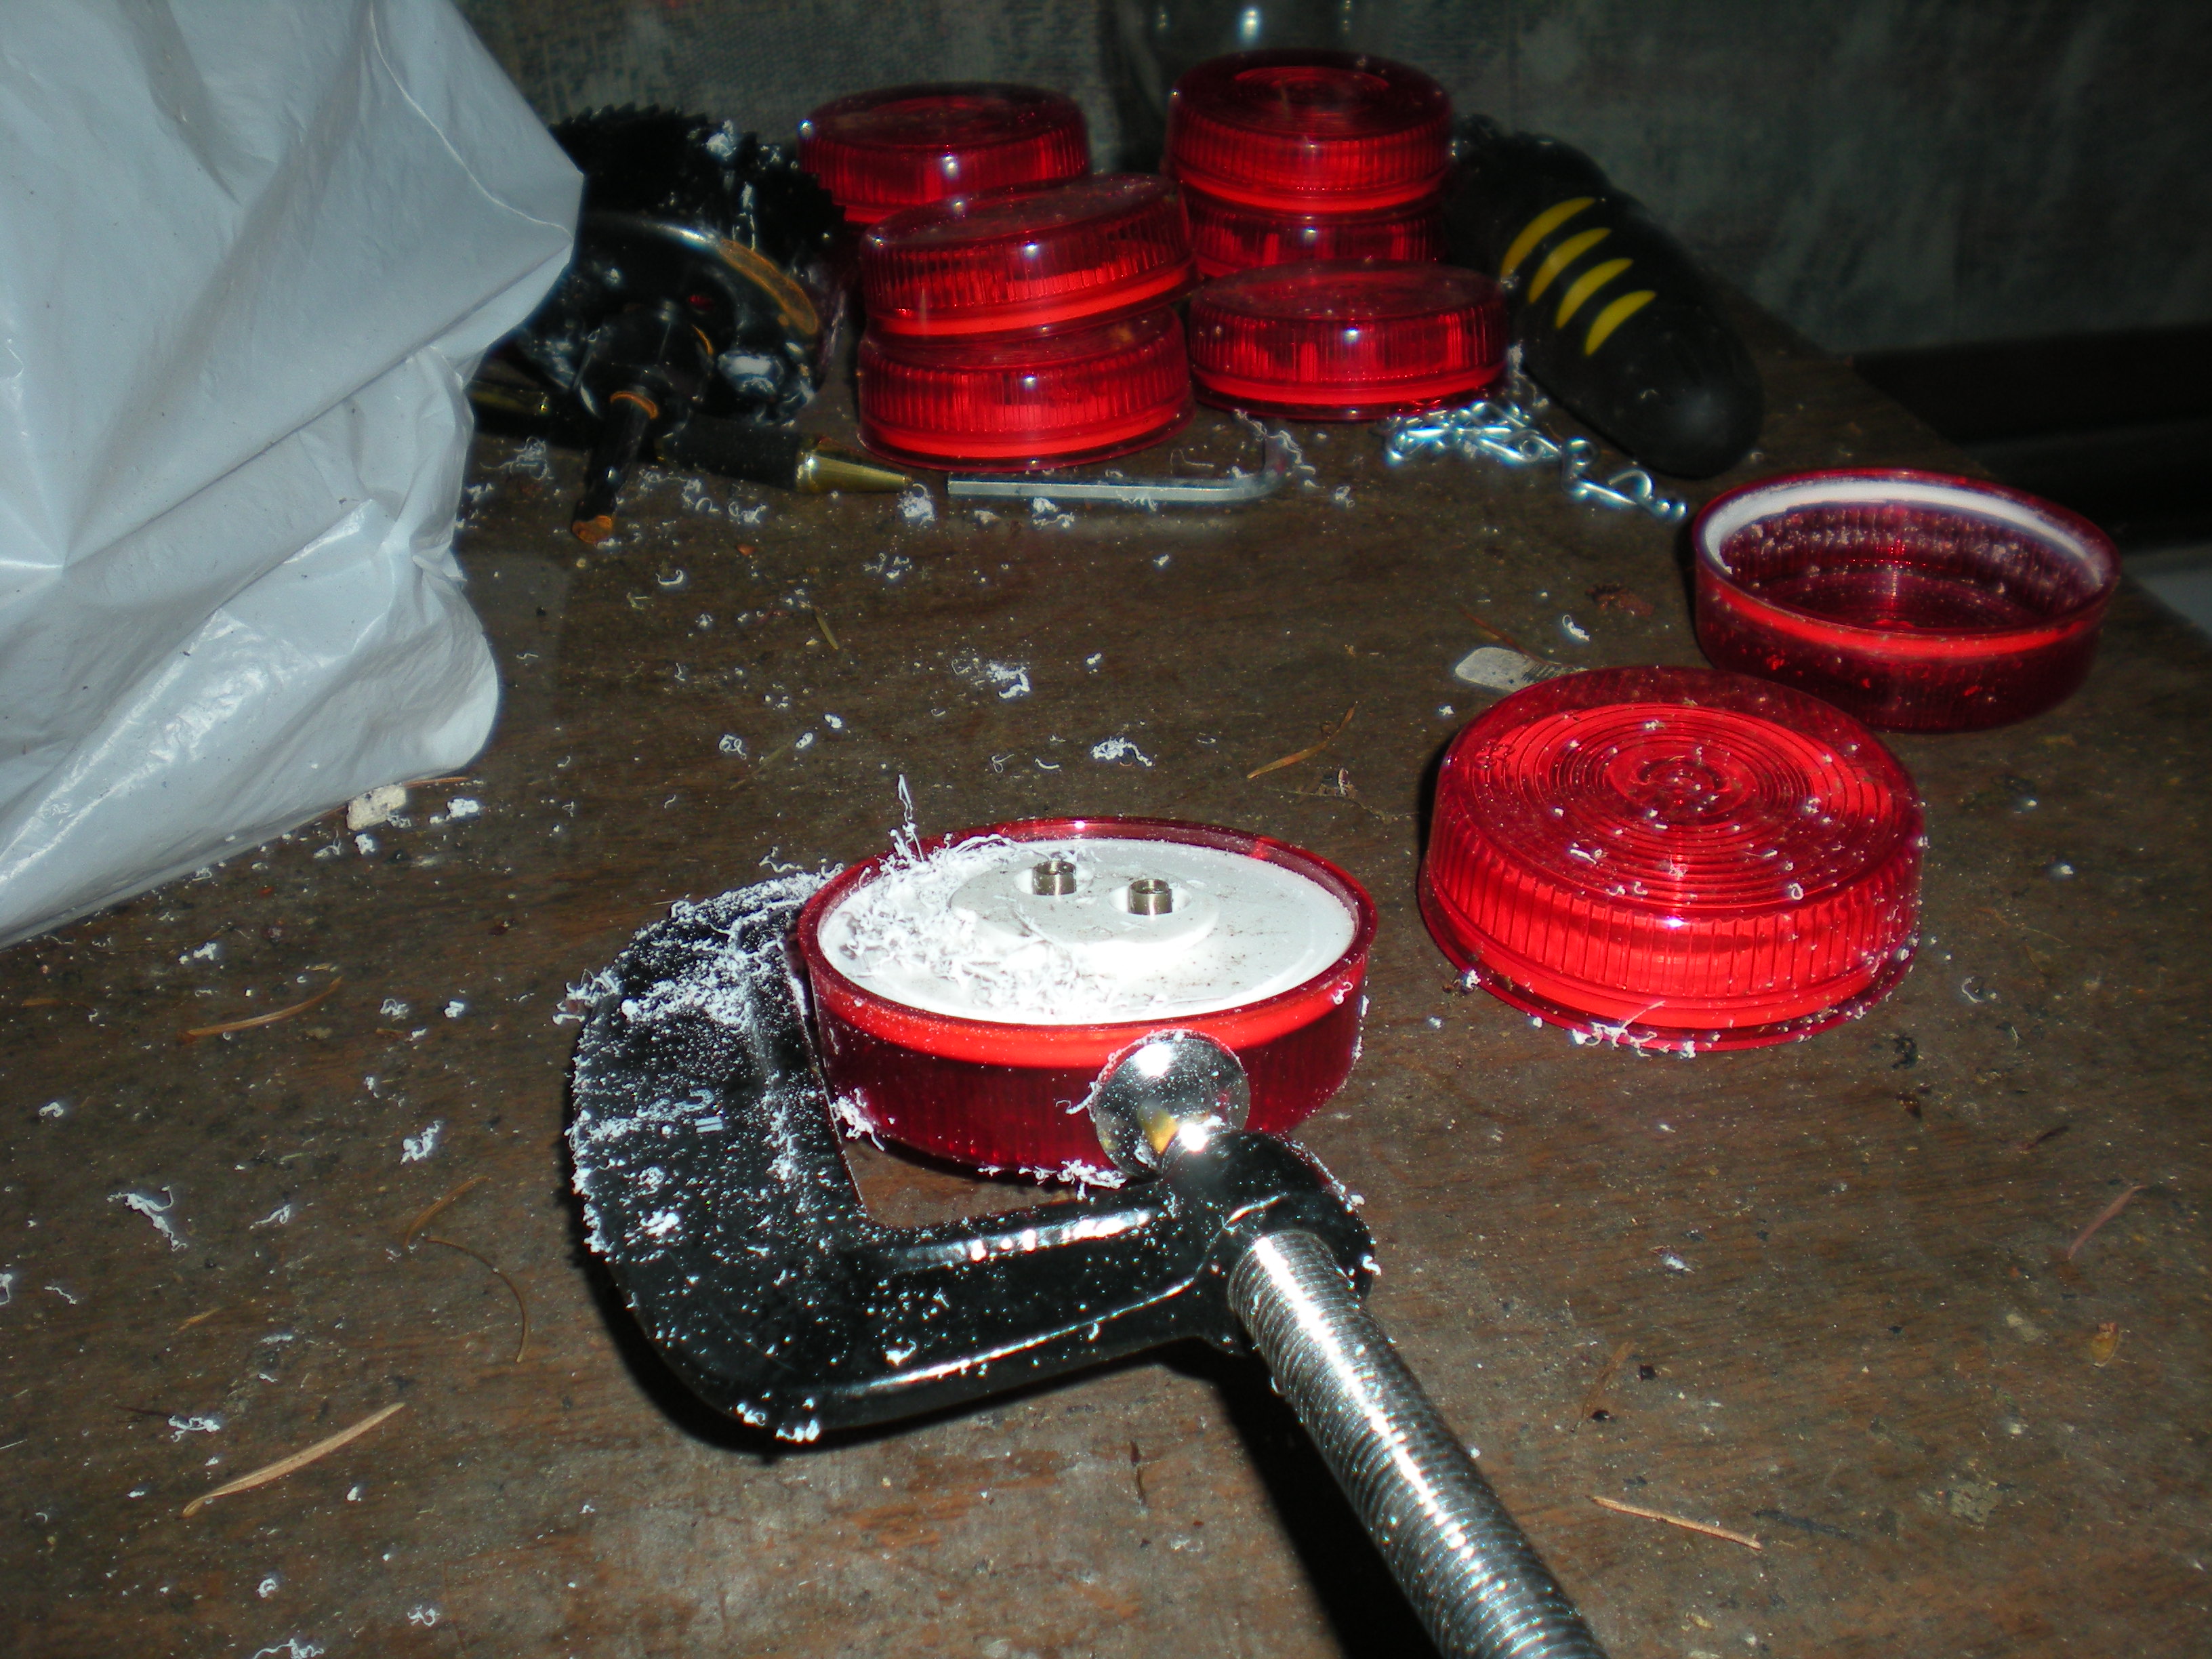
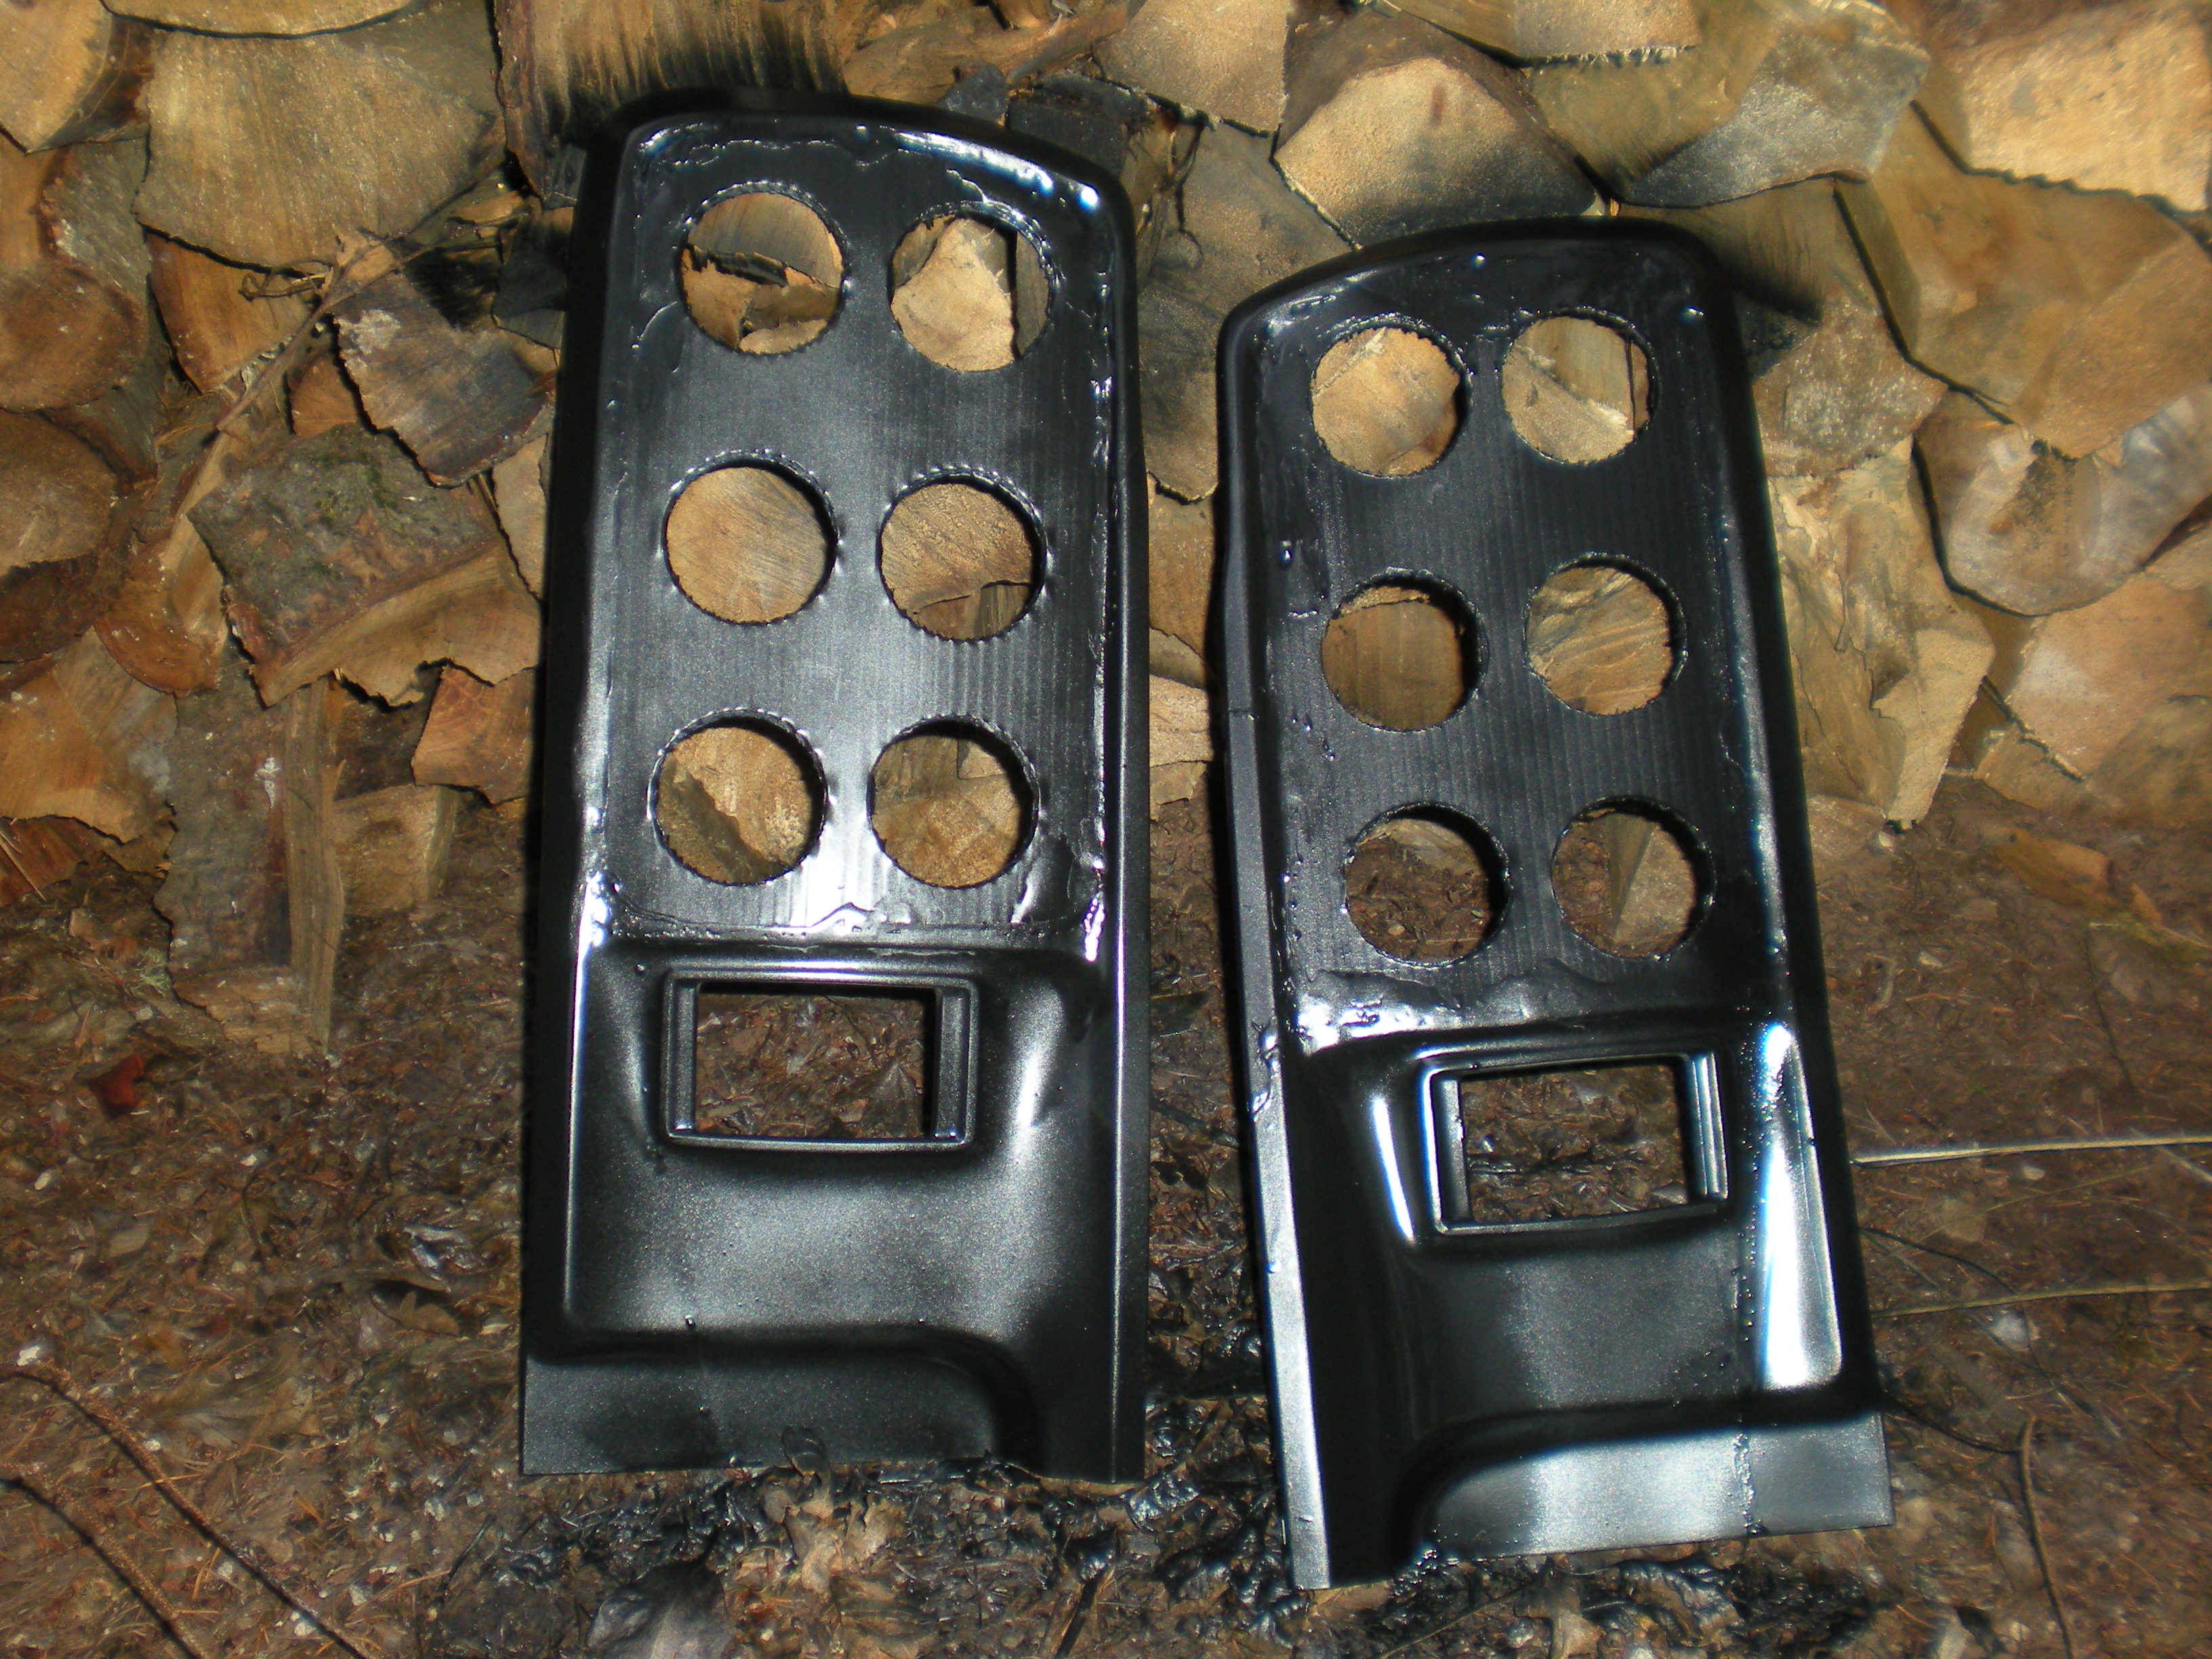
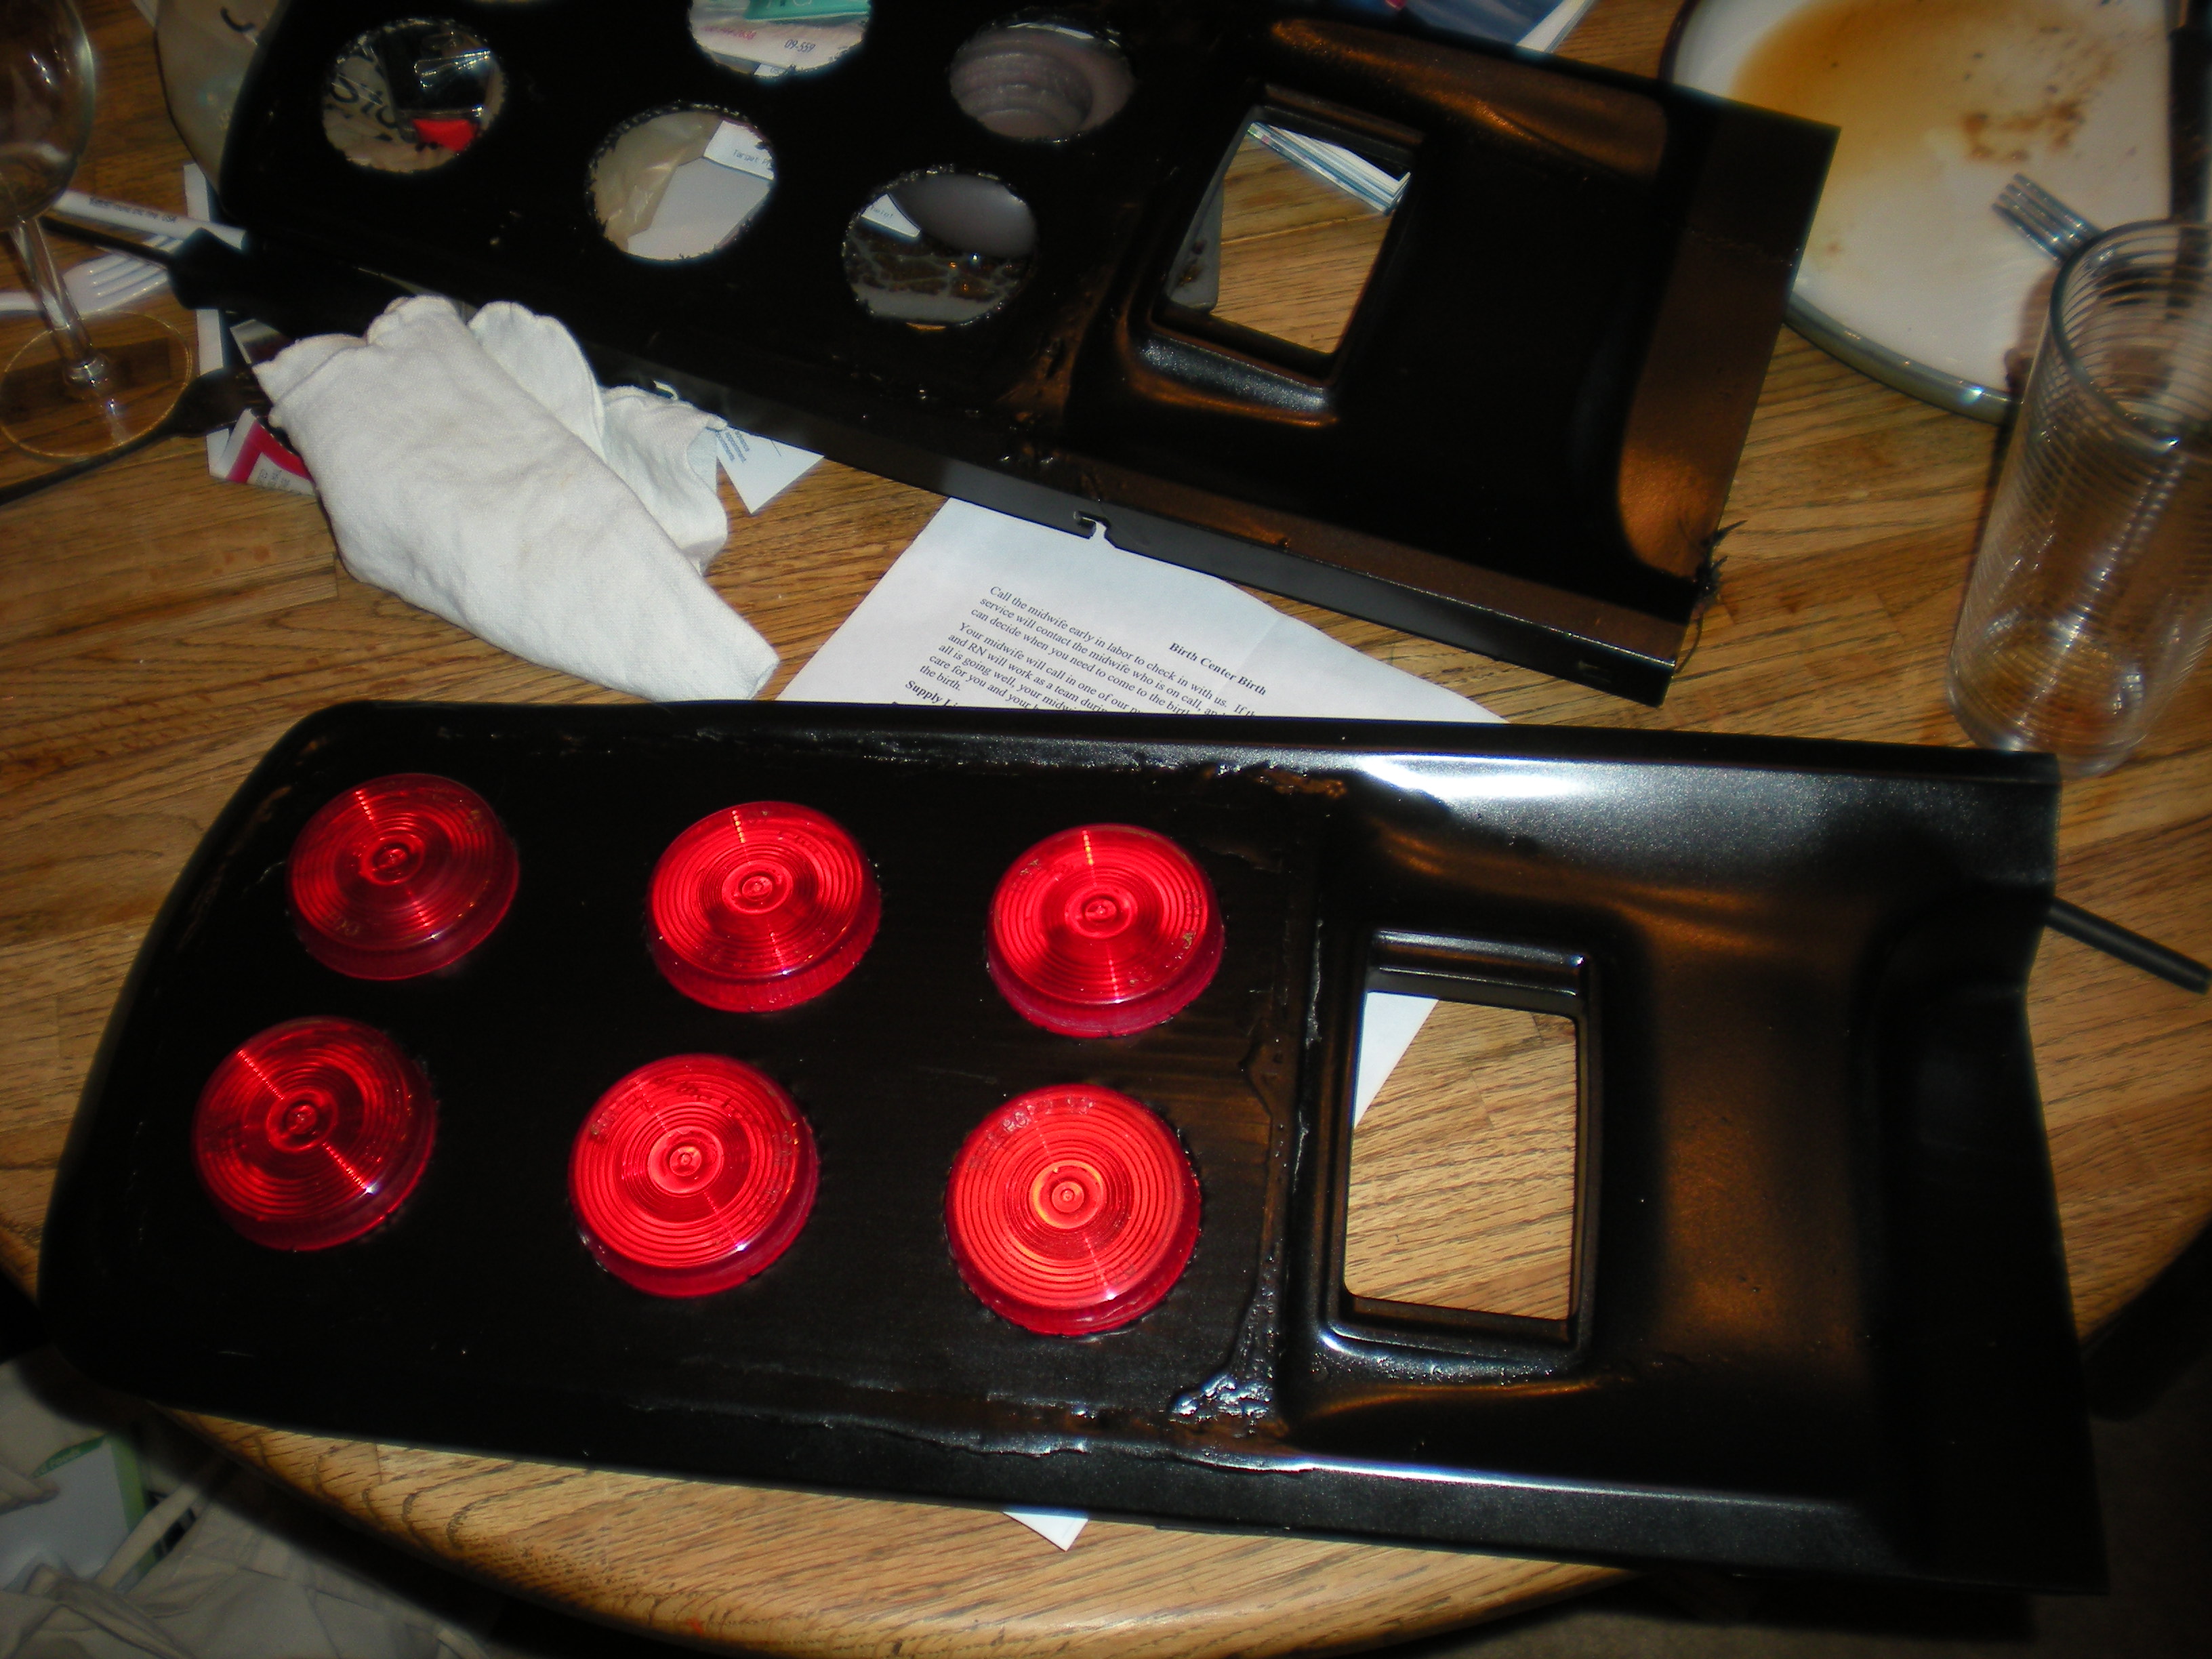
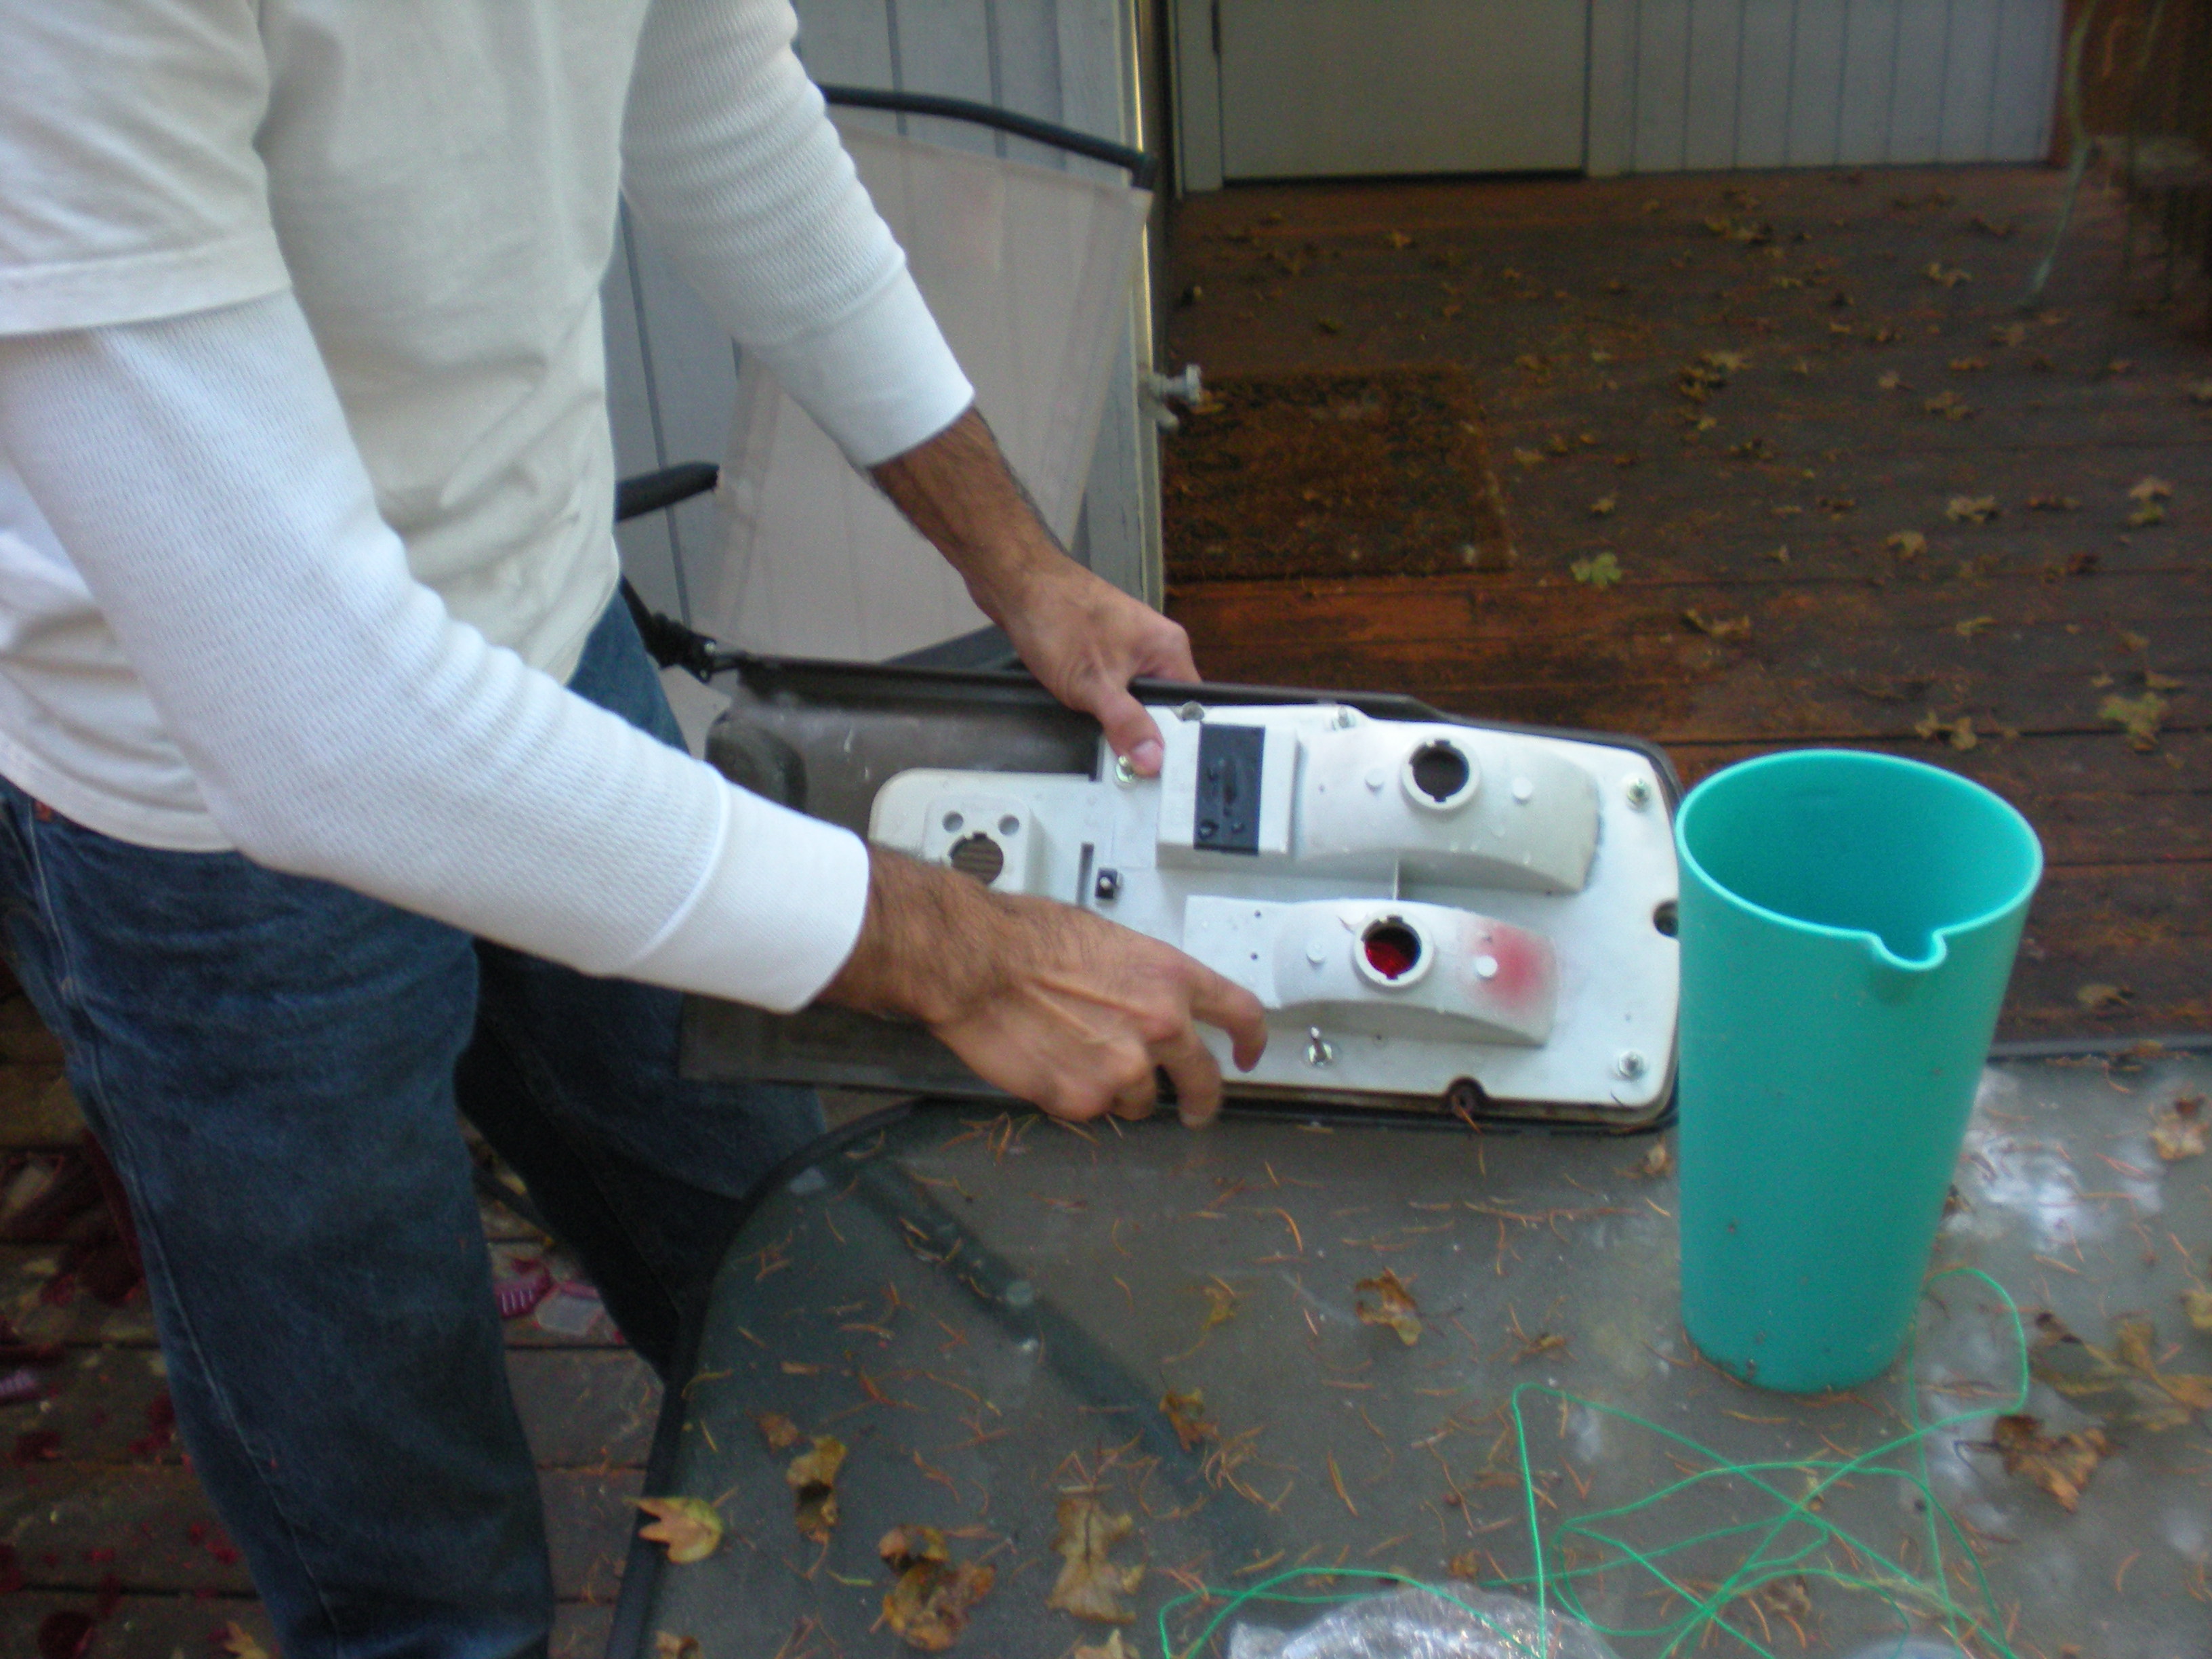
Thanks for all the positive feedback, everyone! Yes, I do plan to eventually fill the holes and smooth the rear panel underneath the lights, but I'll actually need to learn how to weld first and bodywork is currently beyond my skill-level. I don't believe in spending money to get a body shop to do it until after I swap out the engine, so the new paintjob and everthing that comes with that will just have to wait. I'm also thinking of installing two round reverse lights directly below the license plate as well for safety. Not too worried about the gas tank though; if I'm rearended, I figure that'd be the least of my worries, but maybe I'm just being blissfully ignorant. Tinted tails is a good idea that I considered, but I think that'd look better if the round lights were recessed (frenched) instead of protruding beyond the bezel. My two cents. Process itself took more hours than I really want to count, but I was learning and doing this in my spare time after work and on weekends...here's how I did it in case anyone else wants to try something similar: First step was removing the taillights from the car. Then I removed the stock housing and reinstalled that on the car so I could still drive it (legally). Didn't look bad actually; note the original army green paint. Next step was dismantling the bezel and removing the chrome-like lens surrounds. I made a paper template before cutting the plastic to fit. Test fit of the plastic which was later epoxy'd into place. Had to pre-install the lenses to see what it'd look like! Bondo'd the gaps to make a smooth transition. In retrospect, Bondo did not adhere well to the plastic, but it sanded down pretty smooth. More sanding might've gotten it perfect, but my sanding was already starting to eat into the plastic...again this was a learning experience. Painted. While I waited for the paint to dry, I drilled out the backs of the trailer lights. Finishing bezel all done! I was so excited to get this on the car. Removed the stock lens housings from the car and tried prying off the lenses, dremeling them, and finally resorted to smashing them out with a hammer which was actually kind of fun. Note the carnage in the background. And then reattached the stock taillight housing to the modified finishing bezel and bolted back to the car. Piece of cake!
-
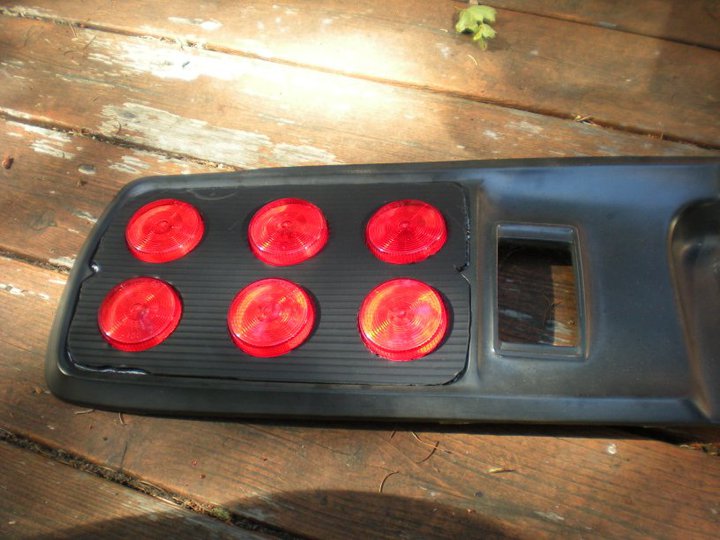
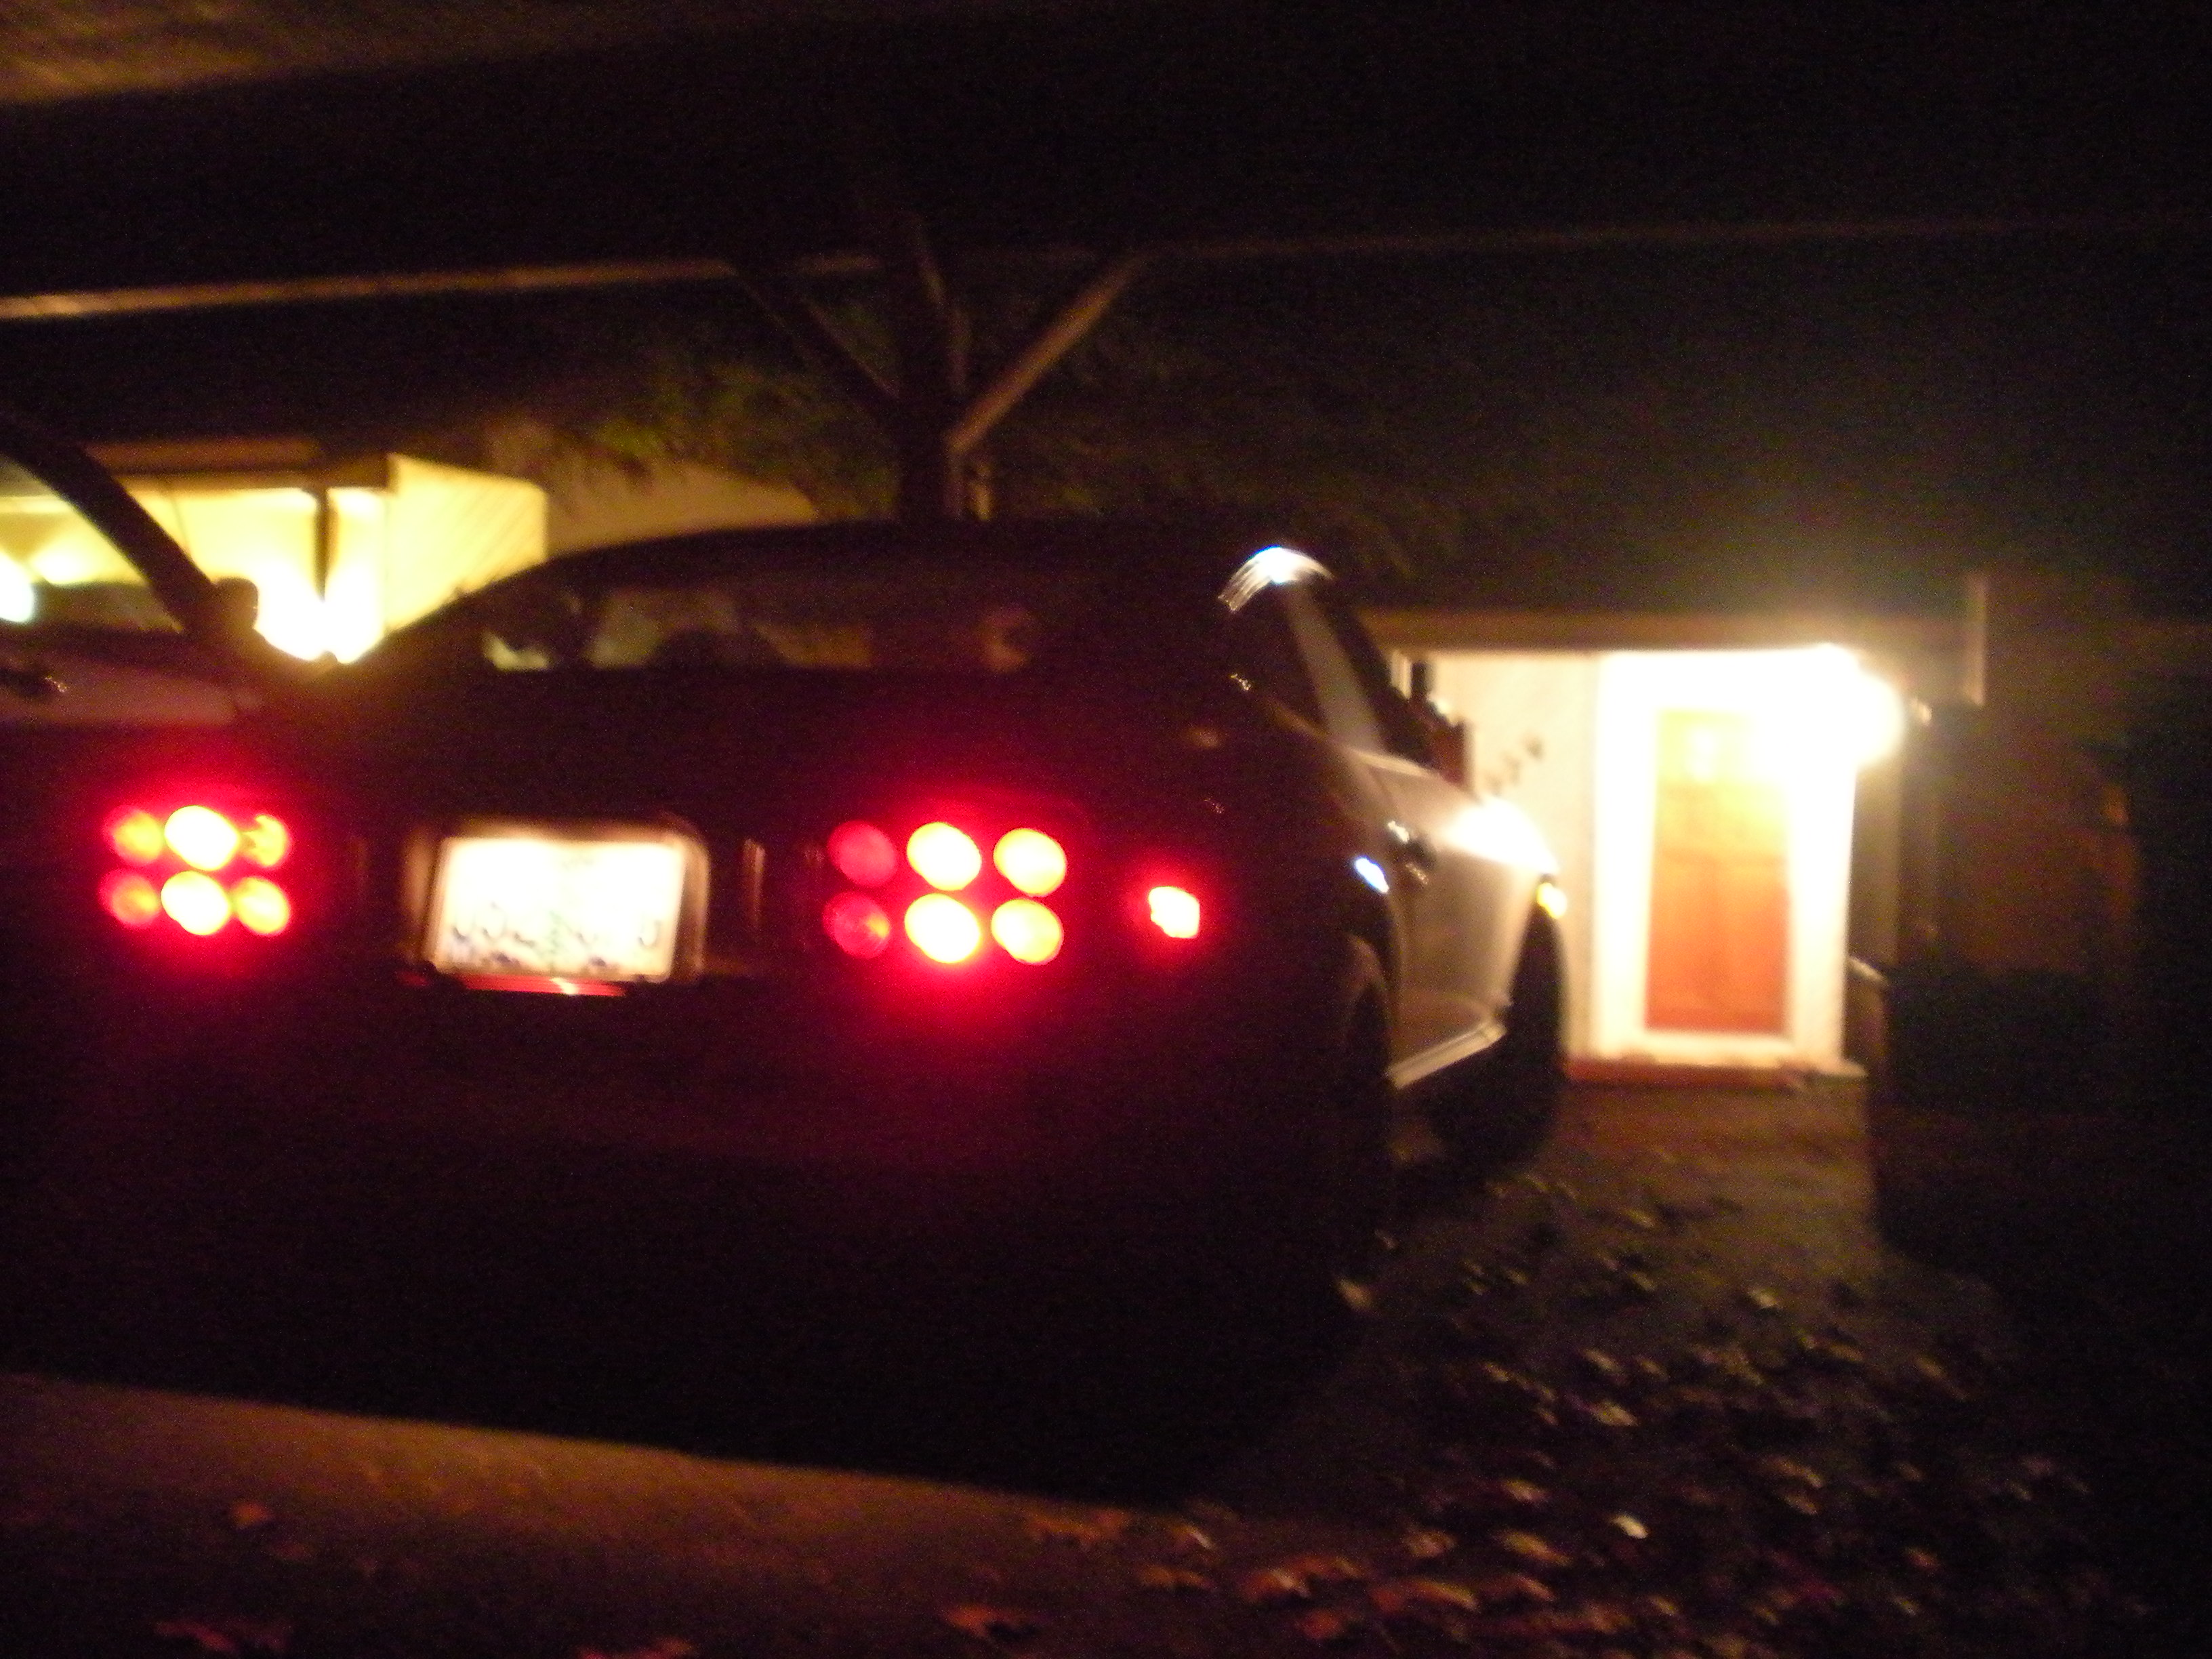
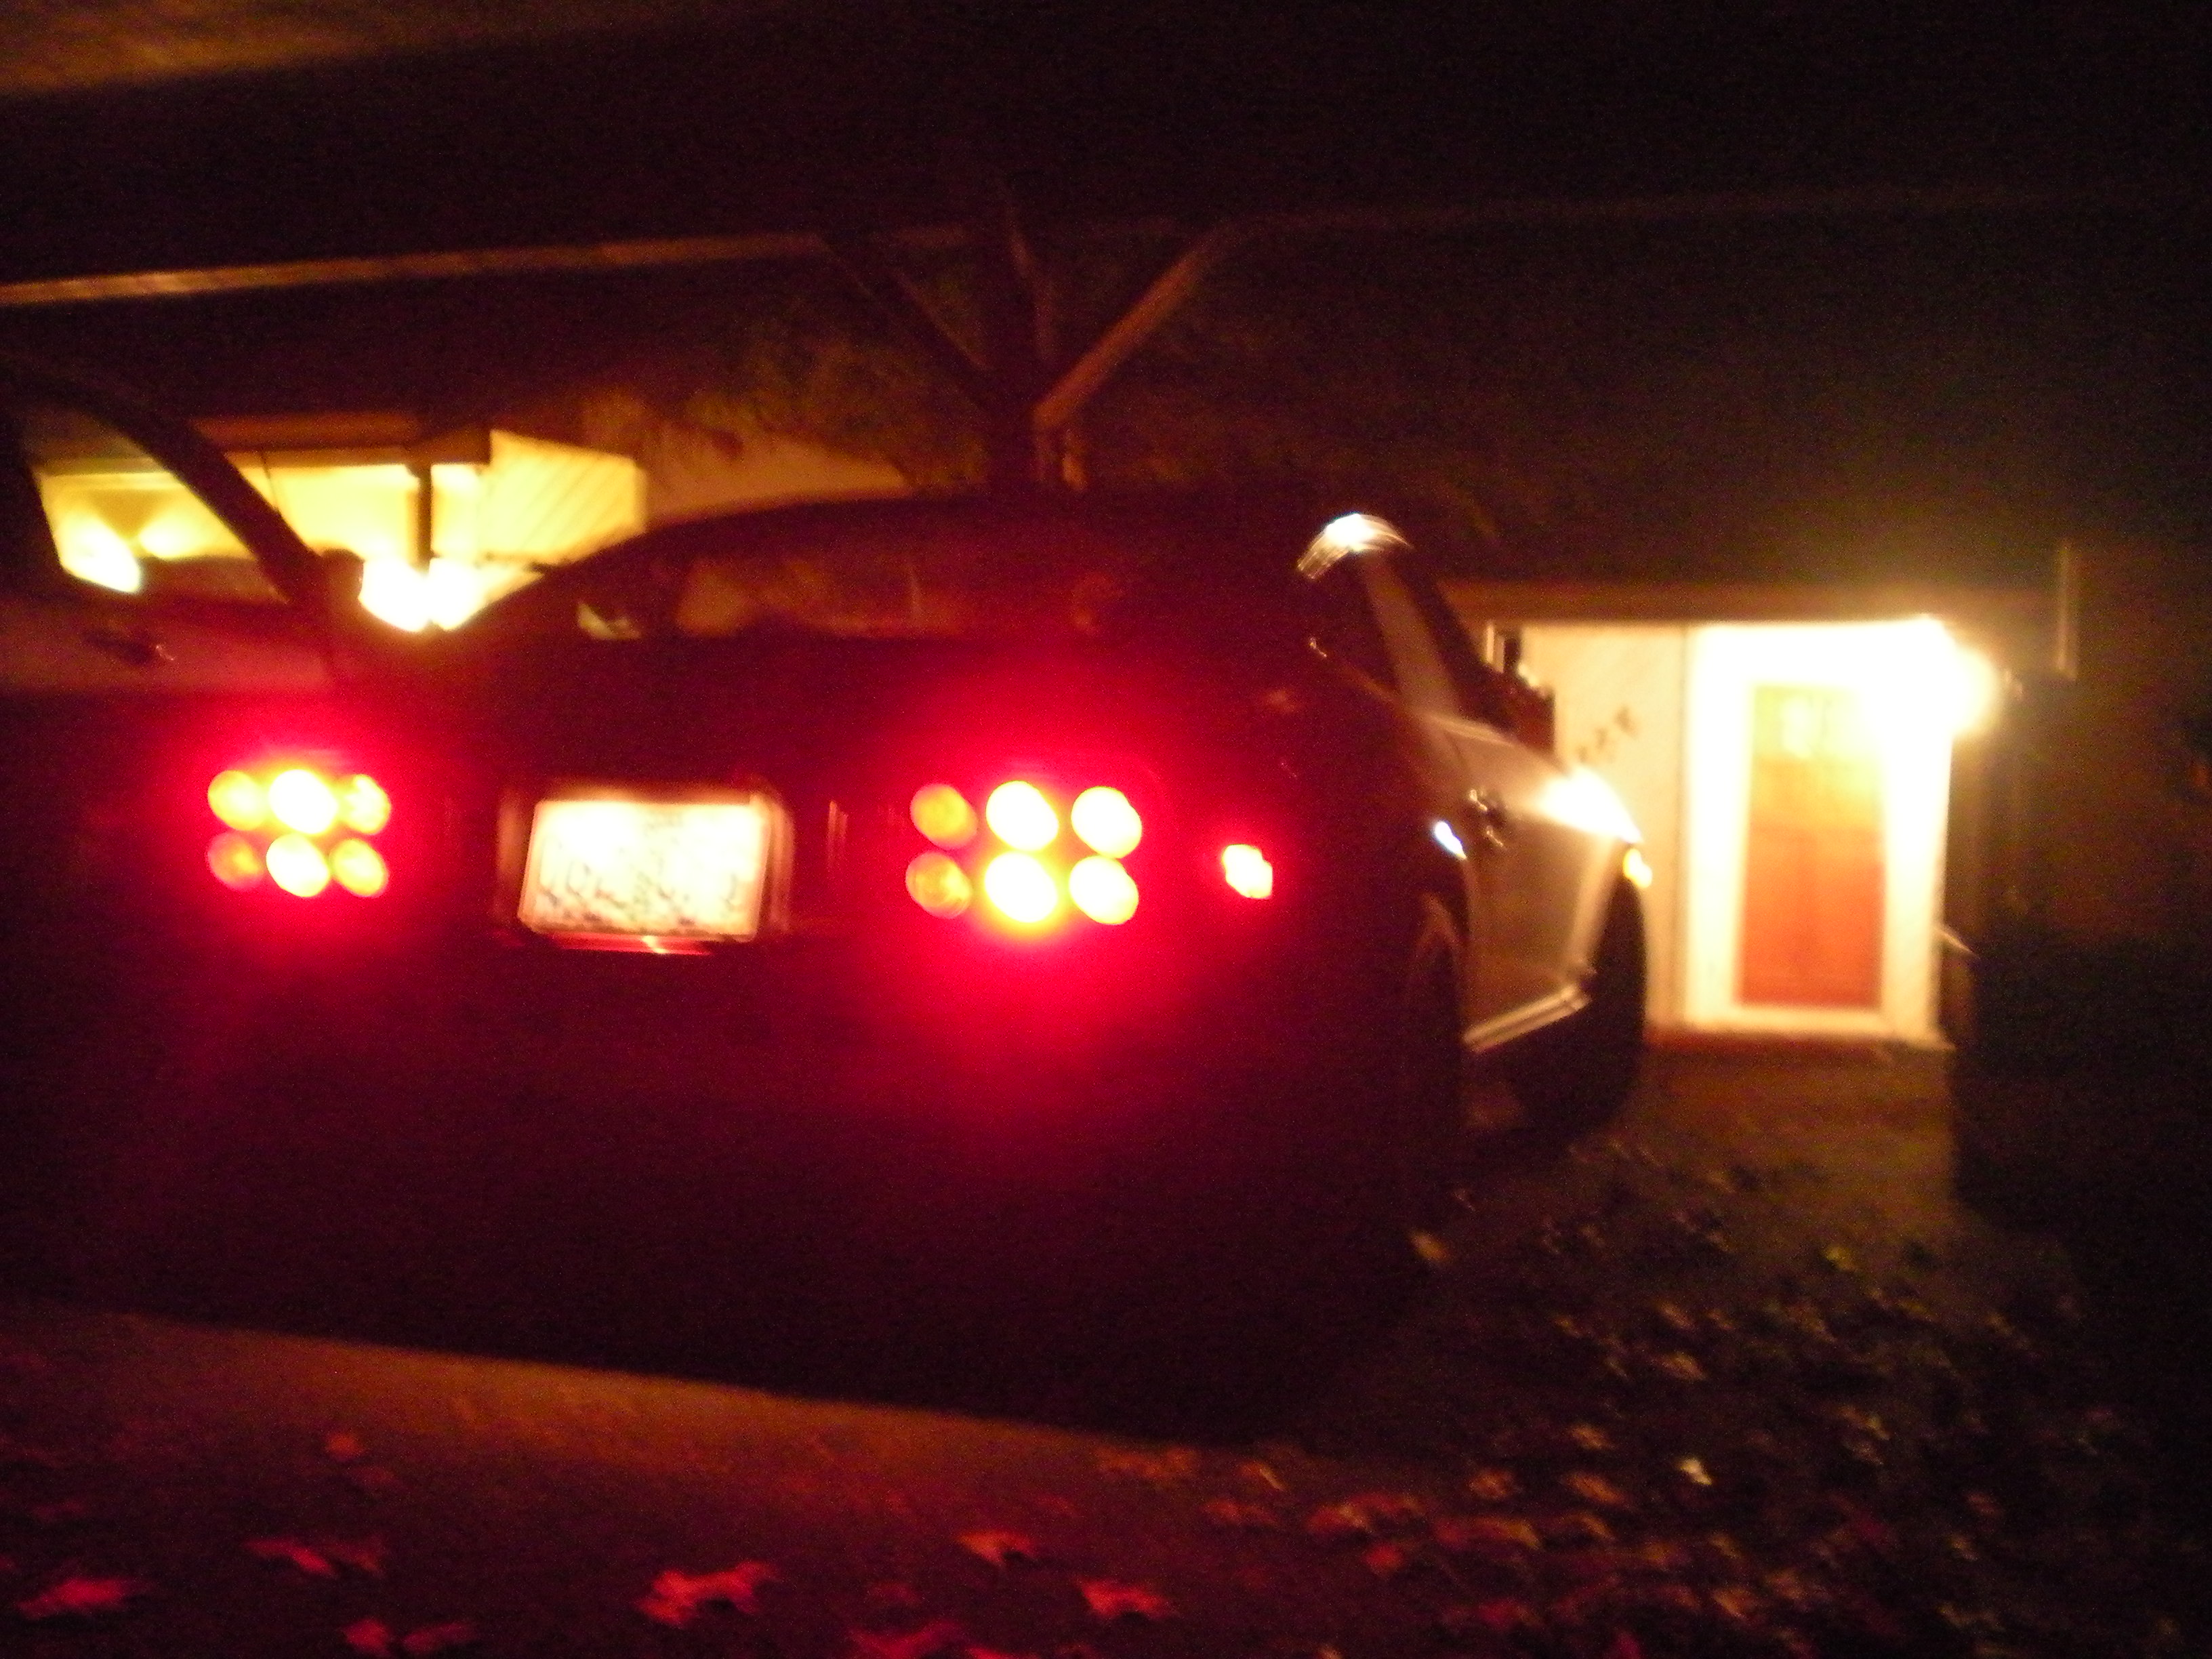
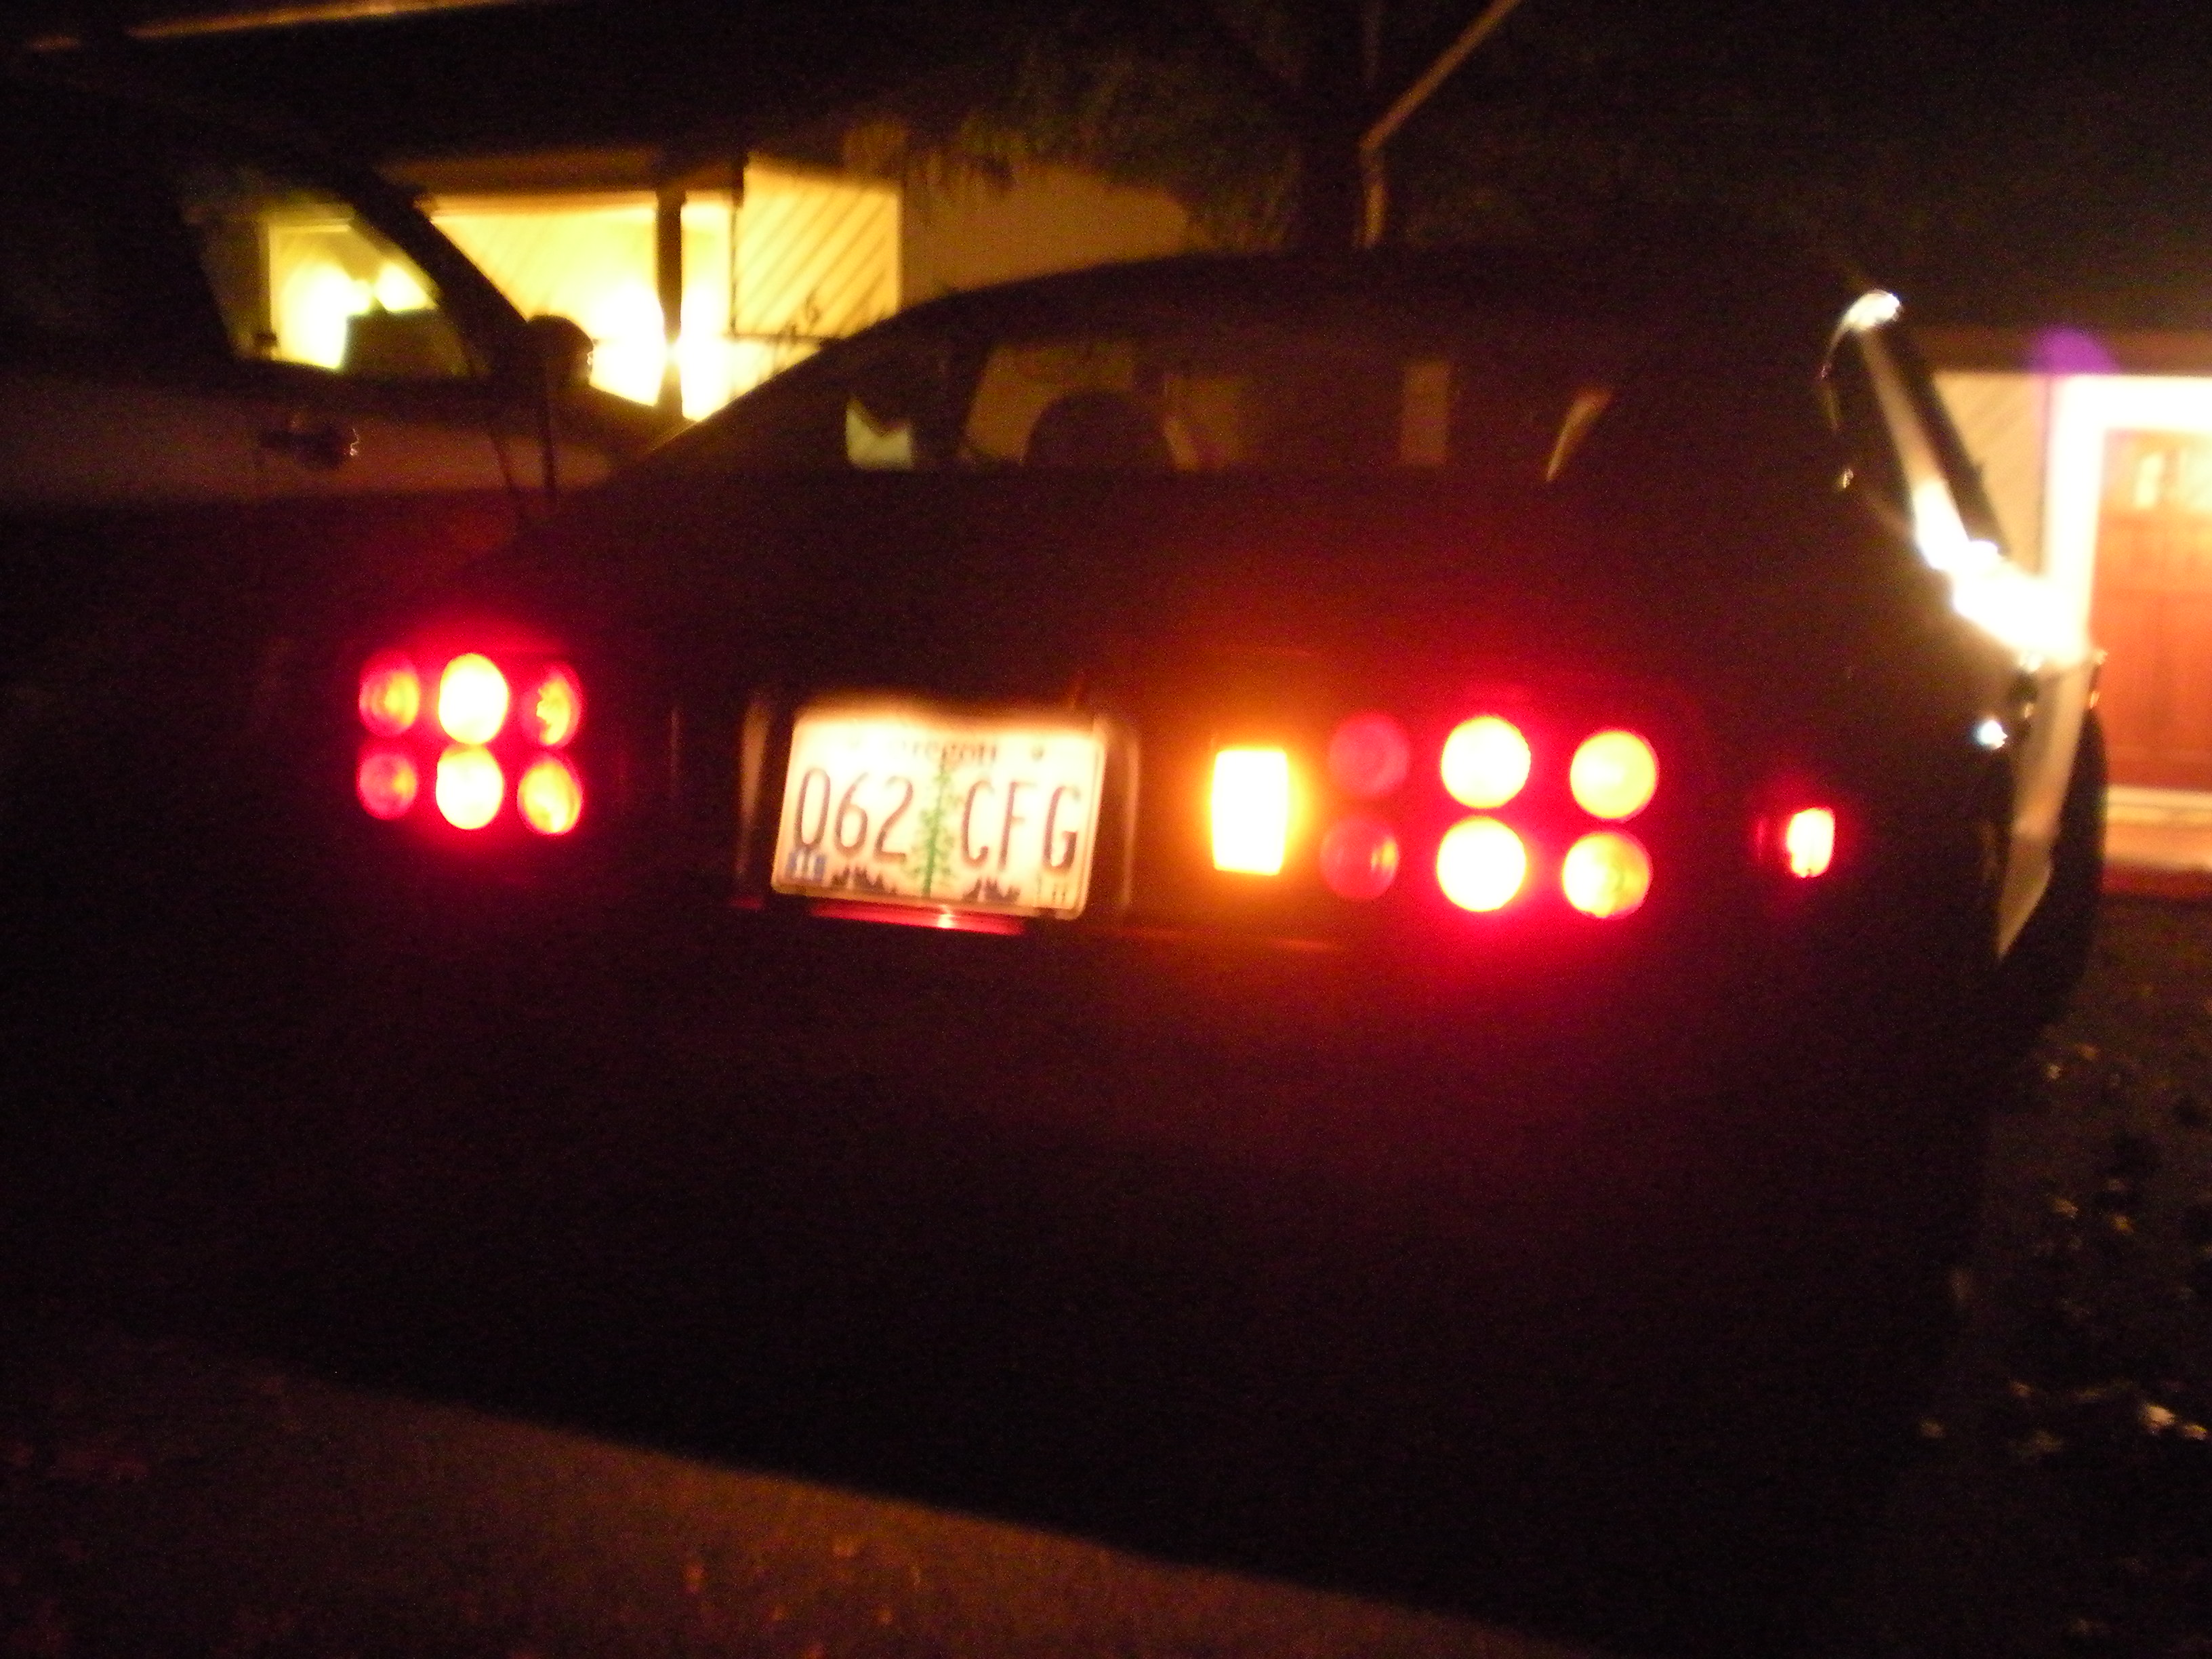
Hello HybridZ, I've been a member for a long time, always reading and learning, but today I finally decided to share something I made with all of you. About a year ago, I had the idea to replace the stock 280z taillights with six round lights per side, in a 3 over 3 configuration. I'd already rewired the brakes to light up both the upper and lower red lenses with the turn signals moved to the clear reverse light housing using amber bulbs all in preparation for this...I wanted a sort of jet fighter plane look. The lenses are simply trailer lights with the backs drilled off, and I dismantled the stock finishing bezel and cut a piece of plastic to fit where the chrome-like surround once was, then I epoxy'd that in and added bondo to smooth it out before painting. The hardest part was removing the stock lenses from the housing so I could bolt it all back together. Note to self: dremel and plastic do not mix. Anyway, it was a lot of work (my first time working with plastic, epoxy and bondo) and I may have to further modify the stock housing by adding a few more LED bulbs to even out the dispersement of light across all six lenses, but I wanted a unique look for the Z and this is a start. Please tell me what you all think of the new taillights! First pic is daylight just after the install. Second pic is straight on shot. Third is with the lights on. Fourth is with the brakes. And final shot is with the right blinker on.