

socorob
-
Posts
1123 -
Joined
-
Last visited
-
Days Won
4
Content Type
Profiles
Forums
Blogs
Events
Gallery
Downloads
Store
Posts posted by socorob
-
-

Anyone running rivals? I had my car up on the lift this weekend, and noticed all four were coming apart where the tread hit the sidewall. If you have them, check the inside as mine were only coming apart in the inside, the outsides were fine. Not sure which Tire I should replace these with, as these things had crazy good traction.
-
This was his answer, which I don't know how to respond to:
Thank you for contacting us, may i please have your VIN number, and your OEM part number to see what we have in stock.
-
I said do you have the faster ratio 240 rack?
-
I put one of these in another vehicle I had, I picked it up at a truck stop. The enclosure comes apart with screws so you can easily mount it to something, a bracket, the top of the glove box, Etc. On the first one I ever bought, the cigarette lighter plug on it broke. I hard-wired it in and it worked great.
-
I emailed that guy to see if he has any plans on reproducing the 240 rack.
-
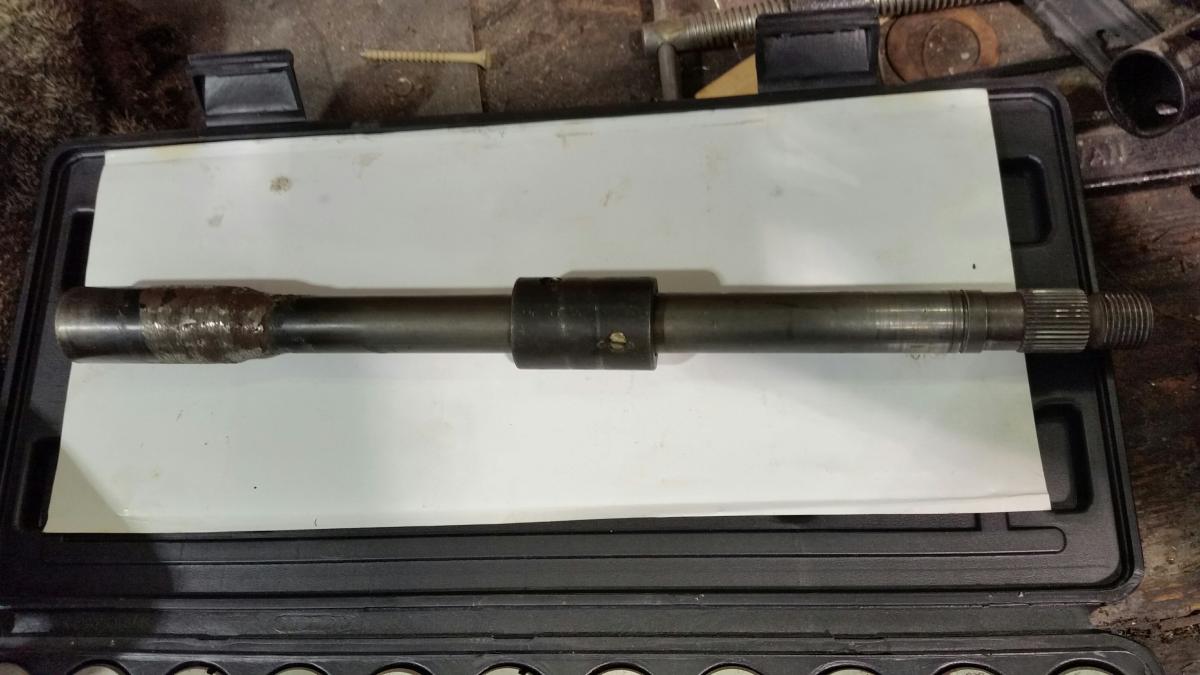
Yes, you can install a 240Z rack in a 280Z. You just have to use the 240Z bushings. I have the standard length steering arms, but have looked into using the quick steering arms.
With the 280Z rack, I felt the steering was too slow for autocross. So, I installed the 240Z rack and I am happy with the responsiveness of the steering. The steering effort did increase, but I do not find it difficult even with 10 inch slicks (at least while the car is moving). I do not try and turn the wheel with the car sitting still. It is my opinion that if you want to have faster steering than the 240Z rack with the standard arms and also have big sticky tires, then you will need power steering.
Do you know what year 240s have the quick rack? 260s?
-
If the shops there are like the shops here, they tend to just get things "in the green". They want to do the least possible and get you out the door.
-
Connected all the wires up except power. Made a little plate to cover where the sensor wires go into the motor. A 5/16-24 tap works in the holes already in the unit to bolt the plate to. Reinstall the little P shaped gasket back into it. By mounting the control box up high, I was able to plug the motor directly into the control box without having to lengthen the wires.
-
Thanks. I haven't driven it yet, so can't say if it's good or not. Hopefully I can get a chance to work on it an evening or 2 this week to get it finished to see how it drives. To me the steering was one of the few things that let the car down. What I would like to do is get a 240 rack (that is if they fit into a 280, does anyone know?), I have short knuckles waiting to go on, and get a smaller steering wheel to get quicker, easier steering in my car.
-
Is it possible to bolt a 240 rack in a 280? Would you use the 280 bushings or the 240 ones? If you had the 240 rack with the short steering arms and a shorter steering wheel, you would probably have some quick steering. I also wonder if there is any plans for this guy to make 240 racks?
-
-
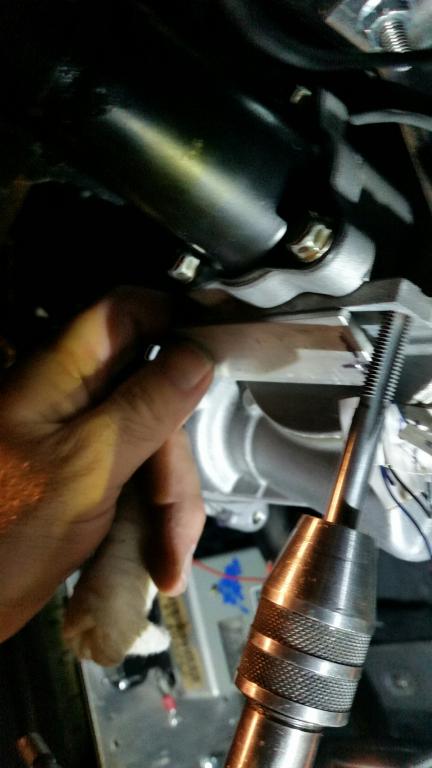
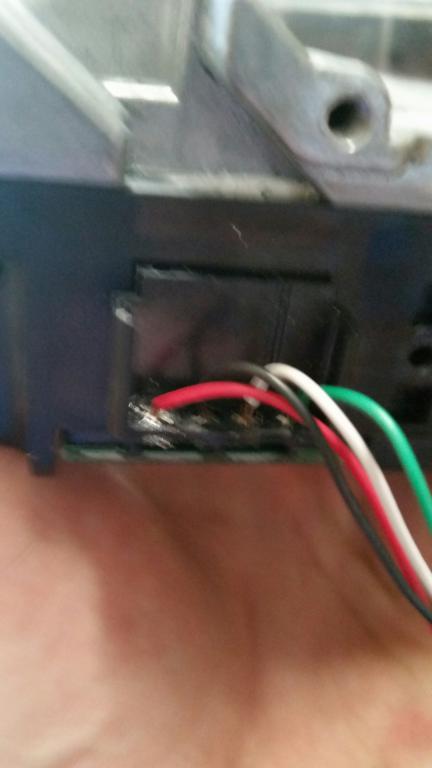
For a little more clearance, I removed the control box from the motor. I decided to desoldered the wires from the control board, to be able to leave them as long as possible coming out of the motor. MAKE SURE YOU MARK THESE WIRES AND NOT CROSS THEM, THE MOTOR WILL MALFUNCTION IF YOU DO AND TURN THE WRONG WAY AND DO WEIRD THINGS IF YOU DO. THERE ARE 4 WIRES, 2 BLUE, 2 BLACK, SO THEY ARE EASY TO MIX UP, SO TAKE YOUR TIME AND LABEL IT! I soldered some longer wires back onto the control board so they will reach from where I mount it to the motor.
I heat shrinked and used a zip tie with mounting screw hole to one of the allen head bolts to use as a strain relief.
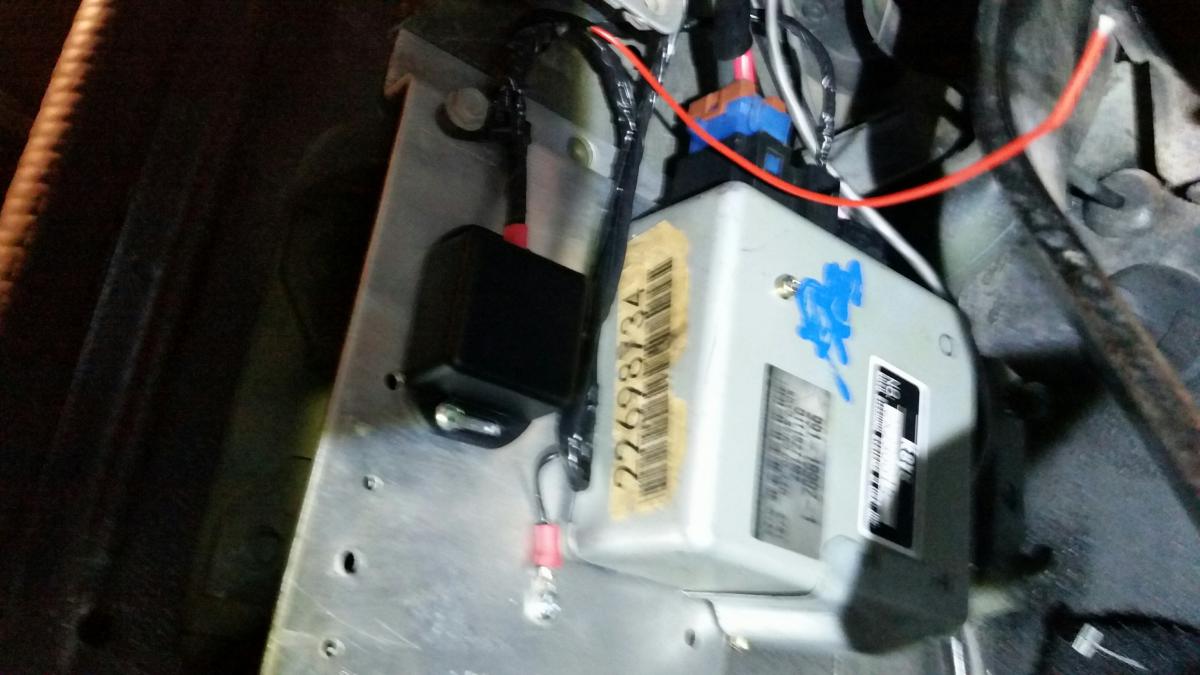
I had an aluminum plate laying around, so I bolted the control box to it, with heat sink paste between the box and the plate.
The box had heat sink paste between it and the motor, so I did the same. You will need a Bruno control box from Ebay. I mounted the plastic box for that on the same plate. Since I no longer have the factory ecu, I will try to mount it where that was under the plastic cover.
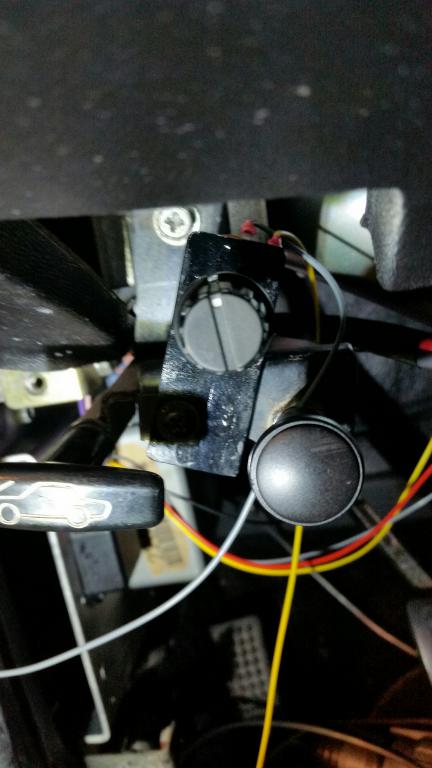
The Bruno controller come with a knob to adjust the amount of assist. I want to eventually put it in the dash where the factory trip reset was but now I just have an empty hole, since I'm using speedhut gauges. It's not long enough and would have to have a bracket made inside the dash frame to do this. I will leave enough slack in the wires just in case the dash ever needs to come out for anything, then I will mount it in there. For a temporary mount in the meantime, I made a bracket and mounted in to the bracket that holds the hood release and vent cable, using the screw that's between the 2 cables..
That's how far I got this weekend.
-
My attempt at electric power steering.
http://forums.hybridz.org/topic/127807-saturn-electric-power-steering-in-a-datsun-280z/?p=1194818
-
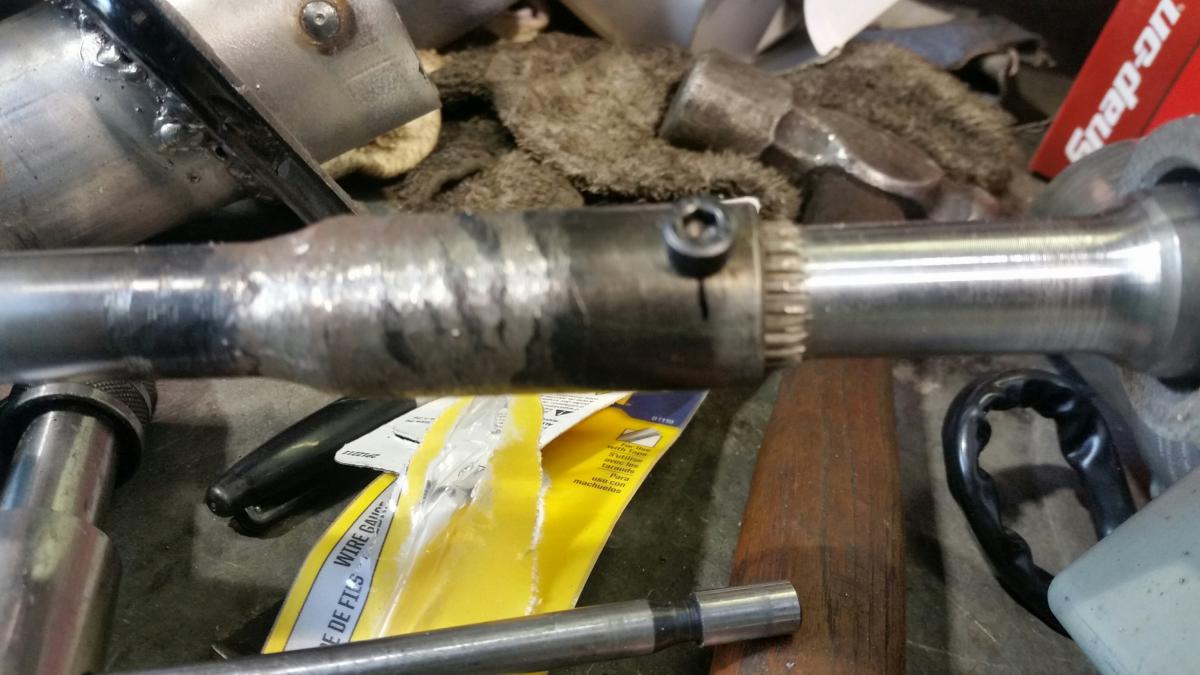
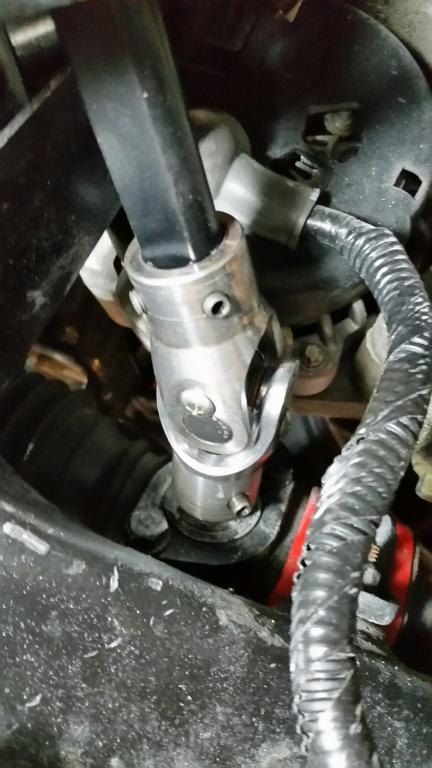
The column tubes need to be cut. Before removing the column from the car, trace the bolts that go through the U shaped clamps up into the dash, so you can mount the column while fitting everything into the exact same spot. You will notice that the Datsun steering wheel was installed crooked from the factory. If you try to straighten the wheel so its perpendicular to the center line of the car, you may not be able to get the plastic clamshell back around it without doing some trimming. While everything is apart, it's a good time to clean and grease the bearing and bushing. The Z tube is cut about 11 1/2" from the top down, and the Saturn is cut about 2 1/2" from the bottom up. The tubes slide into one another. I wrapped some tape around the Z tube to make it a tight centered fit. When it was ready to tack weld, I had it mounted on the motor with the steering shaft in place to help keep everything centered and straight. Nothing gets tacked until all the pieces are fitted together into the car and adjusted for perfect fit.
The Z steering shaft needs to be cut about 11-11 1/4" (lost my measurement) from the top down. The Saturn splined coupler needs to be cut off to use as a sleeve, 2" long. I got a drill bit that was just slightly smaller (1/32 or 1/64) smaller than the bottom of the Z shaft. I put the Z shaft in the freezer and heated up the Saturn coupler with a heat gun. Press the 2 pieces together, may require a rubber hammer, block of wood, etc. Make sure you figured out and mark the depth of how much the Z shaft has to go into the Saturn coupler, because once they are together, that's it, they are jammed and no getting them apart. If you have it correct, weld the pieces together. I used a 5 mm bolt (not pictured, I removed the allen head in the picture and used a regular bolt to drill through the Saturn coupler and tapped the hole, to use to keep the shaft from siding in and out The allen head was too tall and I wanted a little more clearance inside the tube).
Now put it all together in the car and clock, line everything up, get the motor where it needs to be, and put some tacks onto everything. It helps to have blocks of wood, etc to prop everything in place and at the right angles a depths. Make sure everything is absolutely perfect, then tack it up, remove from the car and weld. I had to get a new 5/8" outer snap ring from Ace hardware to use on the top of the column to hold the bushing in because the original one just bent out when I removed it and wouldn't snap back. When you're finished, it should look something like this. Reinstall into car. Put switches back on column before installing, you can't get to some of the screws once the column is in place. I used a piece of flat bar to make a bracket going from one of the bolts that hold the motor in place up to the steering support column for more bracing. You can also remove the bolts from the motor and spin it 180 degrees to get the power wires in a better place, if needed.
REMEMBER, THIS IS IN A 1978 WITH VINTAGE AIR AND JCI LS SWAP, NOT SURE IF THERE ARE ANY DIFFERENCES IN THE STOCK SETUP. IF YOU RELOCATE THE FLASHER AND BRACKET, YOU MAY NEED TO ADD A LITTLE LENGTH TO THE DD AND REMOVE SOME FROM THE SHAFT AND TUBE. ALWAYS TEST FIT THE PIECES BEFORE WELDING.
-
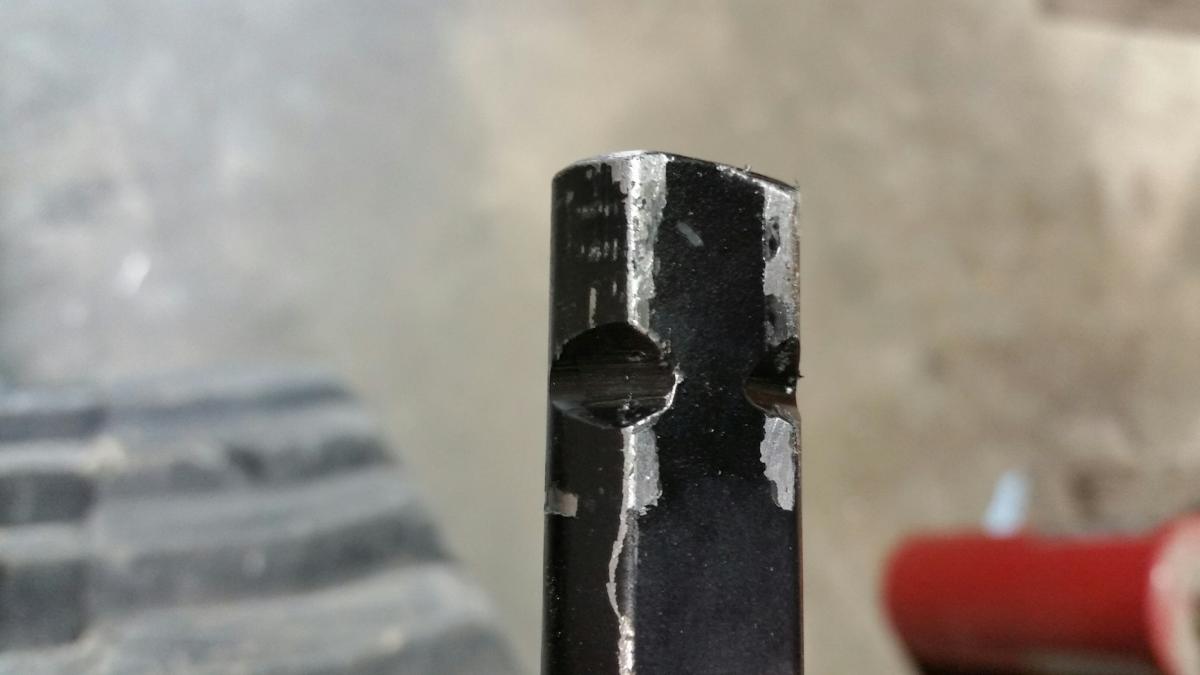
Next I cut a piece of DD rod 17 5/8" long. 2 notches need to be made for the set screws on the woodward ujoint and 1 notch for the bolt on the other end for the saturn ujoint.
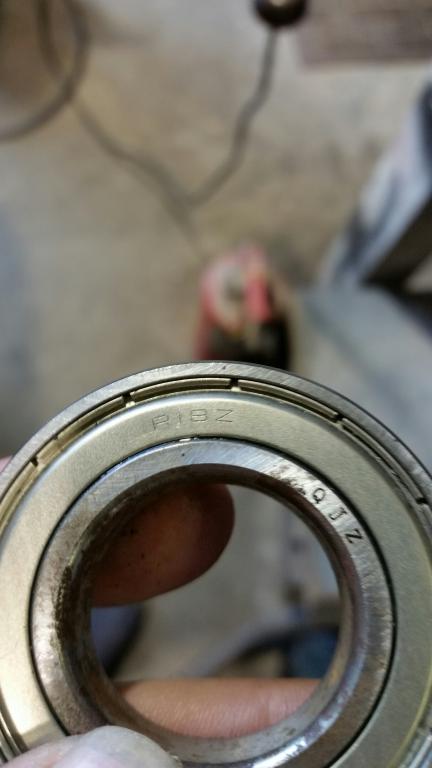
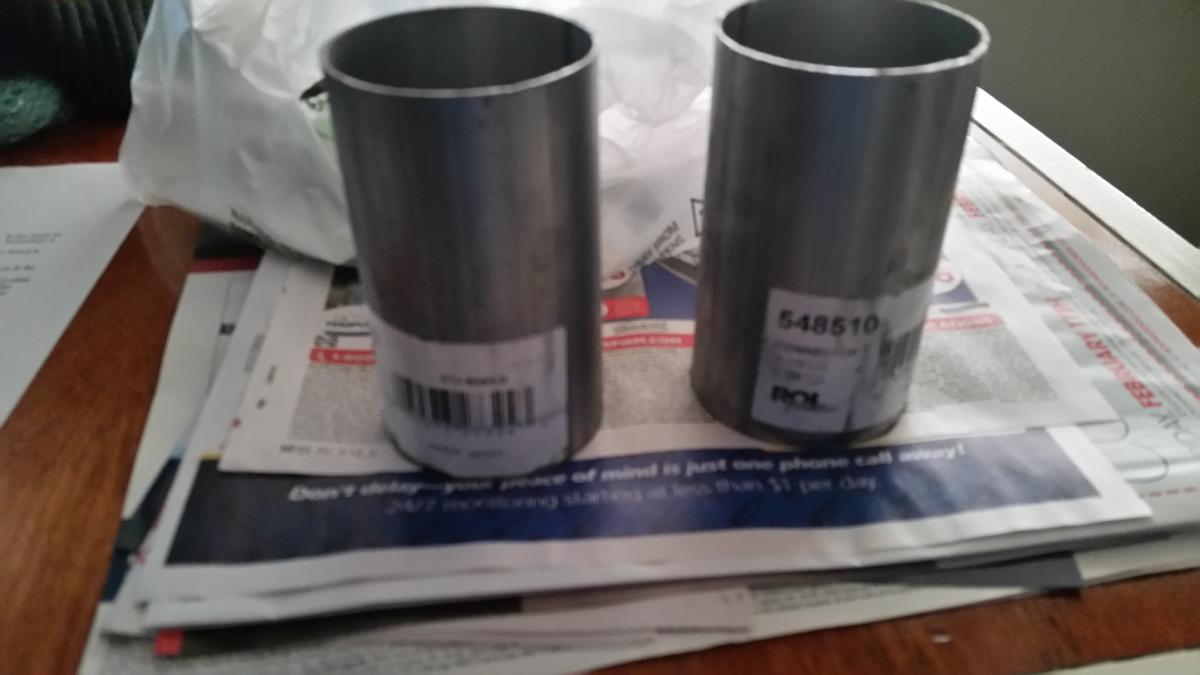
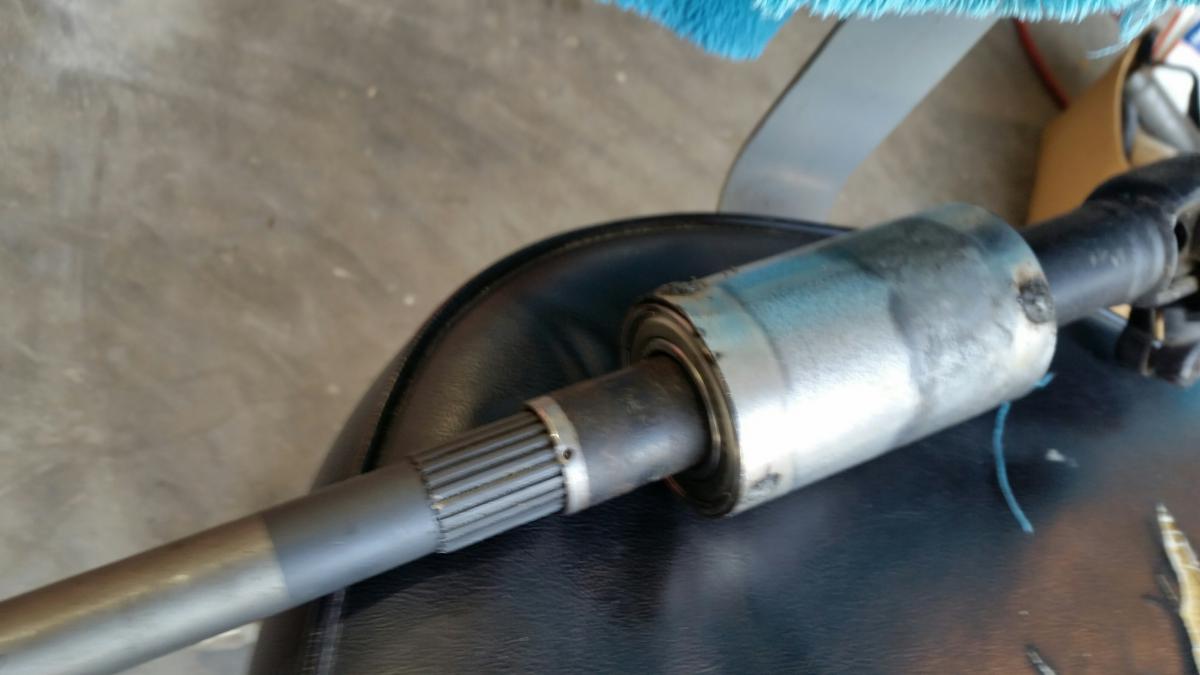
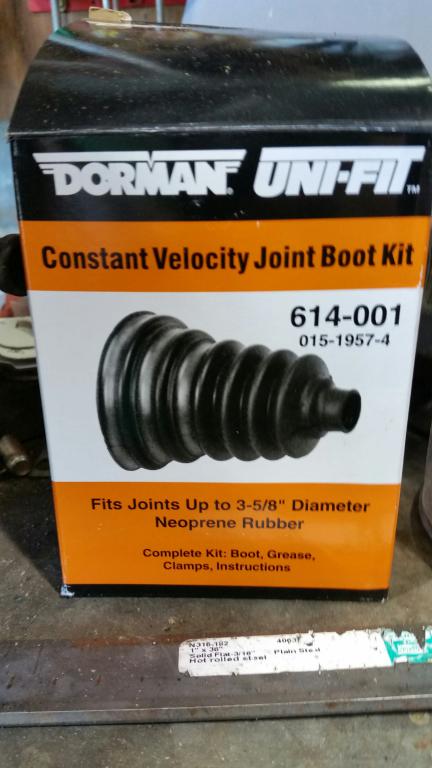
The Saturn lower collapsible shaft has a small punch on it the keeps the 2 parts from separating. Bend that up slightly to separate the 2 parts. You will re punch it when you're finished. Pull them apart to pass through the firewall. You have to take the Z plate and cut the pipe out that passes through it to eventually weld on a ROL 548510 from O'Reillys. Inside that will be 2 R18Z bearings tacked at each end of the pipe. Tack the bearings with the Saturn shaft in place to make sure things stay straight. I drilled 3 small holes around each edge and did small tack with a wet rag to cool it quickly. A Dorman 614.001 boot that's cut to fit with just a narrow hose clamp on the big side and no clamp on the small side so the shaft can spin freely will help keep out water, dirt and hot air.
-
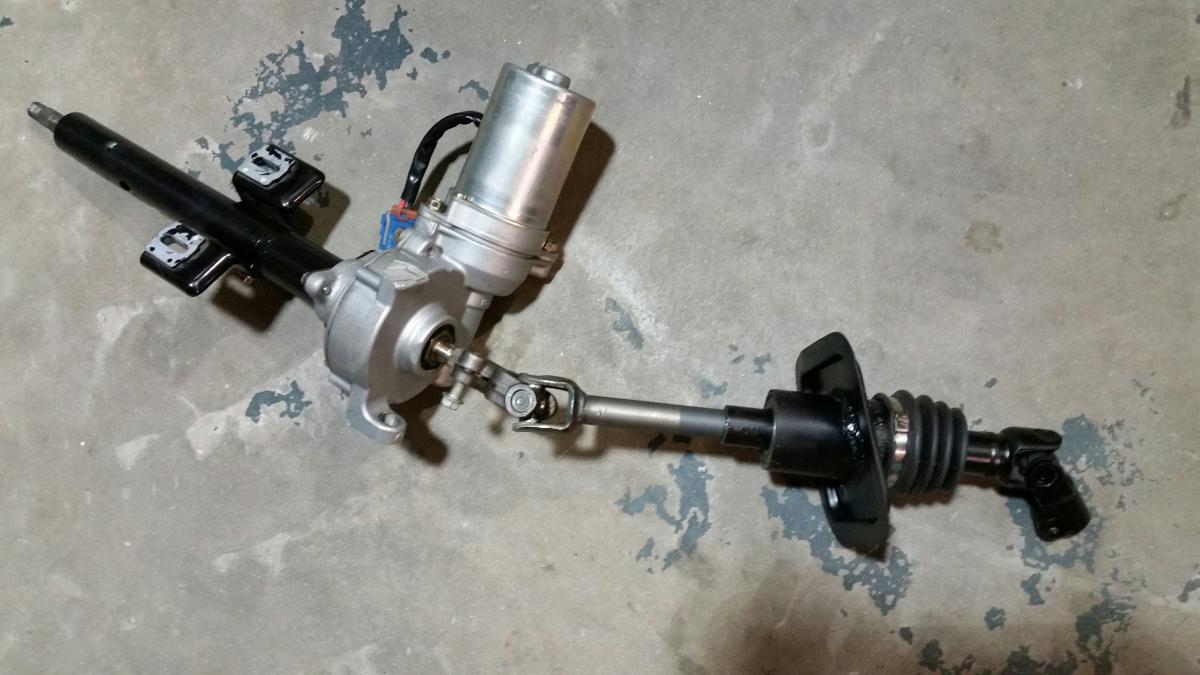
After having and moving all the parts around my garage multiple times for about a year, I finally got some of that motivation to try to see if I could get the Saturn electric power steering into my Z. Mine is an LS swap with vintage air so not sure if the under dash or under hood part will work with a stock engine or not. Also so far this weekend I only got the fab part complete and only turned the wheel back and forth in place, I haven't driven it yet, or wired it. My goal was to get all the parts in without cutting any parts of the structure of the car and have no welded parts on the torque side of the motor. It can only fit in 1 spot, with absolutely no play in any direction, clocked around 10:00. If you were to relocate the flasher that's behind the AC vent and remove the bracket holding it, it would give you another 1/4" space fore and aft and probably let you clock it to about 11:00. Hopefully once it's completed, it will drive well. I will start at the steering rack and work up from there.
Parts used:
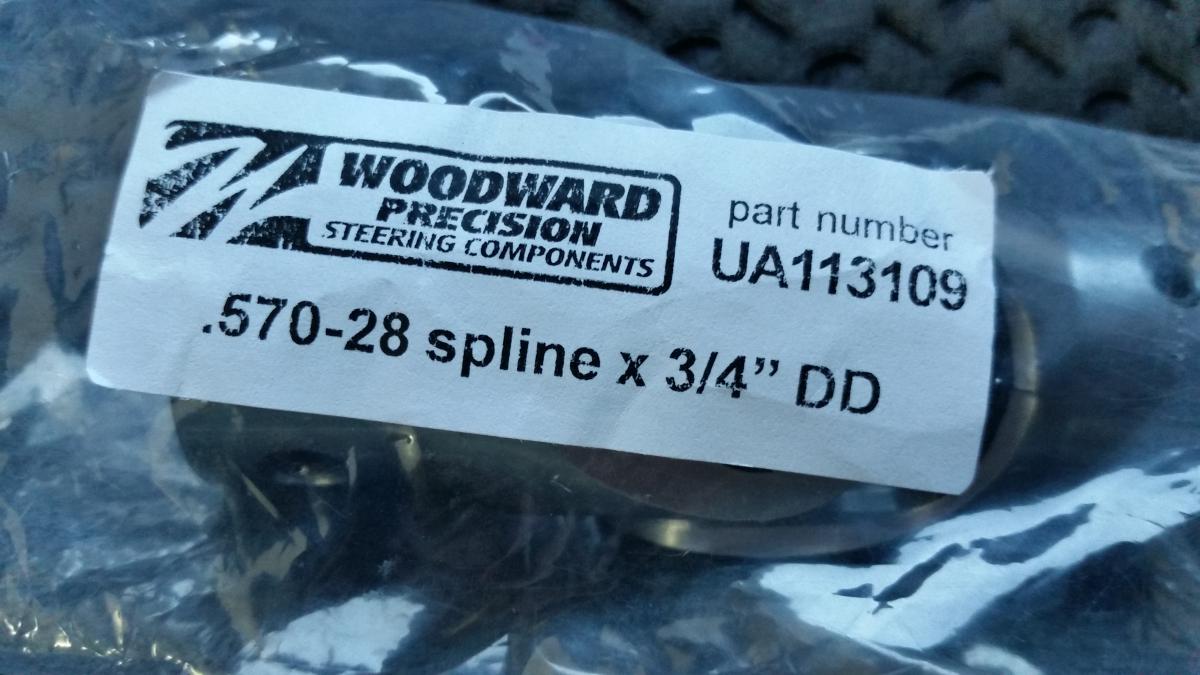
Woodward UA113109 Datsun U joint
DD shaft
Dorman 614-001 uni-fit cv joint boot (autozone)...2 if you want to put one on the inside of the firewall also to dress it up
Hose clamp
ROL exhaust tubing 548510 (O'Reillys)
2 R18Z bearings (Ebay)
Saturn Vue steering column with metal control box (not plastic one) 2002-2007
Bruno controller (Ebay) http://www.ebay.com/itm/Saturn-Vue-Chevy-Equinox-electric-power-steering-controller-EPAS-/122354361512?hash=item1c7ce364a8:g:I7AAAOSw0cdZfi49&vxp=mtr
Hardened bolt for set screw
5/8 outer snap ring (Ace Hardware)
Miscellaneous parts:
primer, paint, bolts, welding wire, flat bar, etc.
I got the woodward UA113109 universal joint to connect to the Datsun rack and convert it to DD steering rod.
-
Also you can get carpet with mass backing to help even more. I think the place was called auto interiors? that sells it. They are in Alabama. They have a sound deadener built on the back of the carpet.
-
I did the whole bottom side of the car on the outside, and the whole inside of the car. It quieted it up a lot too. Make sure you apply them in the correct order. I used fatmat on my last car, some peel and stick crap. That was a huge PITA to install, you can't put it on the outside, and it's hard to cover weird shapes without overlapping, plus if like the factory stuff, if it gets an air bubble in it and moisture gets in, it will never come out and rust the car from under the mat.
-
They make a flextex for texture, but the problem is the dash is going to crack in new places after a while. Mine is holding up great where I repaired it, but is cracking in places where there is still old plastic.
-
I used the lizard skin sound and heat, blocks a ton of heat, and is very light. You also get 100% coverage because you spray it on. Did my whole car inside and out 2 coats. After taping and foiling it up takes about 15- 20 min to do a coat.
-
Call markmonitor up and tell them their analytics sucks and to whitelist your ads. It must have been a certain word combination you used that triggered this.
-
Call them up, whois shows a phone number.
Updated 1 second ago
DOMAIN INFORMATIONDomain:mm-nissan.comRegistrar:MarkMonitor Inc.Registration Date:2013-10-07Expiration Date:2017-10-07Updated Date:2015-09-06Status:clientDeleteProhibited
clientTransferProhibited
clientUpdateProhibitedName Servers:ns1.markmonitor.com
ns2.markmonitor.com
ns3.markmonitor.com
ns4.markmonitor.com
ns5.markmonitor.com
ns6.markmonitor.com
ns7.markmonitor.comREGISTRANT CONTACTName:Nissan North America IncOrganization:Nissan North America, IncStreet:1 Nissan Way,City:FranklinState:TNPostal Code:37067Country:USPhone:+1.6157255164Email:@mm-nissan.comADMINISTRATIVE CONTACTName:Nissan North America IncOrganization:Nissan North America, IncStreet:1 Nissan Way,City:FranklinState:TNPostal Code:37067Country:USPhone:+1.6157255164Email:@mm-nissan.comTECHNICAL CONTACTName:Nissan North America IncOrganization:Nissan North America, IncStreet:1 Nissan Way,City:FranklinState:TNPostal Code:37067Country:USPhone:+1.6157255164Email:@mm-nissan.comRAW WHOIS DATADomain Name: mm-nissan.com
Registry Domain ID: 1830266012_DOMAIN_COM-VRSN
Registrar WHOIS Server: whois.markmonitor.com
Registrar URL: http://www.markmonitor.com
Updated Date: 2017-07-02T04:00:13-0700
Creation Date: 2013-10-07T12:57:27-0700
Registrar Registration Expiration Date: 2017-10-07T00:00:00-0700
Registrar: MarkMonitor, Inc.
Registrar IANA ID: 292
Registrar Abuse Contact Email:@markmonitor.com
Registrar Abuse Contact Phone: +1.2083895740
Domain Status: clientUpdateProhibited (https://www.icann.org/epp#clientUpdateProhibited)
Domain Status: clientTransferProhibited (https://www.icann.org/epp#clientTransferProhibited)
Domain Status: clientDeleteProhibited (https://www.icann.org/epp#clientDeleteProhibited)
Registry Registrant ID:
Registrant Name: Nissan North America Inc
Registrant Organization: Nissan North America, Inc
Registrant Street: 1 Nissan Way,
Registrant City: Franklin
Registrant State/Province: TN
Registrant Postal Code: 37067
Registrant Country: US
Registrant Phone: +1.6157255164
Registrant Phone Ext:
Registrant Fax:
Registrant Fax Ext:
Registrant Email:@mm-nissan.com
Registry Admin ID:
Admin Name: Nissan North America Inc
Admin Organization: Nissan North America, Inc
Admin Street: 1 Nissan Way,
Admin City: Franklin
Admin State/Province: TN
Admin Postal Code: 37067
Admin Country: US
Admin Phone: +1.6157255164
Admin Phone Ext:
Admin Fax:
Admin Fax Ext:
Admin Email:@mm-nissan.com
Registry Tech ID:
Tech Name: Nissan North America Inc
Tech Organization: Nissan North America, Inc
Tech Street: 1 Nissan Way,
Tech City: Franklin
Tech State/Province: TN
Tech Postal Code: 37067
Tech Country: US
Tech Phone: +1.6157255164
Tech Phone Ext:
Tech Fax:
Tech Fax Ext:
Tech Email:@mm-nissan.com
Name Server: ns5.markmonitor.com
Name Server: ns4.markmonitor.com
Name Server: ns2.markmonitor.com
Name Server: ns7.markmonitor.com
Name Server: ns1.markmonitor.com
Name Server: ns6.markmonitor.com
Name Server: ns3.markmonitor.com
DNSSEC: unsigned
URL of the ICANN WHOIS Data Problem Reporting System: http://wdprs.internic.net/
>>> Last update of WHOIS database: 2017-07-27T13:28:44-0700 <<<
The Data in MarkMonitor.com's WHOIS database is provided by MarkMonitor.com for
information purposes, and to assist persons in obtaining information about or
related to a domain name registration record. MarkMonitor.com does not guarantee
its accuracy. By submitting a WHOIS query, you agree that you will use this Data
only for lawful purposes and that, under no circumstances will you use this Data to:
(1) allow, enable, or otherwise support the transmission of mass unsolicited,
commercial advertising or solicitations via e-mail (spam); or
(2) enable high volume, automated, electronic processes that apply to
MarkMonitor.com (or its systems).
MarkMonitor.com reserves the right to modify these terms at any time.
By submitting this query, you agree to abide by this policy.
MarkMonitor is the Global Leader in Online Brand Protection.
MarkMonitor Domain Management
MarkMonitor Brand Protection
MarkMonitor AntiPiracy
MarkMonitor AntiFraud
Professional and Managed Services
Visit MarkMonitor at http://www.markmonitor.com
Contact us at +1.8007459229
In Europe, at +44.02032062220
For more information on Whois status codes, please visit
https://www.icann.org/resources/pages/epp-status-codes-2014-06-16-en
related domain names -
It must not be that hard, I was in VA about a month ago, and the 2 supercars I saw there had Montana plates too.
http://www.thetruthaboutcars.com/2013/02/exotic-cars-and-montana-plates/ -
At least its the same size threads. You can just gets 2 of the same tie rods. Does the input spline appear to be the same, and are there any markings showing who manufactures them and where?


 @mm-nissan.com
 @markmonitor.com
BF Goodrich Rival Problems
in Brakes, Wheels, Suspension and Chassis
Posted
They are almost 3 years old with 4000 miles, give or take, on them. Tire rack said they would pro rate them based on age and treadwear. I only have about 3/16" of tread in the middles of them all left. . I would have to mail them back and pay I think they said $7 a tire charge. I can't decide whether to go back with these or try something else.