
Tony D
-
Posts
9963 -
Joined
-
Last visited
-
Days Won
74
Content Type
Profiles
Forums
Blogs
Events
Gallery
Downloads
Store
Posts posted by Tony D
-
-
Yeah, reading through this, I was going to say 'it depends on what type of torch you use'...then I realized even my best turbo torch was marginal on heavier castings, but when I screwed my yellow MAPP gas on the dual-gas body it was no problem!
Another thing, like John C suggests and which is smart on any casting is oven preheating. But this can go away quickly if you aren't in a SHELTERED place without breezes.
Combat this with a cheap Harbor Freight 1100F Electric Heat Gun and have it blowing into your preheated casting. This will keep the plenum area VERY hot.
I'd still used MAPP Gas since it works so well. But you can really start moving on a lot of areas with that preheated casting and the heat gun putting so much temperature in from the inside out.
-
I used one of the "Nissan Style" side-mount stands when I lived in Japan. I found it very stable and the engine didn't 'spring' when you were working out on the end near the water pump.
Makes blocking the crank very easy as well.
-
GREAT TO SEE YOU BACK!
And progress from the 'little shed'!

Does your boss watch you do this at work?
"I know where that car came from!"
-
Seal the front end save for a 2X4 bottom breather opening above the front splitter, below the bumper line.
Seal the bottom of the engine bay similar to the Z432 FRP Undertray, and at the rear near the differential duct all that air up through the floor over your radiator, and out your back window area.
In land speed racing this would be what EVERYBODY would do if it wasn't specifically forbidden!
There is nothing wrong with letting air into the engine bay, as long as you can vent it to an area of low pressure. That back hatch area is one big super sucker...
Insulate your tunnel VERY well.
Run synthetic oil, and a tranny/differential oil pump and cooler setup.
That should do it!
Second alternative: Radical slant-nose treatment on the front end, and a pair of Small Car Radiators under the master vac and battery venting to the front fenderwells. Same sealing treatment under the engine, and at the firewall to force all air through the pair of radiators.
-
The accel pumps move HUGE fuel. I'm on board with JM's comments 100%. It follows with everything I've seen through the years. People always undersize that idle pilot jet. You can make the mains larger, but they still don't 'tip in' until around 3K putting this 2500 stumble directly still on the pilot jet.
The Japanese guys were like mantra "main jet over 3000, pilot below"....
Remember these are OEM Street-Driveable Carbs. To get any kind of fuel economy (like EFI with closed loop) you run on the smallest jet you can and the lowest throttle opening you can. If your cam is 'coming on' at a low rpm and your idle vacuum goes UP at off-idle speeds then you start drawing VERY HARD on that pilot jet---and while you get more fuel, you get a LOT more air through that fixed bleed. The only adjustment you have for that is to make the gasoline jet bigger to compensate.
You could try to tweak your float level, but at this point, with you making progress and being able now to see changes in the direction you want to go with the jetting, I'd 'stay the course' and keep going in that direction.
With that main jet selection you will be set for a variety of engine configurations!
-
hehehe!
"It Begins"
The "Blue Turd" you saw me driving around in is basically my only car as well. In order for me to pursue similar endeavors, I've figured I'm going to get a BMW E36 to drive daily when in town so when I'm there in the states, I can start an involved mechanical project and if something comes up....I CAN LET IT SIT FOR THREE MONTHS till I return and have the time to properly address it and not simply rush to cobble it together because I got to get to work on Monday.
I know your pain, man! I know your pain!
I did happen to uncover an Autobox next to the grey container under the weeds. I'll look into it to see where it came from... I gave the last two away for $75---one N/A and one from a great running 83 L28ET that I was doing rally jumps through my wash in the back yard before I cut it up and took the driveline to use! No plans to do that with my 4N71's but who knows....
-
I follow the Kenya Rally as a chassis I supplied through Z-Spec here in Sint-Odenerode Netherlands was apparently prepped and has competed there since 2009. That is what his company does, competition preparation for Classic Racing and Rally. Paris-To-Dakar kind of stuff.
The 240/60/80 is a tough chassis, it's not so much needing heavier metal on the underlying structures, but properly stich-welding the seams, and getting the skid plates right.
You guys would probably hang me if you knew what I've done to my Z's offroad. As a kid, I would go out into the forest to watch the night stages of the POR in Michigan. I found the mix of cars, from factory fire breathing superpowered monsters, to stock VW Rabbits with exhausts ripped off and what sounded like two burned valves being driven at 110% down narrow dirt roads with trees inches away addictive. Somewhere, I have Super8 25' reels of Ektrachrome... on these reels there are clips of a dark green 1969 Corvair Monza getting air over a particular stretch of road near Michigan's Silver Valley Recreation Area. I came to the realization that once we had optimized the speed to gain maximum altitude on this particular area...there appeared to be enough clearance to actually lay on the road, where the car would easily clear you in both vertical and horizontal planes...
The last clip on that film was of the front end of a Dark Green 1969 Corvair Monza launching over the cameraman, the undercarriage of the car, and a nice 'from the rear at ground level' shot of the landing. All the driver said was "Where were you shooting from? I didn't see you when I launched." Oh, wait till you see the shot, I got it, it's perfect!
When we viewed that, my mother was walking by as everybody was shouting....and the reel went into hiding very quickly! It was viewed sporadically over the next couple of years. I think the Adults thought it was some California Stag Film.
In a way, it was the forerunner of today's Gonzo Themed Porn....Our Gonzo Rally-Car Porn!
Kids, Don't Try This on Your Own...
Oh, and the driver about FREAKED when he saw it. "YOUCRAZYSONOFABITCHYOUWERELAYINGINTHEROADBEYONDTHERISE?!?!?!?!?!"
Yeah, your point being?
-
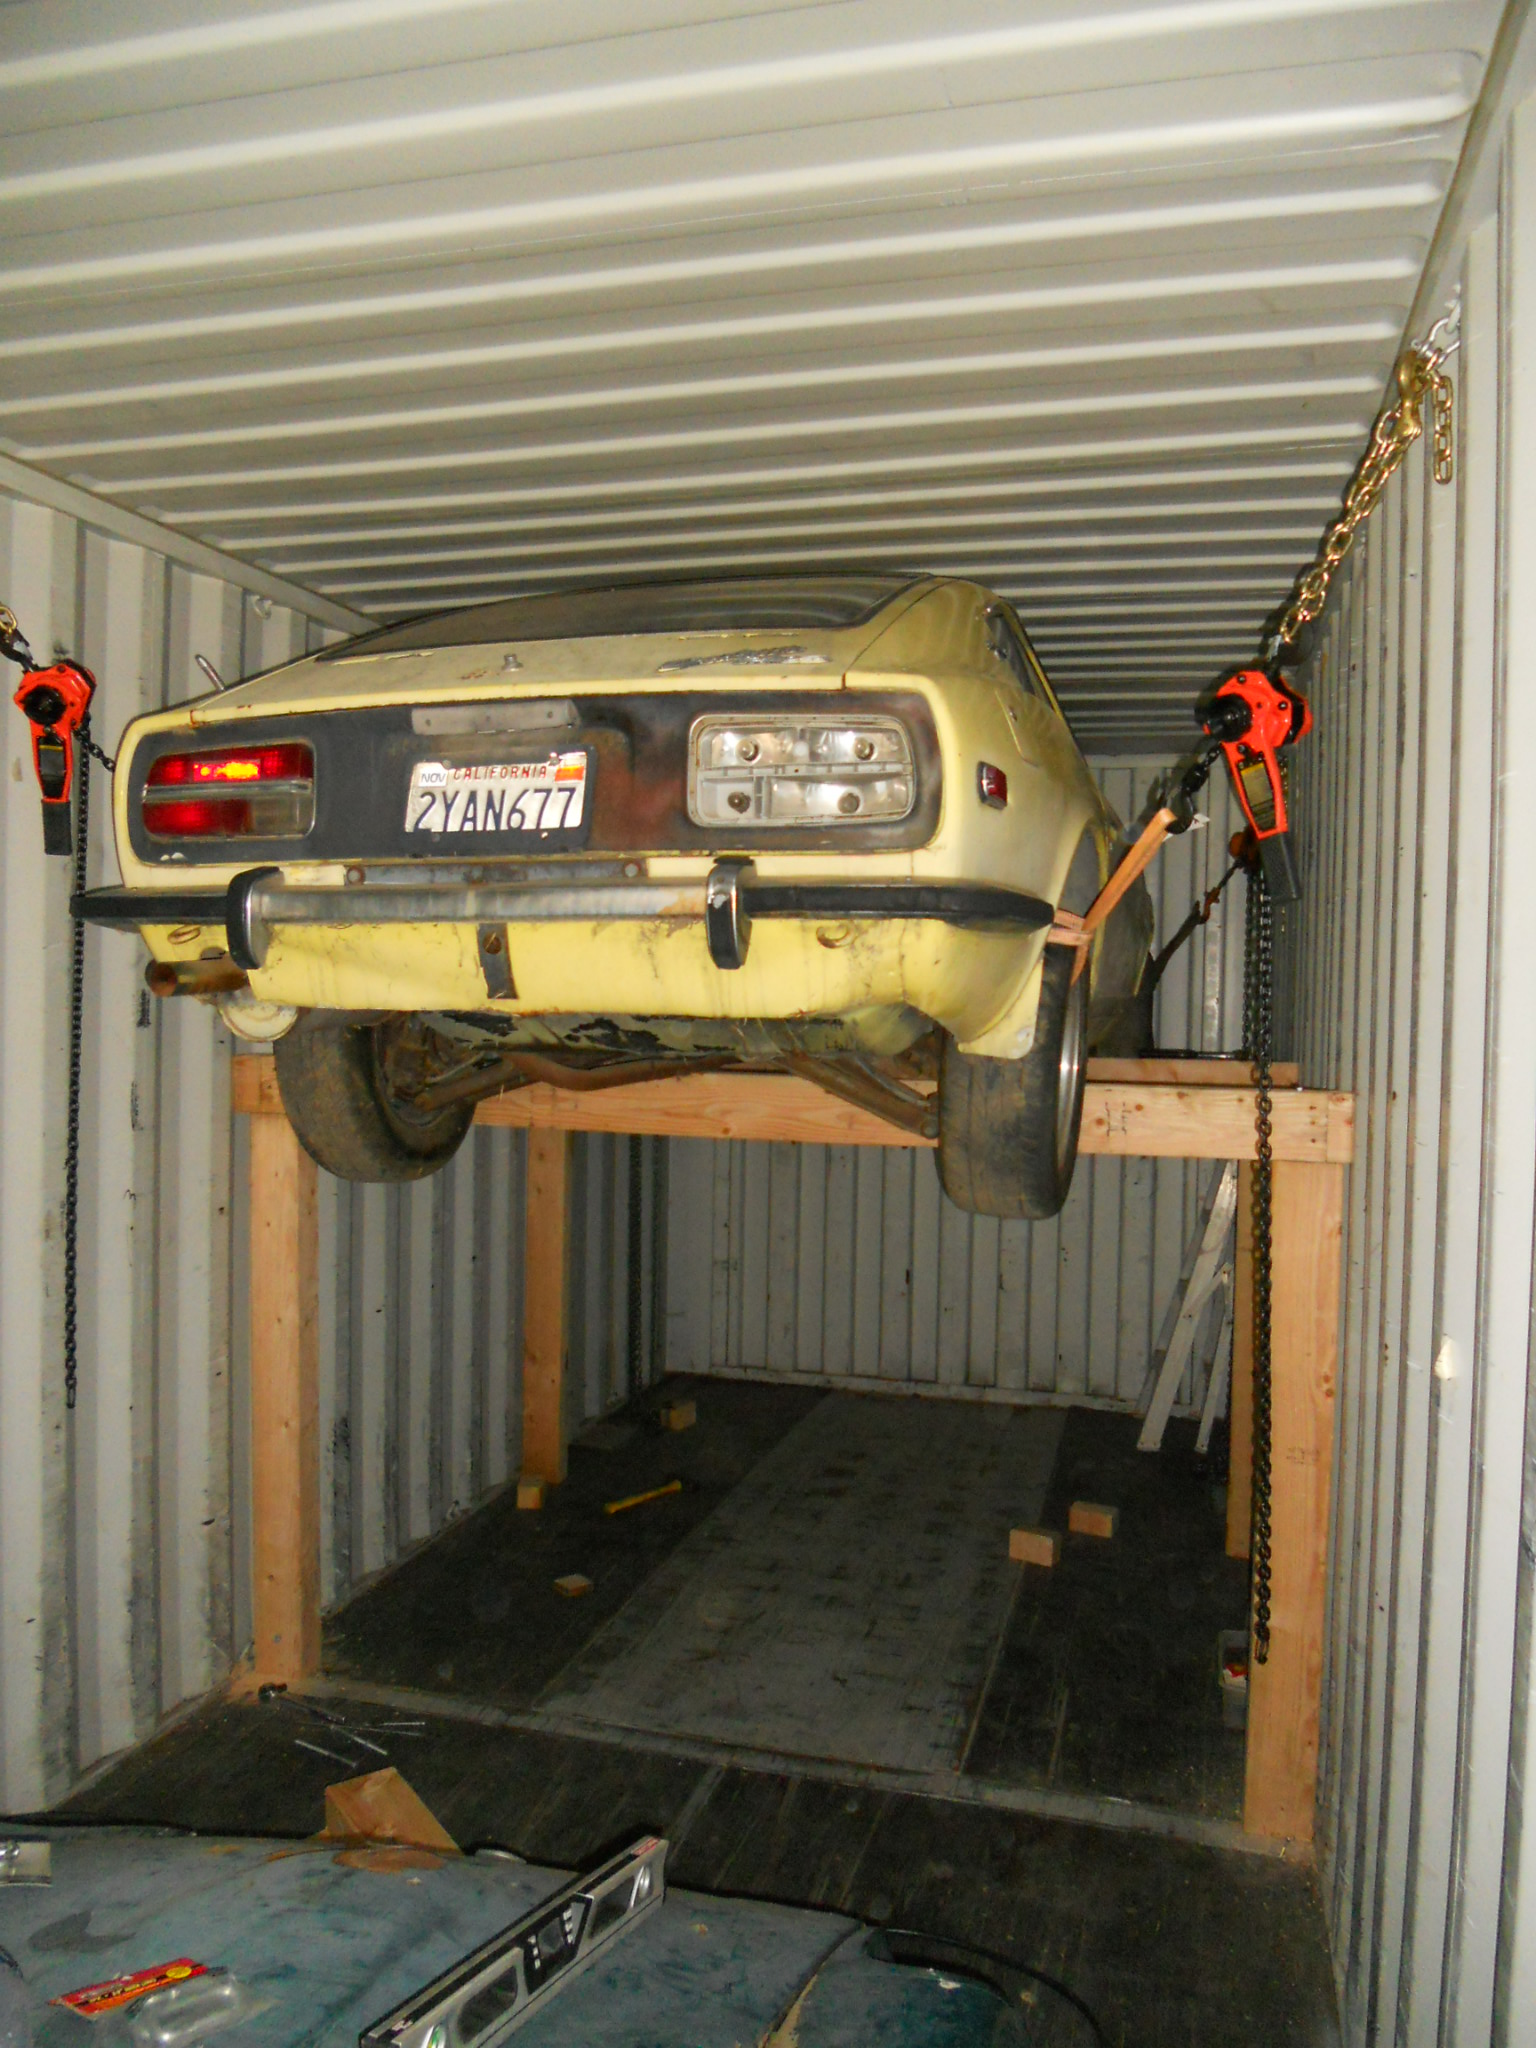
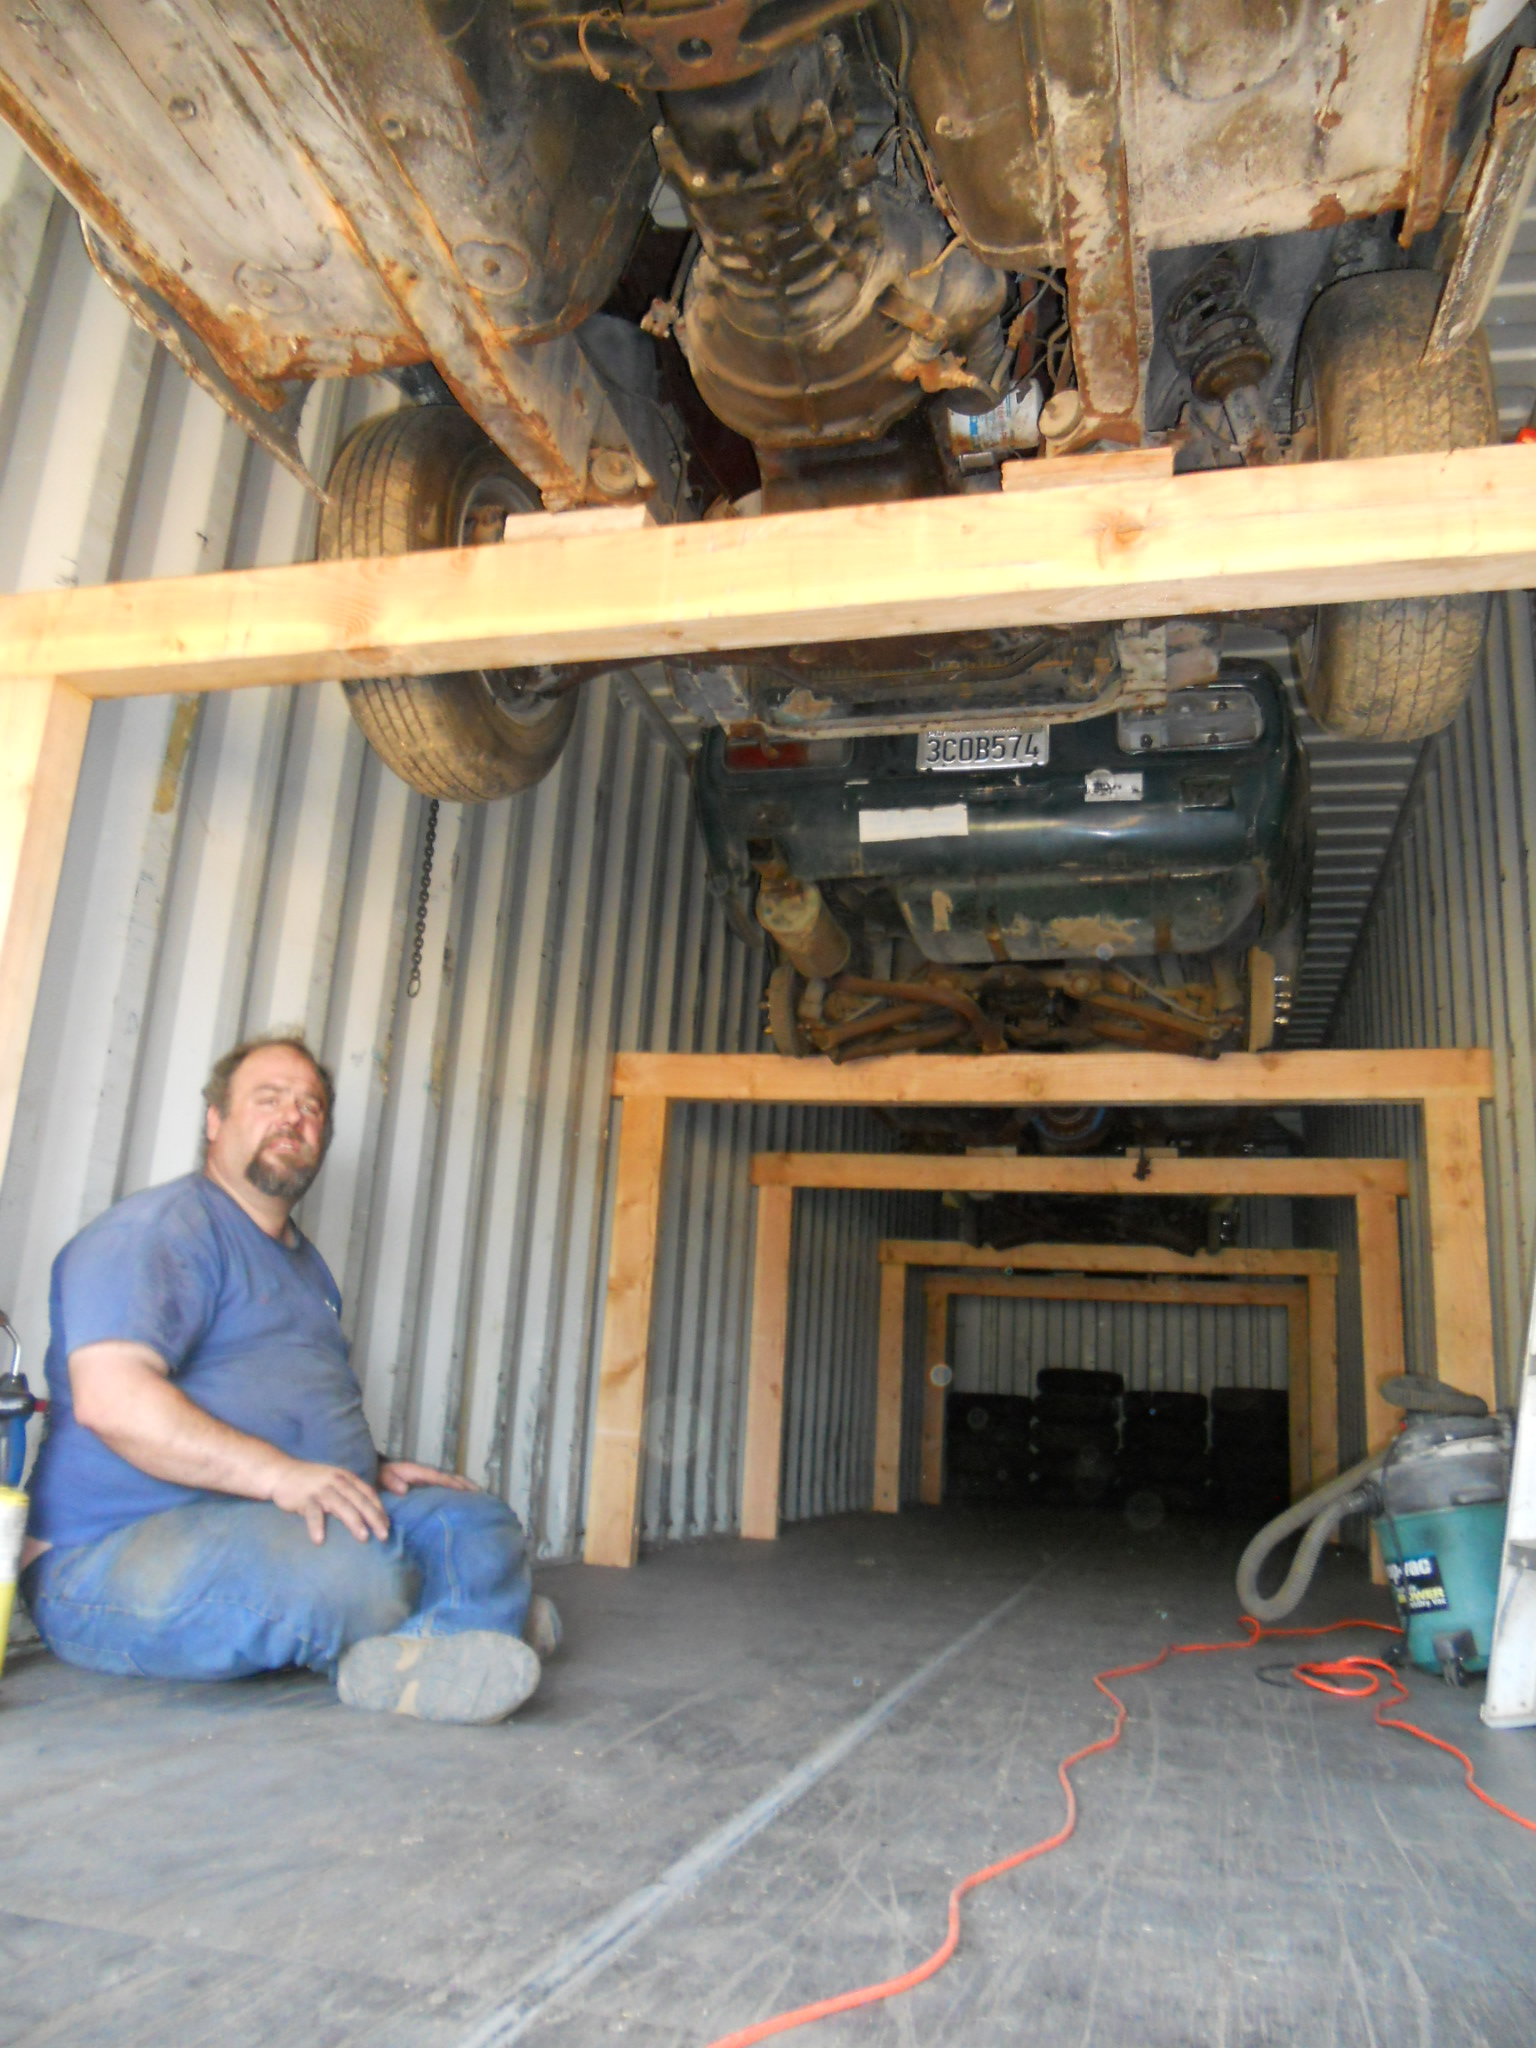
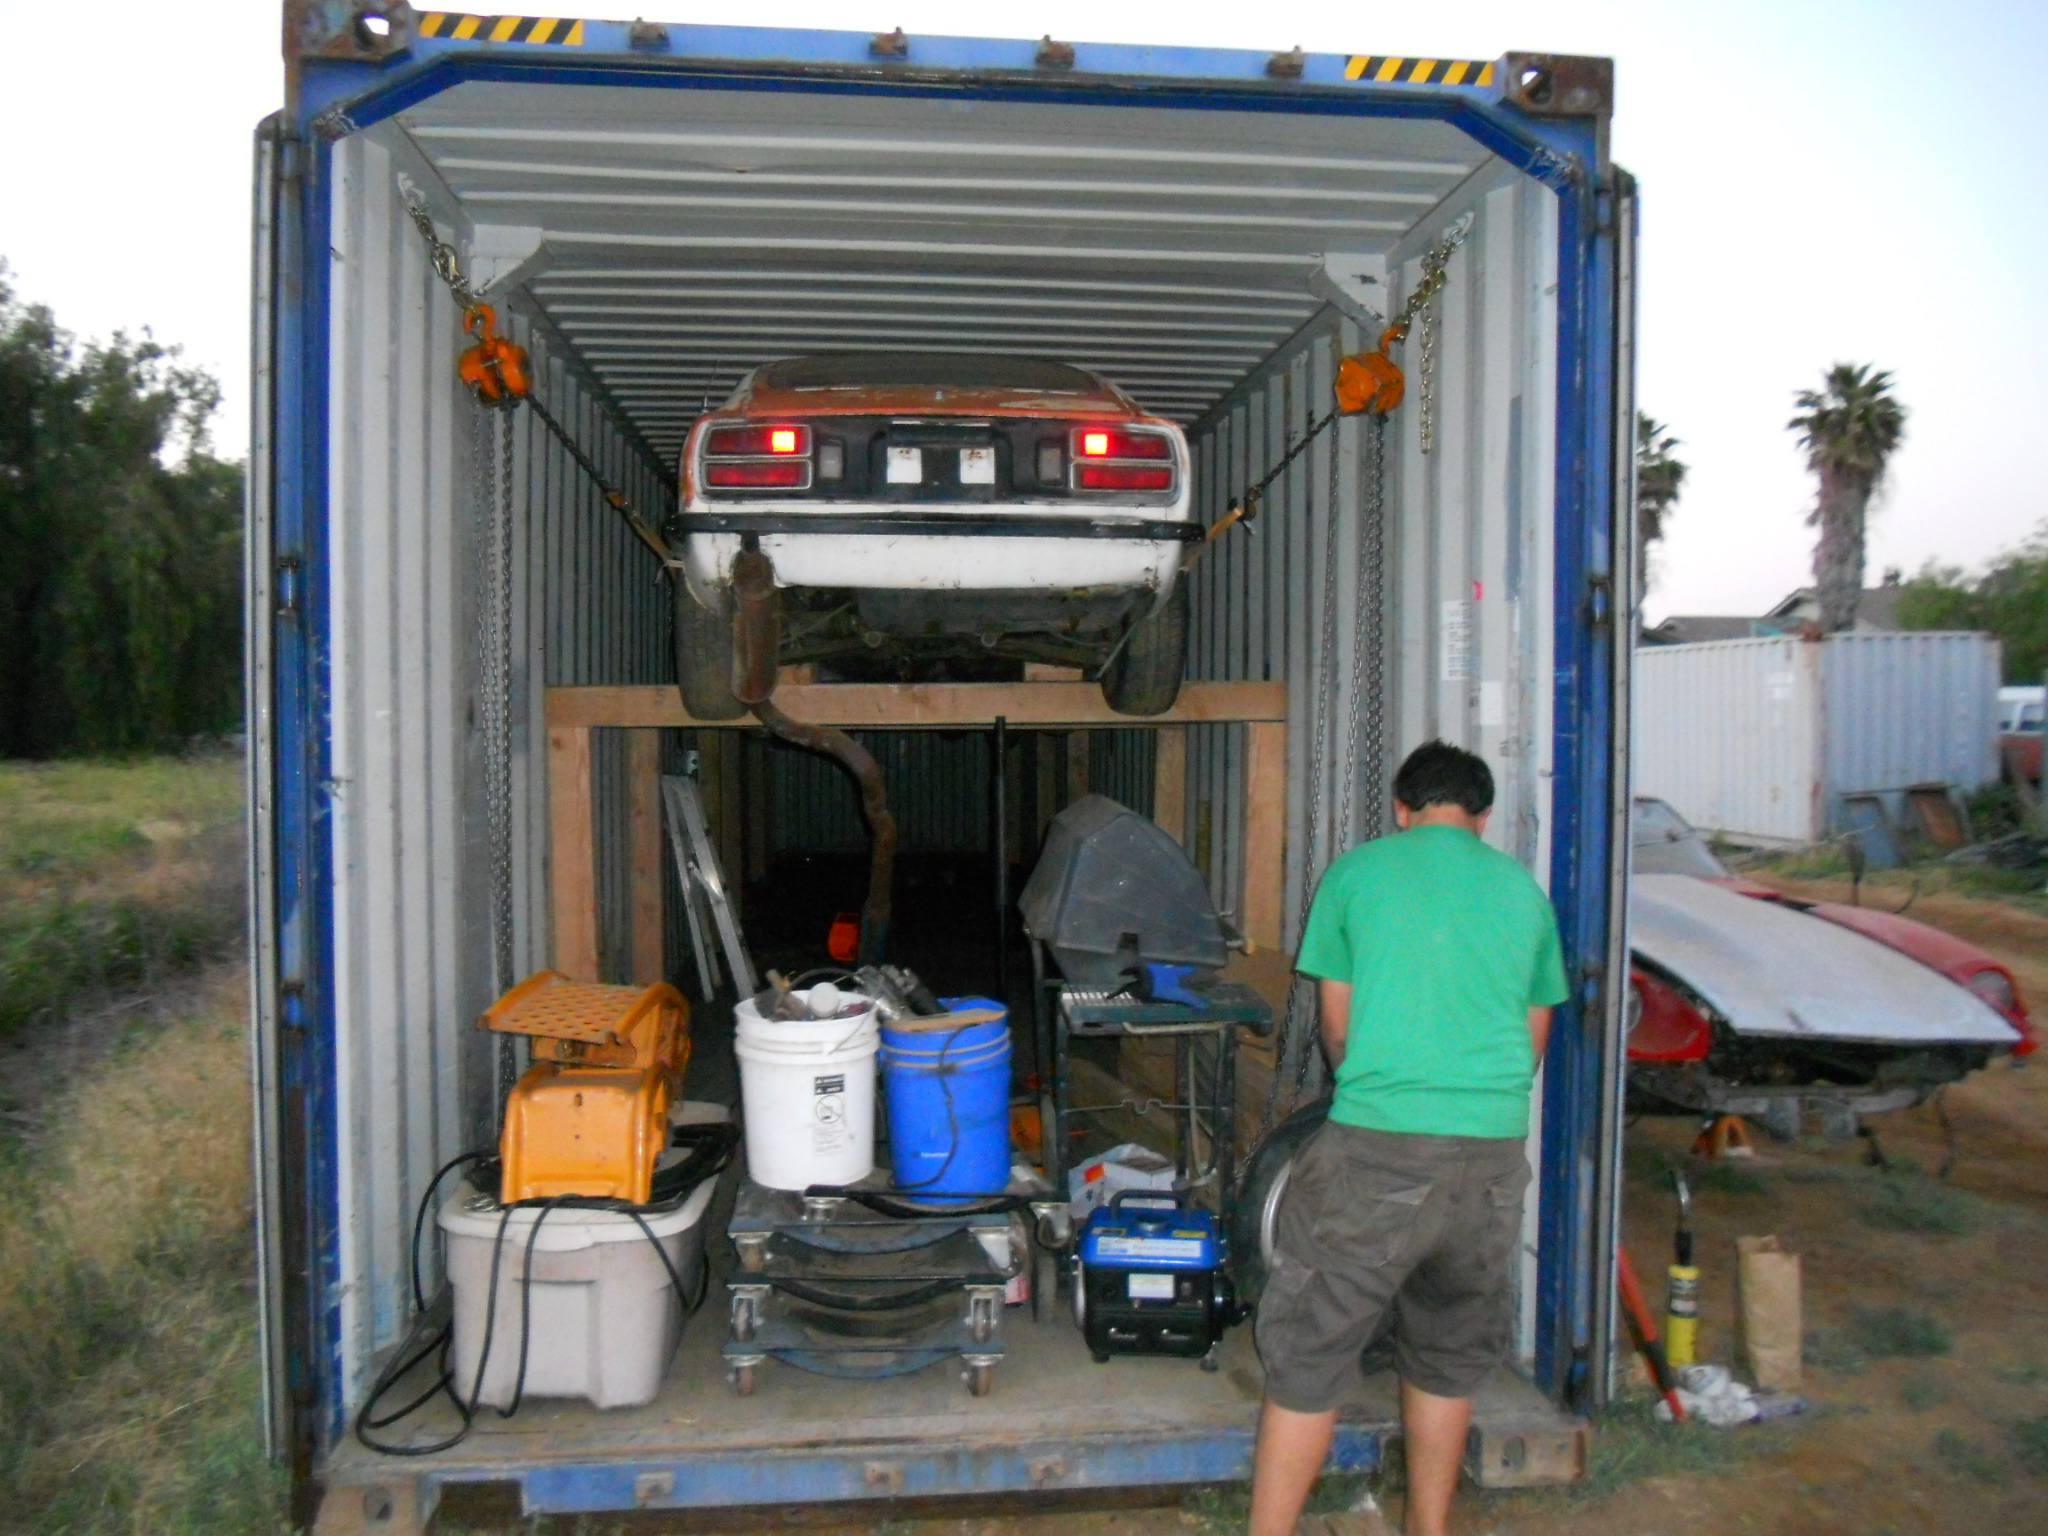
Truthfully, if you can get the back portion on the railroad ties, personally I pick up the radiator support and walk onto the trailer as it's backed up under the body.
If you are speaking of spring spacers, you can block the struts solid by assembling the top section over SCH40 PVC pipe that fits over the strut piston rod. Assemble the top spacer/spring perch and they are solid. But make sure you tie it down TIGHTLY so they don't jump off your spacers. Same for bigger pieces the diameter of the springs.
But I've done the above procedure at least half a dozen times. I get cars without suspensions offered all the time. It's easier if you have a regular utility trailer actually, as without the open middle section, you can do the same thing with a floor jack, or wheel dollys. (you can see them in one of my photos!)
Really, the tub is not all that heavy, getting four guys to lift it really isn't out of the question. a Couple of 4X4's will support a non-stripped Z.
With a sturdy Oak Tree Limb, some 4X4's, 4 10' straps and a couple of chainfalls you could suspend it altogether and drive the trailer under it!
-
Nissan Stock Item, still in the Nissan Box...
-
Rent a Cherry Picker...
Put your tub on the ground, with the rear area (either moustache bar or where your factory sway bar mounts) up on one or two railroad ties.
With your chassis on the ground, strap to your upper radiator support, or the strut towers. I use the radiator support (Bottom one will give you more clearance.) Pick it up high enough to get the trailer backed under the unitbody back to the back dunnage.
Drop the front of the chassis onto a 4X4 across two furniture dolleys placed about where your T/C rods go--the dolleys will run on each wheel ramp.
Go to the back, use two straps, hooked to the bumper screw holes, and pick the back end up.
Back the trailer the rest of the way under the car.
Drop the back half of the car onto a 4X4 on two more furniture dolleys just rearward of the doors.
You can then push the car to wherever you want on the trailer. Strap it either across the open doors or from the bumper screw holes and the lower front radiator support. If you had the factory tie downs, bolting them on and using them to secure it to the trailer would work as well.
Using the support points mentioned, I've lifted and supported Z's for long term storage and ocean-shipped them tandem stacked in containers without any issues.
-
You can get them at WW Grainger and McMaster Carr if no place else. I have a Dwyer Slack-Tube Manometer as well--but a water manometer don't work on a bumpy road.
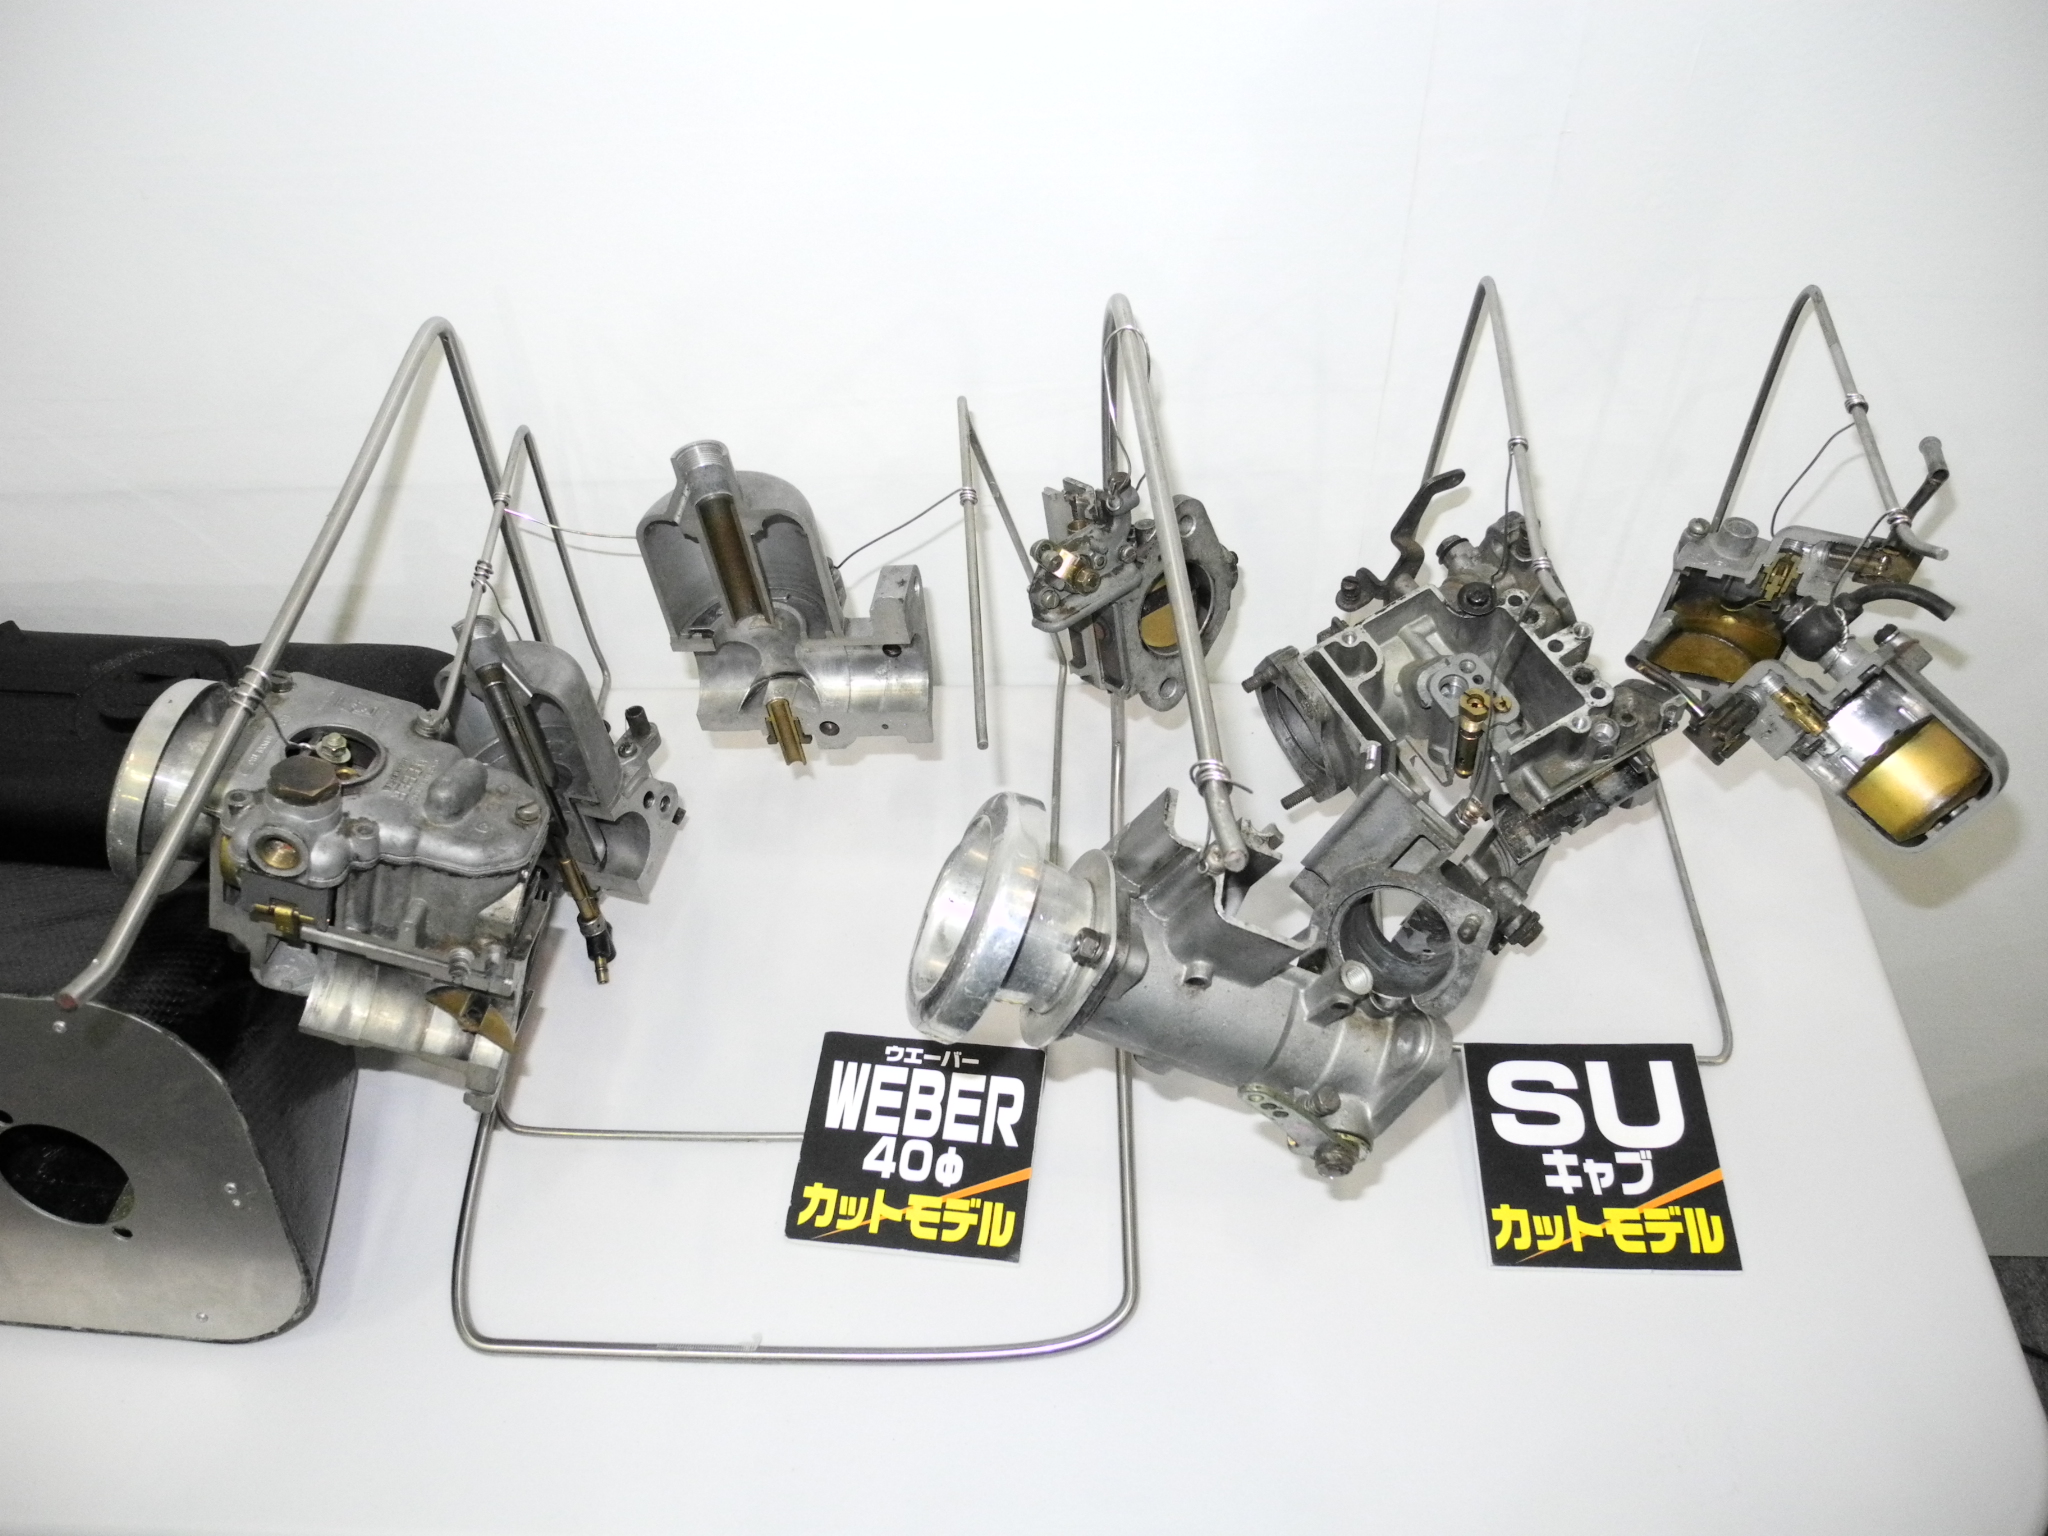
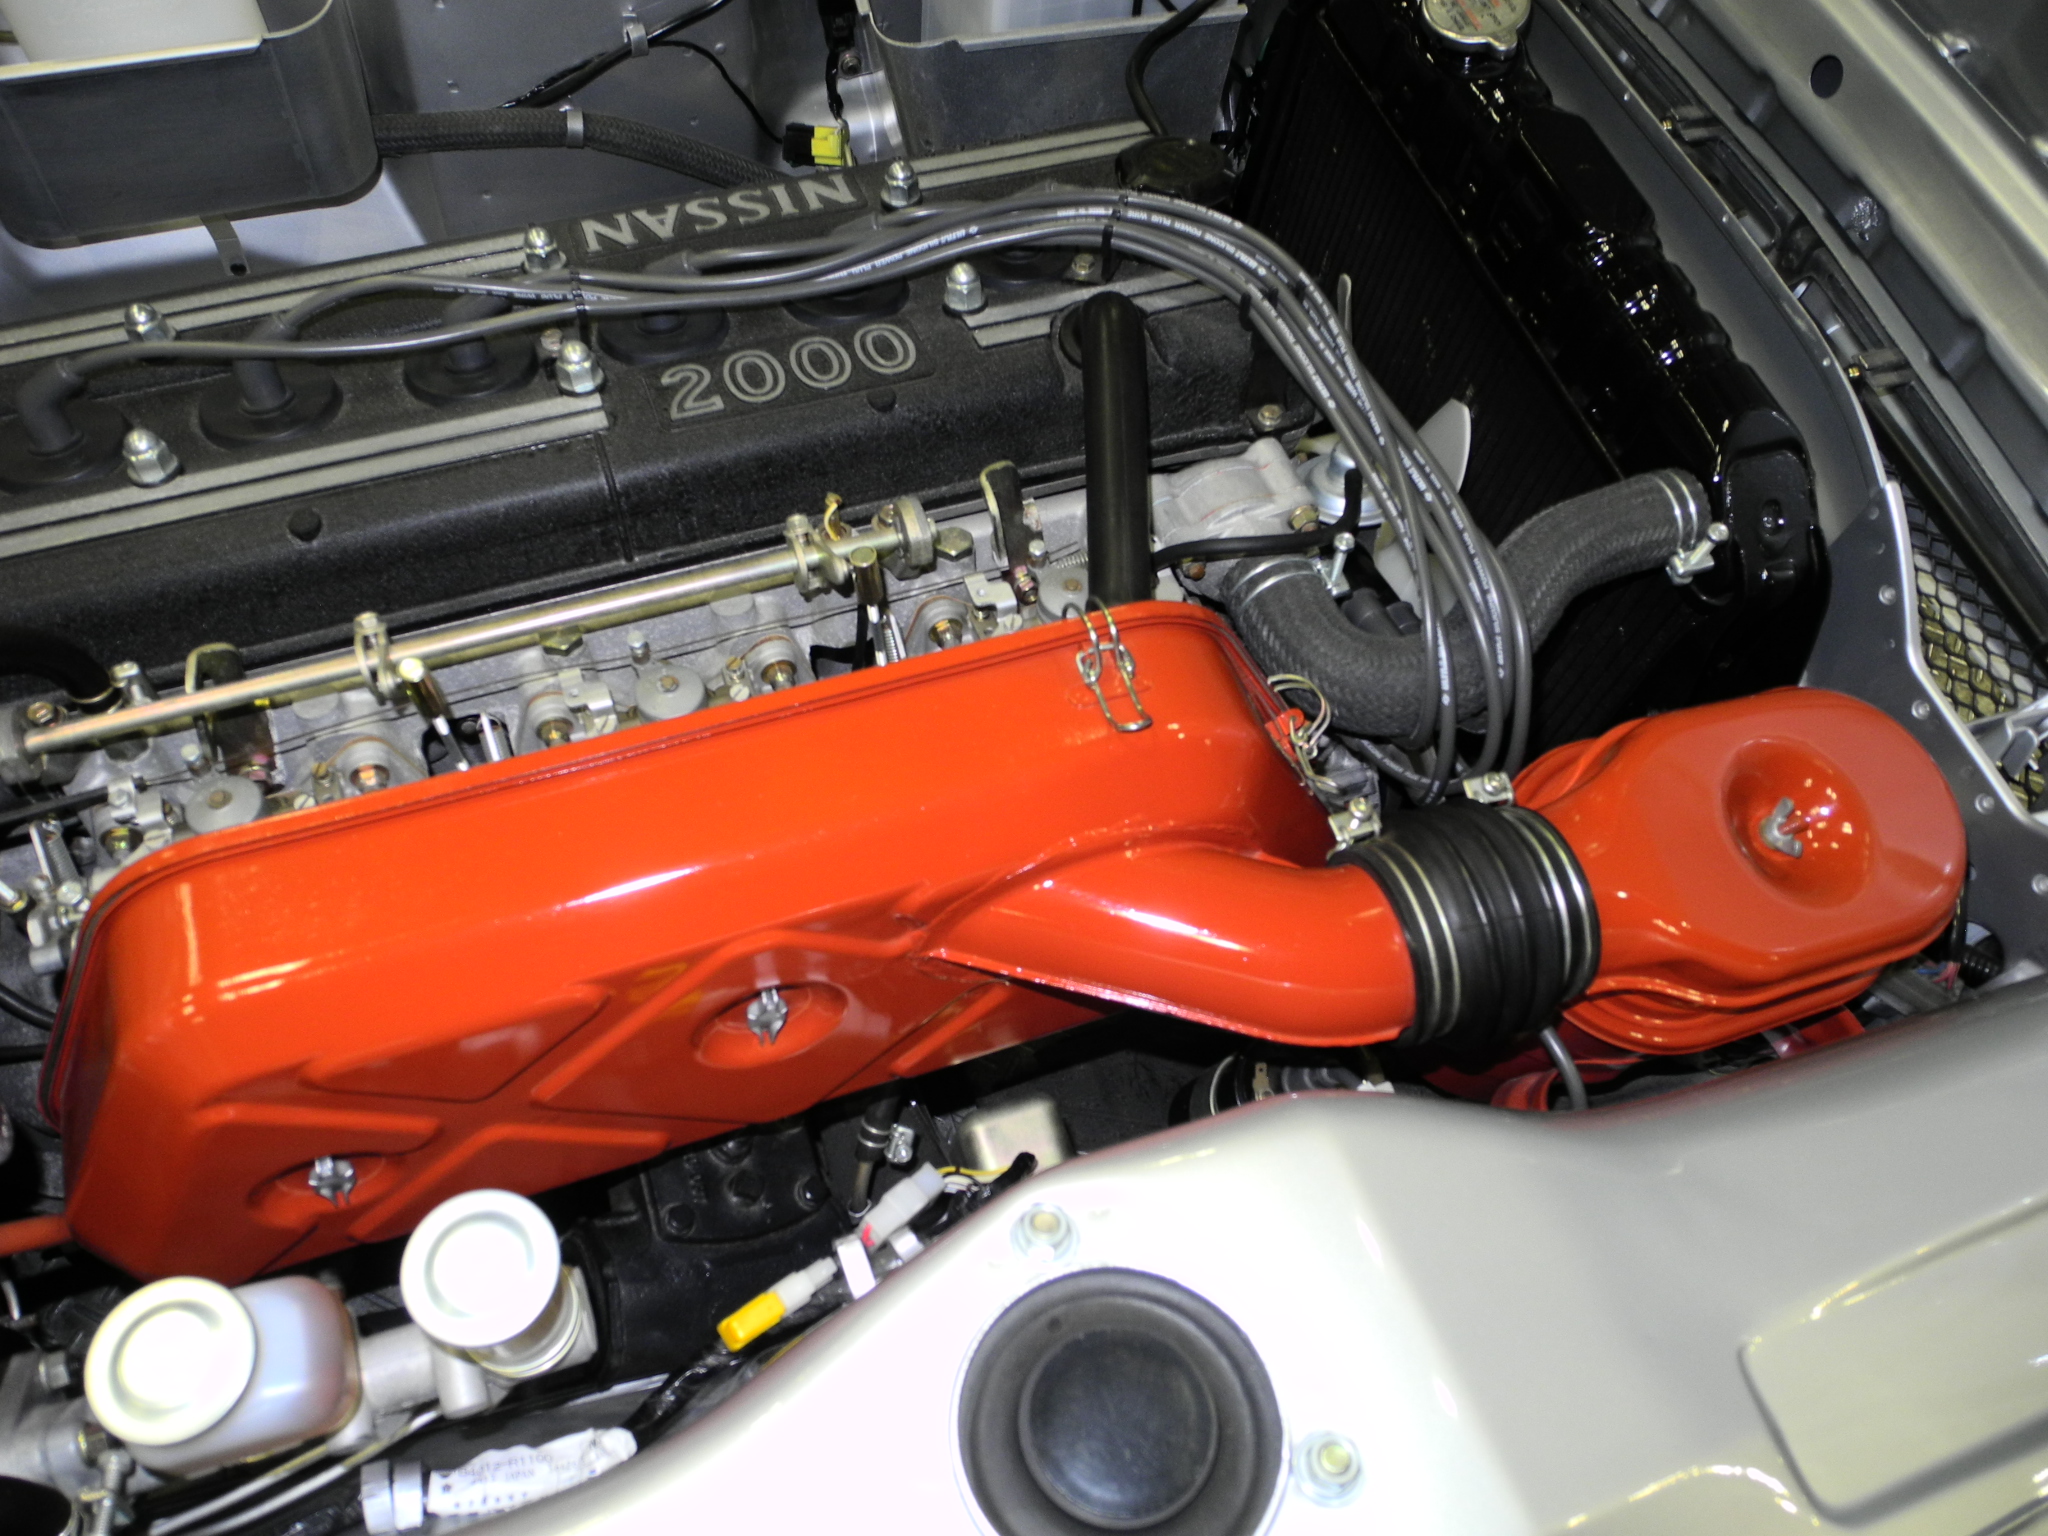
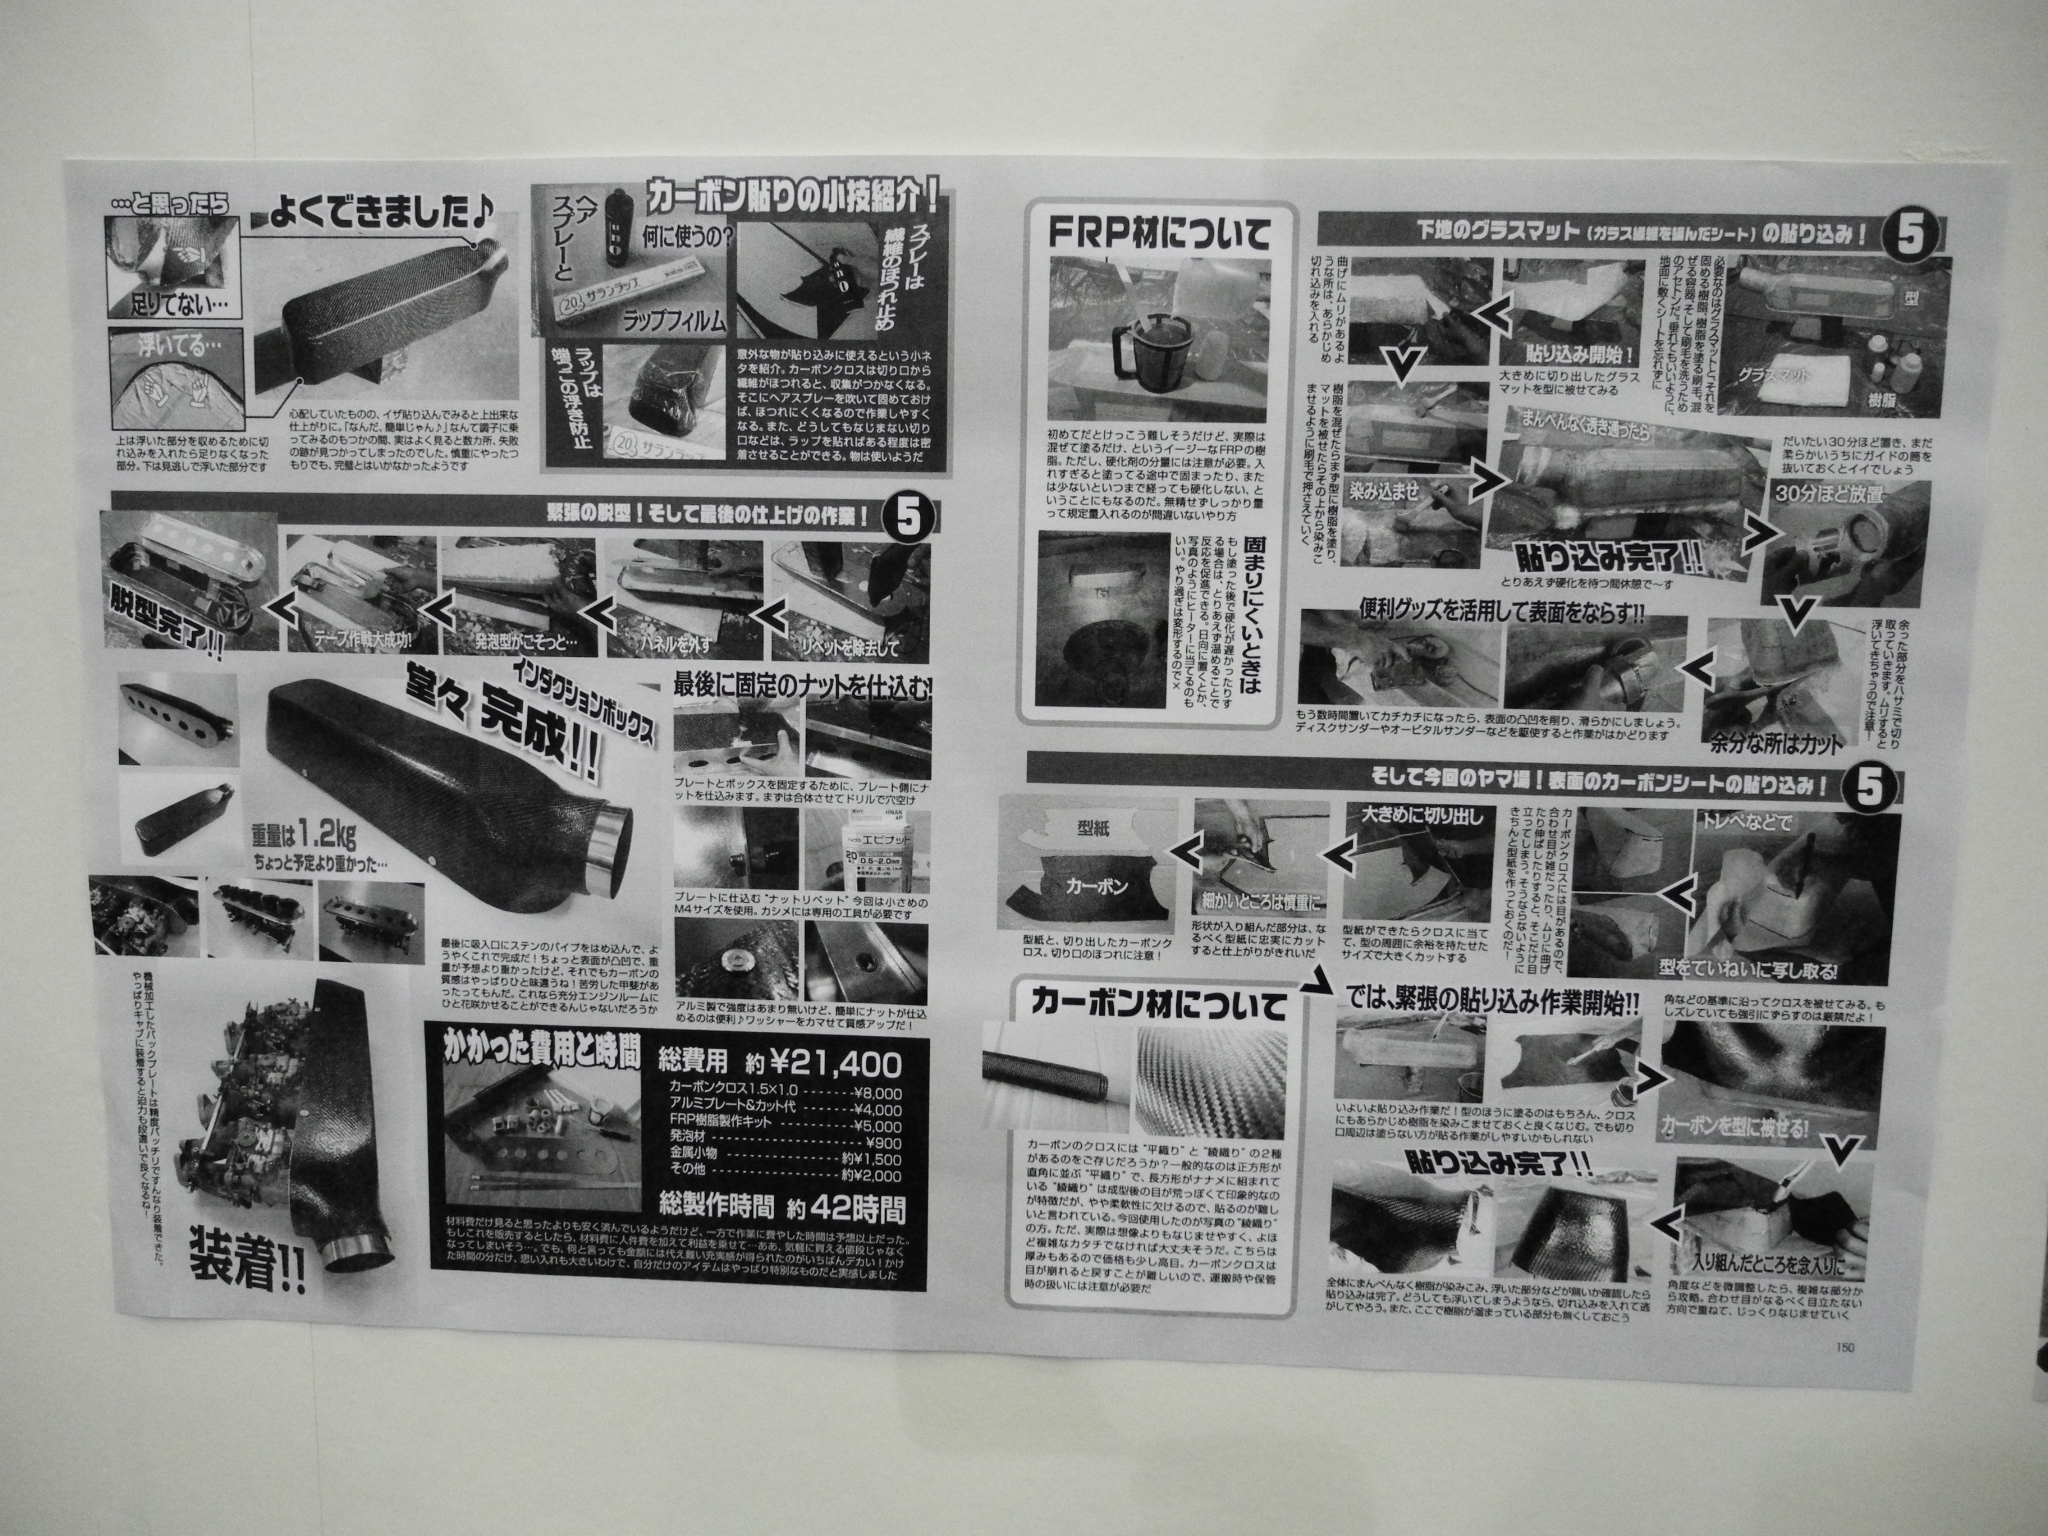
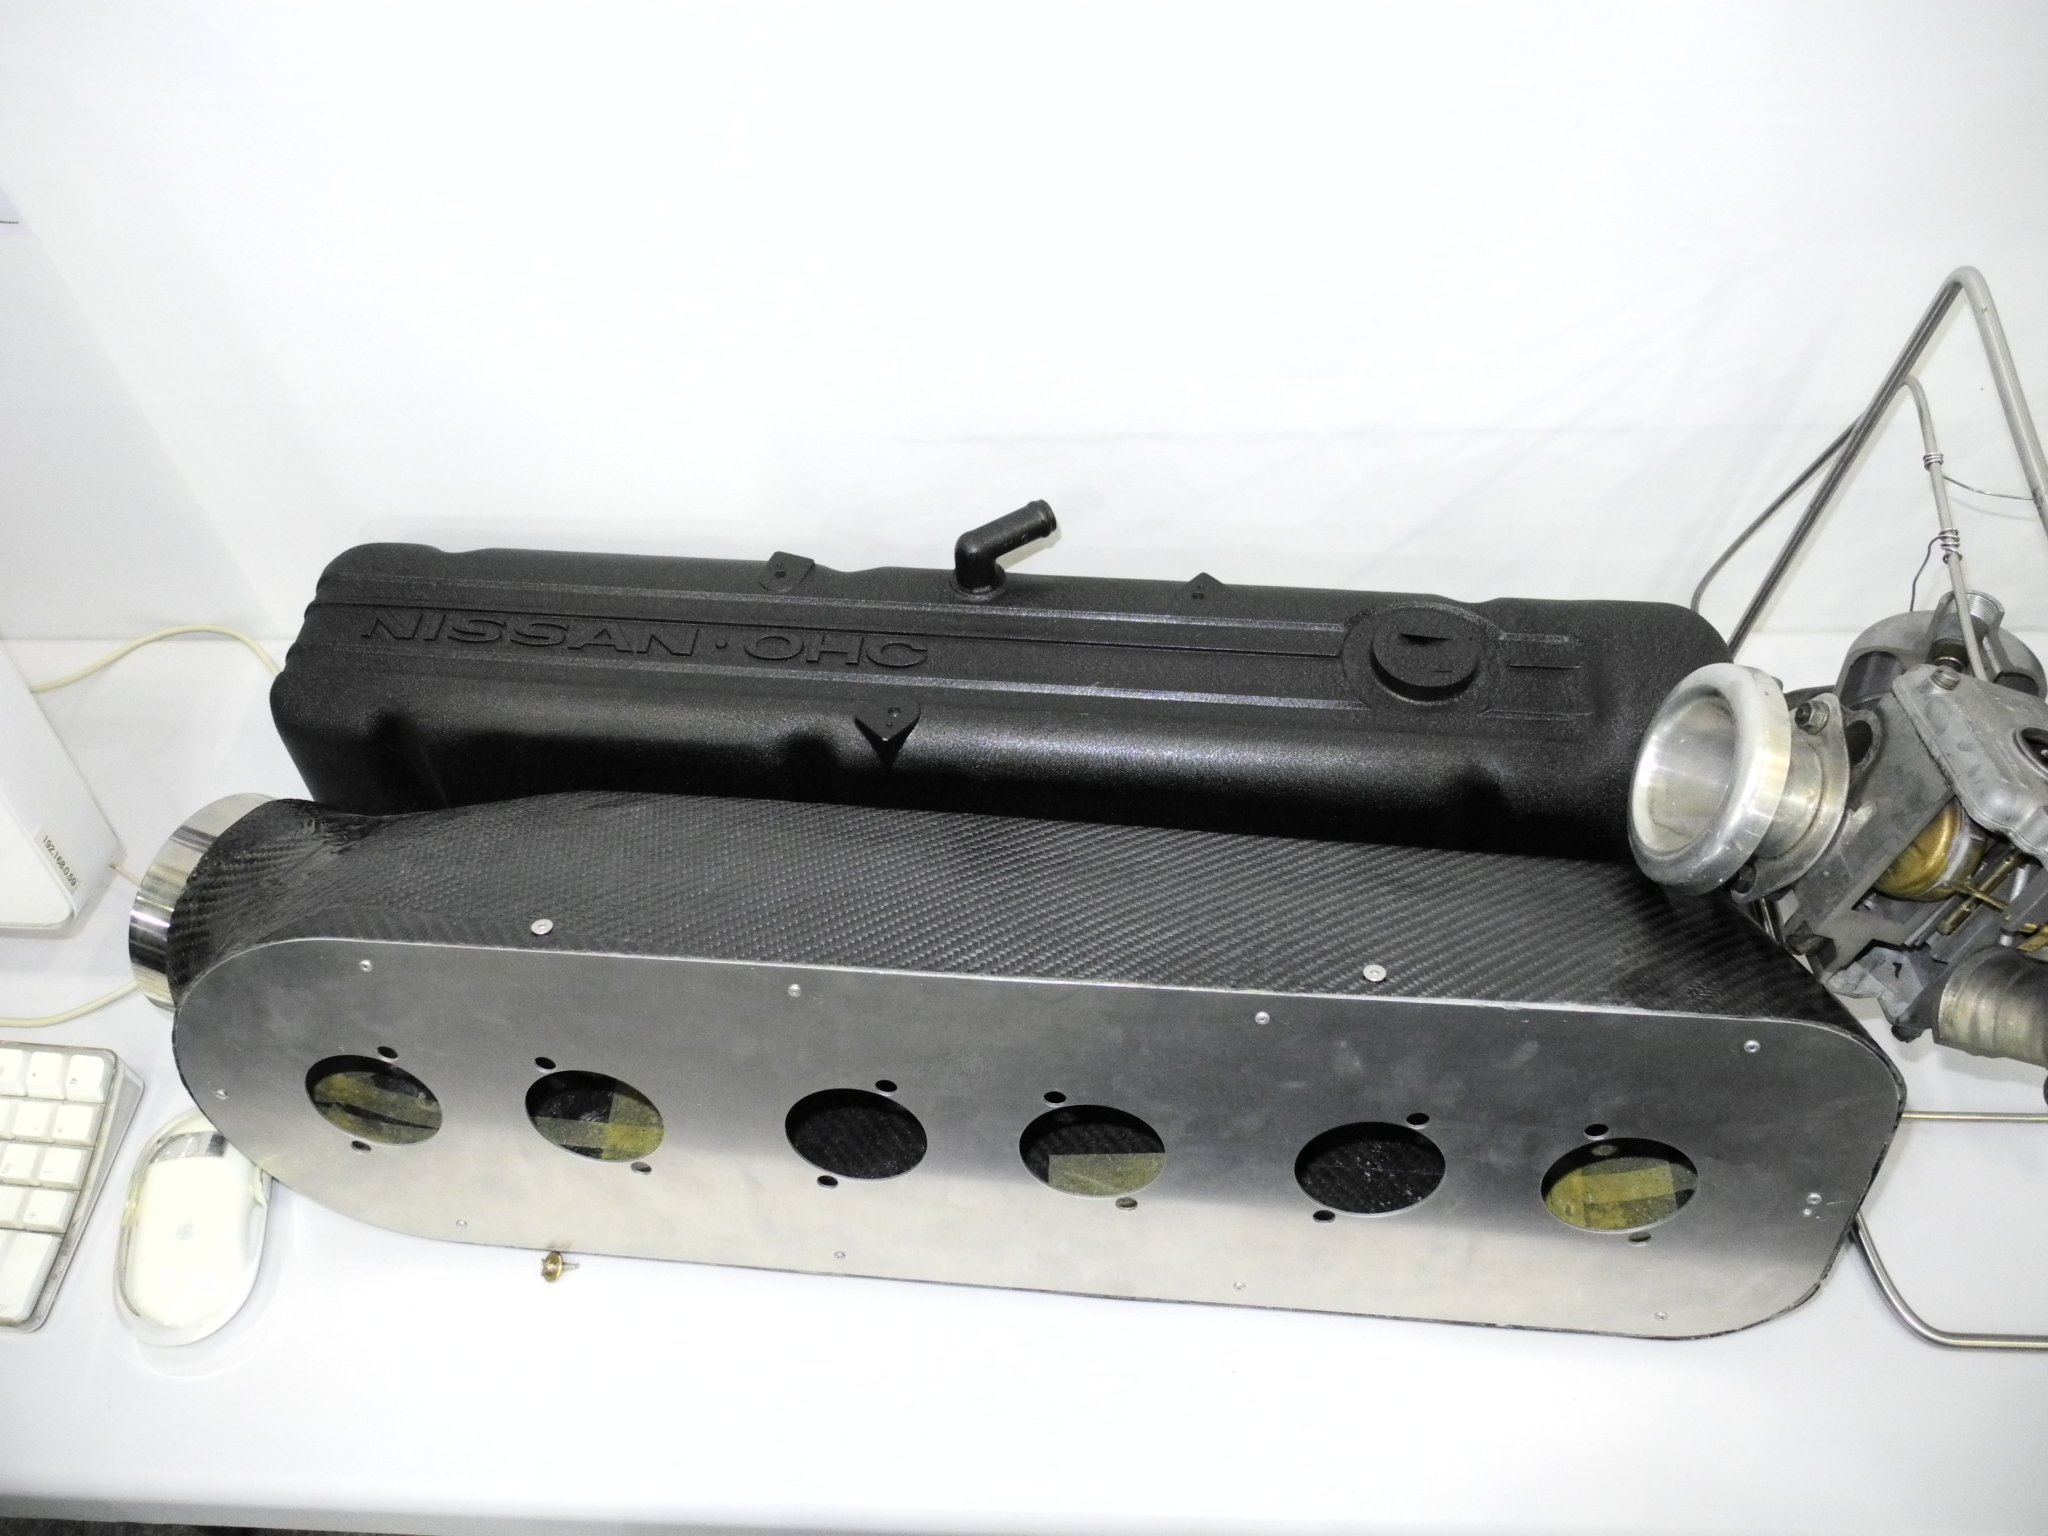
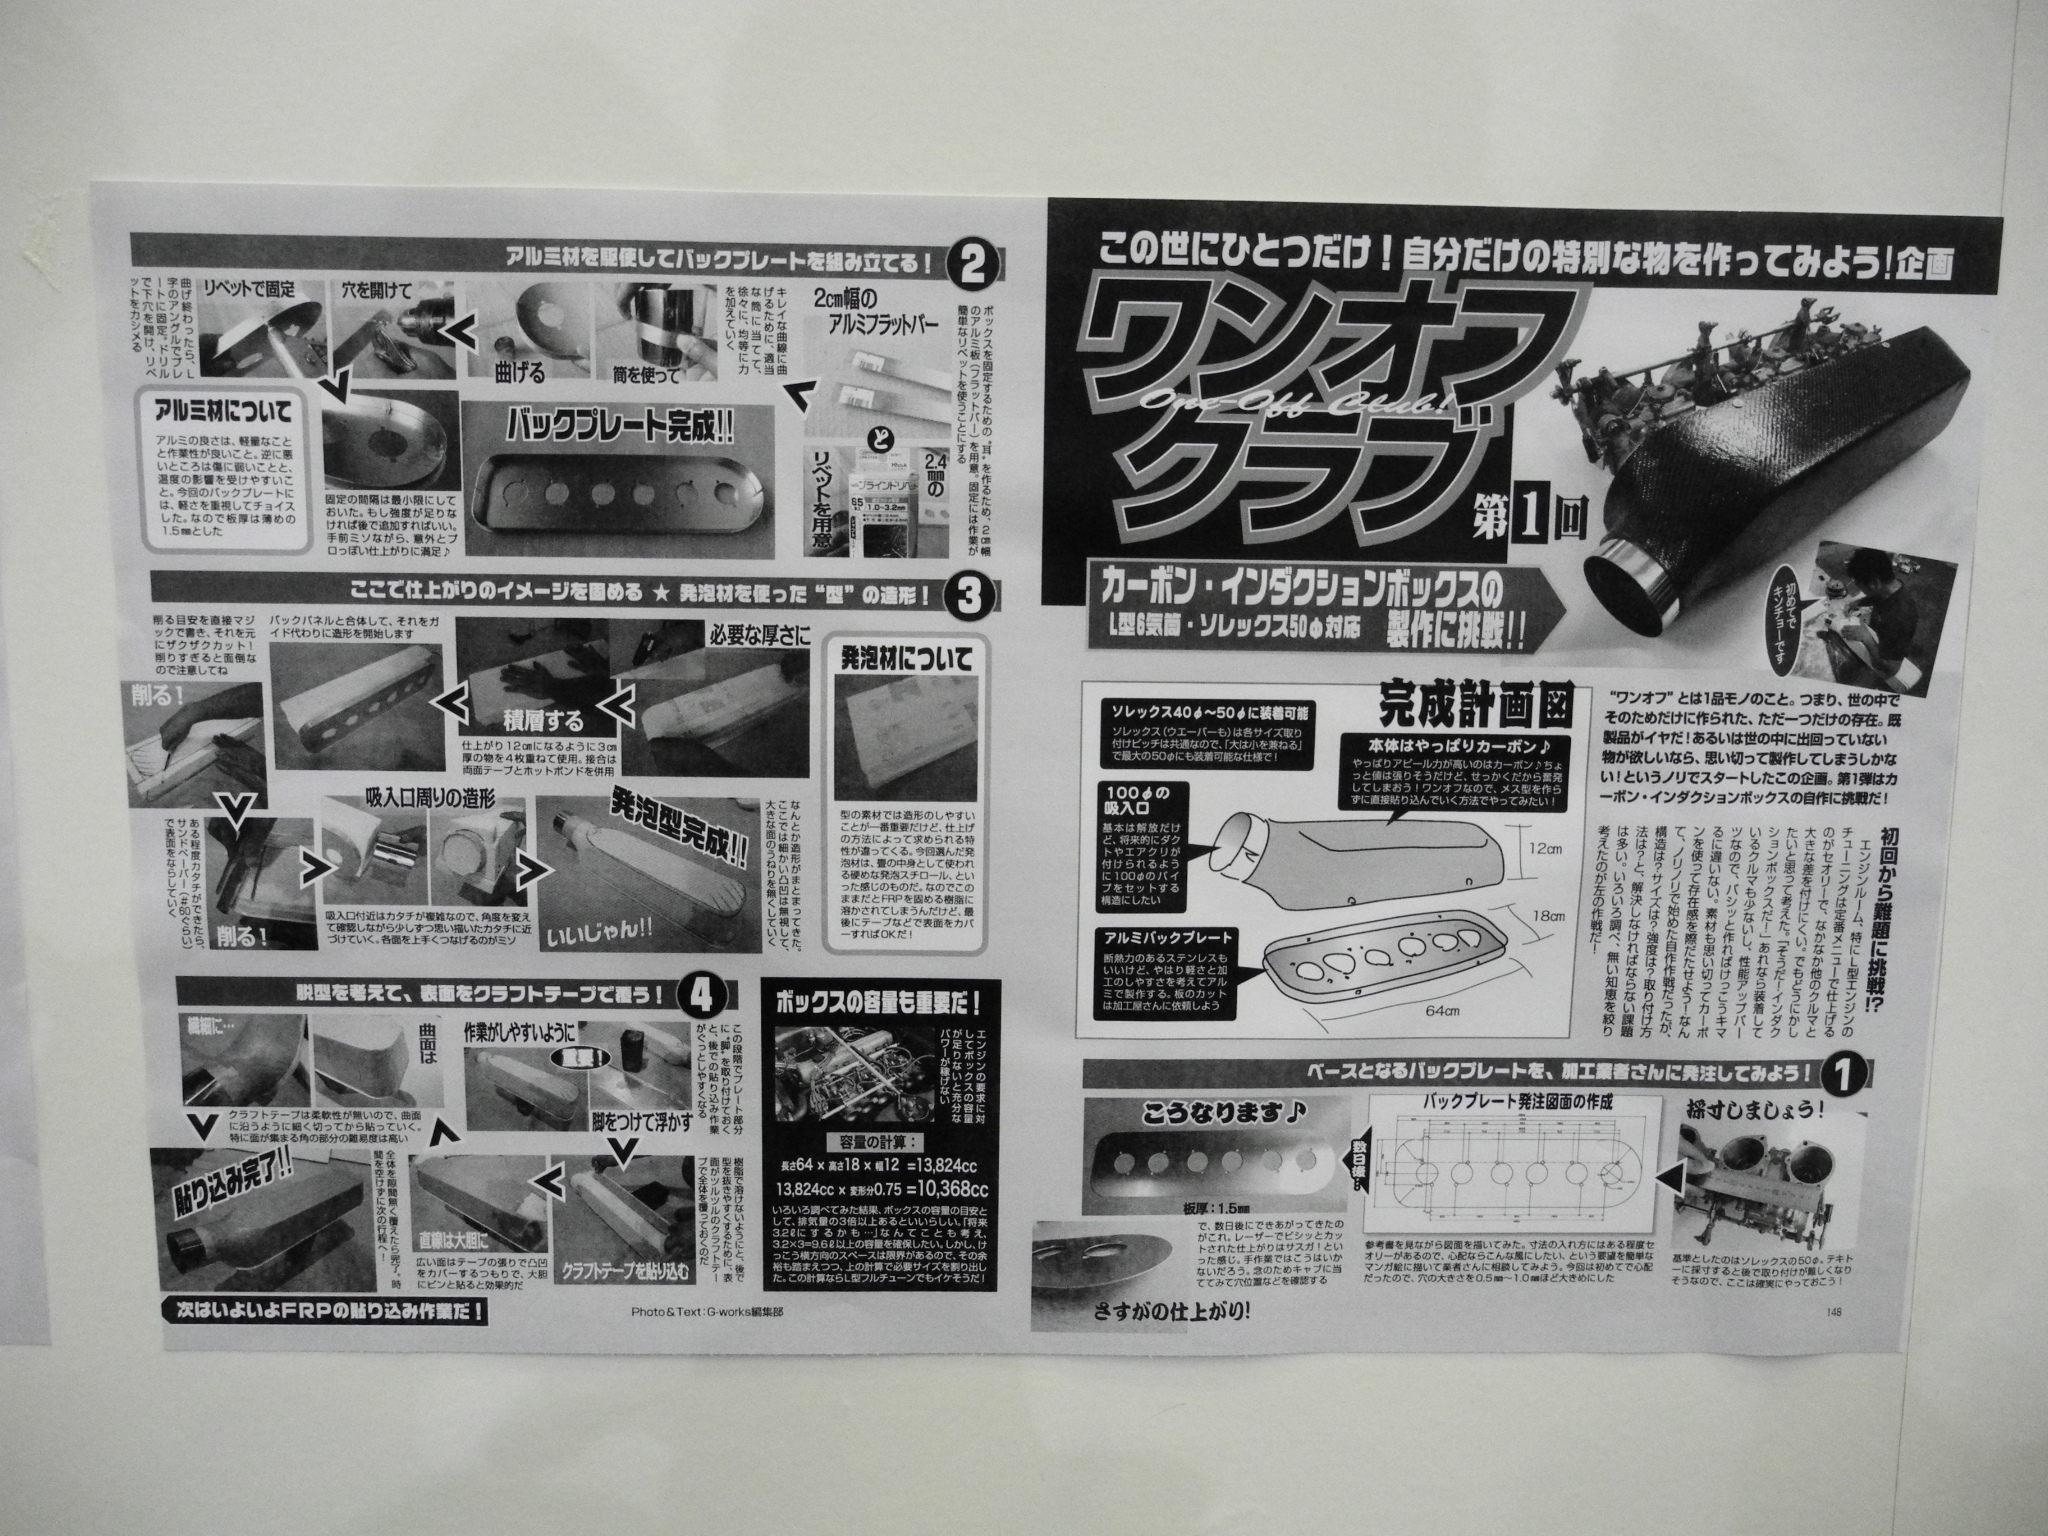
Wanna See How Carbs Work? Cut 'em apart and make a technical article like in G-Works Magazine in Japan:
For ONCE I'm on an API-Style job with me in the office a bit more, and on the equipment a bit less, so I can actually run across this stuff!!!
FACTORY CAI BOX:
RE: The missing holes... don't feel bad, I just ran across these photos I took at Nostalgia 2Days in Yokohama last year (Same as where I got the above carb cutaway shot!).... The "In the Flesh" version of G's Works Garage Project FRP Airbox (though admittedly they converted their Mikunis to EFI ITB's!:
Just Rubbin' it in! LOL:
-
May want to PM Bernard as he is running the 3N71 Turbo Tranny on his ZX, far as I remember. Manual Valve Body.
JeffP was playing with the Nisstune to control the Z32 Autobox behind his Turbo Engine in his 79 Coupe Drag Car.
-
I will remind you the first year the Kenyan "East African Safari Rally" was run recently under the ORIGINAL RULES (meaning NOBODY but the driver or assistant could touch the car once the stage started---maintenance personnel could only touch it once it made it to the end of the stage.) The 240Z was once again at the TOP OF THE FINISHING LIST AGAINST MODERN COMPETITION!
If you have it right (like the VW Beetle) there just isn't much you need to change to keep it competitive.
in fact, if you go to their website---WHAT CAR GRACES THE HOMEPAGE???
IF IT WORKS, DON'T CHANGE---LOOK FAMILIAR FROM 40+ Years Ago?
I'm not sure, but I may have supplied the chassis for this car...
Posh Company, Indeed!
http://www.eastafricansafarirally.com/
What was that I said again about limiting droop and making all your travel on compression?
So, does it look like you will need anything more than stock, slightly modified?
-
PM Sent-I will not discuss this publicly for obvious reasons.
-
On a dyno with a water manometer.
On the road most easily with a Magnahelic Gauge that reads in Inches H2O and has been compared against a water manometer to verify there is no drift or skew.
Did it all the time in my youth!
-
Yeah, when I got access to the car, I started taking photos. When I left (closing) we both realized I'd spend three hours there!
There are a million photos of these cars out there. But you don't see many where the guy laid on his back sticking his camera underneath to catch details of exhaust hangars on a 10MP camera...
Which is what I did.... Most of these photos were replicated again in HiRes.
I was contemplating 'getting thrown out' because I SO BADLY wanted to open the doors to get interior photos better than I what I could get through the windows. As it was, the violation of the intent of the rope barrier was quite blatant. I didn't touch... but moving around that car with the camera was like being in Vegas at Cheetah's!
-
Can't see the numbers in the photo on offer, so I guess his 500 is safe. Which is his aim I suppose.
Eascoaster wanting to be a Westcoaster... what else is new?
I got ejection seat armed stickers on the dash of my 260 Blue Turd as well, decalomania official USAF Issue ACESII F15C/D model ones.
You can buy my turd for only half as much---give me CASH 8K and take it away. You can keep the decals and Flea Baily, the side seat mascot.
-
I should have gone to page two first!
D'OH!
I'd never even considered someone making a box without the bowl vents incorporated. It's a must-do, learned way back in the 50's! The box is fine for ITB's but for carbs it's a definate NoNO!
I would also be curious to see what depression you have in the box under WOT at speed. If it's more than 4" W.C. sans-filter, you are undersized on the feed line. If you are there or lower (2-3" W.C.) then everything is hunky dory.
-
Your air box does include the float bowl vent opening on the front of the carb, correct?
Please say yes...
-
Do you know your piston-to-valve clearance? Chances are good they mechanically interfered the first time you fired up and after that it ran just fine.
This has been known to happen, just because a piston nicks a valve doesn't mean either is affected by it other than some cosmetics. Polish out the nick (er...'install clearance retroactively') and call it done!
Which valve is open furthest as piston is near TDC or approaching TDC? Look at your cam card to find out, these truths will become self-evident!
I think you are on the right track in thinking some cam timing change from drive chain slack may have caused some unholy valve-piston osculation...
But what do you do? Spend $500+ for a mechanical tensioner. We haven't yet, but could if we were road-racing. As you postulate relative change and acceleration/deceleration is what throws slack into a chain. If you're running Bonneville or Top Speed, you're ON IT and there is none of the radical throttle position changing like in street driving or roadrace. (Reference John C's snapping of oil pump drive shafts, JeffP spinning the timing drive gear, etc...) When you throw impulse in an opposite direction in a back-and-forth manner you can shake things loose.
Then again, we have been running at Willow Springs just to get seat time...still no issues though!
Just breathe easy: It could have been worse!
-
I loved the post recently about how someone 'discovered' the idea from a semi to put a bug screen in front of the S30's radiator to keep crap out of it...
If you will notice in one of the photos of a Z-Car prepped in 1971....
-
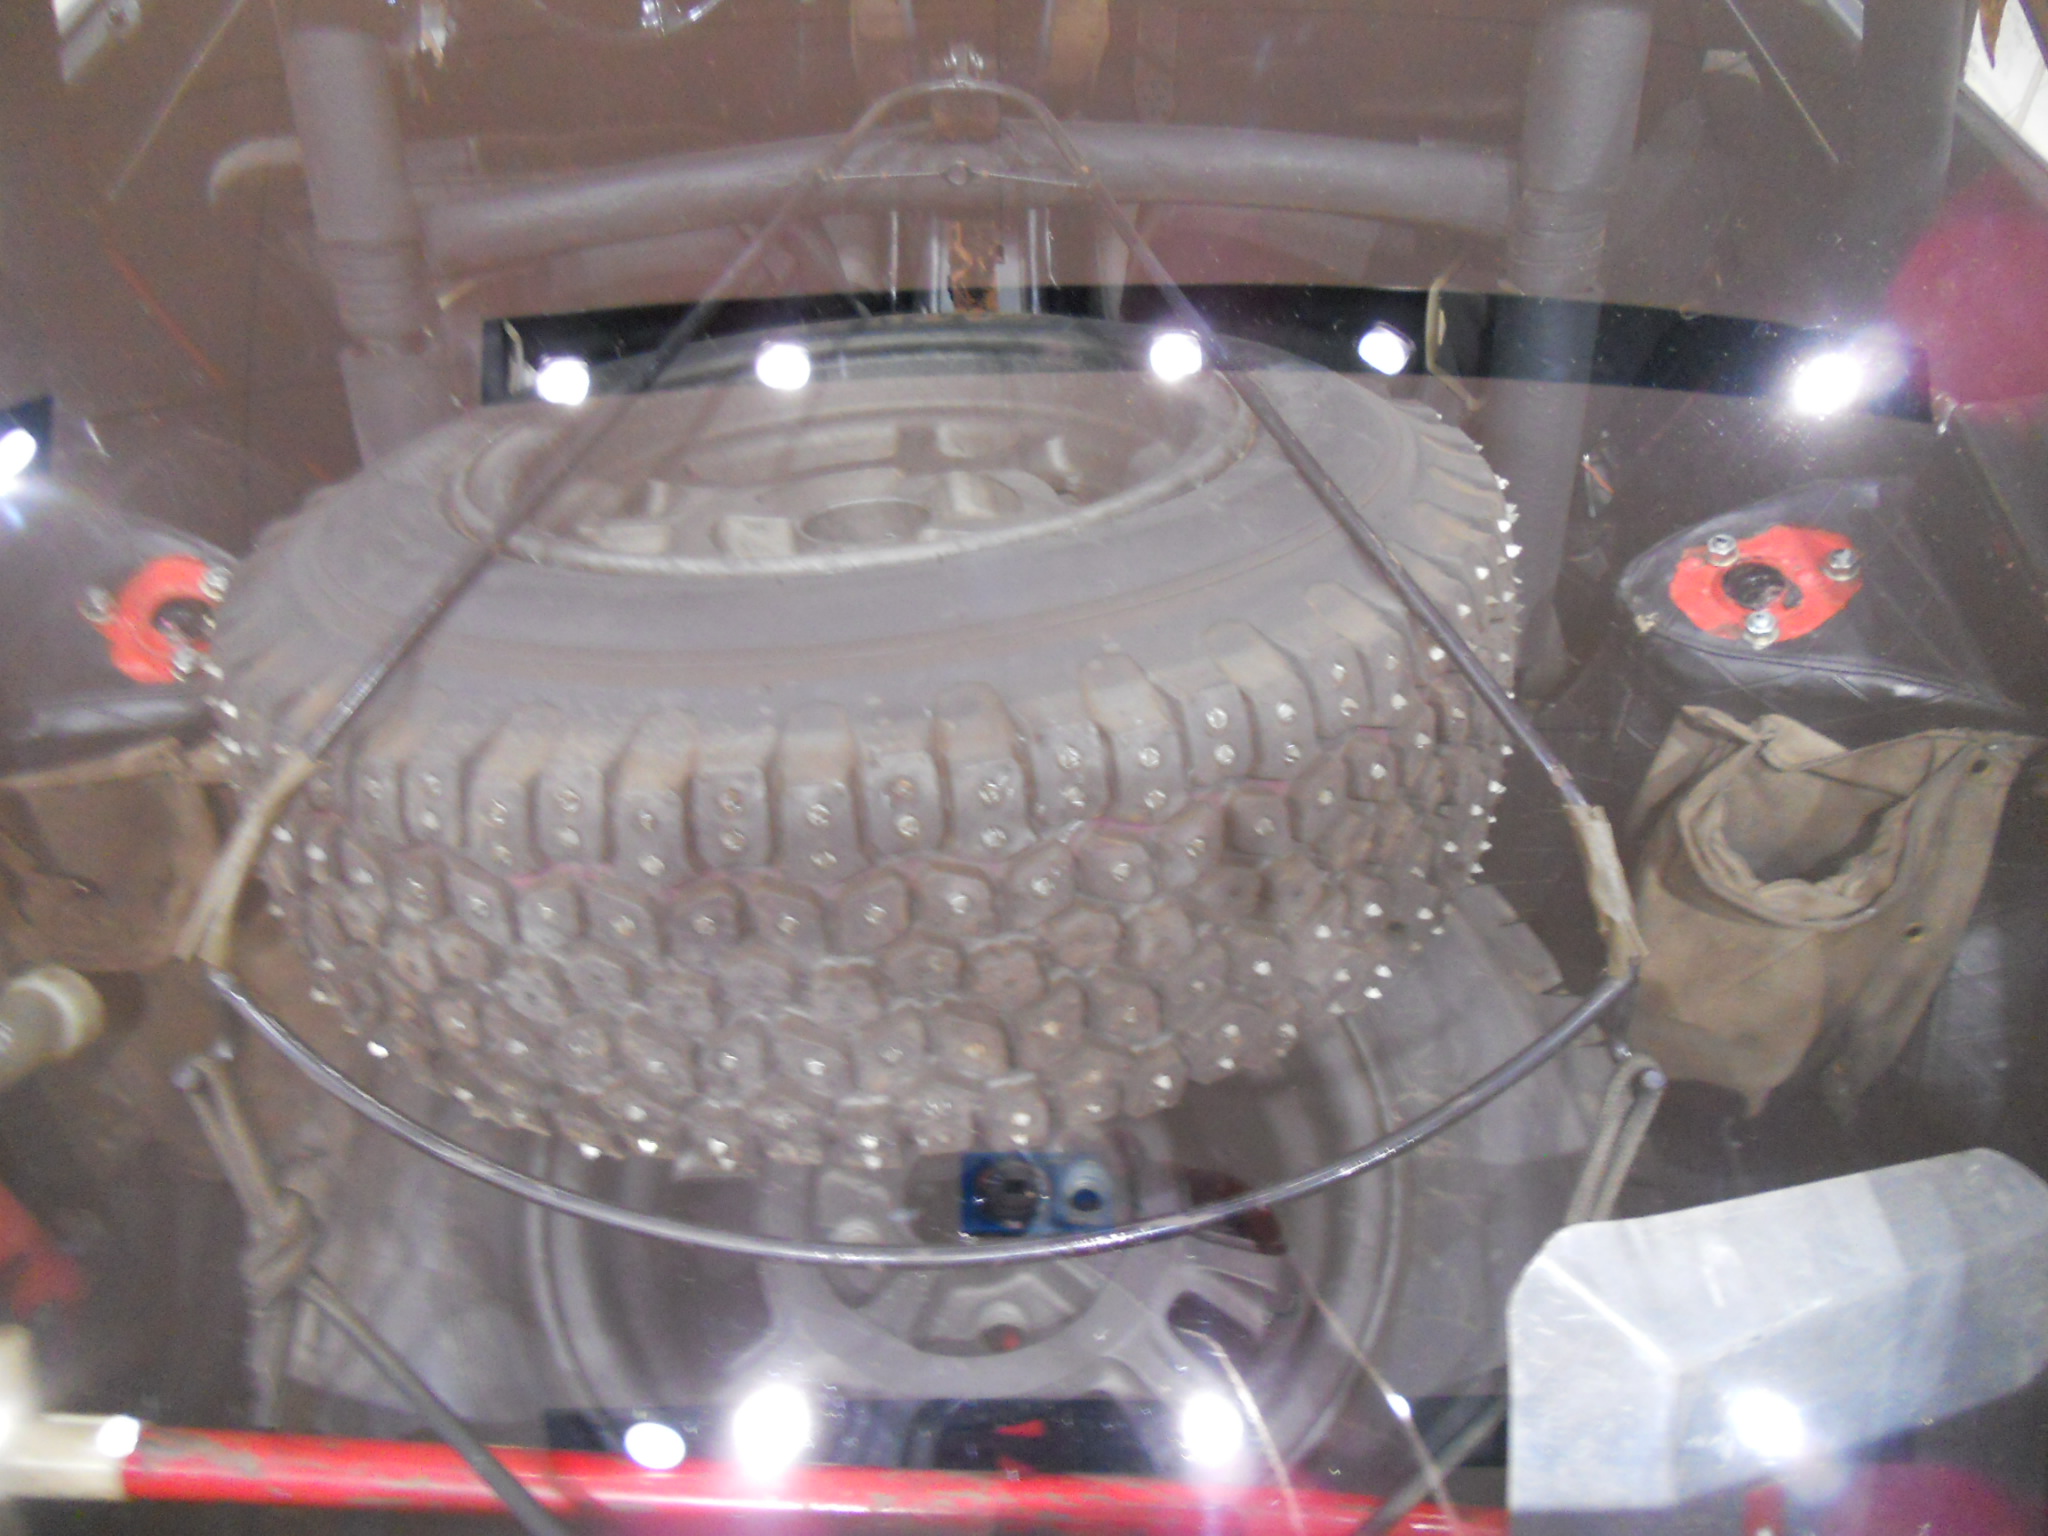
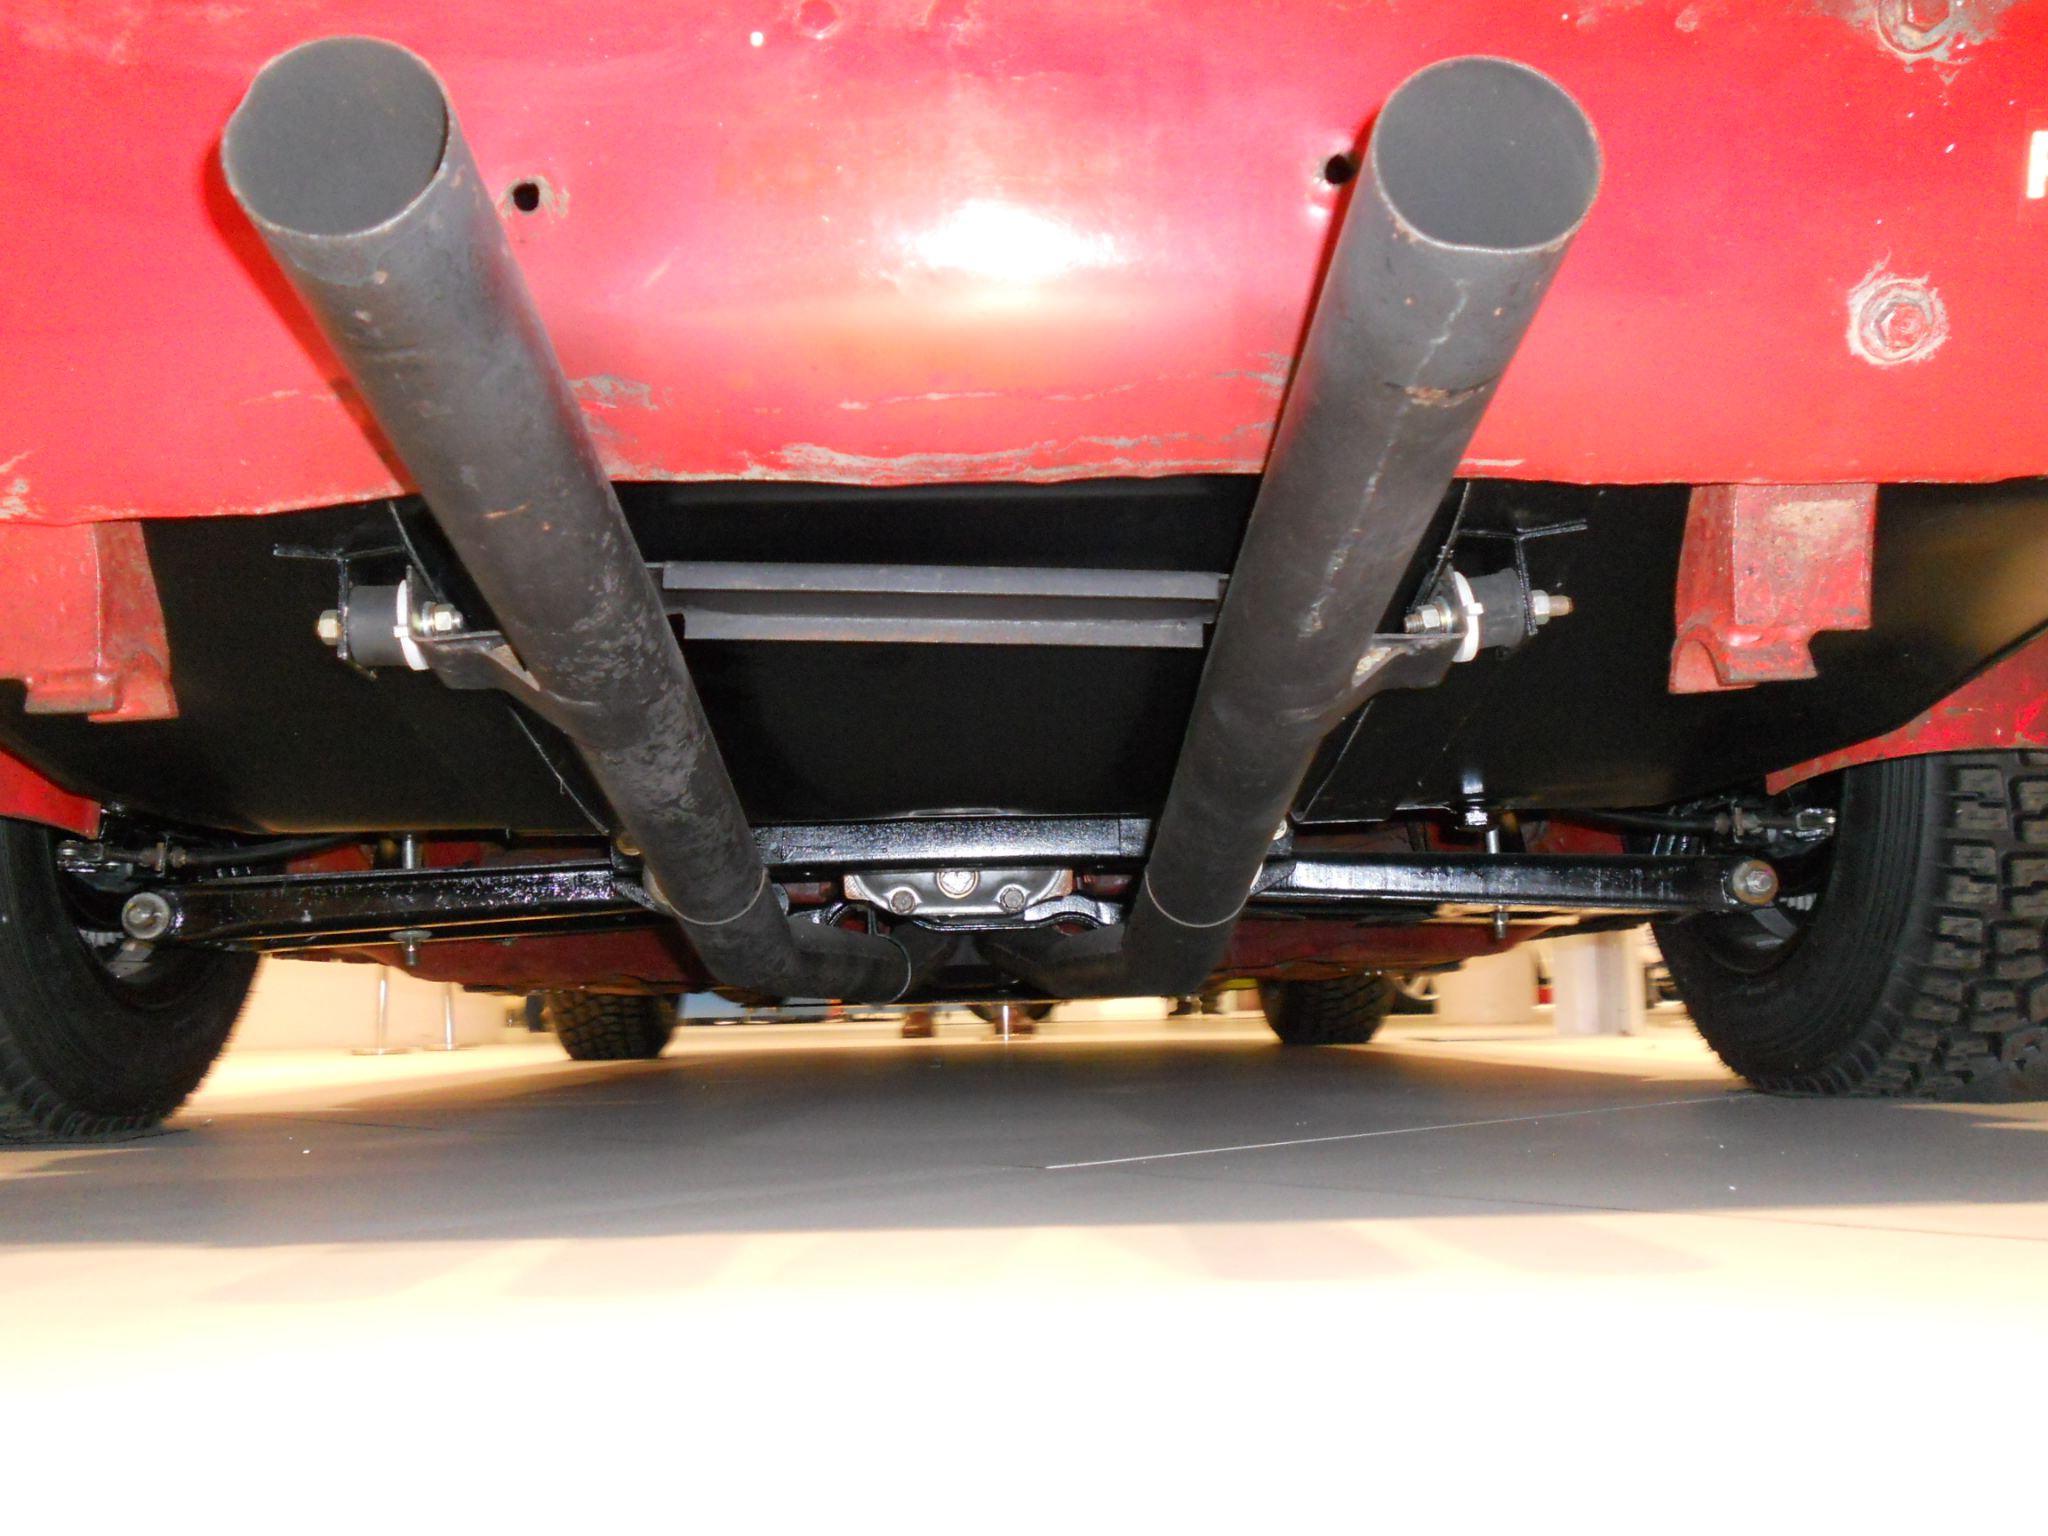
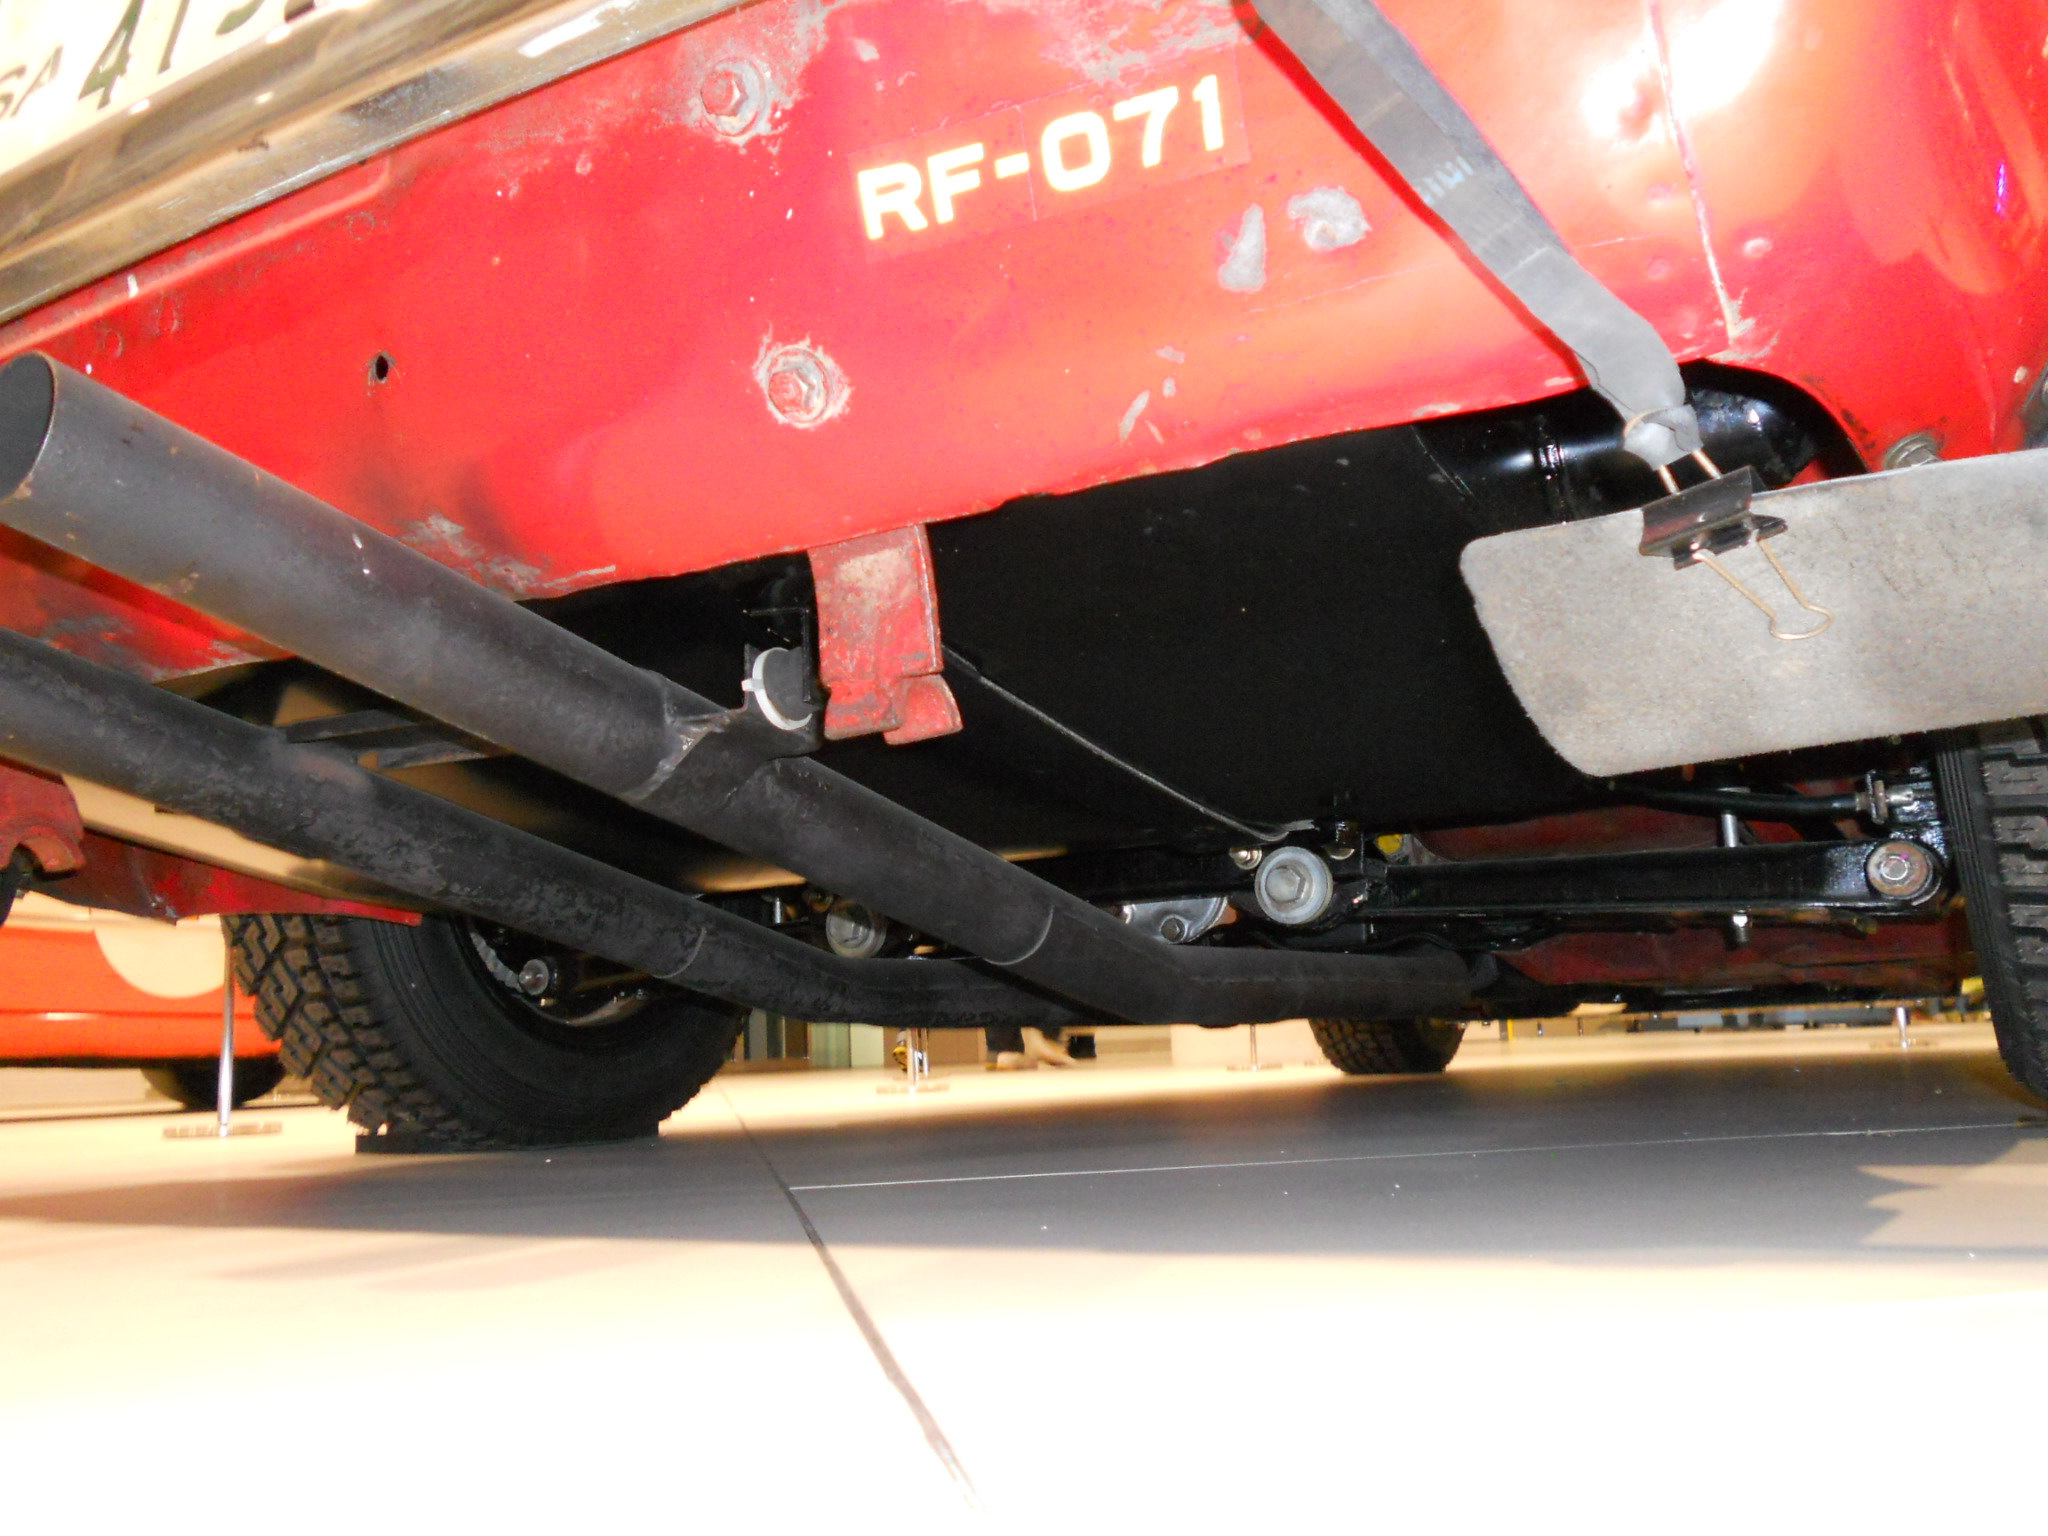
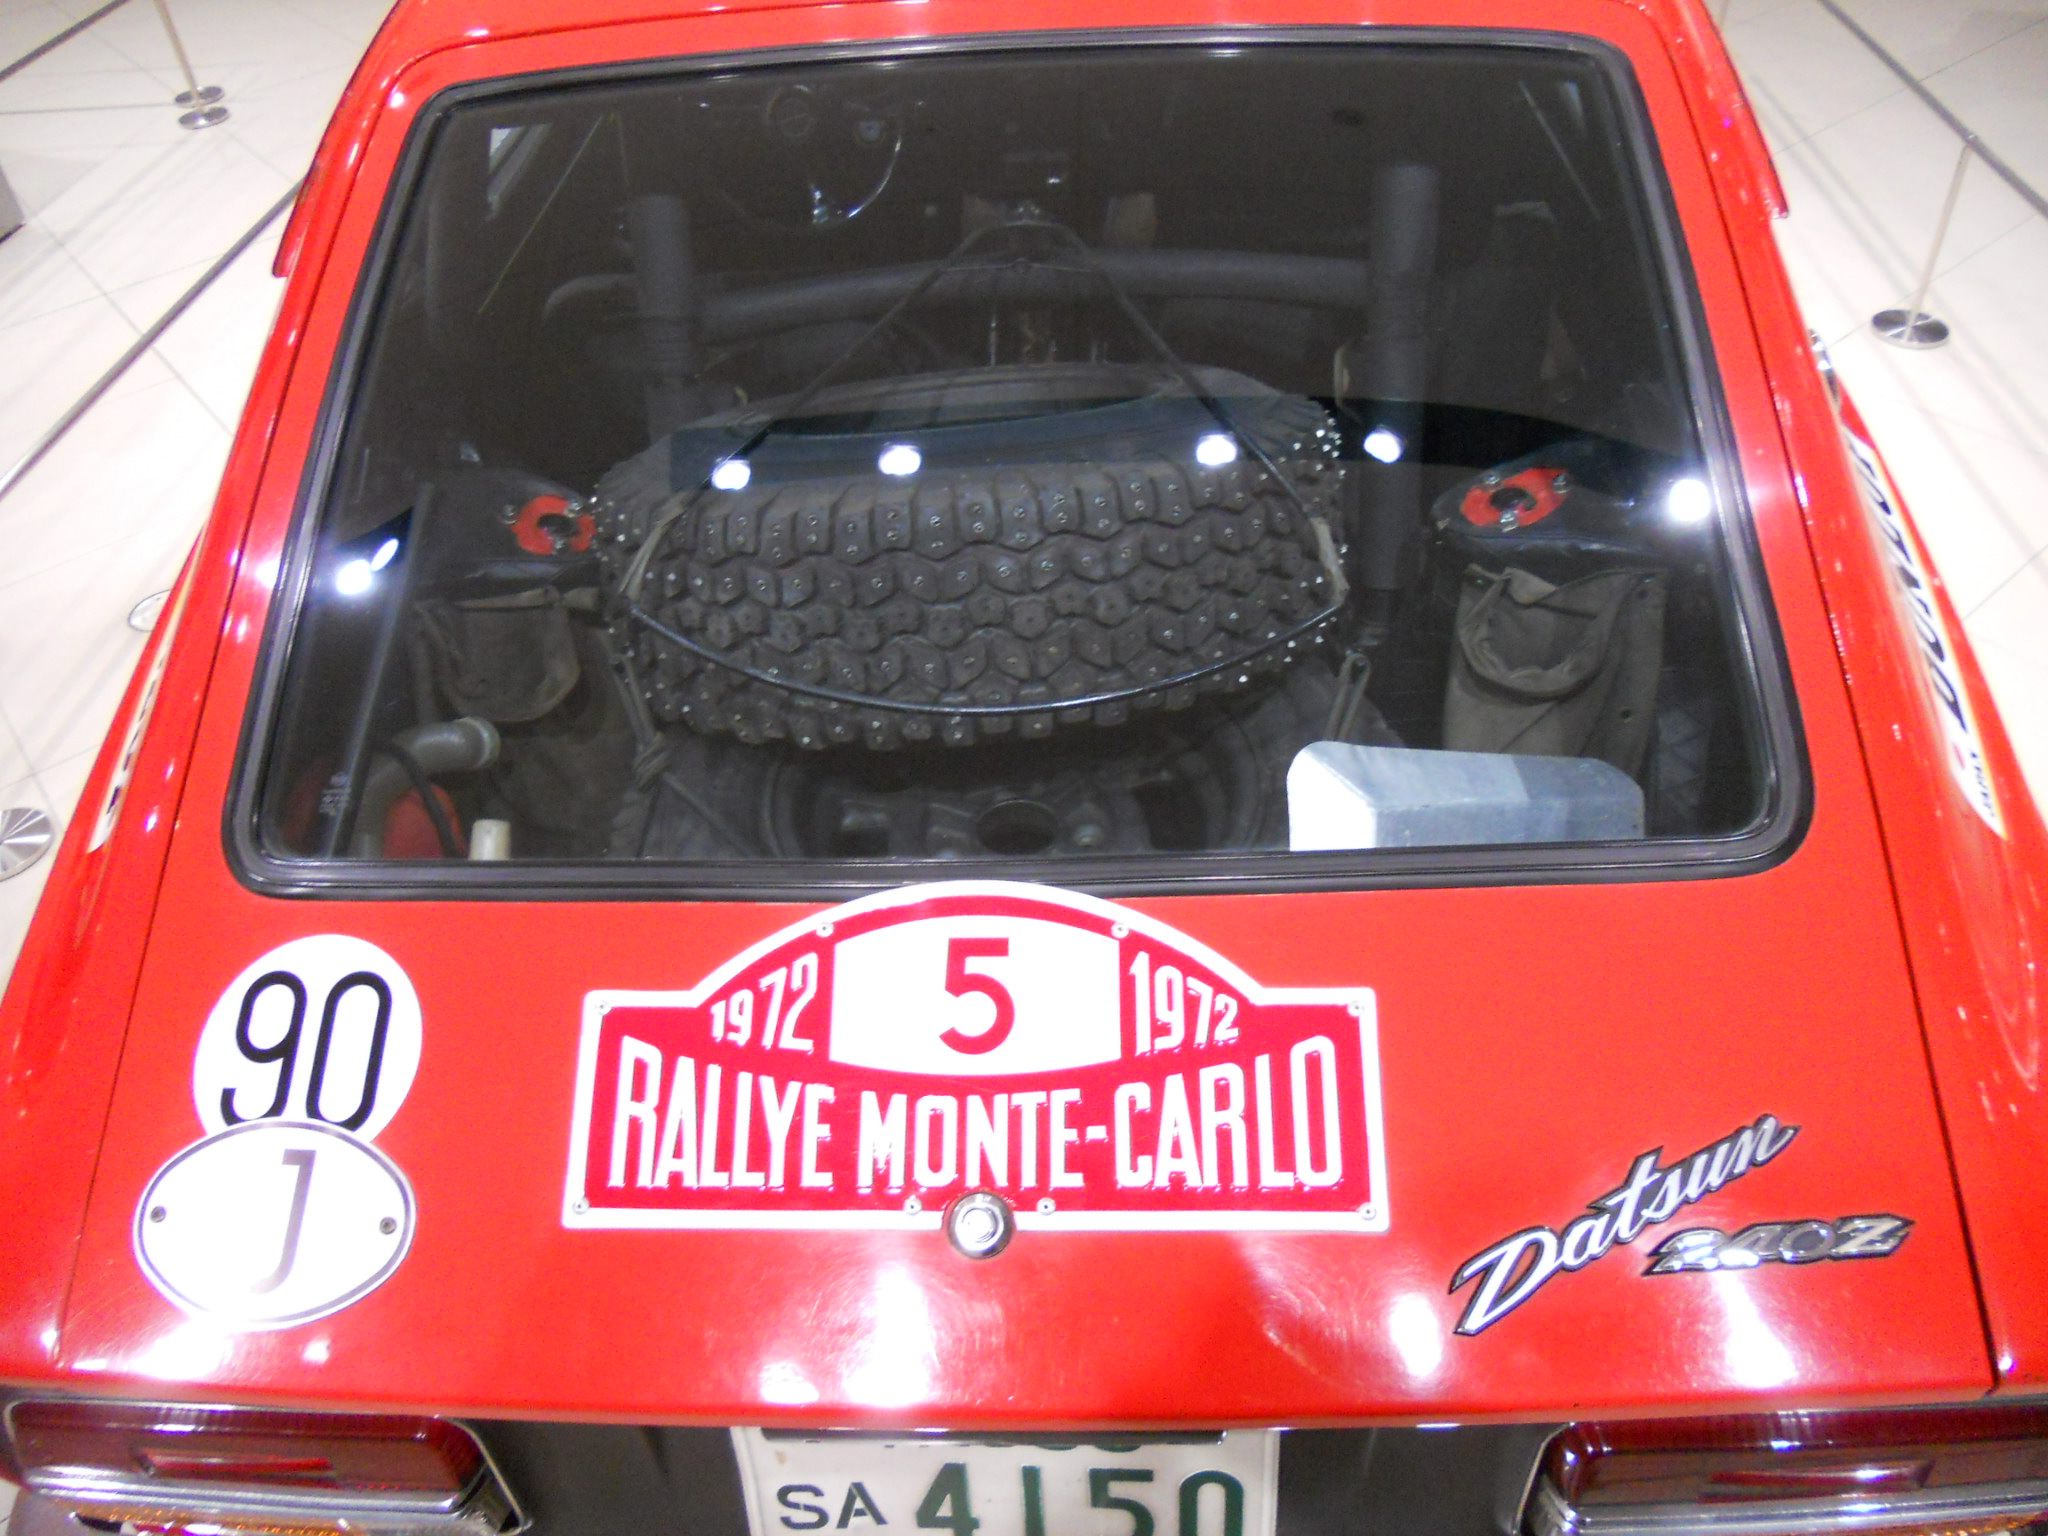
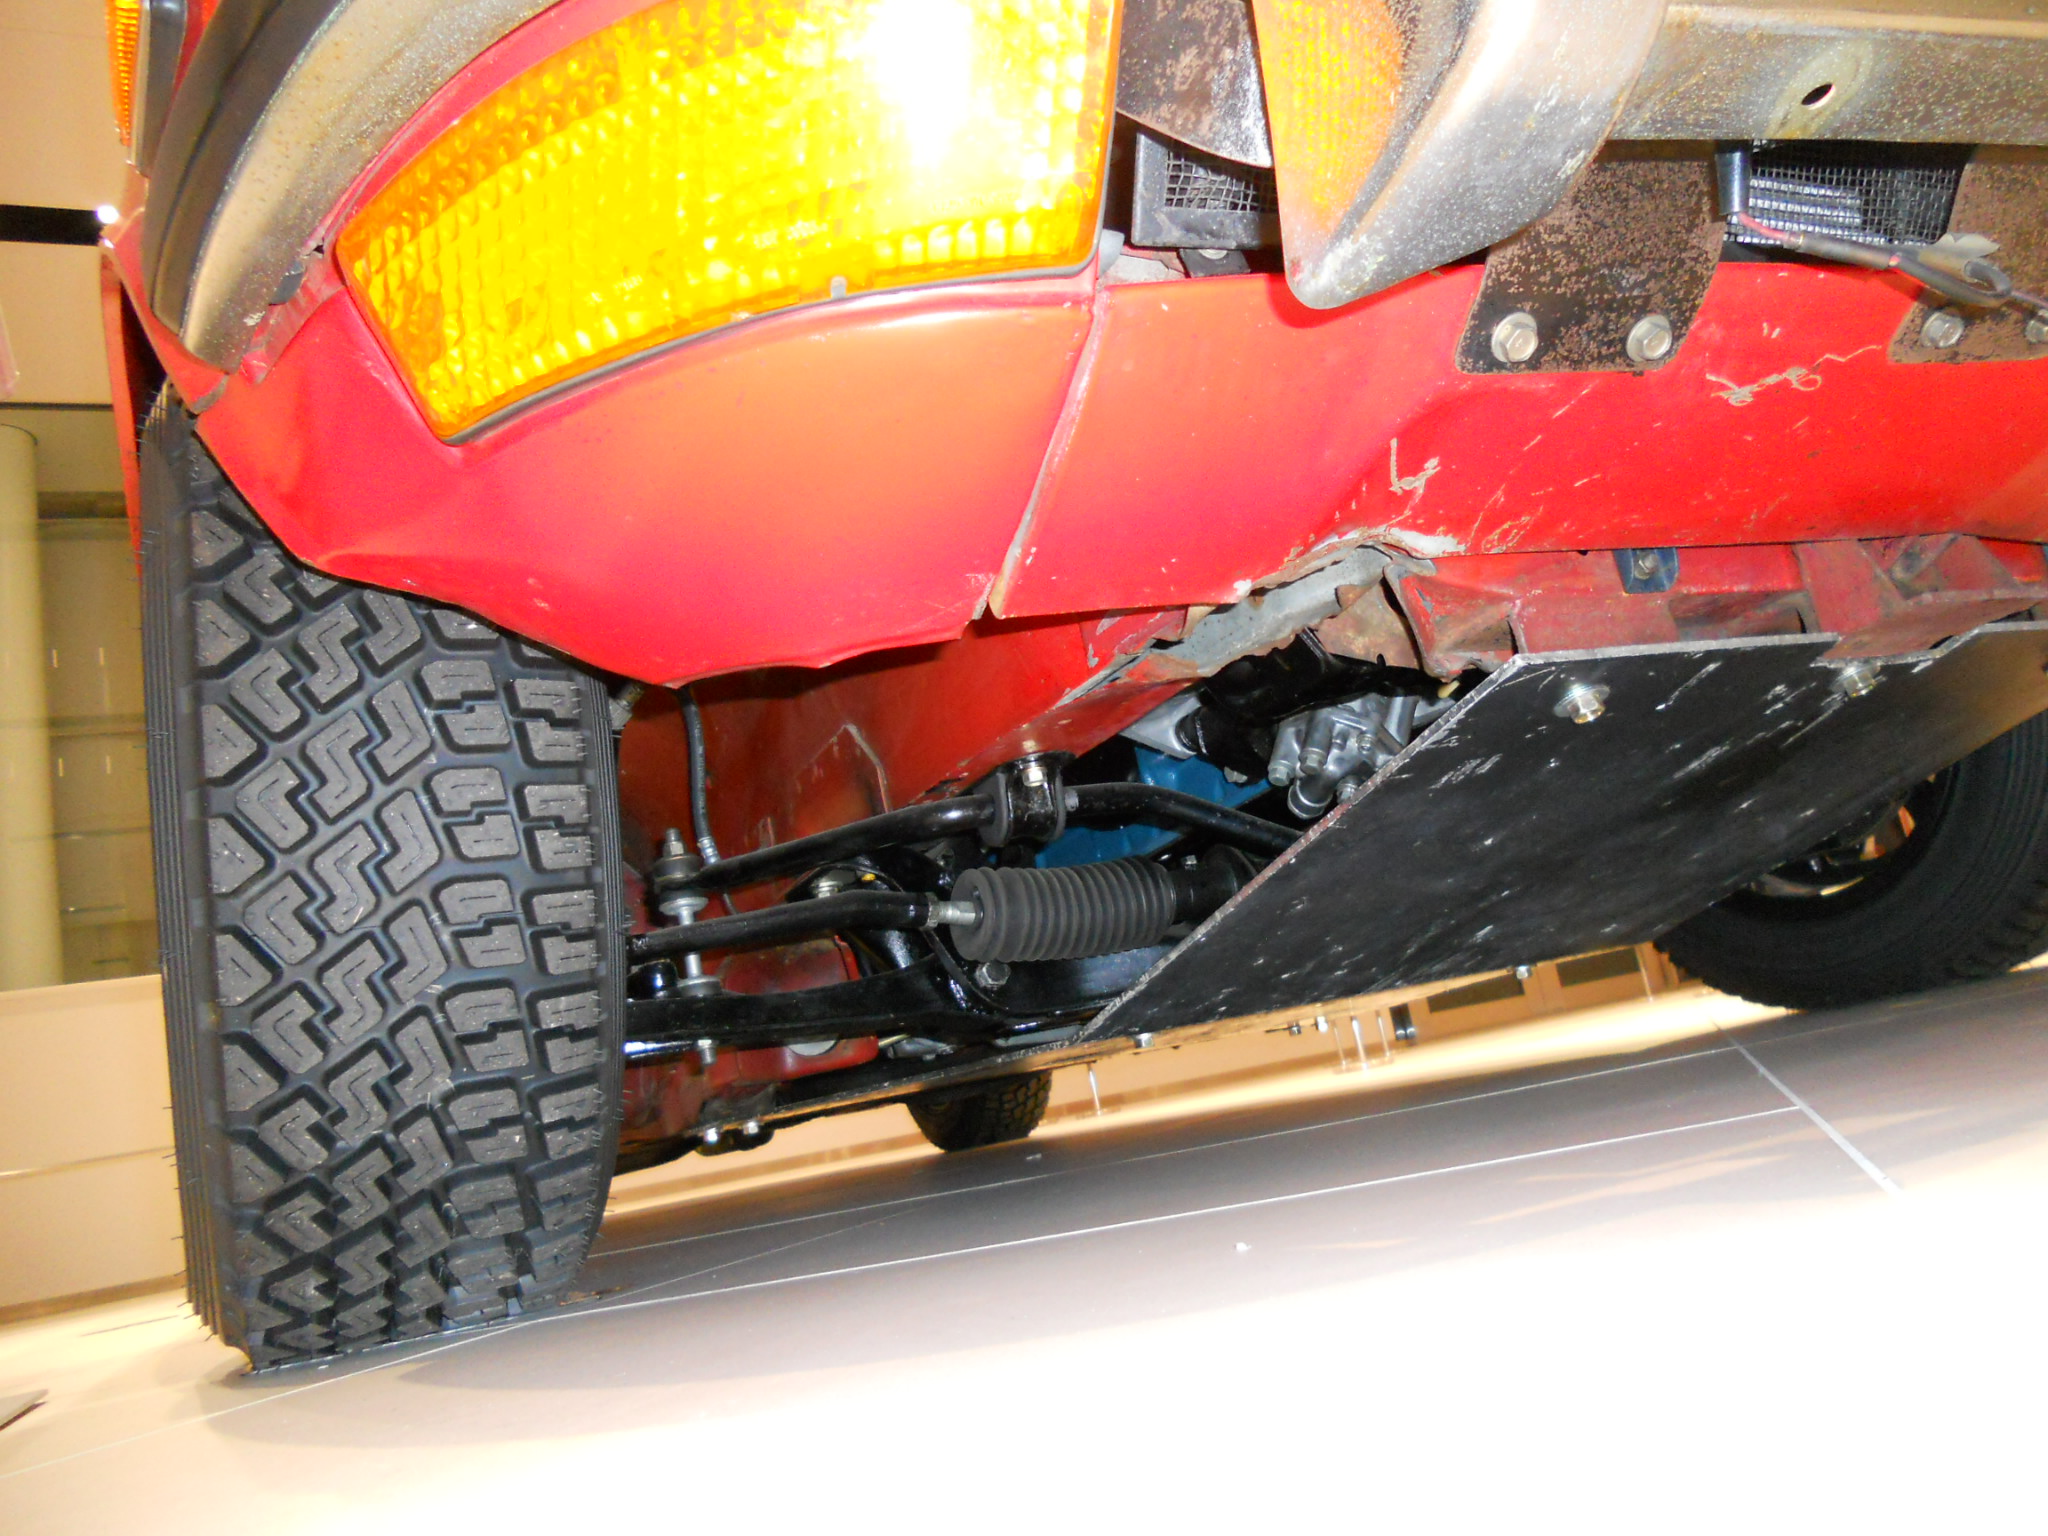
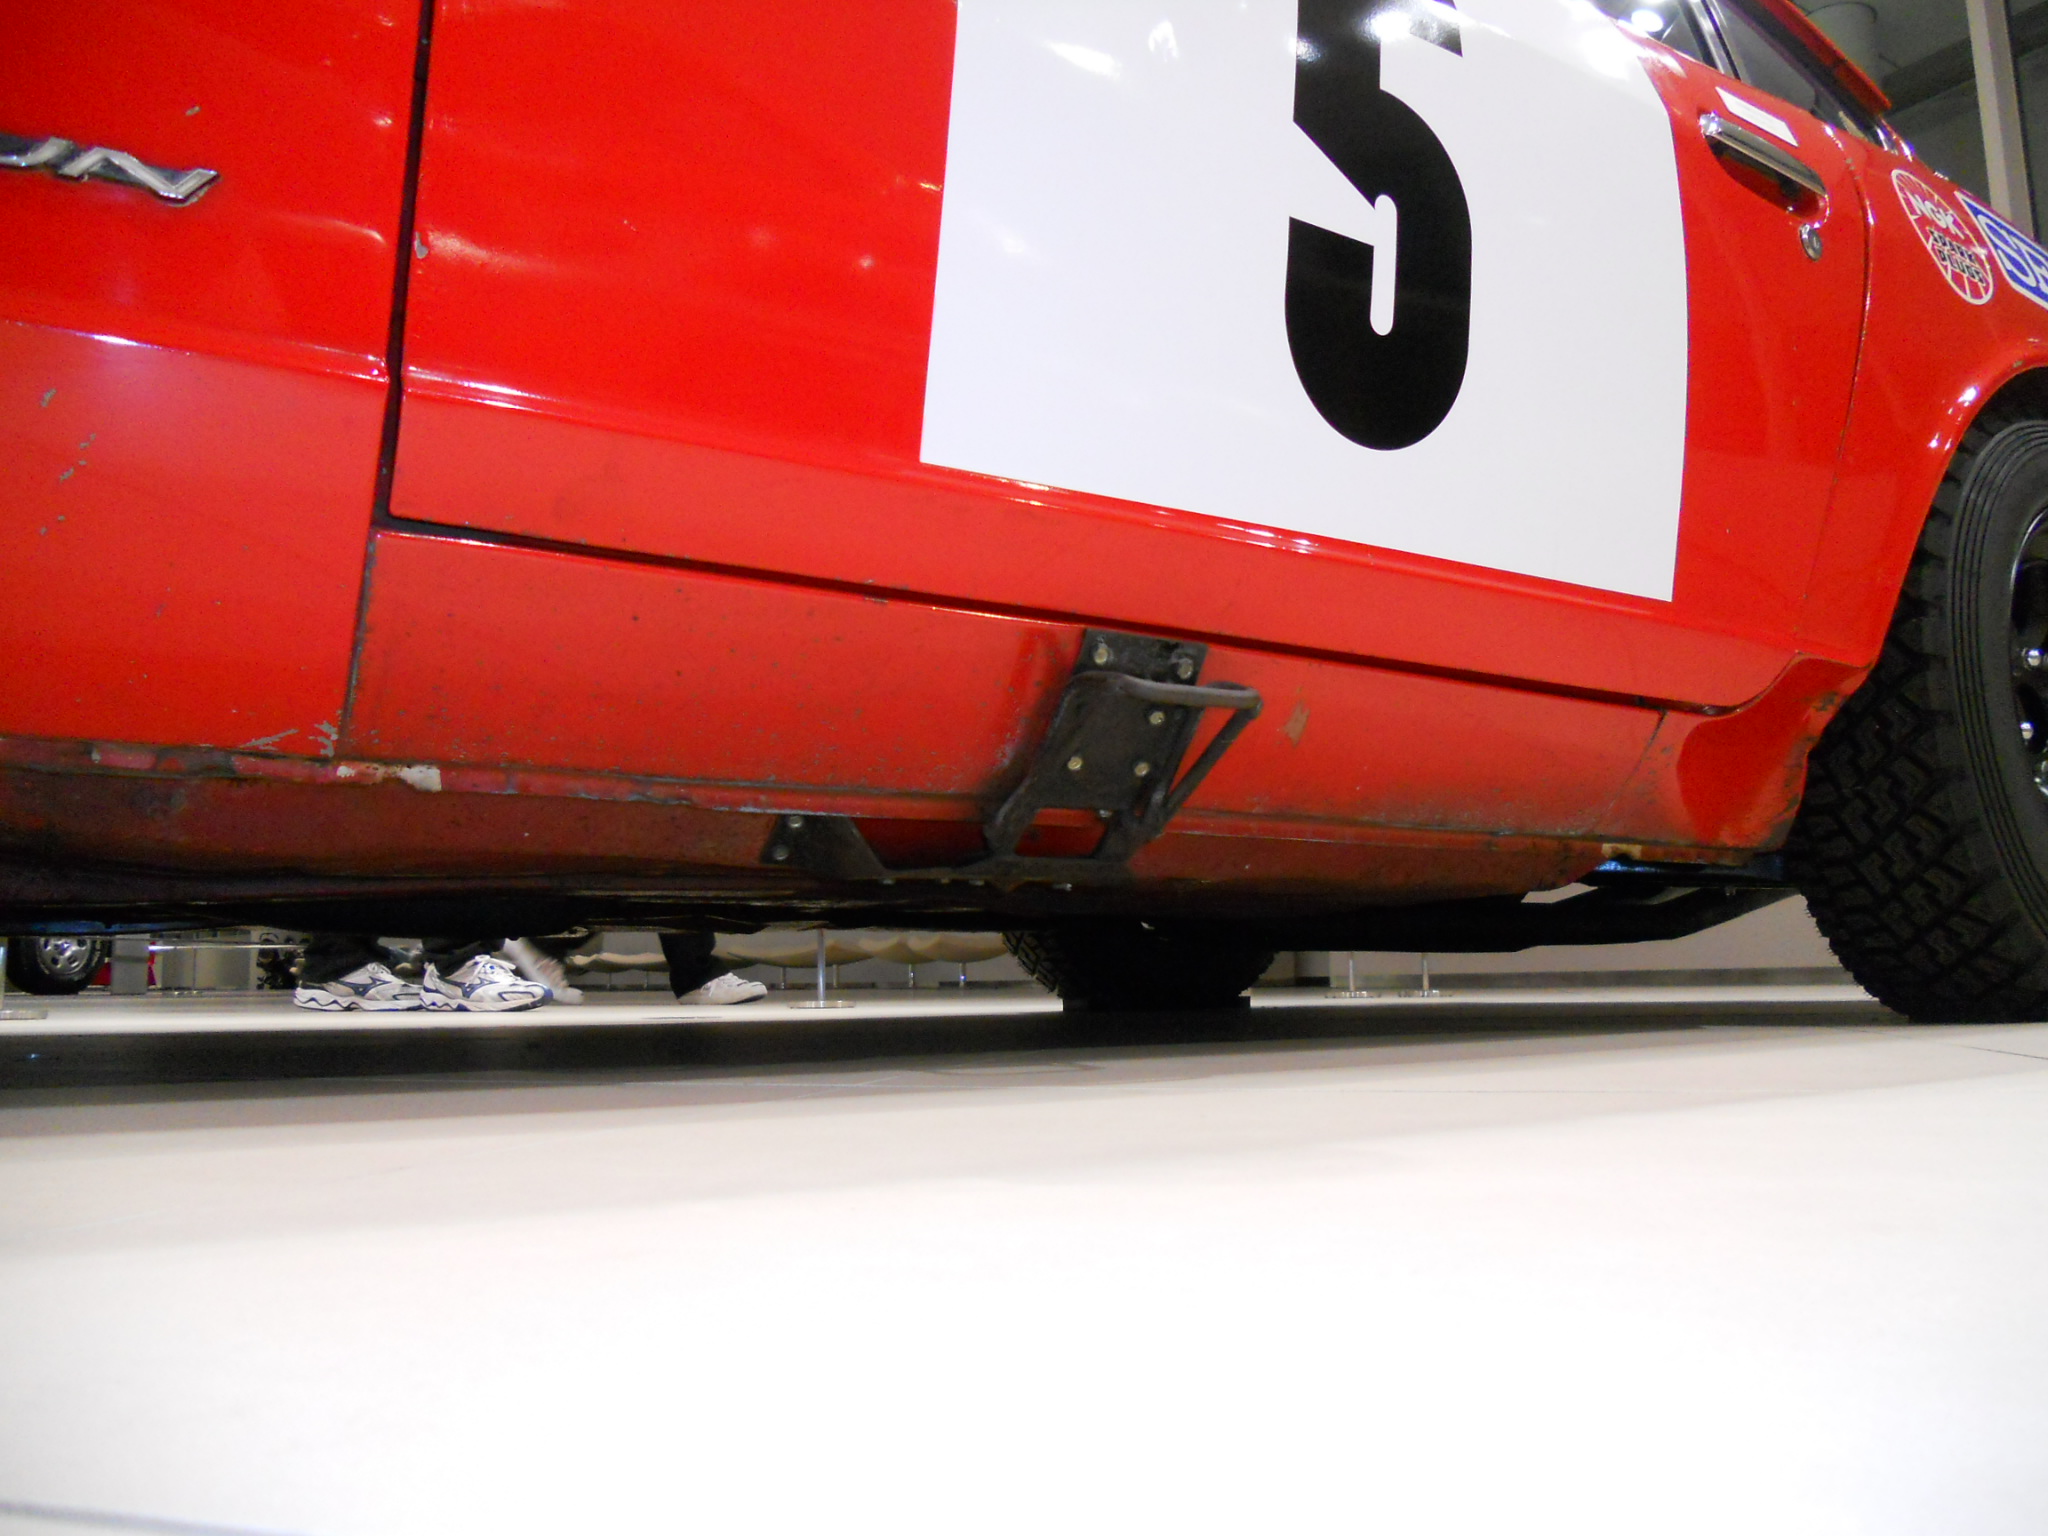
Current tires on the car displayed at Zama (#5) and loaned to Nissan Dealers through Japan are Dunlop SP Sport-85R 185-65-14 "For Rally Use Only" directional tires (marked "Outside" and "Inside" on the sidewall)--THESE ARE DIFFERENT THAN THE STUDDED TIRES IN THE BAGGAGE COMPARTMENT, but comparably-sized.
This is a cross-section of the 'under photos' I took in Lo-Res. They can come on fairly unimpeded. The high res stuff is more in detail of little bits about the car, but from these you can see they have 'dropped' the car for display--look at the droop in the tie-rods, definitely set up for a higher spring rate to lift the car than what is on there now.
In these photos you can see the damage from rubbing tyres, and ripped unit-body parts from things being torn off the car at some time.
You would be surprised to know how well a stock Z does off-road just stock. Lift the suspension by rewelding the perches an inch or two higher and using higher rate springs to prevent bottoming so easily and get some suspension travel dialed in and you are set with a pretty much stock car. For what you propose, your main concern will be lifting it some to prevent bottoming and protecting undercarrige from damage scraping over crap. Have a look at these photos (see their spares: two tires, a shovel, a long-travel jack, and stuff bungeed in bags all over inside the car!) and see if you get any ideas.
This one doesn't need to break the bank. Remember this was a full-on-at-speed competition car. If they did it with this, there's no reason you can't as well!
-
Really? Because Pete Brock seemed to do just fine rallying back in the 70's...
Not with 36-38" tires he didn't. If you are going to make offhanded comments, at least be intellectually honest doing so!
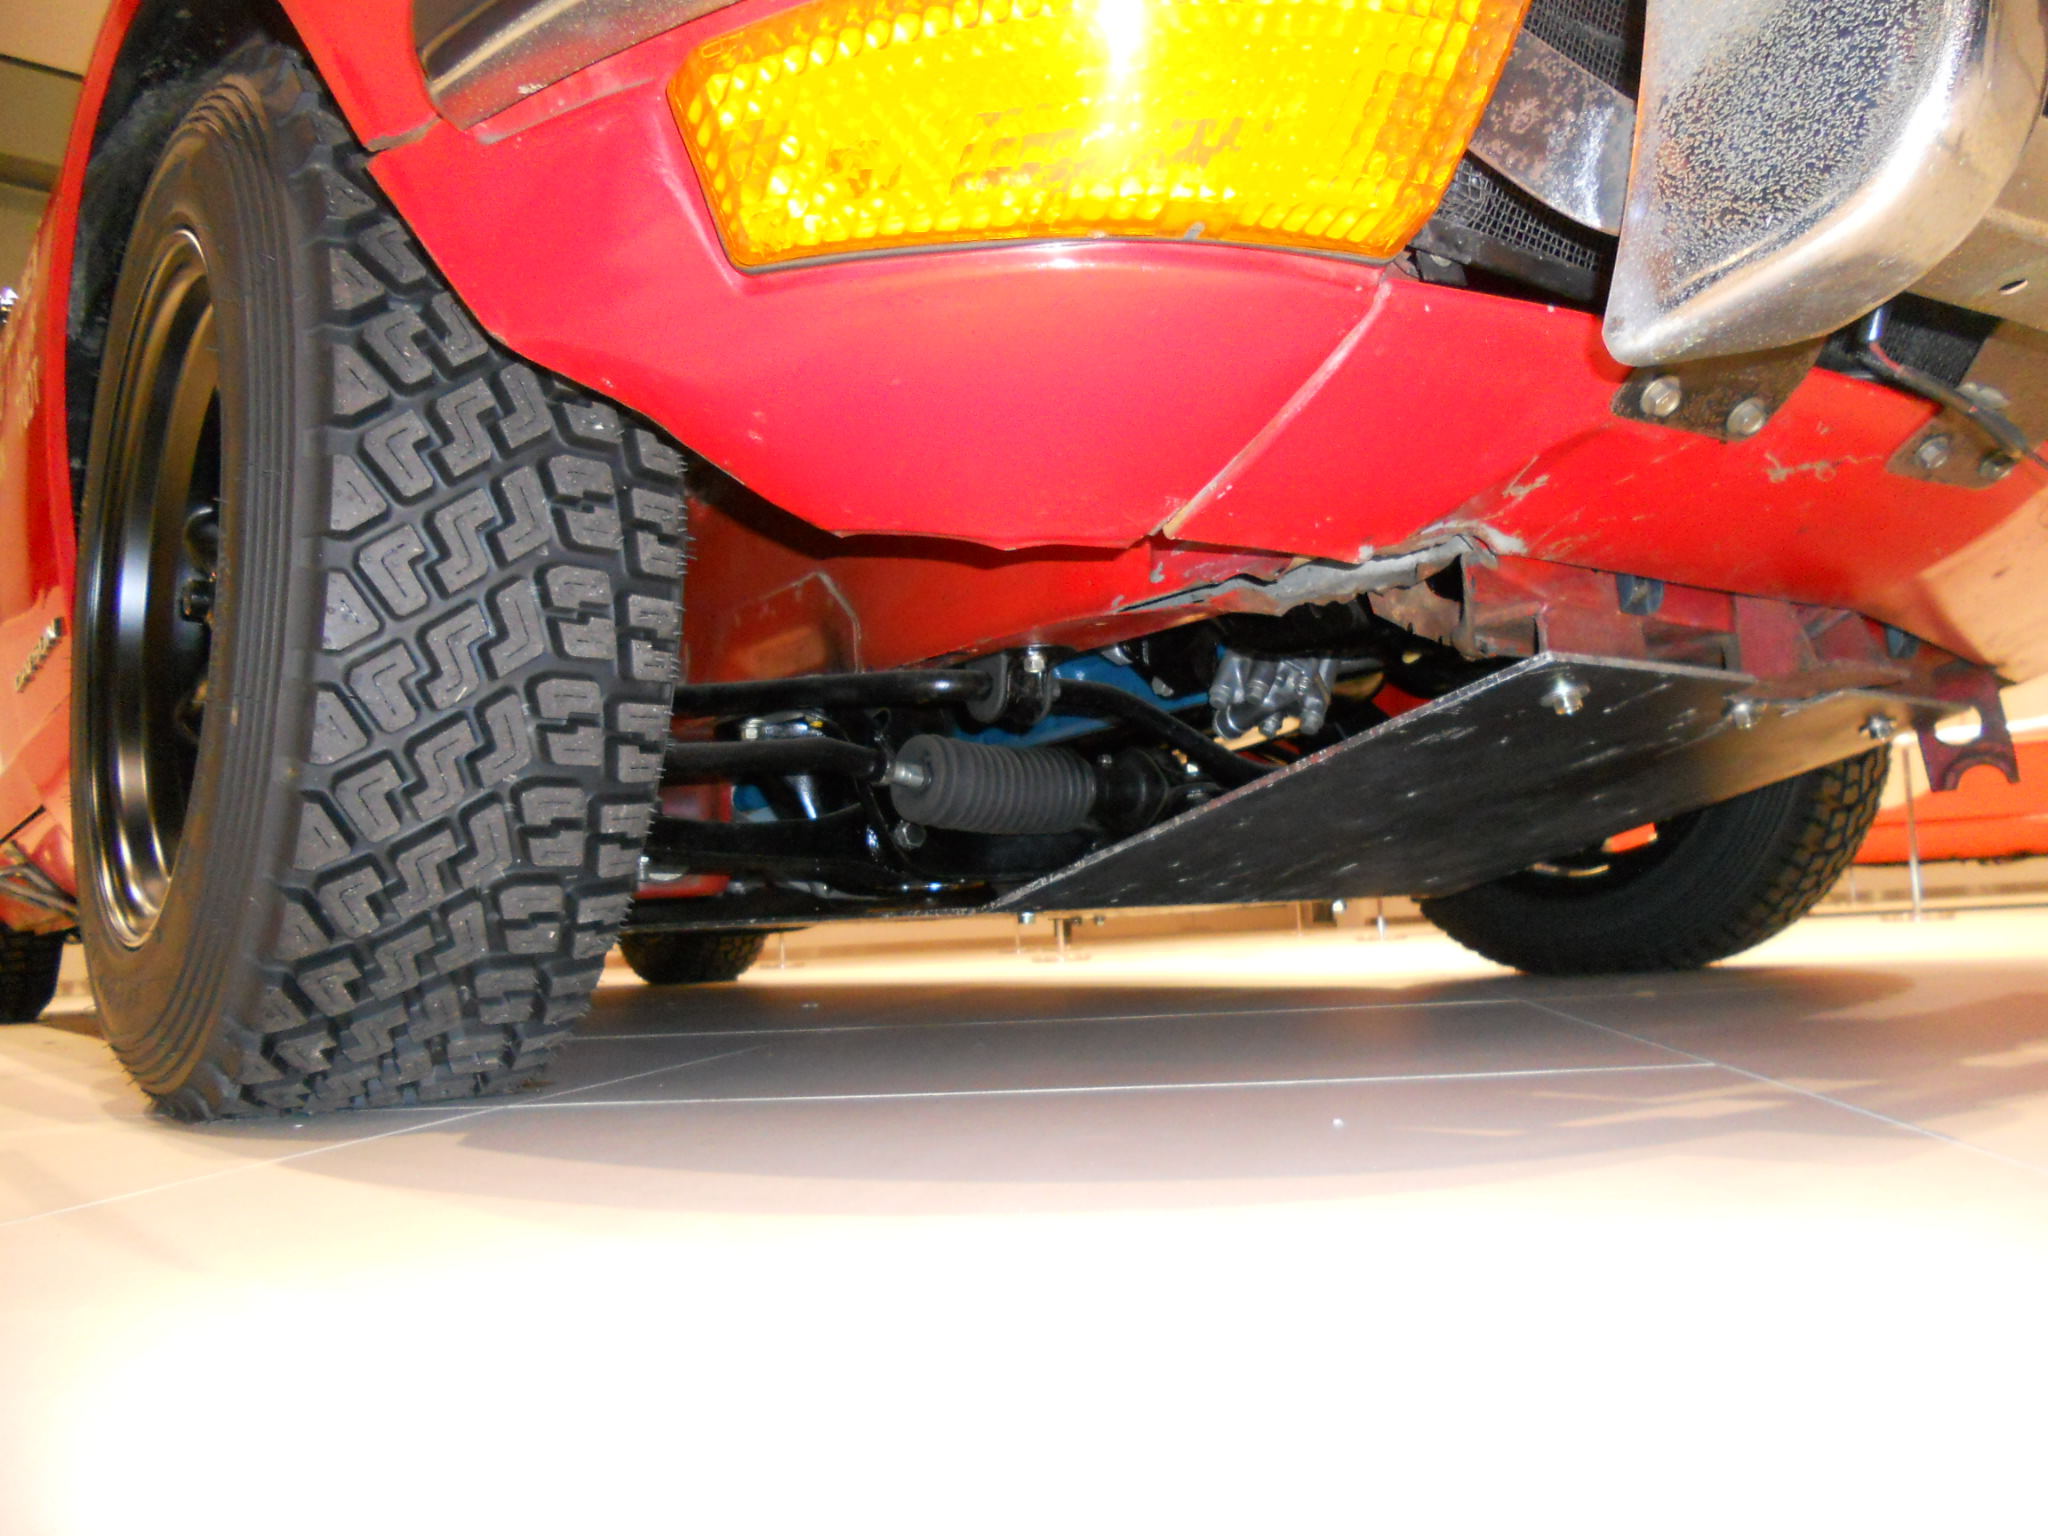
Brock used 7.00-LT-14's and similar sizes. Suspension travel was increased, but not to the extent that even a 30" tire would take full compression without rubbing on something.
If you want to use 36/38" tires, strip the Z suspension out of it, and bolt it on a Bronco-II frame and go mudding. It's been done before.
If you are going to use the Z Chassis for realistic desert running, you will have to be reasonable about tire sizing and actual compression/extension. There are things you can do to increase this travel but physical limitations within the unit body fenderwells aren't going to allow 38's. 28's maybe, possibly 30's. But you are already into the territory where at least a 4.11 is going to be necessary to run around in top gears...likely 4.38's! (But worry not, 4.62's are out there!)
The photo you show as your "inspiration" most DEFINATELY did NOT use coil-overs or ANYTHING NEAR 38" tires! The Works Rally cars used a strut and spring package set up to raise the car, and ran 14" wheels. I actually have photos of not the #11 car, but of the #5 with the EXACT size wheels on it... If you can give me some time, I have them on my archive drive from last year and can maybe post details on the tires. I shot a lot of Hi-Res photos of the car and I'm not too sure on how they will work here without heavy resizing. It may just come down to me reading the sizes in my photo and telling you what it is. I have photos of the shocks with the Nissan Tag "Monte Carlo Spare" still on them and can say they were not coil overs. A simple cutting of the spring perch and raising it a set amount will give you a lift without spending a buttload of money on suspension.
Remember the Works cars competed in very harsh conditions at speed with what many times appeared to be stock components. On closer examination you find thicker metal in unit bodies, or legal-within-the-rules reinforcements to standard suspension components. If you aren't stuck on total 100% factory looking tweaks things like changing your outer tie-rods to heim joints with the use of standard Tie-Rod Adapters to allow for the articulation required without binding makes your life a lot simpler!
I have been in, on, and around those #11, #5 rally cars, as well as the Baja 1000 Bluebird 510 and they're not as exotic as you think. A lot of times people these days do things because the parts are available and 'it's how it's done now'---back then a lot of this didn't exist. They simply reworked stock stuff and to everybody's surprise it worked just fine!
-
big valves help breathing


.jpg)
.jpg)

.jpg)


Lifting a z
in S30 Series - 240z, 260z, 280z
Posted
Never underestimate the fun of loose gravel, a light flywheel, and unpopulated forest fire roads running tall ridges...
Just watch out for the Gleaming Alloy Air-Cars which are two-lanes wide!