Jboogsthethug
-
Posts
1717 -
Joined
-
Last visited
Content Type
Profiles
Forums
Blogs
Events
Gallery
Downloads
Store
Everything posted by Jboogsthethug
-
 I haven't seen one myself but I haven't focused as much on restoration as much as racecaration ha.
 -
Jboogsthethug's 1971 240z build
Jboogsthethug replied to Jboogsthethug's topic in S30 Series - 240z, 260z, 280z
Also, I forgot to post this here but I'm also going to be posting videos covering the updates. Here's the first one just introducing it. I will actually stick with it this go around ha. I settled on naming it "The Shogun" because I felt it was fitting! -
Jboogsthethug's 1971 240z build
Jboogsthethug replied to Jboogsthethug's topic in S30 Series - 240z, 260z, 280z
Thanks amigo! Getting close! -
Jboogsthethug's 1971 240z build
Jboogsthethug replied to Jboogsthethug's topic in S30 Series - 240z, 260z, 280z
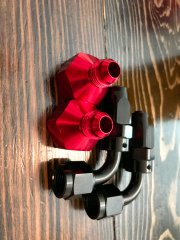
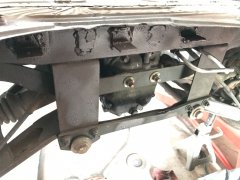
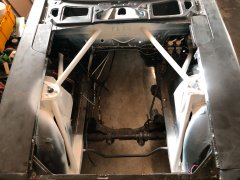
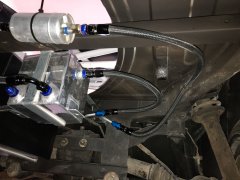
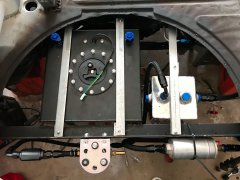
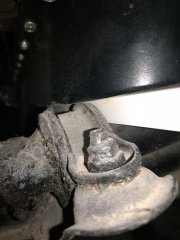
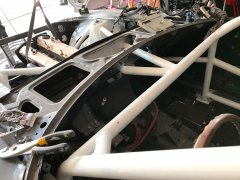
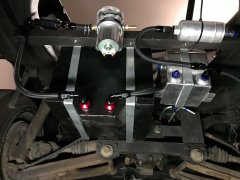
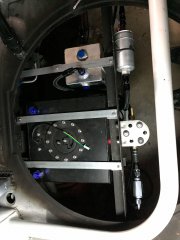
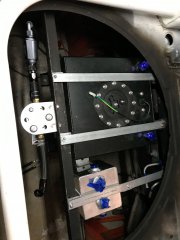
When I did the first set of mounts I learned a few things but also did them in ways that I wasn't excited about per se. I later learned more and so I tried to apply my new knowledge with the second set. Firstly, I didn't know how to keep the motor straight. I learned a bit via the internet and found a nifty trick of using a string tied in the direct center front to back. So after a few measurements and marks, here we go! I also did my best to level out the engine beforehand but it ended up being a 1 degree downslope towards the rear. I would've preferred the opposite (1-3 degrees sloping forward) but with my oil pan being bigger it didn't allow my engine to drop forward as much as I'd like. That's ok, I have future plans that will make this oil pan obsolete so I'll get it perfect then! Of course, the engine does still have a slight lean to match factory. Here's a thread I started that might help anyone interested in learning more about that.: Using the rubber mallet to get things dialed in before fabbing. You can see I have a piece of MDF board sitting on my cross member giving me a tiny (1/8" or so) gap from the bottom of my oil pan to the top of the crossmember. I also removed the stock mounts as I decided to go straight solid mount on the motor and tranny mounts. I cut these piece off the first set of mounts as I knew I could easily reuse them. Gearing up for the measurements. First, I made these as the base for the mounts to the crossmember. I then put a bolt through and tightened them down so they wouldn't move. Did the same with the engine side of things too. Then, I made measurements and got it perfect with cardboard! Not the kind with the air pockets in them. The kind that is thin and stiff works best! I just did my best with measurements first then took my time and got the pieces perfect. You can see the passenger side is longer and skinnier than I would've liked but that's also due to the oil pan size. Should be plenty strong still! Transferred to some 1/4" (if I remember correctly) thick metal. Plenty strong I'd think! Cut out! The tabs, rectangle bar and the two squares on the left are for the tranny. Cleaned up the rust ha, looks much better! I put the pieces in place and tacked them up, here they are before the back plates were added. Then fully welded! My welds are getting better. Not perfect but I'm happy with my progress in that realm. In place and bolted down to check for warping. Fits great! Then on to the tranny. The RB25 tranny causes problems with the stock tranny mounts as far as fitment goes. The speed sensor is in the exact spot of the mounts and just hits it. Plus, as you saw from my first mounts you have to add extensions to mount up and it puts undesirable leverage on the stock mounts. So instead, I cut those completely out and used the tabs and the bigger squares I fabricated earlier to weld on new tabs. I welded the squares in the place I'd want the tabs to spread the load a bit across the thinner metal. Then I welded the tabs to those squares. I used the rectangle bar, drilled it out and bolted it up to the tranny. I removed the stock bushing mount from the tranny and bolted to that mount. I drilled big holes on one side and small holes on the other to access the bolts easily. You can see I accidentally drilled those backwards and since I had no more bar left I cut tabs and welded over the big holes then reversed it. You can also see the side holes that allowed my bolts to go straight through the tabs and old it in place. My welds are less good here as I am not great at overhead welding yet ha. Oops! Welded up a bit. They will hold but they are not pretty ha. I'll clean them up later when I get under to paint. All in and solid! I am feeling much better with these mounts. More to come! -
Jboogsthethug's 1971 240z build
Jboogsthethug replied to Jboogsthethug's topic in S30 Series - 240z, 260z, 280z
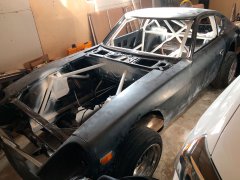
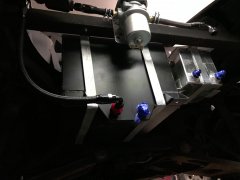
@Zetsaz Here she is with the tint done up next to the 4Runner! Both great cars! Next up, I decided to throw the engine back in and start getting it all buttoned up. Before I did that, I needed to get the oil pan and oil pickup tube finished. I bought a $20 engine stand and went to work! Removed the tranny from the back: New bolts all around! I covered up all the ports and plugged it up then wire brushed the old gasket off and cleaned it all up. I know some people frown on that and a razor would be better but this was faster and I've not had problems yet doing it this way. All cleaned up, nice and pretty! You can see the problem with the stock oil pickup tube angle vs where it needs to be. So cutting was needed.. The straight piece was from some pipe I bought from a local metal store, perfect fit! Tacked in place to make sure it is all good. A LOT of measuring happening here to make sure there is the optimal clearance between the bottom of the pan and the tube opening. More on that here: It all looked great except one problem... My oil pan was slightly too deep for the mounts I already made! This is it sitting on the crossmember, no clearance unfortunately. Too much gap for washers IMO. So with that, I made the decision to just start from scratch. I wasn't completely happy with my tranny mount anyway and I had different ideas for the new one! So, I ripped it all back out again, cut up these mounts and started from scratch. That's where we'll pick up in the next post! -
Jboogsthethug's 1971 240z build
Jboogsthethug replied to Jboogsthethug's topic in S30 Series - 240z, 260z, 280z
It's a great dad mobile for sure ha. I picked it up for 7800 and it had 96K miles on it. I get 40 miles to the gallon, can fit a ton of crap in it and it's pretty quick so overall I'm happy for sure! The new Tacomas are awesome though. We bought my wife a new 4runner in 2016 and I love it! It is not cheap though ha. I know I can trust it to always get her where she needs to go though and it will last forever! I actually really love Toyotas. My next project is probably going to be an 80 series Land Cruiser, those are awesome! -
Jboogsthethug's 1971 240z build
Jboogsthethug replied to Jboogsthethug's topic in S30 Series - 240z, 260z, 280z
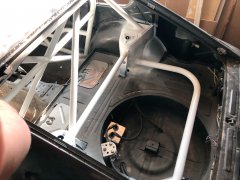
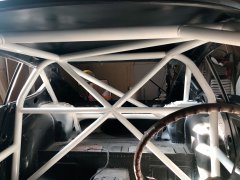
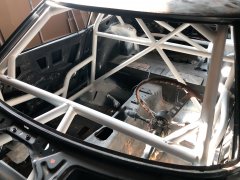
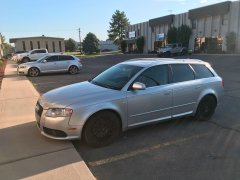
Thanks @jhm! SO after I got the cage back home, even after wiping it dry the rain had done it's worst and the cage started to rust pretty much instantly (no real shocker ha). So I got to work and gave the entire cage a sanding with some 2000 grit if I remember correctly? Sanded it all real nicely. Wiped it off with paint prep, covered up all the paint (that hadn't been ground off) and taped it all off and gave her a nice white coat to prevent it from rusting again! Just some paint+primer rattle cans from walmart. I actually wish I picked up a different brand after seeing how easily it comes off. Eventually I'm sure I'll sand and paint it again because of that but for now I've got some protection and I'm happy! Also, picked this TDI Audi up for a great deal as my daily about a year ago now ha. Thought I'd share. Great little car! More to come! -
From the album: Jboogsthethug's 1971 240z build
© Jboogsthethug
-
Jboogsthethug's 1971 240z build
Images added to a gallery album owned by Jboogsthethug in Members Albums
Jboogsthethug's 1971 240z build -
-
From the album: Jboogsthethug's 1971 240z build
© Jboogsthethug
-
From the album: Jboogsthethug's 1971 240z build
© Jboogsthethug
-
From the album: Jboogsthethug's 1971 240z build
© Jboogsthethug
-
From the album: Jboogsthethug's 1971 240z build
© Jboogsthethug
-
From the album: Jboogsthethug's 1971 240z build
© Jboogsthethug
-

From the album: Jboogsthethug's 1971 240z build
© Jboogsthethug
-
From the album: Jboogsthethug's 1971 240z build
© Jboogsthethug
-
From the album: Jboogsthethug's 1971 240z build
© Jboogsthethug
-
From the album: Jboogsthethug's 1971 240z build
© Jboogsthethug
-
From the album: Jboogsthethug's 1971 240z build
© Jboogsthethug
-
From the album: Jboogsthethug's 1971 240z build
© Jboogsthethug
-
From the album: Jboogsthethug's 1971 240z build
© Jboogsthethug
-
From the album: Jboogsthethug's 1971 240z build
© Jboogsthethug
-
From the album: Jboogsthethug's 1971 240z build
© Jboogsthethug
-
From the album: Jboogsthethug's 1971 240z build
© Jboogsthethug
-
From the album: Jboogsthethug's 1971 240z build
© Jboogsthethug