
Greeko
-
Posts
171 -
Joined
-
Last visited
-
Days Won
3
Content Type
Profiles
Forums
Blogs
Events
Gallery
Downloads
Store
Posts posted by Greeko
-
-
here is some decent reading.
It seems like the hx35w may be able to just support what you like.
Nice to see a fellow vancouver tuner!
-
Hi guys,
About me
I'm new to these forums, and will be posting a build log soon for my 1972 240z project. I just wanted to quickly post up a review over a company that my friends and I haven't really heard of before getting one of these cars.
Why I ordered this part, and chose Retro-Spec
I wanted a spoiler for my 240z, and figured I wanted to get a nice lightweight one so that my hatch and strut wouldn't have to put up with a weight acting as a lever on the end. (This car will be my new DD). So I searched around and decided I wanted to give the company Retro spec a try. I did so as a test to see their quality and service since they have various goodies for our cars, and didn't want to drop a fortune on them until I was sure they were worth it.
I want to make a note that I don't want the look of carbon fiber on my build, so any composite pieces will be painted appropriately. However, some of you may want the look of bare carbon fiber, so this review may be worth while.
Ordering Process
There is two websites, and a Facebook page. The two websites are a little conflicting. One has a self check out, the other has a notice to email them for part ordering and information. I didn't see the second site until after I ordered from their self help website. To me, its unnecessary to have more than one site, and at first, was concerned I just bought from a fake site, so emailed them to confirm and got a response shortly after . I was kindly informed not to worry, and that my order was already being processed, and to check out them on Facebook, if I have it. (I don't) So they do respond, and quickly, which is good.
Cost
I paid 279.99 for a carbon fiber tail with shipping to Oregon. Not bad.
Shipping Review
I ordered 5/14/2016, and today (6/27/2016) got the package. A little over a month turn around time, but I don't mind for composite pieces. I understand it takes time. However, I didn't get any tracking information, and the "shopping notice / receipt" email that was sent claims it will update itself to show current status. It never changed to show it shipped, so today before I got it, it still said "order processing". Its important to me to have shipping information so that I can be sure to be there when the part comes, as well as ensure it wont be stolen when delivered. So this is a negative to me.
Quality
Okay and now finally about the part. I will explain first, then show pics. The spoiler looks good from afar, no noticeable problems such as being wavy or anything.
Up close, the carbon fiber is flawed a bit in some places. However the real problem comes from the resin. Its fish eyed in places, has some type of lines running across from the mold, is not very smooth, and has some bubbles. What makes matters worse, is a few chips and pits. See the corner in the picture below. The pictures dont really do it justice how unpolished and rushed the part looks.

Overall
Not bad for the cost. My friends agreed that for the price, its just fine. The cons such as the turnaround time, lack of shipping updates, and the fact that the carbon fiber can never be left raw and unfinished due to its poor appearance may be a definite negative to some. Like I said above however, I don't care for the look of it for this particular project, but its still sad none the less. I will be giving this part some good sanding and so forth before it gets painted.
Will I buy from Retro-Spec again?
I'm really not sure. I haven't tried all the other options out there, so I will probably try another company for a competing part.
That's it for the review guys. I cant wait to post up my build!
IMG_20160627_184422_01.jpegIMG_20160627_184422_02.jpegIMG_20160627_184422_04.jpegWhich model spoiler is this ?
Hi to the OP, remember we have no question asked a money back guarantee if you want to use it.
Thanks!
Good to see a manufacturer willing to stand behind their product!
-
That would be a pain to integrate!
-
havent had much time to post anything lately because of work and all but i seem to only run into prob'ems with this build. Ecu was repaired and i firgured everything was good to go. well i was wrong I cant get the engine to rev past 2200rpm. i went to pull some codes and came up with code 41 which is for the throttle position sensor signal, open or short in tps signal, ecu.
i tested an ecu off of a local soarer and same problem so i ruled it out, went to the local parts source and grabbed a new tps sensor plugged it in and still the same. The wiring harness is brand new and from wiring specialities so i ruled that out too. inspected my coil pacls and noticed some of them had cracks in the so im going to purchase some new coils tomorrow morning. assuming its not the coils does anyone else have suggestions?
I scrapped the toyota Ecu and went with Microtech...best money i ever spent!!! Started up right away!
The cracked coil packs will cause shuddering and knocking ...you should stil be able to rev it. Does it struggle? Idle smooth, revs smooth to 2200? have you checked the voltage signal going to the TPS? one wire should be voltage, one reference and the other signal
-
Gosh darn thats quite the dilemna.
There are a lot of choices for swaps... Just across the border you can get a 1j or 2z engine for 1500-2000.
What did you end up deciding?
-
BTW the link you posted tried to hijack my browser. Don't click on the link.
Really, worked fine for me!
-
I'm wondering what compound I can use to bond the stock metal hood hinges to fiberglass hood?
I would Epoxy some fasteners to the hood so you have some adjustment in the latch.
-
I had a b18c CRX back in the day and I now have a 1978 Datsun 280z... The crx was fast if I could get traction but my Datsun is much much faster!!!
I did however pull out the stock L28 because my horsepower goals for a NA L28 would cost me $10000 in rebello parts, machining and bits/pieces. I opted out for a $4000 fix. A 1JZ with standalone management. I now run 338 hp at the wheels at 12 psi and she is a BLAST to drive. If you want to stay with the stock L28..maybe do a turbo option? Maybe thing about a 280zx turbo swap?... there are a couple for sale on the forums...
Good luck
-
In addition if someone has a parts Number list to help track down some of these bushings for my 1978 Datsun 280z I would appreciate it.
-
Hey guys,
I have been looking for a set of replacement bushings and do not want to go the Poly Route.
Has anyone found a supplier that carries a decent set of bushings? Mainly LCA. Mustache bar.
Thanks in advance
-
Okay. Do you have pictures of how you did this? I have a colored wiring diagram which has them labeled c1-c11, do the connectors say which one they are on them? Truthfully I didnt look at them that hard when removing
Ill be using the stock 1j ecu with a harness from wiring specialties
The connectors are pretty easy to decipher. Just look at the pinouts on the drawing and look at the connectors, a bunch of them have non terminated pins,
I am attaching a commented PDF that helps you with alternator terminations, starter terminations etc etc.
I hope it helps. I was going through my notes a bit
-
-
When I removed the engine harness I noticed that it seems the body harness no long has a source for power? Its possible that it still does but I have no idea where it would come from lol. Any advice would be helpful
Hey man,
I just finished up my 1jz 280z.
You need to use engine harness c1,c2,c3,c4 and c9 with your JZ swap.
You integrate these wires/connectors to the alternator, starter, headlights and a couple random items underneath the engine bay.
Depending on what you use for ECM you will have to splice and integrate the original harness into the new.
-
I am having incredible difficulty finding wider wheels for my Datsun.
I was looking for 17x9/10 or 18x9/10 wheels. Everything I find online has incredibly bad offsets and would require wide spacers.
Let me know what you have.
Regards,
-
Thanks man,
that helped me out! I will be ordering that bad boy!!
-
Very nice attention to detail. I wish I had the time to do what you are doing here.
-
Not those no, the rubber stoppers in the corner of the door below the door latch
-
I am interested as well.
Let me know when they come up!
Regards,
-
I hope we're talking of the same part i'm talking of sill plates. Thanks.
Taking about the door stops. I dont need sill plates..I should get pictures up
-
Hello everyone,
I picked up a project car and now its nearing completion. I need some interior panels that were missing from the original owner. Hope you guys could help me out
1) Gas tank sender cover ( its the metal circular cover that goes in the back hatch area)
2) Tail Gate Trim ( its a rectangular plastic cover that covers the metal part of the Hatch)
3) Door Stops (the pieces in the bottom corner that act as a stop)
4) Arm Rest chrome cover ( the chrome part that covers the end of the arm rest that bolts to the door)
Thanks in advance,
Niko
-
I just finished my 1978 Datsun 1jz 280z swap. She is purring like a kitten. Running 335hp at the wheels with 12 psi. Mechanical is done, just requires paint. I am just over the border from you in Vancouver, I did pick up the car originally from Everett area. It was a california car.
Message me if you are interested.
-
Have you reached out to them?
Their site says they are satisfaction guaranteed.... I mean, it looks pretty good, just could have used another hour or so of prep and finishing... not a HUGE deal... Maybe he will give you a break on your next order or possibly throw in free shipping because of it... -
Wow, Sooo much work in the details! I was lazy and just slapped in a 1JZ lol
-
Interesting, I think it's probably due to how far back my engine is then. Curious to see how yours comes out.
Wasn't able to do much this last weekend due to the rain and probably won't have any major updates in the next two weeks.
Started working on attaching the body harness to the bulkhead connector and noticed two wires for the headlights were severely corroded. This might have been one of the reasons I had issues with my headlights. I went ahead and disassembled each of the pins from there housings. Once that was done I submerged them in a vinegar salt mixture for about 15 minutes or so and wire brushed what remained. I then soaked them in water and baking soda to neutralize the vinegar/salt. This procedure has actually been working really well for me.
That works really well for cleaning but make sure you put some sealer over the metal... Once you have stripped the coatings then they will corrode super quick.. If you have metal contact lubricant or even WD-40 (its a miracle spray) will work well to keep things nice, clean and operating well from my own experiences.


seattlejester's 2jz swap info
in Toyota L6 Forum
Posted
I would like to put in my 2 cents here.
I went with a 1JZ because I got the ENTIRE swap for 2400 us currency. Thats 1jz gte non vvti, w58 etc.
I got it through a local shop in the vancouver, bc area who bought it from an importer. Reason why I did this was for warranty purpose. THe shop has a good reputation and was very easy to deal with!
In hindsight..I should have ponied up the extra $1000 for the 2JZ swap...but Its in the car an running ludicrously well!
ECM:
I scrapped the stock toyota control because of a couple reasons:
Plastic connectors were worn and brittle;
aging wiring harness, custom cutting and splicing would be needed
Control was overcomplicated from the factory (its got some nice features but I didn't need them for what I wanted)
Chipping the stock computer is difficult; i did not want band aid piggy back control
So I went with a super easy to use/start Microtech EFI. I fabricated a brand new harness custom to the Datsun engine bay, got a used ecm and was all in for $1200.
The car starts, idles and runs marvelously with GOBS of power!
Radiator
I went with Champion Radiators 3 row for $200...It is THICK, bolts right up to factory mounts and uses toyota factory hoses with NO issues!!! I am super happy with it
http://www.championradiators.com/Datsun-280z-radiator-1975-1978
Mounts
I also went with CX racing for mounts. It was cheap, it works and have no issues
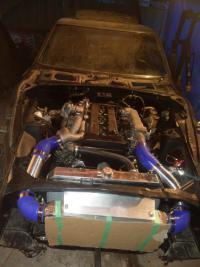
Intercooler
I went with CX racing again for this. I got their intercooler kit with piping..It fits like a glove! Super happy with this product for the value!
Just my experience... I am just over the border if you want to take a look at what I did. Its running at the moment but the interior is in 1 million pieces lol