appleslicer
-
Posts
34 -
Joined
-
Last visited
Recent Profile Visitors
3657 profile views


appleslicer's Achievements
")
Newbie (1/14)
0
Reputation
-
Thanks for the reply. I totally get the joke. My buddy and I were that way, but now we are just hypersensitive. I swear I find out something new we should have done every day! I guess the issue of alignment is mostly a guaranteed issue if you use an aftermarket bell housing. Particularly Quick Time Performances'. Lastly, just want to note that my Stage 2 rebuild from Tick Performance is running smoothly. My buddy drove the car about 7 hours straight yesterday while I was tending to another matter. It's nice and smooth and not difficult to shift in any way as some people claim it does with bronze pads. So if you are considering a rebuild in the future, in all seriousness, I would try giving them a call.
-
Woah. I don't mean to hijack the thread but now I am concerned about the bell housing being out of spec?! And the Block clearances? About to sound like a total idiot....here I go: I bought an Lq9, had a machine shop rehone it and I then installed new bearings. Well, I got a T-56 off a guy on craigslist a few months before. The engine ran great, everything was cool for about 20 miles and then the transmission got hard to shift and started grinding 3rd, 4th gears. Then flat out denied entry, and then the input shaft failed completely. I just sent the transmission to Tick Performance. It turns out I had a complete transmission failure. "It experienced extreme heat". And yes, it was filled with trans fluid properly. Lost pretty much everything... Dropped 3,500 For new internals. I could have bought a new trans for the price, but I need this car up and running again. I just got the transmission back Christmas Eve and reinstalled. Never checked bellhousing clearances nor block clearances. Any links or help on how to do this? I have never heard of it before... I am terrified to repeat the situation. Particularly because the transmission seemed just fine at first and then completely failed. I have yet to drive the car after the reinstall and may delay this depending on the severity of these clearences...
-
So I'm finally finishing my build and decided to make the exhaust cutout on the passenger side. I took a cereal box piece of cardboard, traced the driver side hole, measured 40 times and started cutting only to realize the PASSENGER SIDE IS COMPLETELY ASYMMETRICAL!! The cutout is not only lower by almost an inch, but its in to the left too much. I have measured a million times, even drew a line down the center of the car and the measurement is even from the center of the car to each exhaust cutout, but the distances are all wrong! How has everyone else done this?
-
I'm not a pro. My last car was an 08 Honda Accord. Honda's are cool, and I dont know your exact experience. I'm 24 years of age and I've spent 30K on my build and it doesnt even close look like it. Anyways, if I could do it over, I would do this: - Properly bag and tag every bolt, washer and nut. Ensure you have good labels on where they go. - Get small plastic boxes from the local store, and label them "Under dash, under hood, hatch" ect. Place your bolts in their individual bags in these. - Replace your hardware with the much cheaper steel that matches the old ones. Stainless not only costs a lot more, but also are much weaker (grade 2). Also they gall easy, and frack up your threads. - Don't reuse any hardware you remove. Chances are its strength is compromised. - Use anti-seize on all hardware. - Dont use lockwashers. Just washers are fine. Enough about hardware - EZ wiring harnesses are super cheap and very very nice to use. You will need relays for higher current devices, and ground wires that I would purchase from wirebarn.com (14/16 gauge GXL grade wire) - Stock wiring harnesses are the devil. Enough said. (Can you say fire hazard?) -Buy a xenon air dam (urethane) on ebay. There is a seller selling them for only 140 bucks shipped to your door! Yes fitment is frustrating at first like the other ones, but no big deal for a file. To me the biggest advice I would give myself is this: - Don't worry about brakes or suspension. Keep it stock. WAIT until you drive the car. Worry about keeping it road worthy. (or as close to it at all times) as possible. - Worry about the engine FIRST. NO COSMETICS (if you can help it!( No paint! No rust repair! No rechromed this or that. - Careful with sandblasting. Things can warp and be eaten very easily! Yes you can think long term projects are okay but it will get frustrating fast and you will rapidly lose motivation if you dive in too deep. Get the car on the road. My two or three cents. Best of luck Kyle
-

Fiberglass Mafia Wide ZG Flares - looking for reviews
appleslicer replied to JoeK's topic in Body Kits & Paint
Good find. I got the jpn garage ones before they closed down I guess. Those look exactly the same (actually they look nicer, smoother.) Worth a shot to me. -
And I would be interested/definitely committed as well
-
When I got my 240z, the previous owner jerry rigged a Grant steering wheel on a hub that I'm not even sure is stock. The horn never worked, (there was just no wiring at all for it all), and the turn signal indicators didnt turn off after you complete the turn. I now have an NRG Hub, NRG Quick Release, and Sparco Steering wheel combo. Can anyone snap a few pics / share what their horn / turn signal setup looks like? Even if its a stock setup it could help me determine how to "fabricate" something to make this street legal. Thanks!
-
These bushings. Attached. They are at the ends of the steering rack.

-
What would help me from anyone interested. Post your bushing size with a digital caliper if you can. I recently found out I'm using a 280z rack, so it may be different sized diameter. I don't really know.
-
Hi guys, Talked to a shop about making new bronze bushings for my steering rack. He quoted about 80-120$ for a set, but this price would be cut down depending on how many people were interested. If you don't already know, there are no replacements anywhere out there for these bushings. They are made to be very tight clearance and when they are worn, contribute to a very loose rack with sloppy steering feel. With these replacements, there would be almost every replacement piece available to rebuild your steering rack.
-
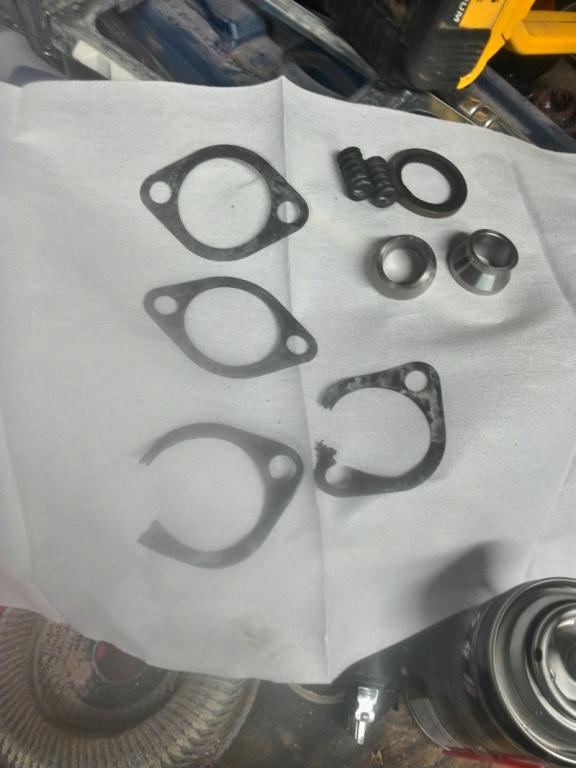
Hi, I'm looking for the shims/gaskets that go around the the gear on a 280z steering rack. See picture for what mine looked like. Thanks! Kyle
-
Steering Rack Rebuild Questions
appleslicer replied to appleslicer's topic in Brakes, Wheels, Suspension and Chassis
Just confirmed... I do in fact have a 280z rack... Is the cross member any different between a 240z vs 280z? -
Steering Rack Rebuild Questions
appleslicer replied to appleslicer's topic in Brakes, Wheels, Suspension and Chassis
Thank you kindly. To review where I am at, and what I know to do (to help anyone else, and if anyone has some additional advice for me) : 1. Fully disassembled steering Rack 2. Use Blind Inner Internal Bearing Puller Slide Hammer Kit from Amazon.com to remove inner bearings 3. Clean all grease, ect. 4. Paint/powdercoat/ect parts as required Ordered the following: -Super Lube 21030 Synthetic Grease -Rare Parts RP26575 Inner Tie Rod End (X2) -Energy Suspension Rack Bushings (TTT now offers their own variant now) -Empi 88-1509K Rack and Pinion Bellow Kit (X2) -Techno Toy Tuning Outer Tie Rods (Right/Right) -Steering Gear Worm Shaft Seal SKF 6641 I searched for the part number in your thread. It lead me to ebay. The description said the seal only fit 75-78 280z's under part number SKF 5810. Decided to search if the seller had a seal for 240z's. Indeed he did. Bought that. Part number SKF 6641. I still cant find confirmation on the bearings. EDIT: I am doing some research. Not much popping up on the interwebs EDIT 2: This must be acceptable as a replacement. Just used my digital caliper to measure the bearing things: 30202 Single Row Tapered Roller Bearing 15mm x 35mm x 12mm EDIT 3 I would prefer to just order the ball bearings themselves. You can get 80 of them for an entire 2 dollars! Ha! But the seals for the bearings are apparently bad if you remove them, so I would need to find a suitable replacement. -
Steering Rack Rebuild Questions
appleslicer replied to appleslicer's topic in Brakes, Wheels, Suspension and Chassis
Thank you so much! Answers that question awesomely. I was fearing. "You got to pull hard. Really hard". Edit: Ordered the puller from amazon. 33.00 bux. Anyone know where to get steering rack parts? The bearings feel a little bit worn... -
Steering Rack Rebuild Questions
appleslicer posted a topic in Brakes, Wheels, Suspension and Chassis
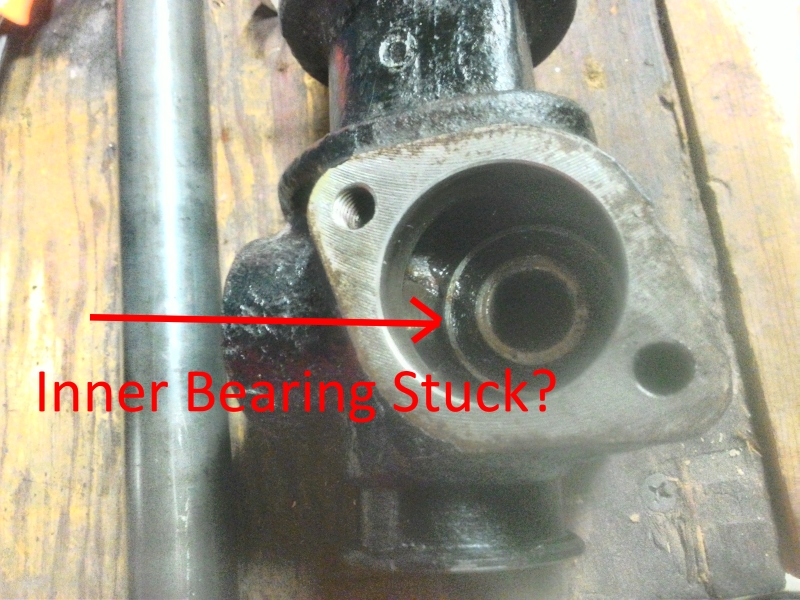
Hi, not sure if this is the right place to ask a couple of questions. I am in the middle of "rebuilding" my 1972 240z steering rack. I fully disassembled the rack and ordered up new inner tie rods from Amazon for $62.00 each: LINK HERE Questions as follows. 1. There were a total of Four shims as seen in the pic. Two thicker ones, and two thin ones. The thin ones look to have disintegrated on one half from rust. Is there any replacements available, or can I safely throw them away and move on? I have never done this before. Dont laugh please. 2. The new inner tie rods, unlike the old ones, dont seem to need the springs and pressure plates, and are instead a one piece unit with their own set preload. Can i toss this hardware? As I fear it will just be loose and rattle around if I put it back inside the rack. 3. Lastly, I want to very much remove the bearings inside the rack as seen in the picture, but even using a pick with a 90 degree bend and inserting it, I cannot seem to pull the bearing out. Seems pressed in. Anyone know of a way to pull them out? Edit: ANSWER: Use a "Blind Puller" Thanks