Here I will chronicle the progress and process of creating a 280ZXT using the stock L28E motor. Why the stock motor? Well, I already have it, it's been done successfully before, and when I melt the pistons I can rebuild it with forged ones. I am however attempting to use parts that will still be useful on the next rebuild.
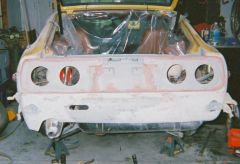
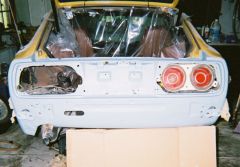
This is what I'm starting with. My 77 280z with stock drive line.
I've spent all winter amassing the parts needed for this upgrade.
Here are most of them: (to be described in detail later)
http://album.hybridz.org/data/500/the_goodies.jpg
Start of project before tear down begins:
"Before" shot of engine bay:
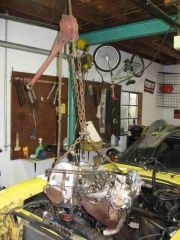
Removing the head and manifolds as one piece to make disassembly easier.
I'm going to leave the bottom end alone for now because the compression is 155 PSI +/- 2 PSI on all cylinders.
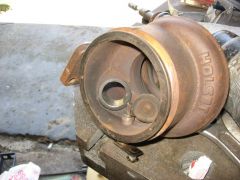
Test fitting the turbo to get an idea how the thing will fit. The turbo
is a Holset HY35 from 2003.
Oil line and AN fittings for turbo. I used an adapter on the turbo side
rather than re tapping it.
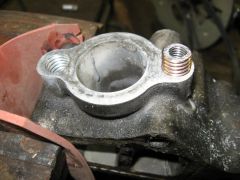
I found more than a few bolts chemically welded where aluminum was involved. The heads consequently snapped off and needed drilled out.
I was very pleased with how well the "helicoil" kit from the parts store
worked. Here's one of the thermostat housing holes after repair.
I used a light duty wire brush to clean up the chambers.
OK, the helicoil only works if you don't make a riduculous mess out of the
stuck bolt when you drill it out like I did to the water inlet. I happily was able
to fix it though. I drilled and tapped the holes to 1/2-13 and then made my own
inside/outside threaded inserts. This has held up fine and saved me from buying a new front cover.
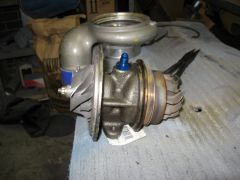
Hear are some shots of the HY35 with the housings off. Something you
actually don't see pictures of too often.
Here the wastegate opening was enlarged from 18mm to 28mm.
I brazed a 1/2 NPT bung onto the stock oil pan.
Here I'm halfway through repairing the front cross member. I also added a sort of bracket to serve the following functions:
Support the intercooler
Support and protect the oil cooler
Give a place to solidly bolt driving lights
Backup the center of the urethane air dam
Provide furture anchor points for a belly pan
Here's the finished repair and bracket:
Intercooler mounting brackets. I choose this intercooler for it's efficient vertical design and because it's not so big as to slow spool up.
The block striped down and ready for painting/reassemble:
Deck cleaned and ARP studs installed. These studs really make aligning the head a snap.
I'm using Beck/Arnley head gasket from Autozone. Yes, I sprayed it with copper coat. I wanted extra insurance against leaks. So far so good at the 1000 mile mark.
Sexy front shot of the motor sporting full stainless socket head bolts.
Chopping off any extraneous bosses off the manifold:
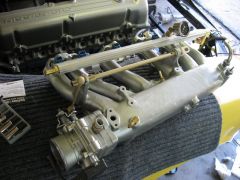
Not a bad looking intake:
Custom three layer heat shield, stainless then 3/8" ceramic insulation, toped off with a carbon fiber looking ceramic fabric:
Testing how I wanted the turbo clocked. Manifold wrapped to increase exhaust velocity and keep intake heat soak down.
I also made this home brew turbo blanket for the turbine housing. It's made from stainless sheet with welded hose clamps, holding ceramic insulation around the turbo. It works really well to keep radiant heat down:
A shot of the "Ron Tyler" diff mount. Something that I consider a prerequisite
for adding lots of power.
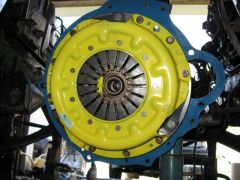
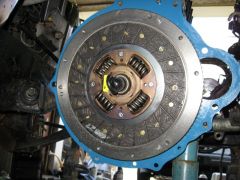
ACT HD pressure plate and organic street disc in 240mm size. Supposibly good for 400 ft/lbs. I'm using the stock hydralics and they easily move this PP through it's range.
Frontal shot of how the turbo looks in there, plus all the sparkling newness.
The "after" shot of how it all looks together. You can see my eBay Tial knockoff BOV. It works great and for $45 with stainless mounting flange, it can't be beat. Oh, and it sounds good too. The intercooler piping is 2.5" stainless.
Here is my fixture for TIG welding the exhaust and intercooler plumbing:
The most critical weld I had to make, joining 304 stainless to cast iron. I preheated the cast iron to 800 or so degrees. After the pieces were tacked, I capped the ends and purged with argon. It welded very smoothly, almost easier than plain stainless. Once the weld was complete I wrapped it in insulation to make it cool very slowly:
The finished downpipe, first naked, then wrapped. I placed the WBO2 sensor as far as I could from the turbo so it wouldn't get too hot. On that note, I cannot stress the convenience of having WB sensor enough. Your going to really make turning hard on your self without it IMO.
Here is the completed exhaust in all it's stainless, v-band glory.
Well thats it for now. Currently it running great and is scary quick.


 PROJECT_3
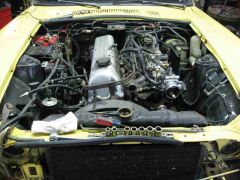 PROJECT_2
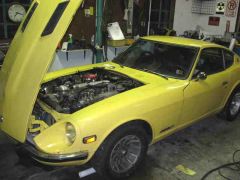 PROJECT_1
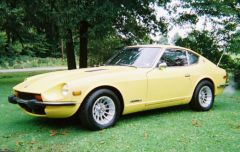 oldskool280
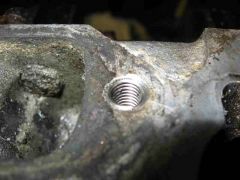 THREAD_REPAIR