
nish
-
Posts
134 -
Joined
-
Last visited
Content Type
Profiles
Forums
Blogs
Events
Gallery
Downloads
Store
Everything posted by nish
-
I wanted to post my little finding just in case someone might benefit from it. I'm running MS2 with EDIS and I have found a really easy/cheap skate way to mount the wheel. And before I continue I want to mention that this is NOT the best way to do this, rather an inexpensive way to test/toy with EDIS. Parts required: EDIS trigger wheel from a 1990's Ford Tarsus (or other vehicle with same part) Update: HizAndHerz found that 3.0 liter V6's without a dizzy have this part. This is the powdered metal one with all the holes in it. Two 4mm x 60mm bolts (please double check this) Two lock washers Two 1.5 inch long roll pins with ~4mm holes Assembly: There are four inner mounting holes on the EDIS wheel, which are about 4mm ID. The threaded holes in the stock 280z damper are 4mm (can you guess were this is going?). The holes in the damper miraculously match up almost exactly with the bolt circle of the wheel (less than 1 mm tolerance). I almost fell over when I found this. The roll pins are cut to length and used as spacers in between the wheel and the damper. This allows the bolts to be torqued down without deforming the wheel. I put lock washers under the bolt heads and use red locktite. Getting the wheel concentric takes a little trial and error, but can be done to a safe level (I have about 1mm of offset). This setup has been in use for about 2000 miles now. They way the holes line up will allow the missing tooth to be positioned in one of 4 locations for TDC. I chose the position that would put the sensor in a perfect spot to use brackets attached to the AC holes in the block. UPDATE: here's a front shot now that I'm tearing down for turbo fun. My brackets are strong but simple, made from angle iron and thick aluminum angle. A long piece of 1x1 angle is bolted to two AC bracket holes and extends to the face of the EDIS wheel. An aluminum bracket made from heavy c-channel is in plane with the wheel and bolted perpendicular to the first bracket. The aluminum bracket has a concentric slot to accept the VR sensor and allow about +-10 degrees adjustment. The way the brackets bolt together allows for 3 axis positioning. The brackets were made with a hand drill, hack saw and hand files. Well, hope that made sense. I had some crappy pics of this and can't find them -EDIT- now with crappy pics - EDIT-, but if you can fab stuff reasonable well, then my description will probably get you well on your way to being an EDIS cheapskate. In general, EDIS is easy as pie to setup with Megasquirt and I highly recommend it. Other EDIS related pics: http://album.hybridz.org/data/500/EDIS_COILPACK_MOUNT.jpg http://album.hybridz.org/data/500/EDIS_MODULE_MOUNT.jpg http://album.hybridz.org/data/500/GM_IAC_MOUNT.jpg http://album.hybridz.org/data/500/THROTLE_BODY.jpg Adam
-
There are two small locating dowels that will keep it from spinning, so it'll have to be pulled strait off. Maybe try tapping around the edge lightly with a hammer. Or just give the penetrating oil more time. My HY is basically brand new and the housing still took some vigorous wiggling to separate.
-
I saw this header: (it's an aftermarket stainless header for the jeep 4.0) http://cgi.ebay.com/ebaymotors/1993-93-Jeep-Cherokee-4-0L-Stainless-Exhaust-Manifold_W0QQcmdZViewItemQQcategoryZ33632QQihZ006QQitemZ160049141134QQrdZ1QQsspagenameZWD1V It made me wonder if it could be hacked up and made to fit the L28 with a T3 flange. Do you think it would flow enough better than stock to be worth the trouble based on the picture in the auction? I personally don't mind a fabrication challenge as long as it will pay off.
-
That's music to my ears Phil. I just won a 2003 HY on ebay Monday. Keep us posted on the progress, especially how your megasquirt turns out.
-
71-73 Camaro Taillights:
-
-

-
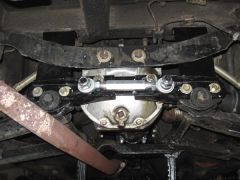
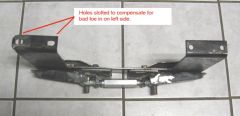
The poor man's rear toe-in adjuster
nish replied to blueovalz's topic in Brakes, Wheels, Suspension and Chassis
Thanks eveyone for the praise. And, it was the late model curved brace just like Jeromio's web page depicts. -
The poor man's rear toe-in adjuster
nish replied to blueovalz's topic in Brakes, Wheels, Suspension and Chassis
Here are pictures of my version of the "poor man's rear toe adjuster." Thanks jeromio for the web page of your version that I used for inspiration. By slotting the cross member pieces instead of the uprights I was able to easily get 3/8" of adjustment in each direction on each side. Parts layout: Assembled view: Assembled top view: Assembled / installed view: Thanks, Adam -
 REAR TOE\REAR_VIEW_INSTALL
 -
 REAR TOE\TOP_VIEW_ASSEMBLED
 -
 REAR TOE\REAR_VIEW_ASSEMBLED
 -
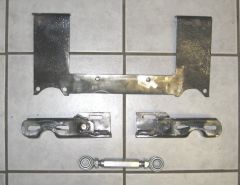 REAR TOE PARTS LAYOUT
 -
How did you make the 1/2" plates that mate to the head? Can you also mention your source for the ells? I'm interested in just this sort of project since I recently acquired a TIG. Nice work so far BTW, please keep us posted. Thanks
-
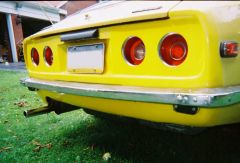
Anyone put different tail lights on a Z before? JK :) Look
nish replied to nish's topic in Body Kits & Paint
Thank you all for your encouragement and welcome to the forum. I've been a lurker for over a year now, wouldn't want anyone accusing me of not using search. I'm in southern Butler county if anyone ever wants to swing by. -
Sorry about the title, I couldn't resist. I posted to show off what I feel is a cheap, easy, and attractive taillight mod. I'll start with the disclaimer that this is not my original idea. I got it from Brian Holdeman. I was already wild about round taillights then I saw his car on zcar.com. I had to know what he used, so I emailed him. He was nice enough to share what he had done. This is my interpretation of his idea. The lights are from a 70-73 Camaro. I got mine off Ebay for $40 in great shape. This pic shows how the lights come as a complete unit that is easy to mount. You can also see how I mounted the stock wiring harness. I cut in new socket holes with a dremel. These are the custom steel panels the clusters mount to. Four 1/4" bolts fasten them to the body. Here are the holes that make the clusters removable from the inside. It is a pretty tight fit, but you don't need to remove them often. Now with panels bolted/riveted in. I used fiberglass filler to fillet around the new panels. This should help bond the panels to the car and hopefully not crack. At this point you could pound on the middle of the panels and get only a dead thud. I also took this opportunity to give myself four 1/4' license plate bolts. Bodywork done and ready for paint (which I royally screwed up) The finished product Another shot A nice 3/4 view just for good measure Let me know what you think. Thanks, Nish