Marc280
-
Posts
85 -
Joined
-
Last visited
Content Type
Profiles
Forums
Blogs
Events
Gallery
Downloads
Store
Everything posted by Marc280
-
I also like it, especially the side view. The flares look like work pretty well with the orginal shape and lines of the car. In my opinion I don't think that the front end works quite as well in the photoshop pics as it don't quite flow with the lines of the car and looks a little too bolt on for my taste...
-
Hey everyone, it's nice to know there are some people actually following this. Although I've only just got back from working overseas for a couple of months and the car is still in storage. I still have to find a new place to live and get set up again, so I don't think there will be any real updates until December or January.... But stay tuned and I'll post as soon as I've got something to share!
-
Hey Yasin, I love the pics of your girls. I own an s130 and up until now I've always thought I'd eventually be selling it so I can work on an s30 due to the looks. Although after seeing those pics I'm starting to think that with some work the s130's can really look good! I think it might be time for me to start saving to get some wheels with a nice big dish.....
-
From memory to get the passenger (for Aus guys) exhaust off there is a bolt that holds dipstick near the top. All you should have to do is undo the bolt and then once you have all of the bolts undone on the exhaust flange you can pull the header off the studs and then slide it up over the dipstick. Otherwise the bottom of the dipstick is just pushed into the sump at the bottom and there is just an o-ring sealing it. So you can easily pull the whole dipstick out from the sump without having to take anything apart. I hope that helps.
-
Hey mate, thanks for that info. It doesn't sound like it should be too hard going by that description. When I am able to work on the car again, doing this and changing the water pump and timing belt will be one of the first things on the list.
-
Hey Tonycharger, Yeah the engine is from a soarer, I haven't actually fixed up the hydraulic fan setup yet. I plan to just pull it apart and take out the parts for pumping the hydraulic oil. There are a couple of posts on Lextreme about doing this. Seeing as I haven't had it apart yet I'm not too sure about exactly what needs to be done but I hope to work it out when I get it off. Otherwise I'm told that a Celsior (or crown... can't remember exactly) mechanical fan setup bolts straight on and then you can just remove the fan and use it as an idler. Another option is (apprently) a 2uz fan setup from a landcruiser as I've heard these also bolt straight on. Hope that helps a little.
-
Hey kolonelklink87, No worries, I know uni can get pretty busy. The build is kinda on hold for a while as I'm over in Europe for a couple of months with work, so it's all in storage now... When I get back I've gotta try to find a new place to live (was a rental house) and then finish it off! So if your still keen in a couple of months, I'll let you know where I am and I can show you. If I hear of any local l28 engine/parts, I'll let you know.
-
Hi Jonny, if your looking for parts, your best bet is probably to post in the wanted section of the classifieds. Each engine you've mentioned will have its challenges although there are already plenty of people that have swapped rb25 and rb26 engines. I think there is also someone here who has done a vk or vh45. Your best bet is to keep searching as all the info your looking for is already on this site.
-
Hey Tonycharger, sorry, but I don't have any pics of where I cut the throttle linkage. To try and explain it I basically cut about 10mm off the top piece of aluminium that the bracket for the throttle body springs connect to... hopefully that makes some sense. As for the diagrams, I've attached the following one which is how I've wired things up so far. As you can see there aren't really that many wires on the ecu that you should have to touch. What I haven't shown is the bunch of wires that I removed, although if your not confident in removing any wires I'd just leave them there as the only they should do is add a tiny bit of dead weight and make the loom thicker. One thing that hopefully should be clear from the diagrams is how the computer gets its power. Basically there is +12V ignition on Pin 1 in the 40 pin plug which is then used to trigger an output from M-REL Pin 24 which turns on the master relay which then powers the ecu (Pins 31 & 32). I can't remember exactly why it is designed this way although I did read about it somewhere I think it was at http://www.autoshop101.com/ (a great source of info for Toyota cars) The other inputs you need is a constant +12V from the battery Pin 33 (otherwise you'll reset the computer everytime you turn the car off). A start signal and then a couple of grounds and you should be good to go! Unfortunately this only been tested with a multimeter so far as I'm now in Germany and the car is in storage back in Australia.... but from all the reading I've done and working through the diagrams this should work. When I get back to Australia I'm going to update the diagram with all the colours for the wires (including the ones I added) so in a couple of years I'll be able to work out what I've done! Hopefully that is of some help, although don't go relying on it to be 100% correct just yet as I've still got to actually test it, which won't be for another couple of months...

-
Hey DoctorMuffin, sounds like you've got a pretty good idea of what you want the car to be able to do which is always good! I don't know of anyone that makes a bellhousing to mate the stock 4 speed to a 1uz although as tonycharger 72 posted there are quite a few companies out there that make bellhousings to adapt to other transmissions. I have a feeling that if you were to get a custom made bellhousing, you could probably have bought another conversion kit and gearbox for less.... Also I'm not sure how stong the 4 speeds are... From what I can tell you guys in the US can get a hold of a r154 or w58 transmissions pretty cheaply. If you got one of these and kit from Australia (with the exchange rate being in your favour) it would be the best option in my opinion. You can use a bunch of different length shifters on these, so you should be able to get one that lines up well for the gear shifter. I haven't heard too many people saying that having tall gears for drifting is really needed (although I must admit I'm not really in any drift circles) and there are plenty of silvias and the like running five and six speed boxs with 4 cylinder engines... Although I think whichever gearbox you do use, you should be able to play with the diff ratios to get it to how you like it. Also 1uz's have been proven to be able to rev pretty hard (so long as you have one of the earlier engines with beefier rods), which will give a wide rev range. The R200 should be fine for what you want to do although, if your going drifting you will definitely want a limited slip centre. I'm planning to try and OBX unit as there are plenty of guys on here that are reporting good things about them and they are relatively cheap. keep us posted on any updates!
-
Hey DoctorMuffin, great to hear of another person looking to swap a 1uz into a zed and that my posts may actually help someone... I look faward to seeing your thread and how you go and if you've got any questions I'll do my best to help!
-
Hey Eric thanks for the encouragement, for a while there it seemed to be getting no where... although I hope to be having the car driveable a month or two after I get back. Luckily I do have another car that I use for day to day transport so I can just work on the zed when I get a chance. A few other things that I forgot to mention before is I have put the bonnet back on and had to cut the top off the accelerator cable/spring bracket to get the bonnet to close. This shouldn't be too much of an issue to reposition. The factory intake connecting to the throttle body won't fit as it hits the bonnet, although I planned on makign a custom one anyway so that doesn't really worry me. Also the wiring diagrams I had don't line up exactly with the engine I have. The wiring diagrams are for US delivered cars and the one I have is a JDM engine. Basically i just has a bunch less wires (which suited me fine) as there are only two oxygen sensors rather than four, no egr and a couple of other little bits. I will try to draw up a diagram of how I've connected it all up for anyone that is interested. As for the switchgear, most of the stuff you'll see around is air insulated although I work with products that condense the whole switchyard into a much smaller building. The insulation gas that is used is SF6 (sulfur hexafluoride) as it has very good arc quenching properties...
-
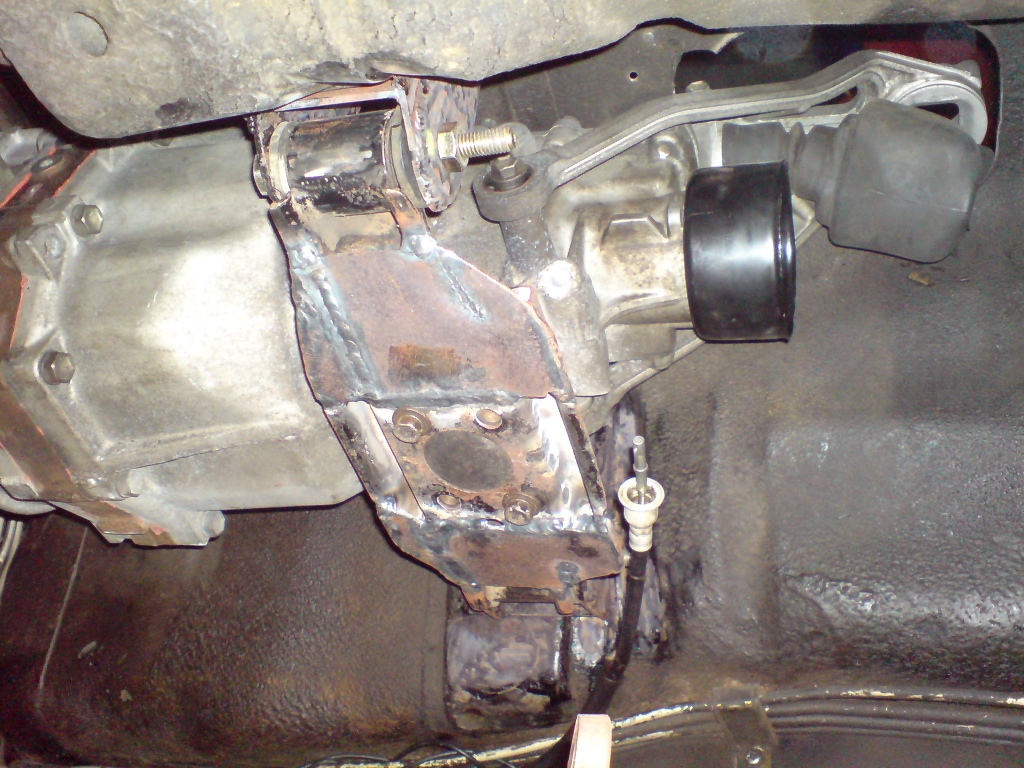
To answer your question eec564, I work with the engineering company ABB. I've got a mechanical eng and materials science background but I basically look after projects installing and commisioning high voltage gas insulated switchgear (for power substations) and generator circuit breakers in power plants. It will be good to go over and get some more training and also a great chance for a bit of a holiday, but just not so good for getting the car finished! I haven't actually got it running, becuase of the things I mentioned before. I probably could have rushed the bits I mentioned before, although I didn't see much point as I still haven't finalised the clutch master cylinder or coated the headers, so I wouldn't drive anywhere and I'd have to pull the headers off again once I get back.... I'm using the stock 1UZ power steering pump and stock 280zx rack. I basically just used a reshaped short section of the original hard lines that attach to the rack and then have made custom hoses to connect everything up from there. I've attached a couple of pics that show a few of the things I've been working on. Also I've modified the drivers side header a little since taking that pic, painted the gearbox mount and a few other bits, but hopefully that give you all and idea of where I'm at. I'll have to try to take a couple more before I put it all away in storage.
-
Hey, I've been pretty busy doing some work on it and I will try to post the progress up here soon. I now have done the following things, wiring for engine, most of power steering (including a cooler), remote engine oil cooler and filter, finished both of the headers (just need ceramic coating), radiator hoses, installed high flow fuel pump, painted mounts.... I think that is it. I have also mounted the engine and gearbox in the car including installing the clutch, flywheel etc. The things left to do are relocate the battery to the boot, mount the power steering reservoir, replace timing belt and water pump and make a pipe to connect the throttle body to the air flow meter. Unfortunately I won't be able to do these last parts to get the engine running as I have to move overseas for a couple of months for work.... So it is all very close but I'm leaving in two weeks and need to pack up my house and garage to put everything into storage as I'm still living in a sharehouse.... fun times! I'll try to post up some pictures and a bit more detail of what I've done, but unfortunately it will now be about another 6 months or so before I can post a video of it running....
-
I i just realised there was a mistake in one of the notes I put on the diagram called '92 1 of 2.pdf In the bottom left corner the note should have been to connect to 30A supply switched from the ignition and not from the M-REL on the ECU. Anyway here is the correct one. '92 1 of 2.pdf
-
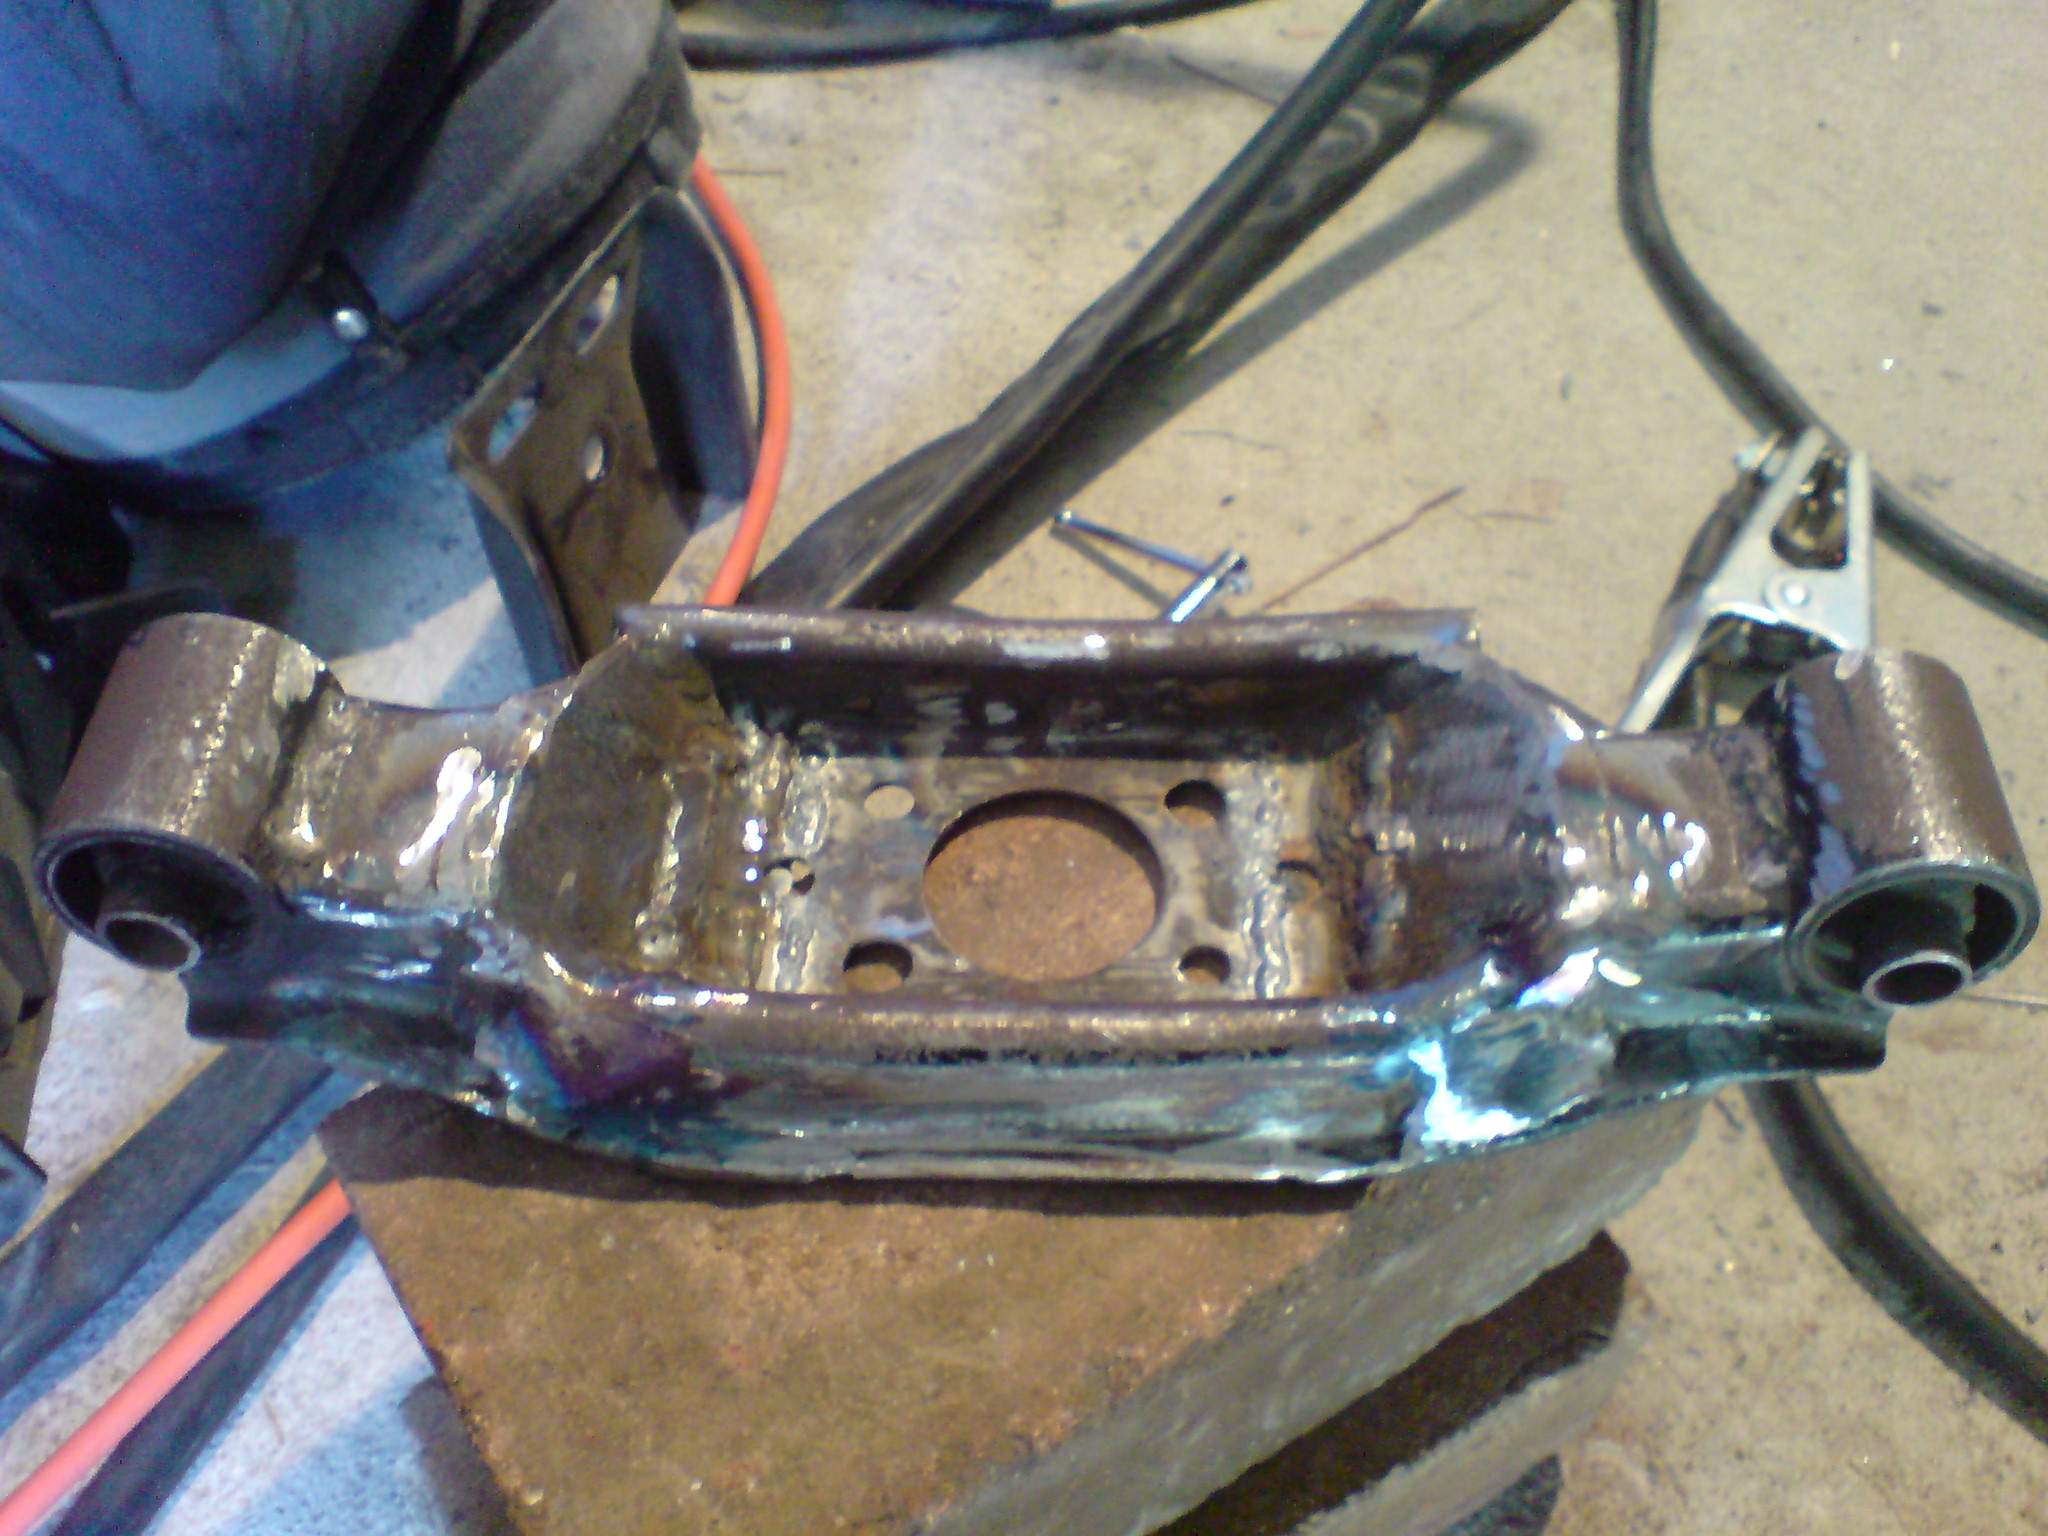
Time for a little more of an update, i've got the passenger side header done now and I've also reworked the trans mount. I wasn't that happy with how it was before so I ground apart all the tacks and reworked it. It may not be the prettiest thing in the world but with a coat of paint I will have something that is strong and functional. I've also mounted the engine and the gearbox with the remote shifter in the car and everything lines up well.I'll try to get some pics up of the headers and gearbox positioning in the next couple of days to show you all what I'm talking about. But for now it is onto the wiring. I've attached the wiring diagrams that I plan to use, so if anyone else out there is planning to do this swap hopefully it might be of some use (although I don't actually know if it will all work yet.... time will tell). Now time to get out the multimeter and get going...... '92 1 of 2.pdf '92 2 of 2.pdf
-
Thanks for the link eec564, I had a look at a couple of the tutorials there and they look like they could be very useful when it comes time to get the power steering going, replace the timing belt etc. The hydraulic fan and mechanism is tucked away in the roof of my garage at the moment, but I'll try to pull it down some time and take some photos. I don't think this is really something that you'd be able to swap over very easily as it is all computer controlled and from memory looking at the wiring digrams it also connects to the main ecu.... As for the alternator being computer controlled, I didn't think it was, although I'd have to look at the wiring a little more to be sure (I plan on getting into the wiring after the headers, so we'll soon find out!). Although if I do go a standalone ems I'll probably go for the Wolf v500, it connects directly to the factory loom and has a lot of features. I haven't decided on the diameter of the master I plan to use yet. The new slave (came in the dellow conversion kit) is 3/4inch which is the same as the stock slave. So I'm thinking I should be ok to use about the same size master as stock (5/8inch according to the manual), although I really haven't compared the throw or anything else to make a definite decision. I've been putting off buying the master at the moment as it isn't required right now and the exchange rate is really bad meaning they cost about twice as much as they did 9 months ago.... I'm hoping by the time I need it the rate might be a little better.
-
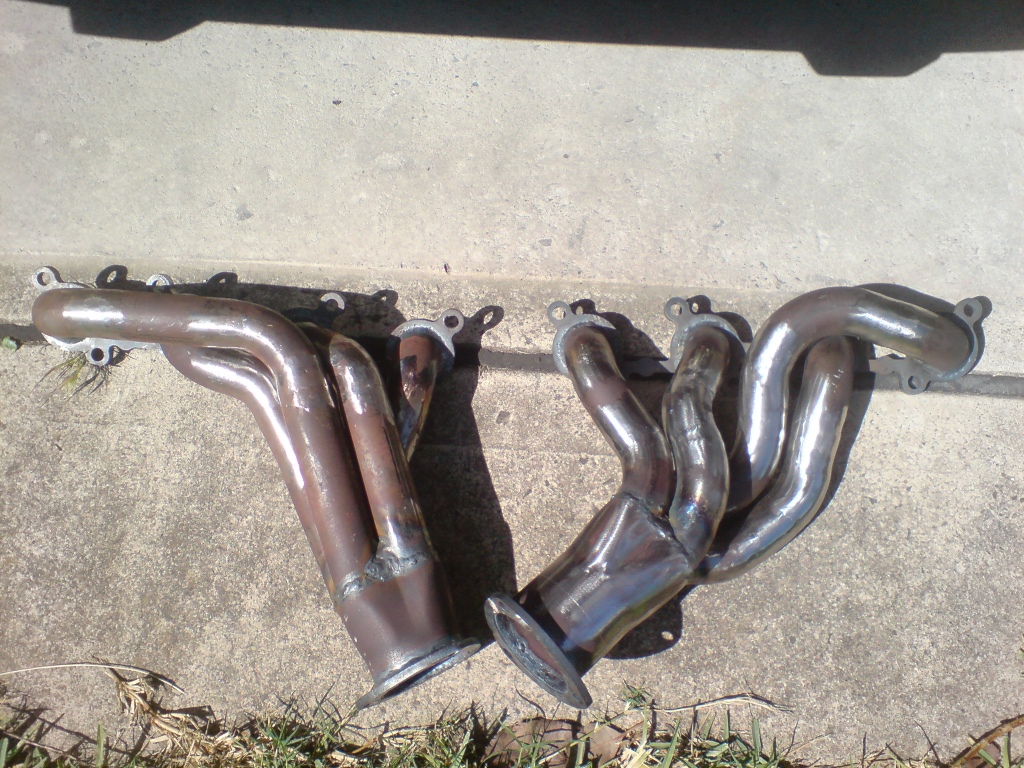
Hey guys thanks for the kind words. I'll keep the seals on the power steering pump in mind, I've also heard of a few others drowning their alternators which ends up getting expensive quickly.... The engine doesn't have a mechanical fan so that shouldn't be too much of a problem. The fan that the soarer uses is actually a hydraulic fan (I'm guessing to keep things smooth an quiet??). I don't plan on using that as it has its own computer and control system and looks like way to much work (not to mention the losses from driving the hydraulic pump) to get it going when I can just use an electric thermo fan. I've had thoughts of super-charging and turbos and I'd like to go the turbo route at some time in the future although it is very tight down there.... so maybe it will have to be a supercharger. For the clutch issues I've actually found an even shorter master cylinder that is made by AP Racing. It is only 80mm and has the exit on the side of the body, so I'm planning to get one of these, as based on the measurements I've taken, it should just fit. The bolt spacing on these is completely different to the stock master, so it looks like I will still have to play around a little to get that to work. I got the flanges/collectors and everything for the headers from a place called Castle Automotive Enterprises (http://www.castleauto.com.au). They don't actually advertise this kit on their website although you can buy the flanges, bunch of bends, collectors, reducers, flanges etc as a kit from them. They also have 'block hugger' headers that might suit some builds. Anyway I've started on the exhaust for the other side, so I'll take some more pics of the progress soon and post them up.
-
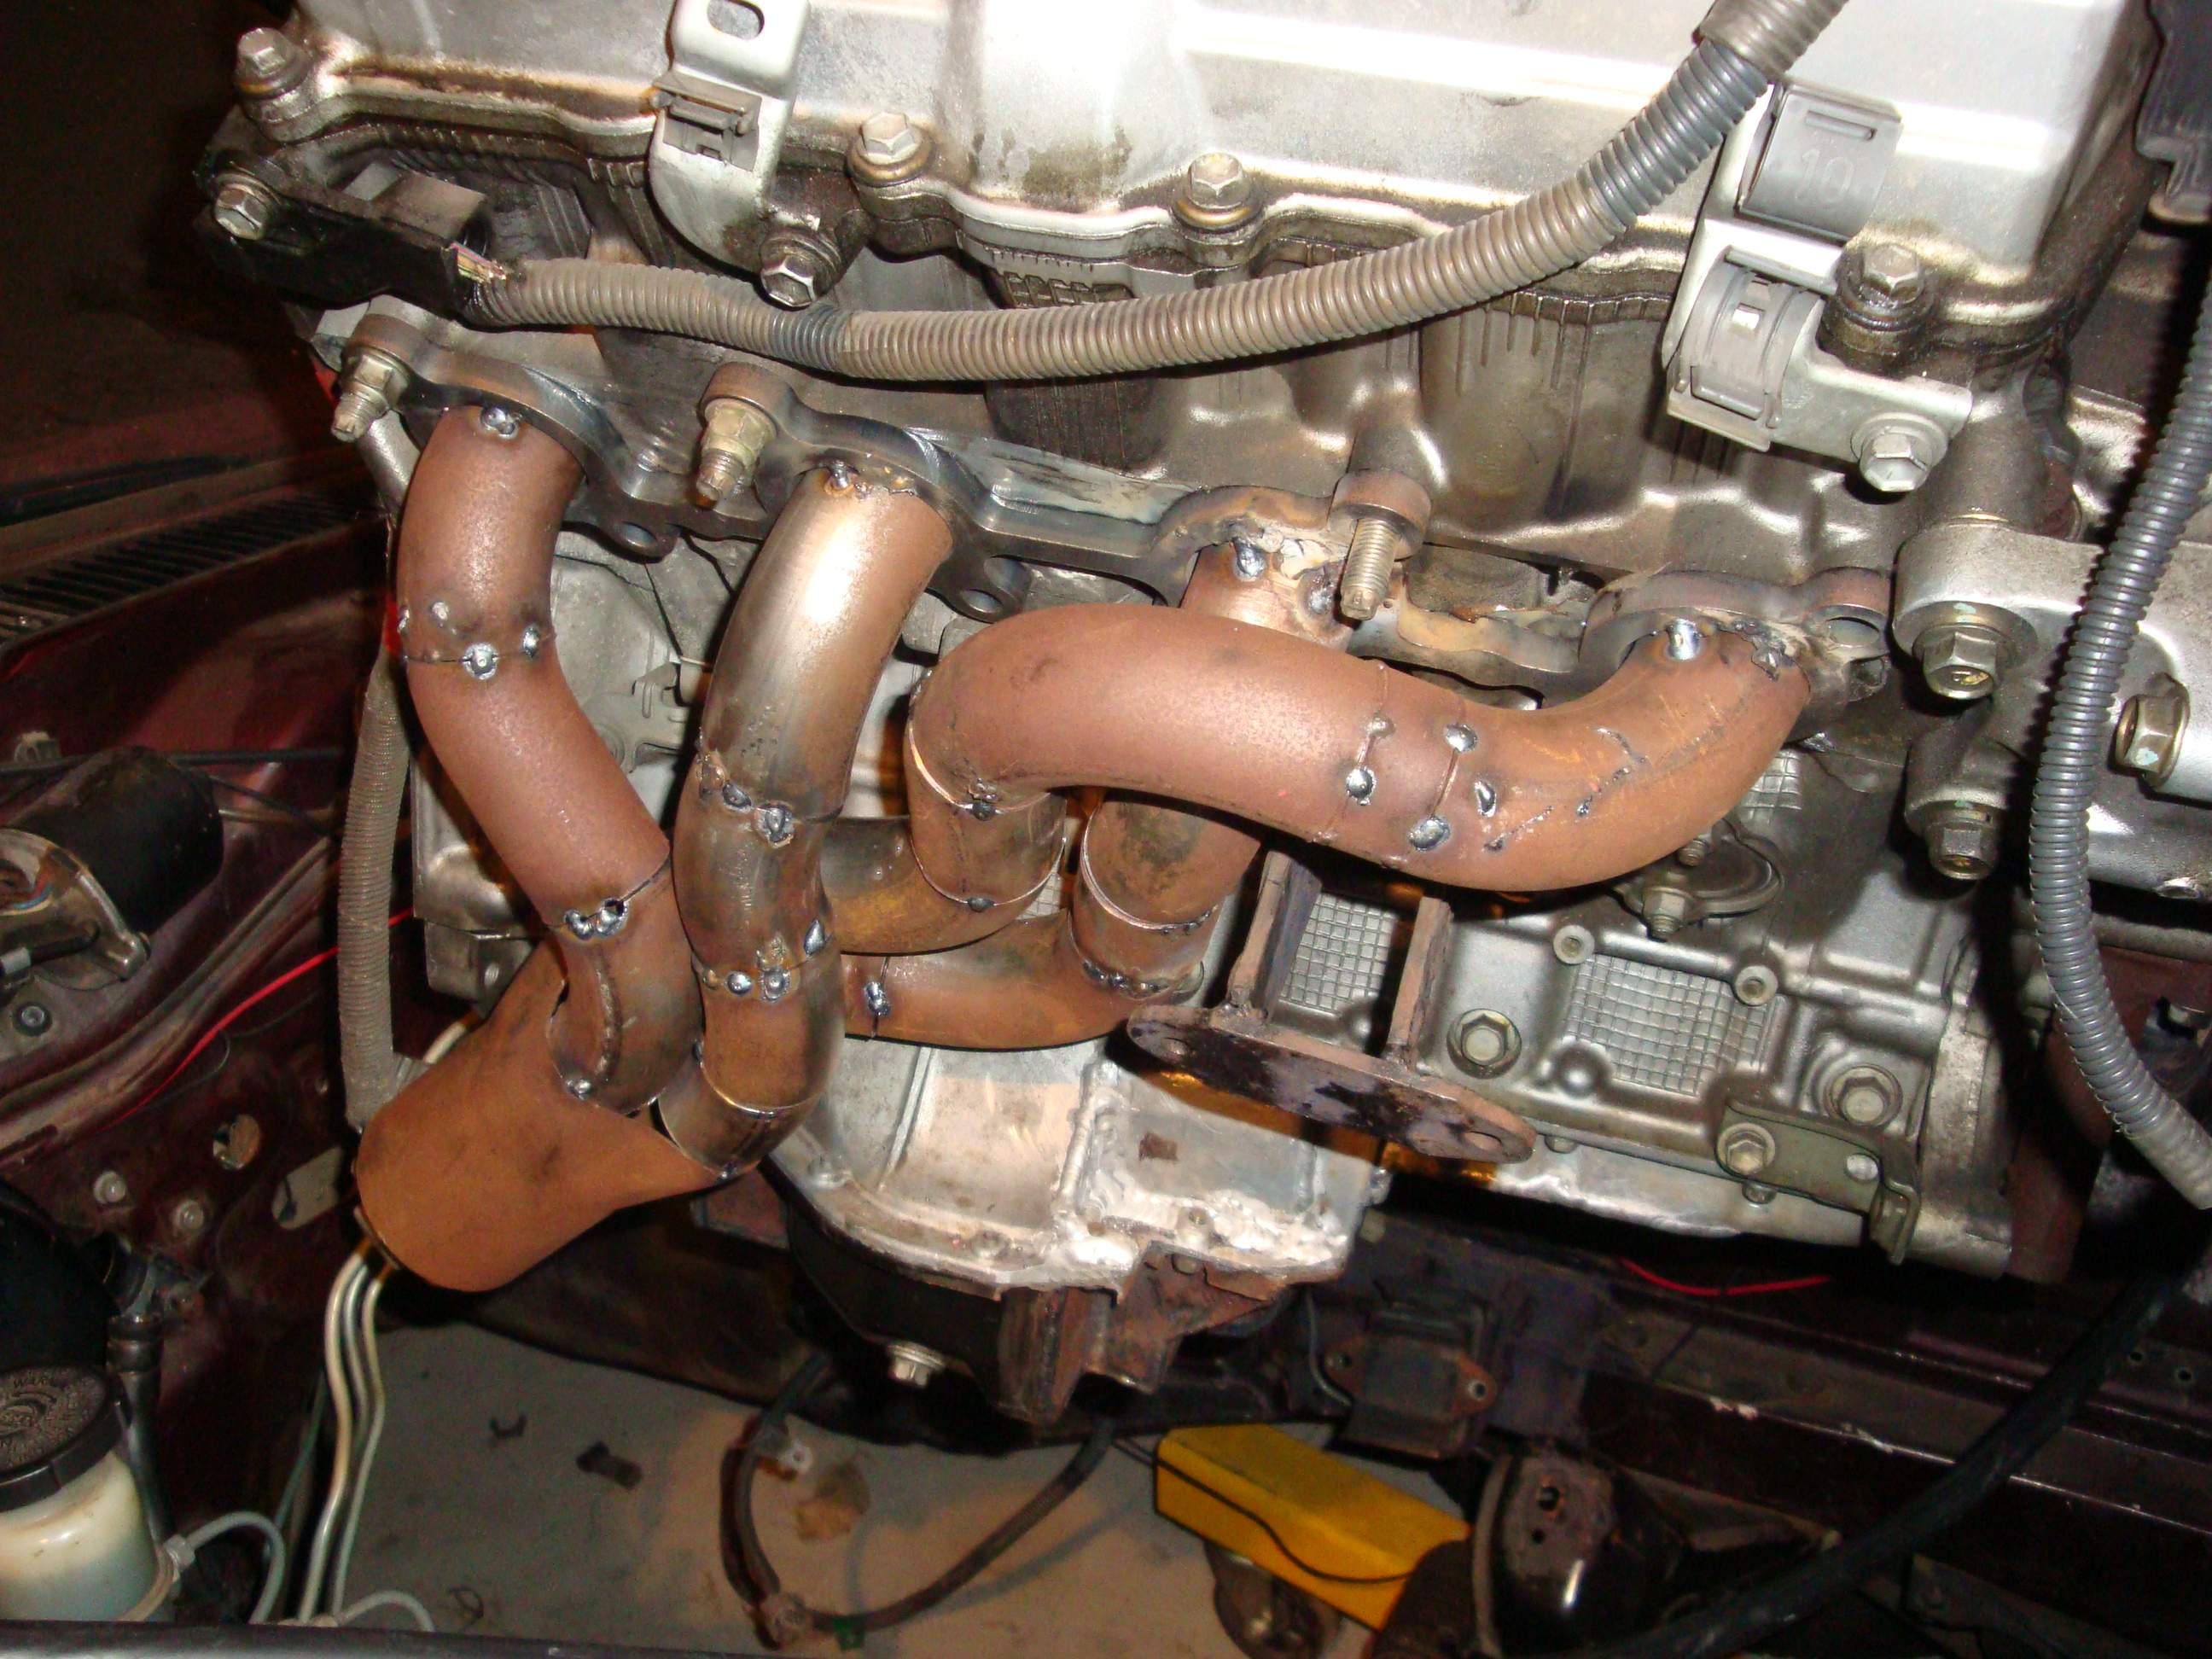
Ok here are the pics that I promised of the headers for the drivers side. There was not much room to run all the pipes as the steering shaft gets in the way for just about everything you try... But seeing as I've never built a set before I'm pretty happy with how they are so far and should definitely be an improvement over the stock ones. For anyone wondering the primaries are 1 5/8 inch diameter, which seems to be a good size going on what other people have found with the engines. Anyway I'd love hear any comments/suggestions as I'm now about to build the other side.
-
I've finally been able to start working on the zed again after getting back from Perth. The part I'm trying to tackle at the moment is building the headers. It is proving to be a little tricky as there isn't much clearance on the drivers side as the steering shaft is right in the middle of where the runners would like to go... I'll take some pics when I get a chance to show you all what I mean.
-
Unfortunately, I don't have anything much to report as I've only just got back to Sydney from Perth and then I'm going to be away again for the next couple of weeks.... But after that I plan to get right into it and hope to have it driveable within the next couple of months. The one thing that I have done, is found a W58 gearbox with the remote shifter and it should put the shifter in a much better position. This will also mean that if I can't get a clutch master to fit in the area I want I can just move the engine forward a little (although this will mean playin with the sump again).
-
280zx front brake upgrade
Marc280 replied to maybemark's topic in Brakes, Wheels, Suspension and Chassis
Yeah I'm pretty sure you will find that setup only works for the Z's and not ZX's as you say. I remeber reading in some other posts a while ago exactly why it doesn't work, but I think it is the mounting points for the caliper on the ZX are different so it won't fit. I think you'll find that you can still use the discs, but you'll have to find a different caliper or make a bracket to adapt to the 4runner caliper. -
Hey mate, I like the sound of your plan (I'm swapping a 1uz into my 280zx at the moment), but take a look in the 'Other Engines' section because there is a guy in there (Tonycharger72) who is in the process of swapping a 1uz into a 260z.
-
Yeah I grew up in Tuggeranong, so I know what you mean about Queanbeyan I've still gotta do a final ckeck of the diagrams to make sure I've got everything right, but once I do I'll send them through. A T56 sould be nice if you could get it in there. I think it would take quite a bit of abuse to break on behind a 1uz. As for the W58 conversion, I've heard you have to do a little grinding with the CRS kits, but other than that they work fine. The Dellow kit seems to be quality stuff, everything bolts up easily and looks like it is all made to work together. So apart from sorting out the clutch master cylinder hopefully there won't be anything else to do there.
-
Yeam I'm planning to tackle the wiring myself, from what I've worked out it doesn't look like there are that many wires that you need from the 1uz harness to actually get it to run. If you decide to go manual I think one thing you need to do is send 12v to one of the wires (where the neutral start switch would have been in the auto) to get the computer to think that the missing auto box it is in neutral. I've got some wiring diagrams that I've marked up, which should show all the wires that are needed to get the thing to run (I'll try to email you a copy if you like). Hopefully I'll be able to test it all out early next year! Although I've heard good things about Sideshows work so if you wanted a no hassle way to do things I'm sure that would be easiest... Have you checked how well a T56 would fit? From what I've heard they are a big gearbox... Any idea what sort of price you think you'd be able to get a T56 for, I would have thought it may be cheaper to go with an R154. I'm guessing you live in Queanbeyan or Canberra then if Rushimports is nearby? I was orginally from Canberra myself.