padam07 Posted December 14, 2010 Author Share Posted December 14, 2010 Ok I made the largest purchase for the car(besides the car). They just arrived on my doorstep yesterday. The front wheel is on the left at 17 x 9.0 with a -13 offset. The rear is on the right at 17 x 9.5 -19 offset. Lug Nuts I got off ebay. I wanted to go away from chrome so I bought gun metal ones. And of course the tires from Tirerack I got a few days ago. Sorry for the crappy cell pic. Front 245/45-17 Rear 275/40-17 General Exclaim UHP Hopefully this week I can get the tires mounted this week. Just have to find a reputable shop that will install tires not purchased at there store. Once I get time I will be heading down to the shop to start getting the fender flares installed. I wanted to wait until I got the wheels and tires so I can make sure the height of the flares are correct. Quote Link to comment Share on other sites More sharing options...
knight-240z Posted December 14, 2010 Share Posted December 14, 2010 What are the rims?, newb question I bet Quote Link to comment Share on other sites More sharing options...
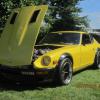
240zip Posted December 14, 2010 Share Posted December 14, 2010 It looks like we selected the same color ... Yellow 240Z I wish I had the equivalent of your Mikuni Jet kit for my Webers. Quote Link to comment Share on other sites More sharing options...
240zip Posted December 14, 2010 Share Posted December 14, 2010 Lug Nuts I got off ebay. I wanted to go away from chrome so I bought gun metal ones. what brand? M12x1.25, but couldn't find them on eBay. Quote Link to comment Share on other sites More sharing options...
padam07 Posted December 15, 2010 Author Share Posted December 15, 2010 What are the rims?, newb question I bet The rims are the Rota's that I purchased through the group buy on this forum. Here is the link. http://forums.hybridz.org/index.php/topic/57565-rota-rbrb-r-4x1143-17-z-offset-wheels/ It looks like we selected the same color ... Yellow 240Z I wish I had the equivalent of your Mikuni Jet kit for my Webers. yeah it is nice to have. I haven't needed to use it yet though. Your car is about a million times nicer than mine. I need bodywork and a new paint job. I guess a good thing is I don't have rust. Lug Nuts I got off ebay. I wanted to go away from chrome so I bought gun metal ones. what brand? M12x1.25, but couldn't find them on eBay. Here is a link to the same lug nuts. This seller has a lot of them and I got them within 5 days of ordering. http://cgi.ebay.com/ebaymotors/20PC-NISSAN-SUBARU-RACING-LUG-NUTS-12X1-25-GUNMETAL-/360169002480?pt=Motors_Car_Truck_Parts_Accessories&hash=item53dbbed5f0 Quote Link to comment Share on other sites More sharing options...
padam07 Posted February 14, 2011 Author Share Posted February 14, 2011 It has been a very long time since my last chance to work on the car. I started a new job which is second shift and with 2 kids I never seem to find the time to get to the garage. I had a couple hours on the car yesterday. I decided to fit the wheels on to see where I am at. I am getting ready to install the flares as soon as my buddies 328 is out of the garage after a new clutch. Here are the pics. Don't worry this is not the location where the flares will be mounted. I just wanted to quickly tape them on to get an idea. You can see in the next 2 pictures that I have some sort of adjustment issue. I had the front suspension completely out and obviously I didn't do something right. Look at how for forward this wheel is. If anybody has an suggestions please discuss in the following thread http://forums.hybridz.org/index.php/topic/98259-front-wheel-not-centered/page__p__922041__fromsearch__1#entry922041 Quote Link to comment Share on other sites More sharing options...
PalmettoZ Posted February 14, 2011 Share Posted February 14, 2011 Hey Padam07- Glad those Mikuni's worked out for you and they have a good home! I think that Tony D once stated that the FET manifold stands for "Far East Trading"? I bought it a couple of years ago off EBAY from a guy in Japan. I think that it was a common JDM upgrade. I'm still pulling my hair out over this Megasquirt ECU, want to sell them back??? JK Quote Link to comment Share on other sites More sharing options...
padam07 Posted February 14, 2011 Author Share Posted February 14, 2011 (edited) Hey Padam07- Glad those Mikuni's worked out for you and they have a good home! I think that Tony D once stated that the FET manifold stands for "Far East Trading"? I bought it a couple of years ago off EBAY from a guy in Japan. I think that it was a common JDM upgrade. I'm still pulling my hair out over this Megasquirt ECU, want to sell them back??? JK HA sorry about the mega squirt. Sorry can't sell yet. I haven't even driven it on the street yet. LOL Yes is doesn't stand for Far East trading. I like it a lot due to it being so short and I have a lot of clearance next to the shock tower. I am still looking for a vacuum hose bung to plug into my brake booster though... Edited February 14, 2011 by padam07 Quote Link to comment Share on other sites More sharing options...
PalmettoZ Posted February 14, 2011 Share Posted February 14, 2011 I looked for the vacum connector when I got your Email but couldn't find it. I will be cleaning out my garage here this weekend so if I run across it I'll let you know. Quote Link to comment Share on other sites More sharing options...
padam07 Posted February 15, 2012 Author Share Posted February 15, 2012 Sorry guys for not posting updates. Since I have started to work second shift I have almost no time to get to the garage and work on the car. I have worked on it the last couple Saturdays and here is some progress photos. I don't have any photos of the front fenders in progress. Cutting the passenger rear. Driver rear after cutting welding. Seam sealer was applied. Next is to paint the bare metal. close up of the front fender After pics (cell pics) but before the rears were cut. I haven't adjusted the ride height yet so that's why it looks off right now. I have not installed the bumpers yet. I have a set of 240Z satin black fiberglass bumpers ready to go Quote Link to comment Share on other sites More sharing options...
makaofox Posted February 15, 2012 Share Posted February 15, 2012 So gorgeous! Keep it up man, im loving where this is going. Quote Link to comment Share on other sites More sharing options...
Dershum Posted February 16, 2012 Share Posted February 16, 2012 Love the color and the wheel choice. Quote Link to comment Share on other sites More sharing options...
EF Ian Posted February 18, 2012 Share Posted February 18, 2012 Love the wheels. Quote Link to comment Share on other sites More sharing options...
padam07 Posted March 9, 2012 Author Share Posted March 9, 2012 I have been working on the car hardcore the past couple weekends. The passenger seat bracket . It is complete and only the seat needs to be welded to it. Don't look at the welding flash....:icon38: I decided to relocate the battery to the hatch area. So I had to purchase a bracket and some battery cables. After some research on hybridz.org I found that it is recommended to run both positive and negative cable back to the engine bat and not just the positive. I guess S30 cars are prone to faulty grounds. I sourced everything from eBay and it it only set me back about $150. The bracket is for a red top optima. My wife just surprised me yesterday morning with my birthday present and father's day present..... She purchased the entire application kit as well as 2 gallons of the sound deadening material. Yeah I know there are many home recipes to make your own lizard skin but I said screw it and wanted to get the real deal. I will be working on the car tomorrow getting the battery installed and the interior back into it. I am going to drive the car for a bit before I install the lizard skin so I can see the difference in sound reduction. The interior is easy it remove in this car. I will have more pics for you guys on Sunday!! Quote Link to comment Share on other sites More sharing options...
padam07 Posted March 26, 2012 Author Share Posted March 26, 2012 For the past 2 weekends I have been trying to get this thing somewhat ready for the road so I can get it out of the garage and at my house. I finally got the car registered with only a little fight with the RMV for not having a title. (bought car in CT which pre 1981 does not need a title) Last weekend I installed the front carpet, console and both seats. I was hoping to drive the car home that day but for some reason the car wouldn't run for ****. Here are a few picks of getting the car pushed out before I realized it was running right. This is why I pushed it out on dollies. My buddy has his M3 completely torn out for a complete suspension and brake overhaul. My car barely squeaked by thank god. It would not have been fun moving his car with no where to bolt the wheels Notice the different setting? Well it turns out the reason the car was running like garbage was because I am an idiot. First of all I had the #1 and #6 cylinder swapped on the distributor cap. Once that was corrected the car STILL didn't run right. After taking of the air cleaners I noticed the carbs were overfilling with gas. It was acting like the fuel pressure was too high and overpowering the floats. So I checked the fuel pressure regulator (I am running and electric holley pump) I noticed when I permanently fixed the fuel pressure regulator to the firewall I installed it backwards so I wasn't regulating anything!!! Once that was fixed and I took all the plugs out and turned over the engine to blow out all of the fuel in the cylinders the car fired and idle like normal. Huge relief!!:icon21::icon21: The ride height is still not where i want it because I purchased the wrong tires for the front and they rub the front of the fender when the suspension is too low. I am just so friggin happy I am driving it on the roads. It has been a long 2 years for me and a long 10 years for the car being on the road. I have a lot of projects I will be doing at home now the car is here. repair door panels install front bumper install rear carpet figure out why the wipers will not work I am sure the list will go on forever Quote Link to comment Share on other sites More sharing options...
78zstyle Posted March 26, 2012 Share Posted March 26, 2012 This is one sexy Z. Quote Link to comment Share on other sites More sharing options...
makaofox Posted March 27, 2012 Share Posted March 27, 2012 Loving it! The yellow and black just works. One of my fav yellow s30's for sure Quote Link to comment Share on other sites More sharing options...
padam07 Posted October 7, 2012 Author Share Posted October 7, 2012 (edited) So it has been 7 months since an update....sorry. I truly haven't done much since then except drive the **** out of it. I have a friend hat always scours the pick and pull yards and I recently got a call from him saying he found a 280z in Clinton, MA. If anybody that lives up here knows that is rare because these cars rot away quickly and almost all old cars have been crushed in junk yards. I went there the next day and found a complete bone stock z. What sucks though is I only had a $100 and I only got away with the door panels and other interior trim pieces. Pissed that I forgot to bring my camera though. My door panels on my car are pathetic. I was going to try to repair them because good used ones sell for as much as $200. I got both door panels, arm rests, window cranks, and door handle cups for $50. Oh yeah they are in mint shape too..... Original 260z panels. This picture shows the arm rest installed on the original because I couldnt install the new panels. For some reason Datsun moved the door lock pull forward 3" on the 280z. I now have to modify the top of the door to move the lever forward. Panels from the 280z Top dash cover for $10. I doubt I will use but I had to grab it. Up to date pictures. Edited October 7, 2012 by padam07 Quote Link to comment Share on other sites More sharing options...
padam07 Posted December 30, 2012 Author Share Posted December 30, 2012 UPDATE!!!I decided to start a new project during the winter months. I will be attempting to polish the valve cover I have left over form the 240z I sold. Here are a fes pics from when I did the initial cleaning and media blasting. I expertise is polishing glass so I figured it really isn't much difference (fine grinding (sanding it case of aluminum) is the most important step).I placed the valve cover in a ultra sonic tank with Lestoil and water at 200 degrees. Let it soak for an hour each side.BeforeSoaking in tankHalf doneIn the blasting booth using silica oxide. This stuff is so fine it is like powder.The finish product. Well step one at least. I will be working on the sanding later. Will be using 400, 800, 1000, 2000 grit paper.Next project I started and finished yesterday was prepping and spraying the floor pan with the Lizard Skin product that my wife bought me earlier this year. Turns out there is a only a shelf life of 1 year so I only has 2 months to get this finished.BeforeIt was after 1 am when we finished so I wasn't able to get pictures when it was fully cured. I guess the final finish is slightly duller than what is shown.I am hoping this is going to help with the road noise and maybe even help with the noise the fuel pump puts out. Quote Link to comment Share on other sites More sharing options...
zohanisback Posted December 31, 2012 Share Posted December 31, 2012 Just read through the entire post. Great project and build! Glad to see you consistently update us when you get something else done. Love the fender flares and roll cage. Overall I think the car is gorgeous, and as a 260z owner, I think you made the right choice, lol. I did notice though...is that rust on the right rear of the car? What are your long term plans for the car? Let us know how the noise reduction is. I wouldn't mind using that or a lot of rubberized coating and sound proof padding. Really want mine to be pretty quiet. It was way too noisy before I started the tear-down. Quote Link to comment Share on other sites More sharing options...
Recommended Posts
Join the conversation
You can post now and register later. If you have an account, sign in now to post with your account.