

zgeezer
-
Posts
772 -
Joined
-
Last visited
-
Days Won
3
Content Type
Profiles
Forums
Blogs
Events
Gallery
Downloads
Store
Posts posted by zgeezer
-
-
I see you're in San Diego. You should be able to pick up an R200 in that area for no more than $100.00. Don't worry if you don't see 280Zs; look for any 280zx or 300Z up through about '89. If you can't find one in your area, send me $175.00 and I'll have my favorite yard monkey pull a long nose R200 for you. I get to keep the change. Start with the pick a parts and then start looking for small out of the way communities that have wrecking lots. You'll enjoy the drive and find small [and sometimes large] treasures.
By the way, before you jump to a live axle 9 inch Ford, decide what you're going to use the car for. If you are going for the Pro Stock look or real serious drag racing, then a live axle has some advantages.
It's your ride, but I do think you should stuff in another R200 and beat the hell out it. You may find that you can go real quick with an R200.
g
g
-
If you think the asking price was high, check out the final sale price: http://cgi.ebay.com/ebaymotors/ws/eBayISAPI.dll?ViewItem&rd=1,1&item=7998075280&sspagename=STRK%3AMEWA%3AIT
I think I'll buy up about 20 of these motors from my favorite JY.
-
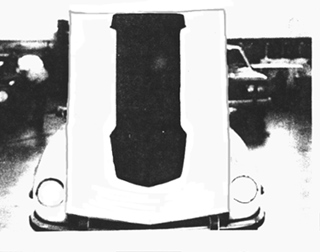
My swap is a LM7 truck engine and I think the tall intake manifold will not clear my hood. Although it is called a competition hood scoop it really is a fiberglas cover over the huge long hole that is cut in the hood. It is a vent, venting engine compartment air out the sides. I'm trying to put this together as "old school" as I can, with the idea of pawning it off on the street as one of four emission control v8's that Datsun imported to show detroit how to meet '72 smog standards... or some such line. Badge it as a Fairlady and tell the world I bought from some loadmaster on a 141 Starlifter back in my days at Travis. Some good line for the Turbo'd Civic crowd and, what the hell, Mustangs are good too.
Corzette, thanks a lot, I've sent you a PM
g
-
Not only can I not spell, it appears I can't read either. It's white '87 Turbo with, I think a clsd. The day before I purchased this a locally well known Z hoarder had looked it over, expressed an interest in the wheels, but passed on the differential because is was the "anaversury" model. I think the white paint job saved this one for me. It's nice to have two CLSDs, but I need some other things more.
I will give it to any person that can make a 1973/74 "Competition Hood Scoop" available in Southern California to pull a mold. Or, if you or your estate has such an animal and would like to sell it, I'd even throw in some boot. Here is what the scoop looks like: http://zhome.com/zcarfilesJPEG/CompHood.jpg
Anyone out there?
g
-
Thanks a lot folks for the comments. I think I'll call Carl this weekend. That shop is not too far from me.
g
-
Yep, there it was sitting all alone in my favorite jy. It's really white with chrome plated 16 inch 7 inch wide alloy wheels and a finned cover plate on the differential. I can't spell anavursery, but thats what I think it was. Bought the differential and both 1/2 shafts and the wheels. I expect to pull the lsd carrier out and install it in an earlier 3:54 R200. In reading the multitude of notes on this swap, I think it should go into my 240 with no problems. (I've got MM's adaptors for the 4 bolt CV joints) This time I'll go easy on the H20 and WD40. Anyone aware of any issues with this LSD swap that hasn't been chewed to death?
Anyone out there feel a real need for Japanese Chrome Alloys. If so, pm me.
-
Two years ago, I located a 3:36 R200, bought it, opened it up, "cleaned" it up with degreaser and a h20 hose, air dried it with hair dryer, sprayed a can of WD40 into it and then buttoned it up.
Two months ago or so I scored an clsd from '89 Turbo. Glee, Joy, and Great Happiness.
Opened up the R200 and it was filled (and I mean FILLED) with rust the consistancy of a stale french baguet.
Dismantled the R200, cleaned out the rust, purchased all new bearings and delivered it all in a box along with the clsd carrier to a local differential guru. This guy never worked on an R200, but had a reputation of being the man to set up you Ford/Chevrolet rear ends.
Three weeks and a lot of $ later he delivers a clean 3:31 clsd R200. However, this thing is tight, really really tight. It can be turned only with a six inch bar on the pinion. When it turns I can feel through the bar a drag and then a release and then another drag that feels as if it matches up to the meshing of gear teeth.
I pulled the cover, drained the gear lube, painted several ring gear teeth on each quadrant and then turned the ring gear one rotation. The pattern in the yellow "paint" I used looks consistent in all quadrants and is a "smear" pretty much in the middle of each tooth.
I've never felt a rear end this tight, but the guru assures me that all it needs is a few miles on it to loosen up. I think he screwed up the assembly in some manner. Does anyone here have any insight as to what exactly might be causing the problem. Any comments would be greatly appreciated before I take it apart again.
g
-
I've been "in the process" of this swap for the last two years. I expect to actually set an LM7 into a early 71 240 sometime this month.
Here's what I "think" I know.
There are many small and a few large differences between the LS1 [which most folks are using] and the truck motors.
* The truck engine is an iron block, not aluminium.
* The truck pan is deep and would not likely clear speed bumps. Change it for a LS1 pan from a Camaro. Don't forget to use the Camaro oil pickup tube. After you button up the new pan, be sure to remove it and check to see if your oil pickup pipe has moved. I understand the clearances are close and if there is any interference at all between the new pan and the oil pickup pipe it will push the oil pickup tube out of the oil pump's "o" ring seal. You can start up w/o oil... not a pretty sight.
* The trucks have a "mechanical" fan with a fluid drive... just like yesteryear. My measurements place this fan very close to the middle of the engine. I believe I can run this fan with a radiator shroud... Just like the JTR book. As I've not placed my engine in the compartment, I'm not certain if this will be a slam dunk [i've got to be kidding] or if I will need to modify the shroud. The backup position is a Ford SHO fan.
* Other than the AC, all accessories are mounted differently that the LS1. Basically, the alternator and power steering are on the driver's side. The alternator is mounted higher. Additionally, and here's a rub: The accessories are mounted further out from the block and closer to the radiator that the LS1. This means that you can replace all the accessories with those from a LS1, but you will also be replacing the crank dampener and pully.
* The intake manifold is tall and uggggggly. The ugly part can be alleviated by using the cover and rail cover from a Cadillac Escalade. However, it will still be too tall to fit under your hood. Take a close look at the photo of the swap engineered by AutoBacs for an idea of the problem.
* The two solutions I'm considering are: 1) Cut a very large rectangle in the middle of the hood and then cover it with a fiberglas copy of the "Competition Hood Scoop" that was optional in 1974 or so. It's not a scoop, but a vent. Google "Datsun competition hood scoop" and you'll find some photos; 2) Replace the intake with that from an LS1. It will bolt on, but there are a number of points of interference. Most of all the hoses will be rerouted or replaced with LS1 pieces. Your MAF [Whatever that unit is that measures air intake] will now be mounted several inches lower and, I think a bit forward of the truck position. It will kiss your accessory drive belt and tensioner. The folks at Street & Performance out of Mena Arkansas tell me that all I have to do is cut the tensioner arm and lower the belt. They are confident, I'm not; and 3) replace all accessories and intake manifold with everything from an LS1... this could be pricey.
* The 2004 LM7 I'm using has a smaller electronic plug to the injectors than the LS1. You can't use a loom designed for the LS1
* I'm using the corvette motor mounts and isolaters. Use search for the post that will give you dimentions for a simple cross member mount.
* Exhaust manifolds are cast iron and IMO good looking. However, after I measured the engine from the rear transmission mount forward [which for me is a given b/c the JTR rear transmission mount is welded in] I believe the passenger side manifold will interfere with the firewall. My cure was to buy a set of JTR headers designed for the LS1 swap. I'm reasonable certain they will fit or can be MADE to fit.
* There is a reason that the only photograph I've ever seen of this swap is the one posted above by AutoBacs. You will notice that in that swap the iron manifolds are used, but that the engine is set very much forward and that there is no hood.
* But for the fact that I got this very low mileage engine/trans for nickles and I expect to supercharge it [i like to lower compression ratio], I would recommend that you look at the LS1. The prices are coming down and there are kits available that will ease the installation.
* I believe you can save yourself a bit of grief If you contact JTR and price out their entire kit, including the headers. Pull up John's Cars website and price out his installation kit too. Then, really learn how to use the search function here.
Finally, spend some money and purchase the GEN III engine swap DVD from Street and Performance, it's less than $20.00 and will answer most of your questions about the differences between the truck engines and the LS1.
G
-
Yes, you're right: the 280Z rear shock mounts are flat. It is this surface you are replicating in the early 240Z. The plate I cut out is the same shape as the 280Z's mounting surface. The two small triangles are the sides that locate the plate on the early 240Z's.
I'll try again this weekend to post photos to this site's photo album.
g
-
I had similar problem with rear disk conversion. Pulled both stub axles, cleaned [really cleaned] the mounting side of the stub axle flange and then retorqued the bearings to 225#. Problem solved.
g
-
Same here: depending upon price, I'd buy one.
g
-
We had similar problem with early 302W running mild hydraulic lifter cam. We broke cast rocker arms, springs, and bent pushrods. All at cruising speed, 2800 rpm or so. We replaced springs and spring retainers. The problem was solved. The spring retainers, purchased at close out prices, turned out to be a GM product. If your pistons are not chewed up, I would look very closely at the entire spring & retainer assembly.
g
-
Does anyone have any comments about this HID headlight conversion kit. It includes ballasts, so it appears not to be another xenon blue bulb conversion.:
-
I have rust blockage on the last 18 inches of steel fuel line just b/4 my fuel tank. I would like to cut off that portion of the line and re-route a flexible low pressure fuel line to a small mazda style fuel pump. Does anyone know of a tool that would place a stock "bead" around the end of the cut fuel line? You know a bead that would accept a flexible fuel line held by a screw clamp. In the alternative, is there a union fitting similar in function to those compression fittings for copper tubing that I might use.
I've tried to clear the blockage from the line using my old standby- an old speedometer cable driven by a drill, but there are too many 90 degree turns. All other ideas are welcome.
g
-
Someone told me that bright green was a bad luck color for fast cars for some reason. Something about NASCAR' date=' I think.
Anyway, I have been blacking out all the chrome and stainless on my 2+2. I installed early bumpers and they are now black. The aluminum mags will be left bright and polished.
I may flat black the hood, rockers, and cowl panel as well. I like the color combination. 2+2 cars seem not look good in some colors, so how about this one? Would you throw up if you saw this on the street? I was hoping it would be accepted as "old school" and not Rice. I found a few examples of 70's cars painted this green, though mostly "muscle" cars.
So here is a test shot on a spare fender-[img']http://home.comcast.net/~hopharrigan/wsb/media/350385/site1043.JPG[/img]
I have thick skin, so tell me like it is.
I like your green, go for it. It seems to me that the early series I Z's had an "organic" green along with that odd "rust orange brown". A green may in fact be "old school". The fender is neat, buuuuuut, what is that hood? Am I right in that you have a late 280z hood with vents and another old school '74Z "competition hood" vent look alike on the center? It's the horizonal vents I'm referring to. If that is a commercial "scoop", please post the manufacturer. I've been looking and planning on doing something very similar for the last year.
g
-
You locate the flat plate referred to above, by the plastic cover. One end of that cover clips directly over the three bolts holding the shock strut, the other clips onto the mounting bracket that you will ultimately bolt to the plate. Clip the mount to the cover and the cover to the strut. At that point you can precisely locate the plate. It helps to have the plate drilled so that you can bolt the plate to the mount.
g
-
I've put the complete 280z retractable seat belts into an early 240z. First, you cut out pockets from the 280 and weld them into the 240. The outside seatbelt attachment bolt locations are the same. Cut out the appropriate pockets in the 240's pan, bolt up the seatbelt retractors for mockup and then weld in the pockets cut out of the 280. Then mount the shoulder belt retractor on the rear shock towers. This will require mocking up and welding a steel plate on each tower to hold the 280 shoulder retractor and plastic cover/guide. I took my scissors, straight edge, razor, and flat poster board into my jy and made templates of the 280 mounting plate. Easy to do, hard to describe. Just look at a 280 and duplicate that plate and side supports onto poster board. You'll end up with one top plate and two slightly different side pieces. The plastic retractor cover on the 280 clips onto another metal mount: take this mount and transcribe each of the three bolt holes onto the plate, drill the plate, weld a nut on the underside of the plate and then weld the plate and the support pieces to the shock tower. Bolt the retractor onto the plate and you are almost home. The final step is to secure the inside belt/shoulder buckle. In early 240Zs the inside mount is a reinforced nut on the side of the pan "shelf" directly behind and to the side of each seat. As the 240 inside belt was, in fact, a belt, this location makes sense. However, the 280 inside buckle is attached to a stiff cable that, in a 280, is attached to the side of the transmission tunnel. The simple mount would be to locate the cable attachment on the side of the 240 transmission tunnel and weld in, on the inside of the tunnel, a plate with captive (welded) nut. Later 240's might have the inside belt attachment relocated from the back shelf to the transmission tunnel.
My z was in a rotissiere at the time. Cost: $55.00 for the 280 belts and all. $60.00 for the beer and marianated flank steak, and 2 hours of cutting, welding, bench racing and other forms of liarcraft.
There are some caviauts: 1. If shopping JY don't buy any belts that might have be "streatched", 2. Make sure that the retractors work b/4 you pay money.
If I ever figured out how to post pictures, I'd do it here.
g
-
If its any help, I have a complete harness for a 2002 LM7 with AT. That is a 5.3 GENIII truck engine.
g
-
During the past 4 years of crawling over JYs, searching for wrecked 240s, I've been impressed by the large number of times I've seen deep side intrusions into the driver's or passenger's side, pushing the door right into someone's lap. A large number of times the z would be folded right behind the seats, in line with the rear door jam. I built a 6 point "roll bar" out of thick wall tubing about 2 inches in diameter. The hoop is positioned about 2 inches behind the back floor, in just about the same location as the storage bins, welded to angle iron, welded to the body and then capped at the floor level with a square pad welded to both the hoop and the floor. The hoop is tied together from right to left with one straight level tube running just above the floor. It is hidden from the side view by the Datsun chrome back side window frame. Two straight bars run from the back of the hoop directly to the floor in the back, just shy of the plastic back panel over the rear lights. These are straight runs that clear the plastic side panels, but are hidden from the rear and the side by the quarter panels.
The front door bars are positioned down on the hoop to a point below the door line and extend forward to the floor board/firewall intersect. They are welded to the inside of the door sill, welded to a square piece of .125 steel plate that is bolted and welded to the floor board.
With the doors closed, nothing is readily visible from the back or side. However, as the door bars are straight they do impede quick entry or exit. At least for anyone who weighs more than 155#. This setup probably does not meet the criteria of any race sanctioning body, but I do have a stiffer body and some sense of security that there is something other than sheet metal between my butt and the bumper of some SUV. Accidents happen. In my opinion something is far better than nothing as far as cages and roll bars are concerned.
g
g
-
Two matters come to mind: 1. the sx calipers allow simple fully functional parking brakes using your stock cables and two extension links and 2. a stock rotor means you or your shop can replace it without looking for a machinist.
g
-
Two matters come to mind:
1. A fully functional hassle free parking brake, using your Z's cable and
2. A rear rotor that you can replace anywhere anytime without looking for a machine shop.
g
-
Tony
Thanks for the link. The 4.8 truck bores are too small and will not clear the valves or so I've been told by a shop selling AFR, but the same source "thinks" the 5.3 is ok. I will contact AFR.
The truck intake is too tall, but that can be cured by either swapping over to an LS1 intake.... and that is not entirely w/o problems of its own or pretending I own a '73 240 Z with an overheating problem and cut a BFH in the hood and cover it with something resembling the hood vent Datsun sold over the counter in '73 or so. It looks like a scoop, but vents to each side.
g
-
I have a little over 3K to upgrade my 2002 LM7 (5.3L) GEN III truck engine that will be in my Z in another month or so. The engine has only 20,000 miles, so I expect everything to be in excellent shape. It is rated at 285 hp, uses the smaller intake valves (around 1.9") than the Ls1 and has smaller combustion chambers than the LS1 (around 62cc as against 66cc or so). This drops the C/R down into 9 something from the 10 plus of the LS1
I have a chance to buy the new 205 AFR heads and a GMPP HOT cam and springs for the LS1 at a reasonable price. The AFR heads are CNC ported with 2.02 intake valves and are real works of art, but they also have 66cc combustion chambers and I think the loss the compression may offset any other gains they might offer over the stock LM7 heads. One of the design parameters for my Z is that it be an honest middle 11 second car that can and will be driven everywhere. I expected to do this with a mild cam and a supercharger. I would sure appreciate some input, because if these heads and cam work, it will save me a bundle on hood modifications and allow me to look just a little more stock.
g
-
Hi guys finally got my ls1 now i realise the aussie version has the sump or deep part to the front of the oil pan
From what I have found is the camaro the best oil pan for this conversion (into a 240z)
any idea cost of a second hand Oil Pan to suit one in USA
Any recomended places in the USA to buy one
Thanks
Mick
The camaro/firebird pans will work. The truck versions are rear sump, but the sump is deeeeeep and would certainly drag on any obstacle higher than a flattened Foster's can. But, if you have fabrication skills the truck pan might be usable. I purchased my camaro pan off E-bay and paid $75.00 for pan, gasket holder, and oil pump "pipe" to fit.
g
RIP R200 in my Z now Im calling JEGS
in Gen I & II Chevy V8 Tech Board
Posted
Sorry Traub, I responded to the wrong post. My local JY here in California has 3 or four R200s in Z ranging from 280, 280zx and 300Zs. There is probably a 3:54 and a few deeper gears such as 3:70s. If you can't find R200's in your neighborhood and would like to buy one, I'd be more than willing to have my local JY pull one for you and ship it. They weigh around 85# and will fit into a box that is 24 inches, long 18 inches wide and 12 inches high.
g