
EastTnZ
-
Posts
317 -
Joined
-
Last visited
Content Type
Profiles
Forums
Blogs
Events
Gallery
Downloads
Store
Posts posted by EastTnZ
-
-
Yeah I've just got to get brakes before we road race but I should be good for drag racing...just 80-100hp short of you!! I need the wilwood fronts and I'll be fine. Gonna drive it to work and on the weekends to put that first 500 on the clutch and lightweight 18lb flywheel. Feels like it sticks a little throttle wise when you rev it up but maybe it's just that the lightweight flywheel is not dragging it down?
Either way I'm game for some racing so I'll be scouting all winter long as well. Believe it or not I've never raced at a drag strip...
-
I went by blues tech tips lol he was wrong! Oh well let's race! I got my exhaust put on today and it's a sleeper alright. Haven't opened it up yet though.
Thanks for the kind words I'm glad it's mobile I just need to fix the wiring (heater, tail lights, blinkers, and wipers) that do not work...
-
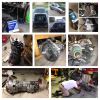
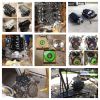
I searched and searched and searched endlessly to build a spreadsheet of what to buy before ever taking on this journey from the car to what I wanted in the drivetrain for approximately 2.5 years. Searching craigslist/copart/ebay endlessly until I ran across a deal in my budget for a $2k running driving Z car. This led me to Virginia and I bought this daily driver 1976 280Z with 168k miles and in fairly good shape. My uncle and I drove it home 300+ miles with dry rotted 10 year old tires and 40 year old bushings with a slight hint of white smoke under hard acceleration on the interstate! Then the build began"¦ This was in March of 2012 just after grabbing my BS in Civil Engineering from UT Knoxville in Dec of 2011. I didn't start buying until December of 2012 and I haven't stopped since haha[/font][/size]

-First I had to figure out the dreaded fluid in the passenger floorboard...leaky heater control valve so I wound up using a Bronco heater valve 74628 (Advance Auto Parts), 2-90* hoses, spare pieces of 5/8" hose and some hose clamps to fix that right up. PITA to get to with stock heater core/ac junk in the way BTW. Future plans are JCI/Vintage Air!
-Engine spec'd out to be cheaper for an LS1 pullout if I could find the right deal but after considering the fuel mileage gains and ease of finding another engine for less if it went south I went 5.3 all the way. Plus boost always sounds better for the future! I have a spreadsheet list for that too!
-2002 5.3 from a Chevy Avalanche with 80k that ran good (or at least that's what the guy at the junkyard said!)
-Drive by cable was my goal from the start to get a better "feel" for the car so I bought a new throttle body and used ls1 intake, fuel rails, oil pan/pickup tube, etc... But I kept the truck spacing on the accessories (cheaper).
-Transmission, besides the car, this was the worst to find and ultimately I went with the TR6060 over the T56.
-2011 Camaro SS TR6060 with 2k miles ($1600 with free head stud kit valued around $225)
-TR6060 has more stock holding power than a T56, a trans cooling system, and supposedly shifts smoother
-But the downsides are that it is more rare (1st in a LS-Z), fixed yoke rear, taller gears, & uses a remote shifter
From then on out I used the "Documemtation" of how to swap an LS1 T56 combo into a Z car and along side other builds on HybridZ to get to where I'm at. From Cooling to the RT Diff Mount to the Fuel Cell Setup I've researched and stalked tons of pages to get where I'm at and asked a handful of questions. My hats off to the site and all who put their 2 cents in because it would've been harder without it for sure. If I can help anybody else that has questions just shoot me a message about the swap. HybridZ and LS1Tech are your best friends during this swap so use them! The 5.3 had no real issues as in tapping the alternator hole (I was scared to do this at first) or cutoff the protruding section from the side of the block but it cuts like butter with a saw. 11/32" Drill Bit & 10mm x 1.5 Tap. I did mine inside the car, so out or in it doesn't matter.
My goal is to daily drive it to work to keep miles off my truck and to replace my burning passion for buying a new Vette since I bought a new '12 Duramax instead. So power upgrades are essential to fulfill my daily need for speed.
Future dream plans are a turbo, beefed up rear, and A/C. But I'm not sure if they can all be satisfied together so we'll see or I may just go and build another with a 5.3/auto/turbo drag setup and leave the stick with a/c for autox/daily driving.
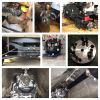
Engine:
-5.3L 2002 Chevrolet Avalanche 80k Miles
-JCI Engine Mount Kit
-MSD Plugs 32829 (Truck Coil Setup)
-LS1 Stock Throttle Body
-LS1 Intake 12560688
-LS1 Oil Pan 12558899 (Oil Filter: PF46E AC Delco / M1-107 Mobil)
-LS1 3 Pin MAF Sensor
-LS1 Stock 26 lb/hr Injectors
-LS1 Alternator Bracket + ¾" spacers
-Tap 10mm-1.5 (Hanson 8340) and 11/32" Drill Bit for Alt Hole in Block
-Ribbed Pulley Advance Auto (P/N: 89015)
-EGR Block off Plug Dorman 1-3/8"
-Lokar LS1 Throttle Cable 36"
-Custom Intake Throttle Cable Bracket
-Custom Firewall Throttle Cable Bracket
-4" to 3.5" Elbow to 3.5" Cone Air Filter
-Dayco 5060548 Serpentine Belt for Alternator Only Setup
-Truck Crank Pulley, Water Pump, Alternator, & Belt Tensioner
-TunedbyFrost for 93 Octane (+25-28rwhp) & P1336 Code Removal
-LS1 Drivers Side Clamshell Motor Mount (5.3 one won't work)
-LS1 Dipstick 12551581 and Dipstick Tube 12551577
Transmission:
-TR6060 2011 Camaro SS 2k Miles
-Custom Transmission Rear Mount to Frame Rails
-Royal Purple Synchromax Manual Trans Fluid (4 Quarts) 01512
-Perma-Cool Hose Barb Fittings 11/32" to 6AN (P/N: 15265)
-2 "“ 6AN 90* Elbow Female to Male Swivel Fittings (Route Cooling Lines)
-Custom Remote Shifter Mount and Linkage Rod (DO NOT BOLT TO TRANS TUNNEL)
-Tremec Shifter TKO600 New Takeoff
-Pro 5.0 Shifter Lever + 6 Speed Shifter Ball
-GM 4l60e to 6AN Fittings (P/N: 12055) Choice Motorsports LLC (+ C Clips)
-Stock Camaro SS Trans Mount
-*Reverse Lockout is the same plug for LT1-T56/LS1-T56/LS3-TR6060
Clutch:
-Monster Stage 2 "“ 12" LS1 Clutch Package with clutch alignment tool etc"¦
-Chromoly Billet 18lb Flywheel
-Tilton 75-875U (7/8")
-48" SS Braided 4AN Clutch Line (TOOOO Long "“ go 36") Tilton to TR6060
-Tick Performance TR6060 Clutch Speed Bleeder (Just Do It)
-Welded on Male 4AN Steel Bung to Slave Cylinder Steel Line In Bellhousing
-GM AC Delco TR6060 Pilot Bearing 12557583 (NOT a T56 Bearing)
Driveline:
-GTOPL-2 Aluminum Fixed Yoke Driveshaft Adapter (1350 Size U-Joint)
-Slip Driveshaft (Oliver's Driveshaft in NC) 1350 to 1310 (23-9/16" Long)
-R200 Neapco Adapter 2-2-899-1 with a 1310 Size U-Joint (M8-1.25x35mm)
-RT Diff Mount from Techno Versions LLC and Modified Prothane Bushing
-R200 3.54 (Stock) Open Differential (1 Tire Fire!)
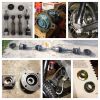
-Modern Motorsports 300ZX Turbo Half Shaft Adapters (New)
-1986 300ZX Turbo (84-89) CV Axles (New) Flipped Cages to Shorten
-75w90 Diff Fluid Lucas 2 Quarts (2.75 Pints = 1.375 Quarts to Full)
-Differential Overflow Tank
Exhaust:
-JCI Headers Used (Non Ceramic Coated) #DAT-405 (Used)
-Dual 2.5" to the Rear of Trans/Driveshaft then Y into 3" out the back
-Borla Muffler 40359 Pro XS 3" In/Out (almost identical size to stock muffler)
Suspension:
-Full Removal of All Suspension Front/Rear and Sanded/Painted
-Full Poly Bushing Master Kit (Red) 7.18102R Hyper Flex
-Tokico 5 Way Adjustable Springs(Red)/Struts(White) Combo
-10w-30 Fluid Refilled in Stock Strut Cartridges
-Rear Spindle Pins/Bushings Replaced By Previous Owner Recently!!!
-KYB Dust Boots (Plastic) with Bump Stop (Not Strapped on the Bottom)
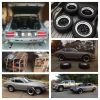
Wheels/Tires/Brakes:
-XXR 531's in 16x8 with +0 Offset (Black/Polished Lip)
-Falken 225/50/16 with no rubbing on stock/tokico suspension
-Stock Brake Calipers Cleaned and Painted Hi-Temp Red
-Speed Bleeders on All Corners
-Hawk HP Plus HB169N.560 Front Pads
-Stainless Steel Braided Brake Lines (All 4)
-New Front Rotors
-Rear Drums Already Had New Pads
Cooling:
-3 Row Aluminum Direct Fit Radiator with Drain Plug
-"˜93 Taurus/Sable (91-95) 2 Speed 3.8L Fan with Connector Plug
-Stock 5.3 Hose Modified to Fit Upper Hose
-22478 Gates Hose from Oreilly's for Lower Radiator Hose
-New Factory 186* Thermostat + Housing (Built Together)
-¾" and 5/8" Heater Hose Lines and a ¾ to 5/8 adapter
-JTR Hose Tee with 5/16" Steam Barb and Air Bleeder
-Radiator Overflow Tank
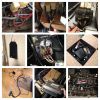
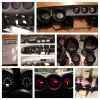
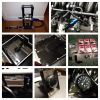
Gauges/Wiring:
-ChevyThunder.com Stand Alone CPU/Harness for 5.3/LS1 w/ OBDII+CEL
-Speedhut 4" GPS Speedo 160MPH w/ Blinkers+High Beam GR4-GPS-05T
-Speedhut 4" 8k RPM Tach (See Group Buy on Speedhut"¦) GR4-TACH-02
-Glowshift 2-1/16" Oil/Water/Fuel Gauges 7 Color LED
-JEG's Fuel Pressure Gauge (on fuel rail at firewall)
-Oil Gauge Pressure Sending Unit behind intake on top of motor
-Water Gauge Sending Unit on rear of passenger head at the battery
-Autometer 2277 "“ 12m x 1.5 to 1/8" for Water Temp Sensor to LS Pass Head
-Autometer 2268 "“ 16m x 1.5 to 1/8" for Oil Press Sending Unit Plug Top Block
-Brass 1/8" NPT 45* Fitting for Oil Pressure Sending Unit Aftermarket
-8 Guage Red Wire From Alternator to Battery
-Stinger 4 Maxi Fuse Holder and Appropriate Fuses for Year Model
Fuel System:
-15 Gallon Universal Fuel Cell w/ Built-In Sending Unit (0-90 Ohm)
-Fuel Cell Hanging Mounts and Padding + Other Mounts
-Fuel Filler Neck Behind License Plate
-Flip Down License Plate Bracket
-Vented Gas Cap
-Dual 10AN on the rear of the Cell (10 to 8 reducer)
-8AN Pushlock Hose to the 100 Micron 8AN Fuel Filter
-Walbro GSL392 (255) Fuel Pump
-Corvette C5 FPR WIX 33737
-6AN WIX FPR Fittings 640860, 640850, 640940 (Russell Fittings)
-6AN Pushlock Hose From Pump to FPR
-6AN Pushlock Hose From FPR to Fuel Rails & FPR to Tank Return
-Fuel Line Holder Clips with Rubber to Run Fuel Lines
-LS1 Fuel Rail 3/8" Hardline to 6AN Push-On Fitting is RUS640850
-Stock LS1 Injectors 26 lb/hr
-*6AN Size Fuel Line is good for up to 450HP
-16' of 6AN and 3' of 8AN Push Lock Hose
Recommended Tools: (besides the usual ones"¦I had to buy/borrow these)
-Engine Hoist 1 Ton (Harbor Freight $105)
-Load Leveler (Harbor Freight $20)
-Torque Wrench (Mainly for Clutch Install)
-Slide Hammer (Harbor Freight $15 for Stub Axle Removal)
-Mig Welder (Lincoln Electric 140HD + Mig Gas $700 total)
-Brake Line Wrench (Craftsman 10mm/12mm $10)
-Spare Sets of Wrenches in Metric (Whole Car is 10/12/14mm"¦)
Issues/Advice:
-Crankshaft Relearn Procedure P1336 "“ It cannot be completed unless a factory setup is in place and I did not have this so I went ahead and had Frost tune that code out. The engine will try to run properly but won't let itself until this is done even though the crankshaft is mechanical. Other than that the engine ran flawlessly from ChevyThunder's harness. This procedure is popping up only if the computer and engine did not match from the factory and I did not get the CPU with the engine. Next time I will.
-Do NOT cut anything off of the Datsun harness until the project is fully running and it all works, ask me how I know... I had to fight a couple of electrical gremlins that were working just fine before I took out the motor and they didn't once I was ready to drive"¦like brake lights and interior everything electrical, but the headlights, blinkers, stand alone engine and the gauges worked flawlessly.
-I'd go 2-5/8" on the triple gauges. Mine look too small personally but they're fine and it's too late now
-80 or 100 Micron Filter before the Walbro is mandatory but my 30 Micron did fine but supposedly too restrictive.
-Upgrade the suspension/bushings like I did and redo all supporting components while they're easy to get to.
-My clutch is actually for an LS1 T56 setup but works with what I have so there's my 2 cents"¦buy the trans first not the parts that go in it. They were having a new years sale and I just knew I'd be putting in a T56"¦
Push button momentary switch wired for the reverse lockout solenoid because my harness was made for a T56 and I am using a GPS speedo not the VSS. 3 amp fuse and a switch from RadioShack and it works good. Keeps me from going into reverse on a 6-5 downshift. It does literally take two hands to jam it in reverse without the solenoid activated and that will not mess it up because it's only a spring pushing back.
More TR6060 downsides I'm coming aware of now that it's driveable, theres a slight clanging inside the trans when you let out of the clutch while it's in neutral. Apparently all 5th Gen Camaros have this from what I read even brand new ones with no miles on them (not just GM TR6060's either). It's a factory sound and slight vibration in the shifter (get a loud exhaust or a good stereo!). Another issue with buying a TR6060 are the batch of factory defective transmissions, which are serial numbers 0-25000 which have a weak main shaft that's not heat treated like the new ones and an issue about not having an output shaft bearing installed. This has been well known to modified 2010's and some 2011 cars that are manual that have broken with superchargers installed and even bone stock 436hp levels. I was unlucky and my serial is 24302... So since I'm going to only have low 300's for horsepower right now I'll be fine but in the future a main shaft upgrade will be necessary. Main shaft (stock) is good for up to 475hp from what I've read.
Gearing is another aspect in transmissions that I was curious about as well...
LS1 T56 - 2.66 , 1.78 , 1.3 , 1.0 , 0.74 , 0.50 (not GTO ratios)
TR6060 - 3.01 , 2.07 , 1.43 , 1.0 , 0.84 , 0.57
Grand total costing me around $14k including the car. That includes a few screw ups, new GM 10.9 bolts everywhere, high end fluids/gaskets, and quality parts to make sure they will not fail during daily use. Most all the parts I bought were brand new unless it wasn't critical like the used headers. It took me approximately 1 year to do it all but could've been done in half the time if I dedicated more time to it.
If I can figure out the picture situation I'll load some on here but until then all my pics are on Flickr via my signature below.
Thanks
Travis -
First of all congrats I did the same thing just staring at mine lol!
Where's the sending unit going? Mine is behind the intake on top of the motor and I used an autometer fitting, then a 45 npt fitting and it works flawlessly. Or is yours located above the oil filter?
Found the adapter: Autometer 2268 - 16m x 1.5 to 1/8" OPSU Plug
-
For the tr6060 guys I just saw tick performance's website and for a $2500 rebuild they have a warrantied 700+ ftlbs guarantee on the stage 3 rebuild. First ever for a Trans rebuild of that caliber. Idk what all it comes with but that's worth it. Just find a cheap core lol
So when I go turbo that'll be my route for a Trans rebuild.
-
http://m.ls1tech.com/forums/showthread.php?t=1680642&styleid=25
Just through some searching for built tr6060's I ran across this. Food for thought but it's ultimately your money and decision. Either route is a win if you over build the Trans.
-
I agree if I would've had the money that's what I would've bought but the shifter location is a little shorter than desired with the magnum (see the blue z with a copper colored ls3 in it) unless you're looking into redoing your dash around the hvac controls. I looked into it and a stage 2 (700rwtq) Tr6060 rebuild is like $1900 minimum lol I hope mines good!
-
Yes I did. I saw a build on ls1tech for a lq4 in a miata that used a slip driveshaft (without the usual slip yoke) so I went for it without having to rebuild the tranny as I have zero experience in that lol. Checkout my link in my signature and you can see the adapter and driveshaft setup. It's 1350 in the front of the shaft and a 1310 in the rear of the driveshaft.
-
I have a standard Camaro SS (2011) TR6060 in mine and it fits fine with the stock tail shaft (fixed yoke). I'm buttoning mine up and should be on the road within a week or so (finishing up fuel setup). In the future I plan on adding a turbo to my 5.3 and with the extra torque holding power of the TR6060 I figured it would be smart plus I couldn't find a decently priced T56. And it only had 2k miles on it for $1600 and I got a full arp head stud kit thrown in for free (future turbo parts).
I trimmed off the ears of the stock Trans mounts in my 280z tunnel and have plenty of room.
And lastly about the oiling issue it has a Trans cooling setup built in so It will work with the radiator I bought with the plugs on the low side for an auto tranny. I have part numbers to go from GM to -6AN so you can run a hose to the Trans cooler if you need them.
-
Haha yeah it was a free shirt but i wear a medium and it was an XL lol
-
Should have swapped a diesel. No spark plug probz then!!
I'm on the same thinking haha how about a Duramax/4L80e... Weight is the only killer! I'd love to have an LML in a z!
-
I recently ordered the 4" gps speedo (160 mph) and 8k rpm tach in 4" as well. They got here within a week and it even came with a free Speedhut shirt! Discount and free stuff I'm a fan! I'm ripping out my dash and redoing it this week and should have them installed soon as this is all I was lacking to finish my 5.3 280z build
Great guy to deal with! And I had different options added in mine as well and it was still fast getting here!
-
Who has time to look at the speedo while racing anyways? lol. I went with GPS so I didn't have to deal with any more linkages and connections no matter how easy they are.
And mine should be here friday! Can't wait for the Speedhut gauges! Checkout the group buy and get a discount (10% off and free shipping from the factory I believe)
-
Speedhut GPS Speedometer or Autometer Speedometer (mechanical) was the general consensus when I was searching for a gauge setup.
I bought speedhut and am waiting on them to come in. Ihiryu can get a deal on them. I got the gps speedo and the tach but sourced other gauges for the 3 small ones.
-
What's your target hp? I've been waiting on this ever since the 5.3 original build post said "I'll be going turbo in the future!"
Good luck with the build!
-
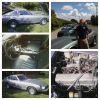
Yeah it's a winch and just put airbags on the z haha. Seriously though I'm probably going to buy an enclosed trailer with a full fold down back door like a few go kart racers I know. It's a great place to get out of the elements at the track if it's too hot or raining as well. And I second the long ramps just in case. Lowest part on my car is 4" off the ground but exhaust is yet to come...
-
I like the setup and I went ahead and put in the modern motorsports adapters and 300zxt axles during my swap. How do you like that cam? I've got an almost identical setup with an 02 5.3 from an avalanche and am looking into a cam. Any videos of it at idle or on the dyno? Can't wait to see what numbers you put down after a stronger axle setup!
-
Same thing happened to my car back in 2008 but it was a cavalier with 107k miles on the stock clutch. Broke all but 1 spring. Put a new hydraulic clutch in and I could press the clutch pedal down with my pinky finger, it was awesome!
What brand? How many miles? What hp/tq was it rated for?
-
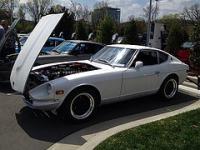
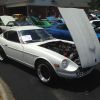
1976 280Z Coupe
- 2002 5.3 bone stock (for now) from a Chevrolet Avalanche with 80k miles. LS1 pan, LS1 alt bracket with 5.3 alternator, LS1 intake/injectors/rails, Taurus fan.
- TR6060 from a 2011 Camaro SS with 2k miles. Monster Clutch Stage 2 with lightweight flywheel. GTOPL-2 driveshaft adapter and slip driveshaft. TR6060 pilot bearing not a T56 one.
- JCI Engine Mounts and Custom Trans Mount while utilizing the factory TR6060 rubber mount.
- AN6 Push Lock Hose, LS1 Factory Returnless Rails (for now), Walbro 255, Corvette FPR, 15 gallon fuel cell. Chevythunder.com wiring harness worked flawlessly truly plug n play, best $500 spent (including emissions flashed computer with 5.3 and LS1 parts on engine). Electronics were my weak point of doing this swap.
- Compiled data to build for a year, took 1.5 years to find the right deal on a car $2k on 3/19/12 and drove it 300 miles home at 80mph with 169k miles on it and dry rotted tires, pulled straight 6 out on 12/15/12, fired up V8 on 9/14/13.
- It took 9 months to fire up because of: new 16x8 XXR 531 wheels/tires, full master poly bushing kit, undercoating, tokico 5 way struts/springs, fuel cell, brakes, rotors, bearings, full suspension removal, cleaned calipers, brake lines, RT diff mount, 280ZXT CV’s and adapters, minor rust removal, etc… and around fishing, golf, car shows, truck pulls, girlfriend, new job, you know “lifeâ€
Now it’s going to be a rush to get the rest fixed up and redo interior, dash, paint/body work competed but at least it’s alive!!
Pictures are on my flickr account in my signature (hope to have a build thread soon to show it off with part numbers and future plans). Couldn’t have done it without the help of all the guys on this site (Thanks) and the loads of info I pulled out of here! Time slips soon to follow…
-
Sweet which type of flares? And what brand are the wheels?
Should be a good start to traction for the new setup! Either way sweet!
-
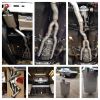
Ok so here goes nothing... my update to this topic is that I kept the TR6060 trans and at first built a shifter that attached on top of the rear of the trans and when I went to install it into the Z it did not fit due to room constraints in the tunnel unless I wanted to cutout a huge hole to let it breath. So as of now the shifter is bolted to the transmission tunnel inside the cab to the body and the shifter linkage is connecting the shifter to the trans.
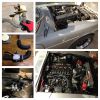
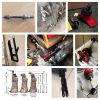
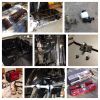
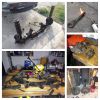
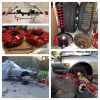
Next is the driveline... The back of the TR6060 is a 3 prong setup fixed yoke and takes a conversion flange with a part number GTOPL-2 ($160 new) or similar version made of billet aluminum and guaranteed not to give any vibration even at 10k rpm. After that the adapter lets you bolt on a 1350 4 Bolt u joint to it (standard 4 bolt pattern) and use either a slip driveshaft (what I did) or a more expensive CV style driveshaft (hundreds more). My driveshaft length from adapter plate to centerline of the 1310 u-joint was only 23-9/16" long. Lastly the other end of my driveshaft is outfitted with a 1310 u-joint to mate up to my adapter to the R200 (had to buy longer bolts with new flange). And a RT style diff mount. I hope this picture loads if not then just checkout my flickr page in my signature the pictures are all there. Oliver's Driveshaft in NC made mine and have quick turn around (<1 week to my door), and any driveshaft shop can do this but I used them since it worked already for a couple of other guys with the same setup on ls1tech.com.
Recap: TR6060 (less $ more TQ) + GTOPL-2 ($100 used) + Slip Driveshaft ($280) + Neapco 2-2-899-1 ($50) + Longer R200 Bolts (<$15)
PS... Make sure you get the right pilot bearing for the TR6060, it's not the same as the T56.
-
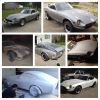
Dang that looks awesome! Hope you wrap the upper radiator hose with a heat shield sleeve, looks like it'll be close! Awesome fab work though and someday I may add some boost... sub'd
Can't wait for dyno numbers and 1/4 mile times!
-
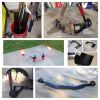
I used a 15 gallon universal fuel cell and put the fuel cap behind the license plate. If I had the $$ I would've got a custom tank built to fit the factory fuel door. I agree with rebekahsz because I've got 2 -10AN outputs ready for nitrous/power adders and it's new and clean and simple... And as usual you have to cutout the spare tire well. Good luck with your routing and it's easy to hookup the walbro 255 and corvette fpr setup. I just wish my tank was shallower because it shows from behind the car...
-
Haha well you could always vinyl wrap it in chrome and see how you like it and it's cheaper than paint lol


1976 280z 5.3 TR6060 Build
in Gen III & IV Chevy V8Z Tech Board
Posted · Edited by EastTnZ
Lol has it been chrome plated yet? Mines in and driving I just got the exhaust completed yesterday and tags today. He has a very nice setup though!
Haha I have found the electrical gremlin...he typed this message. I cutout too much of the wiring when I yanked out the straight six a year ago, and there's a factory splice where 2 red/white wires come together on the passenger side of the engine bay. Connected them together via solder and bam the whole car lit up! And I got my tags renewed today so it's ready to roll.