Challenger
-
Posts
3411 -
Joined
-
Last visited
-
Days Won
3
Content Type
Profiles
Forums
Blogs
Events
Gallery
Downloads
Store
Everything posted by Challenger
-
Thats not a real car... thats a rendering. And yes I bet everyone on HBZ would like one.
-
Thanks!! Did you run it that way Jeff?
-
I REALLY need a tig welder... The first welds look amazing, almost like machine welds, or even soldered.
-
Just threw mine away, ill see if I can get a measurement...
-
Oh I meant just the turbo. But thanks for the picture. Im sure Ill be able to use it somehow.
-
Cut Main headlight/turnsignal, etc harness- How to fix...
Challenger replied to Challenger's topic in Ignition and Electrical
Well me and my friend fixed it nicely a few days ago, looks great all the wires were obvious to which they connected to. -
Anyone thought of taking a poll for who thought was the most helpful, friendly or knowledgeable, etc. I think it would be cool to have a poll for everyones choice, and maybe make up some small prizes. Any thoughts?
-
-
-
-
-
-
-
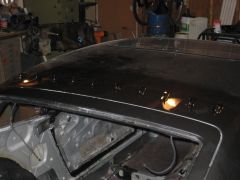
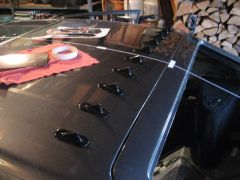
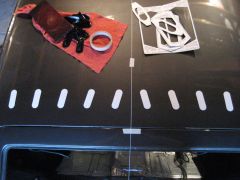
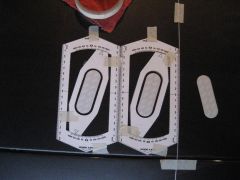
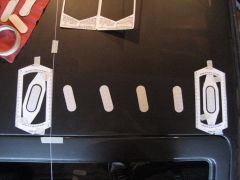
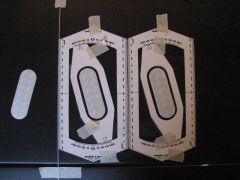
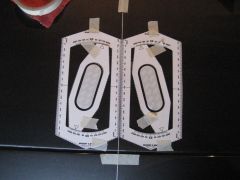
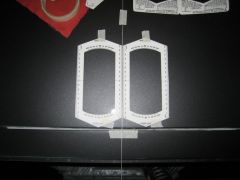
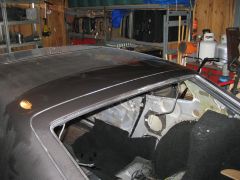
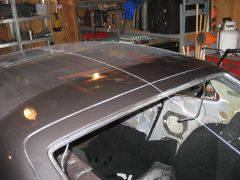
Where and how to get them.... Materials- Vortekz Package- $20.99 shipped. Masking tape- Who doesnt have tape? String- Who doesnt have string? Alcohol- Rubbing/drinking most of us have one of them. Towel- Who doesnt have a towel? First off youll need to decide what area of the rear roof portion the vortex generators will be mounted on. Vortekz reccomends 100mm in front of the part of the roof where the air will seperate. I chose right above the rear hatch, I would use the top of the hatch as a line for mounting them. Second you need to clean the area youve decided on. Use conventional rubbing alcohol with a clean lint free rag. Third youll need to find the centerline on the car. I used the string and a little masking tape to center it on the car. To find the center I tied one end of the string to the center cowl vent in front of the window (13th from the outside one mine) I then pulled it along the roofline and centered the other end on the rear lock. From there place small pieces of masking tape below and above the area you will be working on. (double check alignment after this step) Fourth using the templates provided line them up along the center line. Next using the other set of templates, place them inside the above, and line up the top and bottom points at the 15 degrees (reccomended angle). You can then place the double sided adhesives inside each template trying to make it evenly spaced. Now pull off either side and move the template to the other side. Repeat it till you get the end with this pattern. *center* *15* *15* *10* *5* *0* Now take the right template and move it to the other side and repeat what you just did with this pattern. *0* *5* *10* *15* *15* *center* Moved to other side. All applied. From here you can take your vortekz and carefully place them on each of adhesive pieces making sure not to touch the adhesive with your fingers. This step is quite easy because they come shaped where they can only fit over the tape one way, the right way. Finished, looks like little shark fins! Overall these are really easy to put on, just take your time and be careful and theyll look great. it is also alot easier if you can stand in the trunk area. (no hatch glass )
-
-
-
-
-
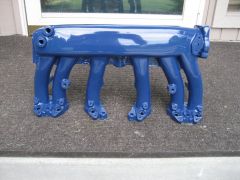
Cutting off EGR Valve instead of Blocking Off
Challenger replied to Challenger's topic in Fuel Delivery
Finished. Not as cool looking as the nonegr, but still looks good. -
-
-
-
It depends on the situation... sometimes it is best to "power it out" by pointing the wheels the way you want to go and then apply power.
-
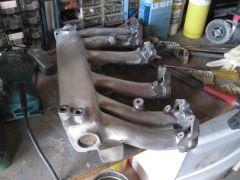
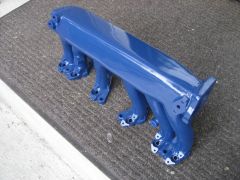
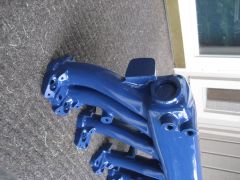
Cutting off EGR Valve instead of Blocking Off
Challenger replied to Challenger's topic in Fuel Delivery
Just finishing up a customers intake manifold.... Cut it off and blocked it. I also got one of the p91's from the junkyard but had an unfortunate accident with one of the linkage towers and busted off a chunk of the runner where it attaches. Ill have to find someone to weld it back on for somewhat cheap. (tig welding is expensive!!) -