Z-TARD
-
Posts
859 -
Joined
-
Last visited
-
Days Won
2
Content Type
Profiles
Forums
Blogs
Events
Gallery
Downloads
Store
Everything posted by Z-TARD
-

-

-
-
I haven't seen them as Metal Skool yet, they play on Wednesday nights down here at the Typhoon Saloon. If they played weekends, I'd be all over it. The same guys also have a Van Halen cover band called The Atomic Punks: http://www.theatomicpunks.com/ I try to see them whenever they are in town, they put on an awesome show and if anything sound even better than the original Van Halen. I'm thinking of taking the frankenstrat to one of their shows to have them sign it. I can't think of anything more appropriate than an imitation Van Halen band signing an imitation Van Halen guitar
-
OMFG.... http://www.google.com/patents?id=-QgyAAAAEBAJ&printsec=abstract&zoom=4#PPP1,M1
-
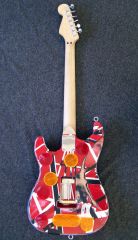
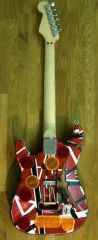
I guess the backside could be considered complete to..... Changes since last pic: White duct tape added to trem spring cavity to keep ground wire from getting caught in the springs Extra holes all over the place, hard to see because many of them are pretty small. A few big ones in the upper horn, and near the broken amber reflector. I'm thinking the reflector on the original was probably broken like that on purpose in order to bolt on a folding platform that Ed used for a while. The platform held the guitar out flat, so it could be played more like a piano.... Removed chunk from red reflector in lower corner, along with adding some sky blue paint to the edges of the body and reflectors. Added small piece of black duct tape to the end of the body. Not sure what function this serves on the original guitar, probably covering up some kind of woodworking horror under it. Additional flogging performed on the rear of the trem spring cavity.
-
-
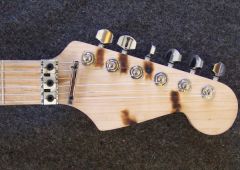
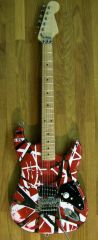
Well, the mail showed up today, and the phenolic laminate for the neck pickup wasn't in it. Looks like I'll have to wait another day or so to finish this thing up. here's a pic of the headstock though, which IS finished
-
-
I've been seriously eyeballing the new 5150 III amp, it sounds like a vast improvement over the Peavey 5150's whch were already great amps. Like nearly everything else with the EVH logo on it though, I just can't get over the sticker shock. Currently going for $3099 at Musicians Friend http://www.musiciansfriend.com/product/EVH-5150-III-HD-and-4x12-Half-Stack?sku=481504
-
No pics yet, since I'm still waiting on some parts to show up for the front pickup, but I did get a lot done over the last few days. The center switch is now rusty enough that it looks like a tetanus factory. I'm glad I have all my shots... I had to paint the fiberglass board material on it with some redish brown paint to simulate the phenolic resin laminate the original vintage switches were made from. Anal, I know. It could be worse though, I could have gutted the fiberglass parts and made replacements out of phenolic laminate instead... I've installed the switch into the center pickup cavity, and am just waiting to wire it up to the front pickup once I get it installed. While I had the bridge out to install the switch, I scuffed it up with some 600 grit wet/dry sandpaper and then coated it with liberal amounts of naval jelly (Pink acidic gooooooo!) to take some of the shine away from the chrome. It seems to have worked pretty well, athough I doubt the difference will be that noticable in pictures. I finally got some cheap cigarettes, "Basic" brand for making the burn marks on the headstock. The pack was labeled as the "Full Flavor" variety. In retrospect, I should have gone with the "Half Flavor" or "No Flavor" if they had stocked them. granted, I'm not a smoker, but these things stink like a burnt can of smashed buttholes, more even than most other cigarettes. I was able to get some decent burn marks out of them though, although now my guitar stinks like cigarette smoke. I've discovered that newspaper works really well for speading up the aging process on the neck. I crumpled up some black and white sections from the local paper and rubbed them along the fretboard and the back of the neck. Some of the black ink transfers onto the wood, as well as the paper itself acting as a kind of polishing cloth to add a little shine. Overall, the effect is much the same as years of built up mung and finger cheese. I also finished drilling all the extra holes in the body. I didn't bother to count them, but I know there are at least 15 to 20 holes in the body that have no real reason to be there. (weight savings, perhaps? ) I did some additional setup work on it over the weekend. Lowered the height of the locking nut slightly by shaving some more wood off of the neck where it is bolted on. Combined with some truss rod adjustment, and height adjustment of the bridge itself, the strings are now really low. They only buzz slightly when picked pretty hard, and they are low enough now that the guitar plays almost effortlessly. I'll get some more pics posted as soon as I get the neck pickup put together and installed, which is the only step left now before I'm considering it "finished".
-
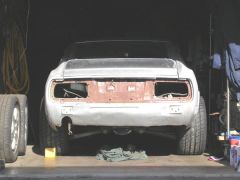
I think that by riveting the aluminum to the steel, you'd be losing most of the benefit of the POR 15. The corrosion between aluminum and steel is a result mostly of electrical action between the two metals. By painting with POR-15 and then bonding/gluing them, you are isolating the steel from the aluminum. Riveting through the two metals would re-establish an electrical connection, and you would likely see corrosion start at the rivet points later on. I think gluing new floor pans in could work, but the fitup of the new pans would have to be pretty precise to keep the glue layer thin for maximum strength. I'd suggest using high strength magnets above and below the floor boards during gluing to clamp the pieces together. Having said that though, my prefered method of repair would still be to weld in a new set of steel pans
-

Pics of Cobra R replica wheels on a 280Z.
Z-TARD replied to Slammed68's topic in Brakes, Wheels, Suspension and Chassis
It's an old pic, but it's all I have right now on the computer. This was right after I got the tires and wheels put on, several months before getting the ZG flares: The tires are 275/40 on 17" rims. I had to go with coilovers, and they clear by about 1/2". -
-
Pics of Cobra R replica wheels on a 280Z.
Z-TARD replied to Slammed68's topic in Brakes, Wheels, Suspension and Chassis
These are off of Ebay, 10.5" in the rear and 9" in the front. I have 300zx hubs on the front, and 1.25" spacers in the rear with the hubs drilled for 5 bolt. -
Good tip with the vinegar. I got my new 3 way switch in the mail, and since it is one of the parts of the guitar that looks nearly destryed by corrosion, I stuffed it in a Zip-Lok bag full of a mixture of vinegar and naval jelly. It seems to be working pretty well. It's been in for a few hours now, and the zinc and cad plating is nearly completely gone and it is etching the steel to a nice dull finish that hopefully will rust up nicely (The Z car owner in me is now questioning my sanity: "Promoting corrosion and rust? WTF?")
-
I'm still working on it I was able to find some white and black duct tape at Home Depot, so I have the tape in the trem spring cavity and the small chunk of black tape on the end of the body. I'm still waiting on the right switch to show up in the mail. When I pull the strings to put the neck pickup and switch in, I'll probably pull the whole bridge out so I can beat it up a little too. Chrome is a hard thing to age without making it look like it was just intentionally aged with a wire brush. I'm thinking sme kind of chemical might work better, like Naval Jelly or some kind of acid to etch into it a little, simulating the acidity of genuine mung, sweat, and finger cheese. I might have to take up smoking for a few days as well, either that or let the wife use the headstock as an inscence holder until I get the right burn marks. I'm going to wait until it's all finished before posting any more pics, because most of the work I have left to do is pretty subtle stuff compared with the work on it so far. Hopefully can get it finished up this weekend.
-
Aside from being the worlds fastest production car, and an engineering marvel/masterpiece, blah, blah, blah, it kinda looks like:
-
I probably could, but I think the wife would file for divorce if I start another guitar project anytime soon.
-
It would be a shame to get that red paint all over the concrete
-
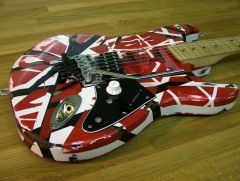
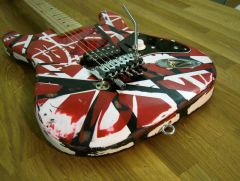
I noticed that too, even as I was taping it up I was thinking to myself "Hmmm, there should be more space between these...." I think that side of the body kind of has the stripes compressed together a little too tightly because of the misplacement of the diagonal stripe on the front. Thats the worst thing about trying to copy one of these exactly: One strip in the wrong location screws up pretty much every other strip you add after it. Oh well I got it put back together today an was able to play it a little. I added some longer spacers under the pickup to bring it closer to the strings than it was before, and it toally woke up a pickup that previously sounded kinda weak. This thing is a beast now, pinch harmonics are super easy, and the tone is total early VH. I need to work on the amp side a bit to refine the tone a bit more, but the guitar is definitely there now. I got the 3 way switch in the mail today too, and found it wasn't the one I wanted after all. The ebay add only showed the backside of the switch, which looks just like the backside of a vintage CRL switch like the one in the real Frankenstein guitar. The front side of the switch though, which is the part you can see in the control cavity, looks completely different than the CRL switch. So I ordered the right switch, and will play the hell out of this thing until it shows up. More pics:
-
-
-
-