Neveragain55
-
Posts
105 -
Joined
-
Last visited
-
Days Won
1
Content Type
Profiles
Forums
Blogs
Events
Gallery
Downloads
Store
Everything posted by Neveragain55
-
Using synthetic oil in your z?
Neveragain55 replied to 280zex's topic in S30 Series - 240z, 260z, 280z
I use this stuff: http://www.castrol.com/castrol/sectiongenericarticle.do?categoryId=9045415&contentId=7081140 It’s a blend and it really works great on engines high in miles. I’ve used nothing but Castrol products for the last 25 years in all types of cars and it’s never let me down. I would think a straight synthetic in an older engine like our L28 would cause leaks. All my motorcycle friends hate synthetics because the older casings (even with good seals) don’t hold the synthetics. -
Thank you very much, it's very much appreciated..............
-
Hi Gang…. When I ripped my 1982 L28ET apart I had to trash the pistons, rings and the rods because the pistons were seized in the block and I had to literally whack them out with a sledgehammer. I obviously damaged everything beyond recognition (except the block) so I have to replace all those components with new parts. I’ve found all the parts I need from several aftermarket sellers except for the rods. I’ve found several sites that sell engine rebuild kits and yes, I’ve scoured the pages in here and other forums but I can’t seem to find anybody that sells just the rods. Two questions that I’m hoping you’ll all indulge me with: where can I purchase new rods for my rebuild, and are the L28ET rods any different than a N/A L28? Side note: not interested in used rods if I can help it, would rather buy new. Thanks in advance…….
-
280ZX Turbo Shaved Intake Manifold Completed
Neveragain55 replied to Neveragain55's topic in Fuel Delivery
Thanks........... -
280ZX Turbo Shaved Intake Manifold Completed
Neveragain55 replied to Neveragain55's topic in Fuel Delivery
Billseph: Your intake was the inspiration for mine so “thank youâ€, and thanks for the compliments……… Based on my past experience with the materials I used I’m super confident she’ll hold up just fine. I imagine the heat from the turbo will cause some slight fading and or peeling of the wrinkle finish here & there along the underside, but I’m not expecting any major failures. (time will tell) Fuzzydicerule: Your intake looks great from what I can see and you can always smooth her out in the future if you want, maybe during your next overhaul or major tune up. HowlerMonkey: Actually the manifold came off of an engine I bought off of EvilZ for my 77 280Z that I’m rebuilding. The donor engine is a 1982 L28ET with very low miles but it needed to be rebuilt because it sat forever and seized up. I’m actually ok with that because it gave me the opportunity to start with a fresh platform and make it mine. (I have no idea why there was red paint on it) Thanks for all the compliments gang…….. -
280ZX Turbo Shaved Intake Manifold Completed
Neveragain55 replied to Neveragain55's topic in Fuel Delivery
This is exactly what I used.......... http://www.vhtpaint.com/products/wrinkleplus/ Thanks for the compliments guys... -
This is my intake manifold write up gang. I want to stress that this is nowhere near as detailed as Brapp’s manifold write-up. This is merely meant to show a pictorial progression of how a stock manifold was transformed into a smooth butterfly minus all the emissions crap. This is what I started with when I tore the engine down: These next two pictures are what she looked like after vapor blast: These next two pictures were taken after the EGR was hacked off. 99.9% of all the hacking, cutting, sanding, and blending on this manifold was performed with a dremel. I used a small, thin aluminum sheets (from Home Depot) to plug the hole left by hacking off the EGR. I cut out just what I needed from the sheet and then folded up all four of the corners and stuck it into the square hole you see. Later you’ll see where I covered all these orifices with a product called High Temp Lab Metal. This area was also filled in with that same product, and it sealed it beautifully. These are the thin sheets of aluminum I used. This picture was taken after the AAC was hacked off and all the surrounding area was sanded down smooth. More items hacked off: This picture was taken after steel bolts were screwed into vacuum holes, hacked off, and ground to just below the surface. If you look closely, you can see the outline of the bolts. That dremel you see laying in front of the manifold was the primary tool used to do almost all of the work. Same picture, different view minus some of the plugs: Here you can start to see the end vision taking shape. The only thing left that had to be hacked off at this point was the large threaded hole where the ERV resided. A close up view of the bolts ground down. I know it looks gnarly, but it wasn’t as uneven and rough as it looks in this picture. I gave up on filling in the holes with brass plugs after looking all over the world (seriously). I wound up going to ACE Hardware Store and found all the (steel) plugs I needed. These next few pictures show the ERV pre & post being cut because I couldn’t find a plug (of any material) to plug the threaded hole it came out of. I had the threaded end (after it was cut) welded on the bottom. I screwed it back into the hole it came out of, and cut off the raised surface area flush with the surface. Here you can see the weld material on the bottom of the threaded section of the ERV. Here is another view of the weld material from the other side. My welder did a really good job with this, but he was honest with me about his (less than stellar) aluminum welding capabilities, and that’s why I opted to go with the High Temp. Lab Metal to cover everything else. This picture was taken just before I cut everything down flush. These pictures were taken after the plug was cut down. If you look closely, you can see a small opening in the center of what’s left of my “make-shift†plug. It sealed very well and I was really happy with the way it came out. These next few pictures are of the intake manifold covered in High Temp. Lab Metal http://www.alvinproducts.com/products/products.asp?id=2 I went this route because although I found a welder to weld the ERV, I couldn’t find a competent (aluminum) welder. After researching this product I was more than confident it would do the job of sealing & covering all of the orifices opened up by all the hacking. Before some of you crucify me for using this stuff or tell me what you would have done differently (which is fine) this worked, and I’m very happy with the way it came out. These are pictures of the intake after the Lab Metal was baked and then sanded down. You can see it did a very good job of covering everything, and if you’ve never used this stuff before, believe me it has the feel & strength of steel (just as advertised). The same thin sheets of aluminum that I used to make a plug for the EGR – I used as backing plates inside the intake. I cut small pieces of aluminum a bit larger than the holes that were left from all the cutting – I stuck them inside the intake and used a sponge to act as reinforcement so they would stay close to the inner walls. Once they were in place I applied the Lab Metal. The aluminum pieces prevented the Lab Metal from just pouring into the intake. This is where I’ll take the most heat – yes – this is industrial strength JB Weld. I know, I know, I know…………..but I’ve used this stuff for years and it’s never let me down. The intake isn’t going to see heat or pressure that surpasses what the industrial JB Weld can withstand, and it fills in all the low spots and divots beautifully once it’s sanded down. Here are pictures of the intake manifold after the JB Weld was sanded down and POR 20 was applied and baked on. This is the finished product minus the Pallnet fuel rail and injectors which are coming in the very near future. As you can see, the final layer of paint was 350º Wrinkle Finish Plus. Yes…… I straight ripped of Billseph’s idea of stenciling out a “Z†on the manifold, painting over it, and then peeling off the tape after final paint. (courtesy of my wife actually, and she did a really good job) Hope you all enjoyed the journey and I hope it gives you ideas.
-
Question regarding a T3 Turbocharger rebuild
Neveragain55 replied to Milenko2121's topic in Turbo / Supercharger
I just rebuilt my first turbo ever and it was a stock T3 off of a 1982 280ZX. It's really straightforward like anything else on a car, pay attention to everything you take off and keep as many nuts and bolts as possible, and mark or scribe the turbine fins along with the shaft in case you wind up re-using them. There's no need to re-balance them (in my humble opinion). 50% of the folks in here will tell you to do it or seek the wrath of God, the other 50% will tell you its ok without the re-balance. If the turbines are in really good shape when they come off, and you mark exactly where they were (in relation to the shaft) when you took them off............you definitely do not need to re-balance them but that's your decision. Here is a link to a cat that rebuilt his and it's a pretty good template for you. http://civic-eg.com/viewtopic.php?t=11208 The biggest pain in the butt is getting all the old studs, bolts, and nuts off without breaking them off inside the housings (good luck). If you do there's a guy up in Canada that will sell you a brand new housing for a very good price (but he'll nag you to death to let him do the rebuild for you) Good Luck, it's really not that hard.... P.S. One more thing, don’t be a sap like a lot of other cats that rebuild their turbo’s and put them back together with all the rust & gunk still on them. If you’re going to go through all that trouble of tearing it apart and rebuilding it, paint the darn thing with some really good high temp paint like POR 20 to dress it up. -
Thanks everybody, It was just a thought "in my overactive mind". But all of you have made me see the light and educated me at the same time. Thanks.......
-
Sound scientific advice, thank you..............
-
Hi Gang, Coming to the end of my intake manifold customization and I have one last crazy question….. I’m planning on getting one of those “snake†Dremel attachments, attaching a flapper wheel on the end of it, and snaking it through the runners to smooth out the interior walls of the runners for better air flow. As with everything I do, I’m also thinking of going overboard and coating the entire inside of the manifold with Glyptal Paint. http://search.eastwood.com/search?w=glyptal&srccode=ga130060&gclid=CKrL6riq37ACFUZeTAodaDy7zg Most of you know Glyptal paint is used inside of engine blocks on the bottom where the crank resides so oil can flow better. I’m thinking that if Glyptal paint can withstand the heat and demands of the inside of a block, it can easily withstand the demand of the intake from day to day plus the air will flow even better. Thoughts???????
-
Dude, Keep ripping into it and go for it............... I owned the exact same car back in 1999, it was completely rotted out on the bottom and the motor needed work and she STILL spanked all the young boys in the "Fast & the Furious" wanna-be's.... One of the most awsome cars I've ever owned. Wish I had her now, good luck with it.
-
Nice, you got incredibly lucky. I spoke to a cat today and he's coming by my house on Saturday to look at everything and give me a price. He's welds in primarily aircraft weld shops and I've seen his work (he's very good). One way or the other I'm determined to get this thing looking as beautiful as all the ones I've seen here in Hybrid and other Z car forums. Thanks for all the tips & advice and I plan on doing a build thread on the manifold alone when everything is completed.
-
I’m actually calling one in about 30 minutes to set up an appointment with him to look at all of this and give me some prices. Hard to believe a welder would charge less than $50.00 bucks or so to weld this thing up. But to be fair this is my first time at this and I’ve been out of the welding game for many years so I would have no idea what’s a fair price. Thanks guy……
-
I appreciate the good advice guys, and I do remember my welding instructor years ago going into great lengths about the struggles with trying to weld or do anything with Aluminum because of its properties. In between posts’ I did some digging and found this little gem: http://www.alvinproducts.com/Products/Content.asp?id=15 I think this would be a good compromise and a way to just avoid the whole welding, brazing, soldering thing all together. Give the link a look and tell me what you think, make sure you click on the instructional video. Thanks Gang……
-
Z240: I understand what you’re saying and I have to admit that it makes sense but I’m still just a little puzzled as to how a lot of other folks are simply using a propane torch and are getting results. Even the instructional pamphlet that came with the Alumiweld rods say that all that is needed to obtain results is either a propane torch or oxy/map set-up. Have you ever used the HTS2000 on our manifolds, and if so what kind of results did you yield? Thanks for the advice; it’s very much appreciated….. Rossman, thanks: It would appear that you’re the second to give similar advice about not enough heat. I’ll make one more attempt tonight in a thinner area and see if I can get the rods to melt, if not I’m just going to source it out to a weld shop and have them properly tig or mig it up. I was really excited when I got the rods thinking they would work like a charm and so far it’s really been a big letdown. Thanks again
-
Ok Gang…. I’m at the point with my intake manifold that I’m ready to start filling some of the small divot’s and larger holes I’ve created by hacking off all the offending emissions crap that I don’t need or want. I’m going for that “clean†look a lot of you have with your intake manifold set-ups. I bought some Alumiweld which I’m sure most of you are all familiar with and I bought both: blue propane torches, and a Bernzomatic Oxy/map set up. I attempted to do a test run on the EGR section of the manifold that I cut off because I wanted & needed to practice on something before I attempted to actually use the stuff on the Intake manifold. I heated the thing up ((for what seemed forever) and it never melted the Alumiweld rod. You’re supposed to heat your part up first, and then apply the Alumiweld rod and the rod should melt onto the surface & bond with the material. Well………………. It never did. No matter how long I applied the heat, the rod never melted onto the surface (the way I saw it on all the YouTube videos) Here’s the question… what the hell am I doing wrong or missing that all the YouTube guys are doing right? The product instructions say that the stuff starts to work at the 700 degree temperature range and I’m literally applying heat for up to five minutes (and longer) and it’s not affecting the rods what-so-ever. The rods themselves will melt if I apply heat to them, but that’s not how it’s supposed to work. Either I’m not applying the heat long enough (which I doubt) or the heat source I’m using isn’t sufficient (which I doubt). I welded many years ago while I was going through Apex Tech in New York taking a auto body shop class and I was pretty good. This baffles me……….. please help…… Below are links to the torch set-up I’m using and the Alumiweld. http://www.amazon.com/Bernzomatic-2880538-Cutting-Welding-Brazing/dp/B003BG5M8U http://www.eastwood.com/alumiweld-standard-kit.html
-
Thanks for the tips…. I’ll be getting the Alumiweld very soon to cover up all of the vacuum holes and attachment points I hacked off. The biggest of these that needs to be filled in were where the AAC, EGR, and air regulator formerly resided. One or two of these holes are bigger than ¼ inch in diameter so what I’m planning on doing is placing a piece of aluminum sheet on the backside of the opening (inside the manifold), brace it up, tack weld it in place, and basically just fill everything in from the top side with the Alumiweld. I’m taking pictures of everything as I go along and when it’s complete I’ll provide a new thread with a complete write up. Good luck with your set up……….
-
It looks like the same thing as Alumiweld, right down to the packaging and everything. Funny you should post this today because I asked a Heat Treat, Metallurgist engineer here at work about Alumiweld earlier, and after reading about all the properties & sheer tensile strengths from their web site he told me that it would more than do the job of covering and sealing up anything on these intake manifolds. The thing is there isn’t a great deal or pressure involved here. I know aficionados will cringe when I say this but honestly JB Weld would seal up some of the smaller orifices as well. I’m not advocating you or anybody for that matter does that, but in a pinch…………. I still have more hacking and sanding to do before I get to that point so unfortunately I can’t speak to the success or failure of either Alumiweld or the Aladdin product but if you use this stuff anytime soon, please do post back with the results. As far as my brass plug issue, believe it or not. After spending dozens of hours on the internet looking for metric brass plugs, I wound up going down the local Ace Hardware store and bought some metric, steel, hex hole pipe plugs and they fit beautifully. Their more difficult to cut through than brass but at least all the holes are tightly plugged up. Website for Alumiweld: http://www.alumiweld.com/
-
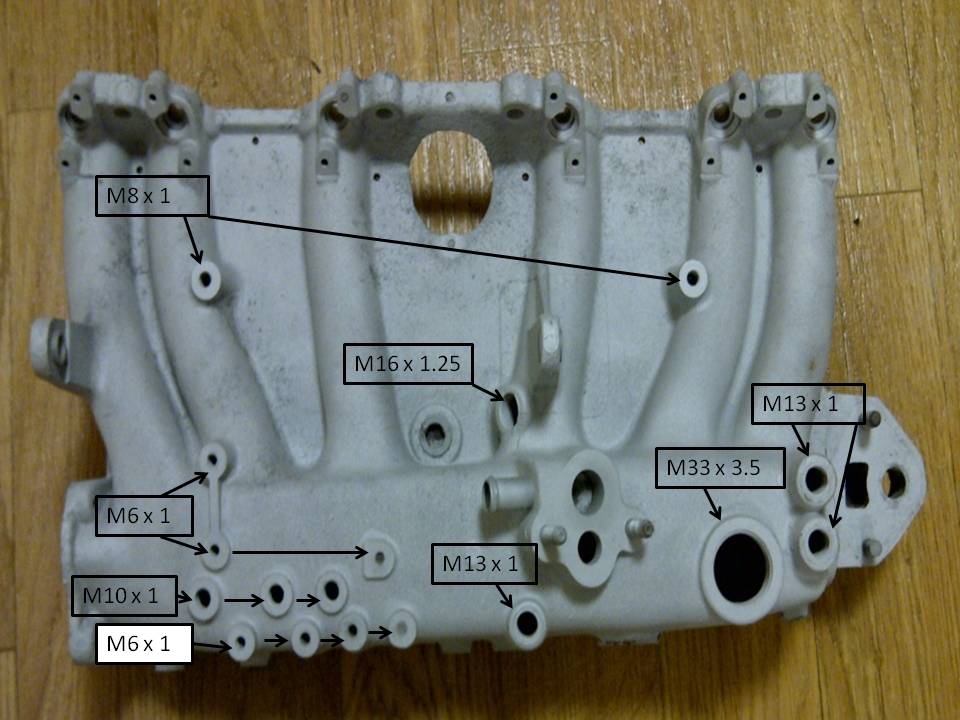
This is what I’ve come up with so far regarding the sizes of the holes in the intake manifold. I’ll attach a picture that started out as a PowerPoint slide labeled with the sizes of the holes. If any of you find or know of any of the sizes to be incorrect, please let me know and I will revise and re-post it. Once we have this thing nailed down, people in the future looking to modify their manifold by shaving & filling it will know exactly what they need. Thanks gang, and I hope this helps others…..

-
Most definitely, and you are 1,000.000% right…… Once I have all the sizes I plan on making a PowerPoint of everything with the holes marked and the correlating sizes, turn that into a jpeg, and then posting it. Very good point and it’s very much appreciated….
-
Here’s what I’ve accomplished so far: I kept all of the emission equipment that I took off the manifold when I stripped it down. I have all of the plumbing that threads properly down into the threaded holes that I want to delete. I have a thread sizing tool but it’s too small for these diameters so I plan on buying a larger one (gonna need it in the future so I might as well) and get the proper pitch and thread dimensions. I did find some on McMaster & Carr but now I have to know what sizes I need before I can go any further. Once I have those dimensions I’m going to order the plugs and screw them down into the holes – and then commence again with the cutting, hacking blending & smoothing until the entire surface is flush. It doesn’t matter to me whether the plugs are aluminum, brass or copper as long as they seal. Thanks everybody…….
-
Sleeperz: Thanks for the info, I don’t know why I didn’t think of them before. That’s the same company I used to replace all of the original Phillips head screws on my old Suzuki GS750E years ago when I restored her. I ditched the crappy Phillips head screws for new stainless steel hex head bolts. I’ll go on their web site and give them a try, thanks….. Cockerstar: I wanted to avoid the drilling tapping bit if I could and just screw brass inserts into the existing threaded holes, and then sand everything down flush. It’s not that big of a deal if I have to go that route but it sure would be nice just to screw some inserts down into those holes and then sand down the raised area to be flush with the rest of the housing. I’m going to try the web site that Sleeperz mentioned and see if they have what I need. The picture of the manifold you attached is the desired affect I’m looking for.
-
OK, So I’m in the process now of hacking off all the offending appendages on my original 1982 280ZX ET intake manifold and I’ve seen all the threads and pictures of those of you who have used brass inserts to plug some of the vacuum line holes. I went to several hardware stores including Home Depot and I’ve scoured the internet like crazy but I can’t seem to find a good source for metric brass plugs that will screw into the manifold. Of course I need various sizes and I seem to have trouble finding what I need. I'm usually very good at researching & finding these types of items and I'm embarrassed to even ask but I can't seem to find them anywhere. For those of you who have shaved down your intakes, plugged the holes with these brass plugs and then welded or sanded over them, where did you get the plugs? Damned if I can find them……. Thanks…….
-
Thanks dude, I'm hoping so..........