JCan
-
Posts
196 -
Joined
-
Last visited
-
Days Won
1
Content Type
Profiles
Forums
Blogs
Events
Gallery
Downloads
Store
Everything posted by JCan
-
Leon.
How did you address oil/crank windage on your z?
Ive seen pictures and it seems to me an easy mod to the existing oil pan could be made...
Referring to the attached, a cover over the sump, maybe add a 1-way vent.
Along the length, maybe a screen or scraper?
Jim
( A new topic 4 me )

-

Hi Jim,
I'm running the stock pan at the moment. I don't plan on tracking the car and also run fairly low-grip all-seasons on my 15's (only reasonable option besides R-comps) so haven't felt a need to baffle the pan. I've long considered the Arizona Z/Kameari baffled aluminum pan (as you have pictured) but haven't been able to justify it as an immediate need.
I've not done research on making a custom pan but implementation shouldn't be too difficult once you have a design in mind. I'd recommend drawing inspiration from the old Datsun comp pans as those have been well-proven.
-

-
-
-
Zetaz. - 280zx 5 speed .. seems to be the weak link in the drivetrain.... ( I've rebuilt it 3 times now )
-
Leon - good to hear from you! I've read your build notes... And am impressed. Few builders have your expertise. Re transmission, I like the cd000a, primarily because of the upgraded synchros and relatively low cost. Been thinking about printing ( either directly or indirectly ) a bell housing. Zetaz - Nice 2 meet you. the current motor puts out approx 200 HP at the crank. I am planning to purchase another L28 and turbocharging it with a goal of 400bhp at the wheels... Will the FS5W71C handle 450 HP. Noting my son seems to eat transmissions almost yearly...
-
My son purchased a Subaru diff... Installation in 2 (approx) weeks. I'll update w pictures.
-
I am resurrecting this thread. Attached is the picture of the '73 240z in May 2013. Today after maybe 60k miles, the car still looks the same engine is pulling harder than ever, but we need a new Transmission and Rear end. After consulting with my son, I believe we are going to go the Subaru R180 LSD route for the rear end. For the transmission, we are planning to go to the CD009 or the 240SX FS5W71C depending on what we can find.
-
Great pictures! We have been using felpro gaskets for years now. I think rock auto has them. Good news is it will fix your combustion flow issues ( no overlap ) bad news is it will reduce your compression ratio due to the fact it is bigger than the opening. i think I have a compressed (used) gasket I am happy to mail to you so you can measure the final compressed piston area Good luck!
-
Leon. Best of luck with your head. I've had mine off several times trying to get everything to work.... Right now everything is dialed in except one cylinder. I like your idea to try compression after the engine is warm (and more importantly when the cylinder walls have oil on them. Right now all of our cylinder compression are above 200 psi. I think it is because we milled the head 0.080". Keep up the good work! (FYI - We are looking into an RB25 swap.but it wont happen for a while) Jim
-
Advise on suspension needed
JCan replied to docjim's topic in Brakes, Wheels, Suspension and Chassis
My two cents. I suggest you go back to stock springs and use the KYB shocks. To level the car, you will have to add spring shims in the back, (if it is not too bad add large washers in between the shock tower and the strut assembly you can get 1/2 inch), they are inexpensive and work well. Your resultant ride will be what you are looking for (as the spring rates will allow the car to move, and the shock will dampen the movement more aggressively than stock). Regarding alignment. Your car must be aligned properly. Find an alignment shop that does 240zs. They will know how to stretch metal in order to adjust your alignment. In San Diego I used Roger Daniels 8517 Ablette Rd Santee, CA 92071 (619) 562-7969. If your car can not be aligned then there is something wrong with your body, either way, the solution is to stretch metal. However, before you do that, I suggest you purchase good sway bars front and back and a tension and compression kit for your front suspension. Best of luck. Jim -
STIFF lowering springs, not coilovers
JCan replied to seventyfour's topic in Brakes, Wheels, Suspension and Chassis
From my experience ( Ihave tried both tokiko springs and eibach springs) When you lower your car by cutting the spring, you move the operating position of the shock to close to the limit of it's travel. Now you can add camber plates which eliminate the rubber bushing which should have the effect of lowering your car 1" without messing up the shock operating position. The cost of this is the rubber bushing actually helps mellow out the ride. Regarding springs, Tokiko and eibach springs both are progressive springs and both are very stiff as compared to the stock springs. My suggestion is for you to purchase eibach springs ($225), cut the fronts 1 turn (on the soft side of the spring) and install them on your car and see how it looks. next drive it to see how you like the stiffer springs. if you like the stifness, and you believe it needs to go lower, maybe you could look at adding a camber plate to get an extra inch. My two cents - best of luck -
Advise on suspension needed
JCan replied to docjim's topic in Brakes, Wheels, Suspension and Chassis
Jim. my son and I just restored a '72 204z and have been tweaking many aspects of the car. With respect to suspension, do you plan to drive yoiur car on a track or on the street? If you are planning to run your car on the street, I suggest you go directly to coil overs and purchase bilstein shocks. this company -> https://technotoytuning.com/nissan/240z/four-corner-weld-coilover-kit-datsun-240z makes a great kit and is priced very well. Our first suspension used tokiko shocks and springs, was way too stiff; our second suspension uses eibach shocks and springs and it is still way to stiff. The primary reason the car is stiff is because when you lower the car the stock strut configuration is almost completely bottomed out. Therefore the springs have to be very stiff. This is why I suggest going to the coil overs and using bilstein shocks. When you manufacture the coil overs you can decide what ride height you want and ensure the car sits exactly at the ride height you want yet has lots of travel both in compression and expansion. Either way, what I am suggesting is a lot of work, but the work is fun and you will experience the benifits of your work every time you get in the car. Best of luck Jim -
Air damn and ducting for MSA front
JCan replied to nick-james's topic in Windtunnel Test Results and Analysis
As it turns out. I have a '73 240z (even though it is built as a 72 240z). This car has a piece of metal with a rubber edge that seals the hood to the top of the core support. I drove the car 100mph today and at about 95 it starts to feel a little lighter, but nothing like the car did at 75 prior to installing the aluminum brackets as described above. Datsun did a great job building this car. -
240z alternator and battery wiring
JCan replied to infiltrate2000's topic in S30 Series - 240z, 260z, 280z
Thanks for your suggestions! As it turns out, the alternator I have in the car just died! IT shorted to ground and caused the wire fuse to blow! Amazing. It is the first time Ive ever seen this fuse blown. Tomorrow, I'll install the new 280zx alternator and try it out. Wish me luck! -
Air damn and ducting for MSA front
JCan replied to nick-james's topic in Windtunnel Test Results and Analysis
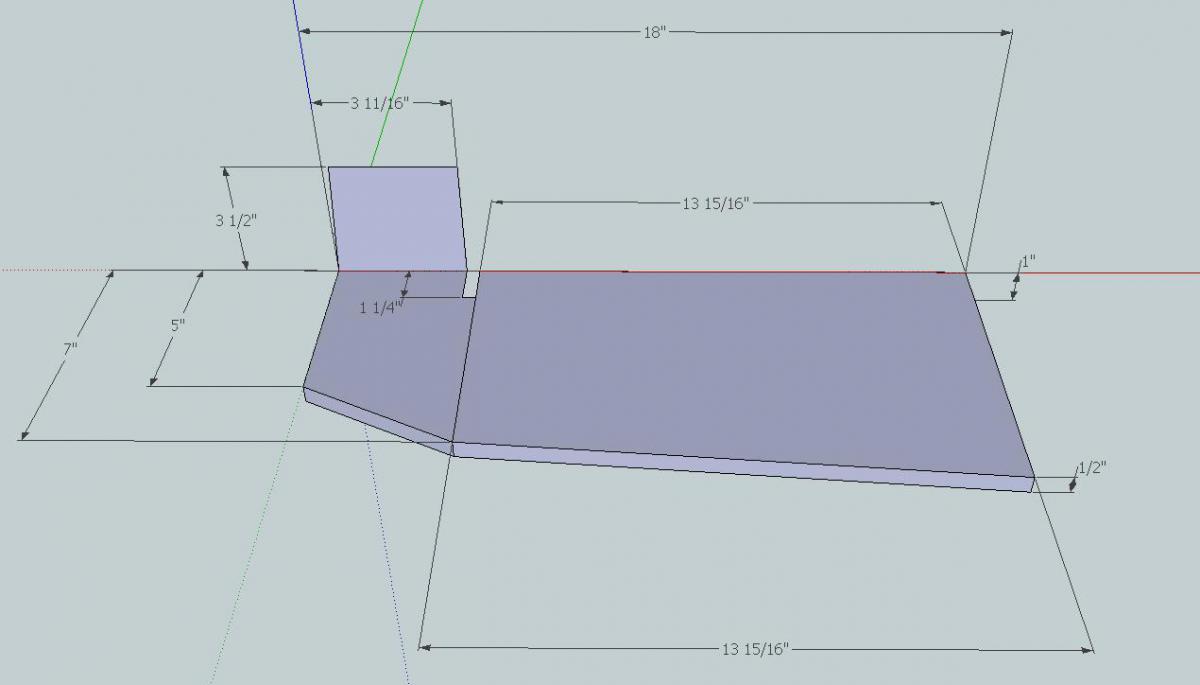
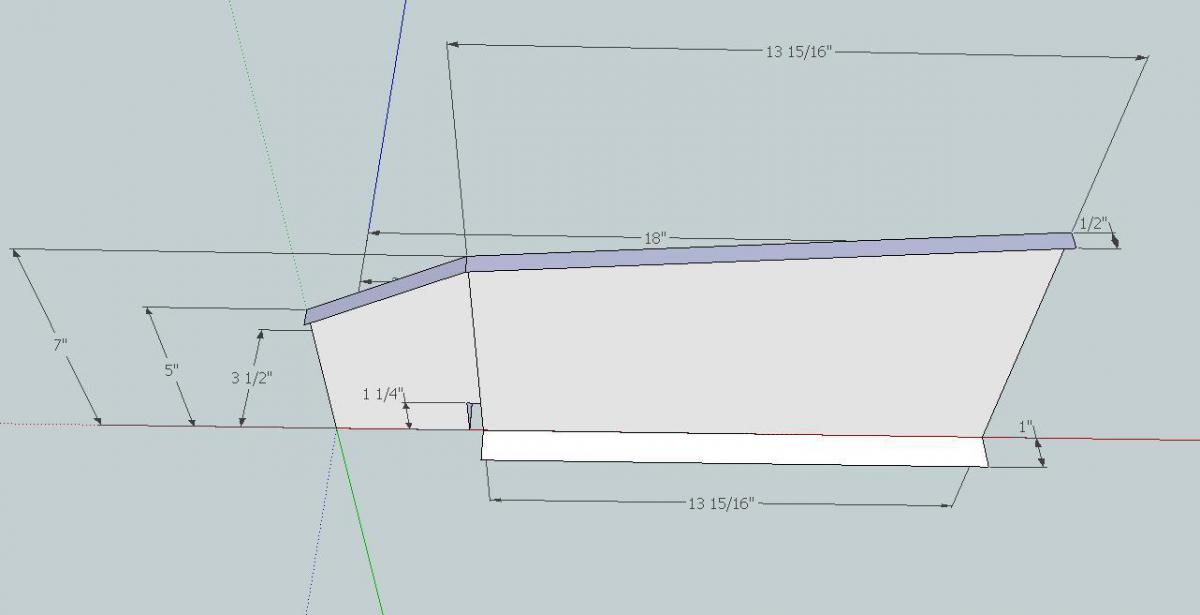
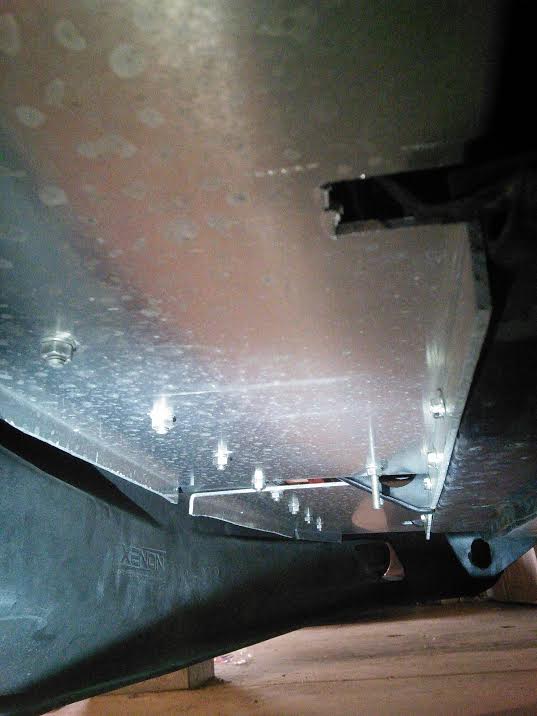
Hello. I recently purchased an MSA air dam and installed it onto a fully restored 240z. When we first installed it the air dam worked okay but at 80 MPH the car started to lift a bit. We were able to substantially improve on the aerodynamics by adding some aluminum plates designed to fit inbetween the lower cross member (Below the radiator) and the air dam. This plate forces air into the radiator and does not let it travel below the car thereby increasing the vacuum underneath. Today the car sticks to the road at speeds up to 100MPH. Described is our simple project. It requires manufacturing two plates out of 1/8" aluminum sheet. This project was very easy to do and the results are easily felt on the road. Directions are simple, manufacture the two plates (left plate shown, right is a mirror of the left) using a hacksaw and a sheet metal break (bending machine). Place the plates inbetween the air dam and the horizontal support beneath the radiator. Drill holes and use self tapping bolts to secure the aluminum plates in place. The next step is to purchase a piece of aluminum rectangular stock 1/8" x 1". Cut it to length and sandwich the top rear edge of the air dam inbetween the plate and the trim stock (1/8 x 1" ) by drilling and installing screws and bolts. 4 on each side should work. below are pictures of our build. FYI - Jim
-
240z alternator and battery wiring
JCan replied to infiltrate2000's topic in S30 Series - 240z, 260z, 280z
Okay... So it turns out that I purchased a 73 240z with a 60A gauge. Do you think the wiring will hold up or should I add another path to charge the battery and use a diode and fuse in line to ensure the am meter is accurate with a discharge and not accurate when charging. Thanks for your inputs. -
That fixed the problem. The car is running very well now. Valves are quiet, car isnt loosing radiator fluid, fans are turning on and off at the right time, I was able to shift into second at 70mph. I'll try to attend JCCS. Leon are you going? Jim
-
240z alternator and battery wiring
JCan replied to infiltrate2000's topic in S30 Series - 240z, 260z, 280z
All. I like having an ammeter in the car over a voltage gauge and am in the process of upgrading my 240z to use the '82 70A alternator with embedded regulator. Everyone I talk to suggests it is impossible to do this but I am not sure I understand why. There is nothing in the stock car that requires current over 30A (the rating of the ammeter), heck even a dead battery wont draw more than 30A. The reason to upgrade the alternator is to allow us the ability to supply additional devices such as new headlights and electric fans etc. Referring to the wiring diagram --> http://www.atlanticz.ca/zclub/techtips/wiringdiagrams/72_240z_wiring.pdf My very simple solution to this is to add a wire from the alternator White/Red wire to a new fuse block to be mounted onto the firewall. This fuse block will have the ability to hold 4 fuses, and 4 relays to power both the electric fans and the new headlights. Placing this fuse block here allows us to maintain the existing ammeter. What am I doing wrong? Thanks Jim -
Good news, I found the problem! Not sure I want to say exactly what it was to save face, but, for the good of the site, I will do it! Did you know that the worm gear is held in place with the front pulley bolt? As it turns out, my front pully bolt was loose which allowed the worm gear to move forward and backward which was enough to change timing. Doh! As this was a full engine & transmission rebulid we fixed lots of little things including: found (by accident) hairline crack between cylinder and water in head (drilled and welded and resurfaced head) Valve Spring Hats hit rocker arms (milled them down 0.020) for clearance. head freeze plug replaced due to corrosion and slight leakage aluminum Radiator had slight leakage, replaced with new one. welded an aluminum bung and added a 185/175 degree thermostat onto the head thermostat housing to control the electric fans. flywheel came loose and friction welded metal onto back end of crankshaft (new clutch, flywheel, balanced, back end of crankshaft re surfaced) transmission 2nd gear synchro not working (replaced 2nd and 3rd gear synchros with nissan oem synchros and refilled with MT-90 synthetic trans fluid The car is 90% reassembled now. should be on the road on thursday. Thanks everybody for your feedback!
-
Bill. Your suspension looks great! What I like most is that you retained the rubber bushing at the top of the shock! That rubber bushing does a lot with regard to maintaining a smooth ride AND cornering well. I would like to know where you got the red coil over adjuster mechanism. Thanks! Jim
-
NewZed. Engine is fully disassembled now. During front cover assembly:, I am going to add some steel washer shims to minimize the vertical slop of the drive gear, additionally I am going to take a look at the worm gear slop when mating with the cotter key. Once this is done I will attempt to rotate the gear to ensure there is less than 1 degree of slop in the drive, afterwards I will look at the distributor closely. Thanks for your tips.
-
Clandestine... Good news! I should know shortly what our problem is, I seem to remember that the worm gear was loose when it sat on the crank shaft. I will check it when I pull the front cover off, that could be my problem. Thanks for your input. Leon. I'll buy tickets for JCCS at minimum and attempt to attend (it is on my wife's birthday... need to work my magic)
-
Leon. Hi! It has been a long time since we talked. Both motor and transmission are out of the car right now. In addition to looking at the distributor gear we are: Transmission - we are putting in stock nissan 2nd and 3rd gear synchros then adding Redline MT90 oil hopefully this improves shiftability from 1st to 2nd. Engine - we are fixing the valve train by lapping the spring caps 0.020 to keep the rockers from hitting (hate the noise); Our new flywheel evidently didnt seat to the crank shaft, screws got loose and the two friction welded themselves together. I have to pull the crank and this week will have it re-surfaced then purchase a new flywheel (we are using 280z turbo flywheel plus ACT stage 1 pressure plate plus stock clutch disk - works great!) Getting back on topic... Regarding the distributor. I suspect that the performance I am hoping to get is just not available using this design. Our plan is to remove the front cover, do our best to improve the issue and run the car. If it is not good enough, maybe I have to bite the bullet and install an electronic pickup on the crankshaft. (harmonic balancer pulley mod?) then add electronic ignition to the complete motor - maybe overkill but after we get the electronic ignition installed then we will be FINALLY be able to dyno the car. I'll look to see if the slop we have is within nissan tolerances. Thanks for the heads up.
-
Update... WE removed the engine and are working on multiple minor issues, one being the 12 degree distributor timing variation. We removed the spindle gear and it has no slop! I next slided the spindle gear and held it in place with my finger (ensuring no vertical slop is allowed), unfortunately, the spindle still has 10-15 degrees of slop. I believe fixing the problem will be a difficult to debug due to the fact that the spindle bearings are located in the front cover and the gear rotating the spindle is located on the crank shaft. I wonder if the problem is the worm gear is loose on the crankshaft? maybe the worm gear is worn ? Maybe the spindle bearing is too loose. more tomorrow. Thanks!
-
Stock retainers! You're a Genius! See you at JCCS
-
Leon. Are you still playing with lash pads? last weekend after adjusting rocker arm gap, I noticed my rocker arms slightly hitting the edge of the cup that holds the lash pads on top of the valves. I am sure this is an additional cause of valve noise. If you are looking at lash pads etc, you might also look at the rocker arm just behind where it contacts the lash pad. I think the fix is to mill the cup that holds the lash pads in place down by about 25 or 30 mils. Our car is getting better and better with time. Are you going to JCCS this year? If so it would be fun to catch up. Jim
-
That is this thread (previous page). Tomorrow we are going to remove the spindle and try to rotate it by itself. If we find play then we will pin it, if not we will purchase a new spindle and drive gear. Since we have restored the car, (it has been two years) we have identified issues and fixed them, one by one as prioritized by most annoying first.... WE are now working on much smaller issues and in general, the car is very reliable and runs great. We are getting ready to dyno the car to adjust air flow mixture of carbs and optimize engine timing. but we can't dyno the car till the timing is consistent. I find it interesting the esoteric problems we are finding - examples: rocker arm anti parallel, optimizing pressure plate force to keep car from jerking when engaging clutch, optimizing air flow through radiator in order to keep from over heating in summer, adding support to air dam to keep it from deforming at high speeds, moving to stage 1 cam for idle, adding small glasspack inline with exhaust pipe to keep exhaust noise at a tolerable level... and now we are playing with gear lash... to name a few.... Thanks for your help. - Jim