Ben280
-
Posts
353 -
Joined
-
Last visited
-
Days Won
26
2 Followers

Ben280's Achievements
")


-

Catch me up the last six years of how to Z community the internet
Ben280 replied to tim.d's topic in Non Tech Board
I'll echo a couple good points in this thread. I came to this board in 2013 after a good run over on Ratsun, but getting deep enough into the Z specific stuff that I was getting more interested in here. Back the, Hybrid Z was already a place of "SEARCH" and "BAD GRAMMAR MEANS YOUR POST IS INVALID". Some very loud voices kept the general discourse to a minimum, even back then. I think generally, as the cars have gotten rarer and more expensive, a lot of the old guard who liked them for the chassis "cool and cheap" moved on. Facebook rose, and HybridZ has been relegated to a reference item. Lots of other thoughts, COVID, the death of Photobucket etc, but on and on and on. I will say, the forum as a model is not dead. I recently joined a Lotus board, and wow are they busy over there! My Tundra too has quite a bit of forum activity. I've said this in other threads of a similar ilk. Be the change you want to see. If you want more content here, post the content! Make it happen. And tell the youth about the resource that is here. There's quite a bit going on out there in the big wild world still. -
Bumping this, the site still needs it!
-
Area27 in Canada is only 400m above sea level, so I'm not sure that accounts for the lack of nice airflow. I'll def take some stuff off the motor, and see what I can figure out. I'm still very new to the LS platform, so there's lots of learning to be had!
-
Not super sure. At 100% throttle, the MAP sensor is really slow to respond and only climbs to 91.8kPa (atmospheric should be ~100). Here's a log at a good period of full throttle in 4th gear. Just pulling super lazily. This motor has always behaved like it's getting enough airflow. With 3rd gear sorted, I should be able to get it back out and do some testing. One theory is that with all the front end ducting, the motor is pulling a vacuum in the engine bay. Another is that the cam timing is off and needs to be tweaked. I think I might pull the front cover off and see what's up, and if there is anything obvious there before I get back out for next season. I've done cylinder temps, compression checks and leakdown and everything seems happy enough mechanically. Just something silly happening somewhere in the system.

-
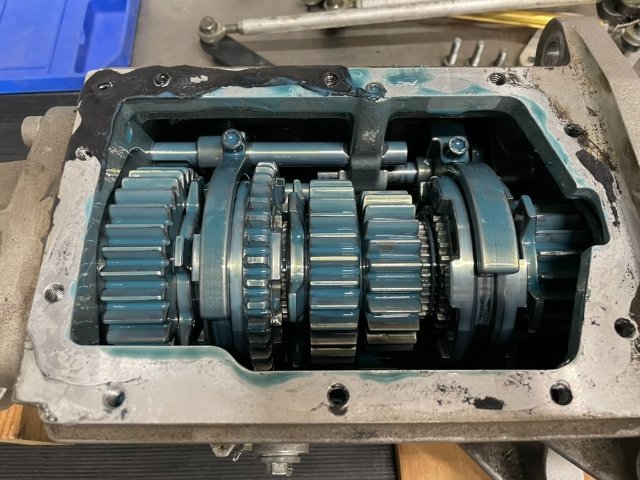
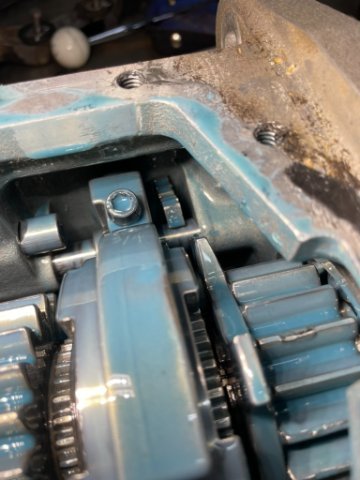
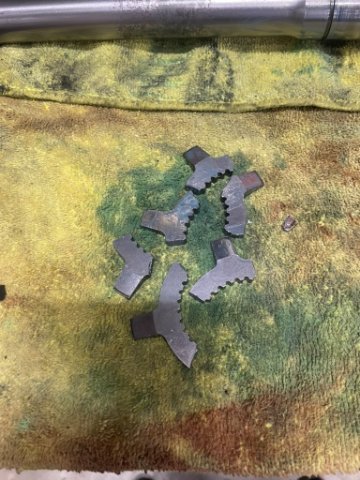
Well, once again we are at the end of track season. Long story short, the car is broken, but I'm excited for what next year brings! Longer version; After a successful outing at the Ridge, I decided to join my Canadian amigos for a weekend at Area27 up in Oliver BC, for a members track weekend, some wine tasting, and a general good time. The tow up was smooth, it took about 8 hours to get there. I've brought the car into Canada before, and it's reasonably painless, but I got searched pretty thoroughly (thanks Random Searches!) on the Canadian side. I dropped the car off at the track on Thursday night, and got squared away for a fun Saturday ripping around the track. We got there early on Saturday, I put the car together, fueled up and suited up to go out for the first session. First problem was the car felt like it wasn't pulling at all on the straights. Area27 is a properly long track, with some serious straights, so I should have been making some inroads there, but the car refused to pull hard at the top end. Second problem came as I started my second tour of the track. I shifted down to 2nd gear for a hairpin, then went for third, with nothing there. No box of rocks, no grinding, just no third gear. Alarming to say the least, but more frustrating as there wasn't an obvious cause of failure. I pulled off, looked under the car, saw all the linkages were in the right place, and had to call it a weekend. Any issue was clearly internal, and not fixable track side. Ended up with about 20 hours of towing for 10 minutes of sorta driving around the track. Womp-womp. Cut to getting home, getting the car unloaded, getting the transmission out of the car and opened up. It became pretty clear pretty quick what the problem was: Immediately upon pulling off the cover plate, the 3rd gear dog ring was nowhere to be seen. Well, that's not true, there was a piece of it over here! Well that's not supposed to be there! You can also see a big gouge in the main drive gear on the right side of that photo. Great, more parts to replace. That was it though. A dog ring shattered, ping'd off the MDS pinion and that was that. I suspect some of the gnarly downshifts I had at The Ridge the month prior were the cause of this, and when I towed up to Area27, this was most of the way destroyed. Shifting out of 3rd, into 2nd, and then finding 3rd to be MIA sounds like it was holding on by a thread, and just abandoned ship all at once. Parts are here, I'll probably take some time today or tomorrow to stuff the transmission back in. There are a few little things I'm working through, but nothing serious or major. Mostly cleaning and refreshing safety gear.
-
The turbo lamik stuff is very trick, and it has a lot of potential. The weight is a downside, but it's low and centered. I have a buddy who just put one in his 2JZ swapped FC RX-7, and he didn't have to touch the tunnel. There are a couple guys on IG as well who have swapped these in with good success. I think compared to the T56's they are only slightly heavier, but much stronger and have nicer ratios.
-
A musician's therapist (The $300 Z)
Ben280 replied to Zetsaz's topic in S30 Series - 240z, 260z, 280z
Really jealous of that diff. I probably need to do a similar thing shortly out here! -
The hairlines weren't that bad, it was the handful that were going through the edge of the rotor that I was worried about. Friday marked my first return to the track in almost 2 years. Knocked off a bunch of rust, the car worked the whole time, and I made a couple changes that were impactful and improved the car. I went pretty slow, so y'all could enjoy some v8 sounds for longer than normal
-
Twin cam head for the L6 from Derek at Datsunworks
Ben280 replied to Derek's topic in Nissan L6 Forum
To quote George Mallory "we climb turbo because it is there!" -
I'd definitely talk with Viking as well. Back when I worked at a performance race shop, they were pretty helpful. Once you get parts in hand from Apex, or just generally more information, I'd call Viking up and see what's what.
-
Good post. I was frustrated for a long time with companies not sharing spring rates on these parts. FWIW, Viking is legit, lots of fast SCCA guys run those things with good results. IF those spring rates were chosen to prevent bottoming out of the shocks, that's pretty poor design. My guess is that the motion ratio of the bellcrank will be the limiting/bottoming out feature here, and that the conversion to pushrods has resulted in some high force multipliers. My guess would be Viking starting point is mounting in a "muscle car" front end, where the motion ratio is fairly low. I'll be interested to hear what the APEX guys say!
-
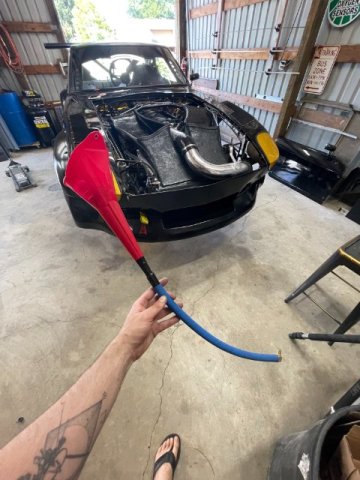
Thanks Leon!! Really happy to have the car back out. Dug into the car over the weekend, found a couple loose nuts, and some unexpected and unwelcome suprises! The big one was my front rotors are not handling the heat very well. The car is stopping pretty nicely, but it seems that's coming at a cost. I'm not sure if this is new, or if it's an old crack that I hadn't noticed before, but it's here now and it's a problem. If I get a second crack, that means I now have a mostly disconnected piece of rotor flying around, and generally not a great idea. I've had these on the car since 2021, so I guess I can't be THAT mad at them. Anyway, rather than sinking $450 into new rotor rings, I'm taking the opportunity to go full floating rotor. Wilwood has been making a lot more lug-drive setups, and it will let me get away from the bolted hat/rotor combo. This will hopefully help fight some of the pad knockback issues I've been having, and generally improve braking feel. Consumable cost is about the same, the big cost of upgrading is new hats. Got some routine maintenance done as well, fluids changed etc. Filling the transmission is a pain in the neck, but a little hose and some creativity made it a little easier. I probably could make this a permanent feature if I wanted to. Modern problems require modern solutions. Ordered up some fresh-ish tires, going with a Pirelli slick, 325/660 rear, 305/660 front. Might be a slight challenge fitting the front, but I think this is the tire the car will run from here, so it will be nice to set it up for one size and call it a day.
-
Went out for some Auto-x this weekend, and had a proper blast. Highly recommended for anyone here who still hasn't gone to try it. Enjoy a slow lap, some V8 noises and straight cut gearbox whine. I have a handful of things to think about and address moving forward, but overall I'm very happy with where this sits. Next up is OnGrid at the Ridge in late July for more testing, and maybe, just maaaaybe a little redemption.
-
I guess the end of the story here is "be the change you want to see". Hype the forums, post on the forums, link to the forums etc. Viewership drives ad dollars which means things will stay solvent and remain online. In that vein, have we done a sticker fundraiser lately? I miss the old HybridZ forum header with the logo too. Can we bring that back?
-
Searchability, and the loss of a lot of photos because of imgur/photobucket policy changes have been hugely detrimental. Even back in the day, I would use Google to search HybridZ, rather than use the forum search tools. It's tough for sure. I think the forums that are thriving right now have had a strong social component, rather than just knowledge, and don't have a facebook/instagram equivalent.