
PaulR
-
Posts
142 -
Joined
-
Last visited
Content Type
Profiles
Forums
Blogs
Events
Gallery
Downloads
Store
Posts posted by PaulR
-
-
I am getting my parts together to do the Wilwood PV install. I'll be removing the stock PV and tie into the lines that went to the stock PV just behind the tool boxes. The Wilwood PV will install in the passenger side tool box so I can reach it from inside.
I called and emailed Wilwood suggesting that they stock these NPT to metric fittings. They basically brushed of the need to do so.
Miles
I like your idea of installing it where you can adjust it from inside. FYI, I installed mine near the master cylinder. I can adjust it by opening the access door on the drivers side. I disconnected the line that goes from the MC to the rear brakes and re-attached it to the output of the proportioning valve. I then installed a new, short line from the PV to the MC. I replaced the stock PV with a union that came with the kit from Flyin Miata.

-
I found the Wilwood to metric adaptor at Flyin Miata. It is specifically made to fit the Wilwood proportioning valve: 1/8 -27 to 10mm x 1mm. p/n 14-76255
Link
http://www.flyinmiata.com/index.php?deptid=&parentid=&stocknumber=14-76255'>http://www.flyinmiata.com/index.php?deptid=&parentid=&stocknumber=14-76255
I purchased the Flyin Miata Wilwood Proportioning Valve kit to install in my 240Z and it fit perfect. These adapters are the ones you need. I had found some other adapters from another source that I thought would work, but turns out they were for BUBBLE flares.
Here is the email I got from them before I purchased:
> -----Original Message-----
> From: Richer, Paul
> Sent: Monday, October 06, 2008 10:35 AM
> To: Keith Tanner
> Subject: Item Number: 14-76240 Complete adjustable brake
> proportioning kit
>
>
> Item Number: 14-76240 Complete adjustable brake proportioning kit
>
> I would like to install this kit in a Datsun 240Z and need
> to verify that the metric adapters are for metric INVERTED
> flare fittings (not bubble Flare). Is that correct?
>
>
>
> Best Regards,
>
> Paul Richer
-----Original Message-----
From: Keith Tanner
Sent: Monday, October 06, 2008 9:57 AM
To: Richer, Paul
Subject: RE: Item Number: 14-76240 Complete adjustable brake
proportioning kit
Yes, with a 10x1 thread pitch. We can sell the parts individually if you
don't need them all.
Keith Tanner
Flyin' Miata
1-800-FLY-MX5s (orders)
1-970-464-5600 (tech)
-
I took my brake line to the right front caliper that crosses the firewall and runs down the right front frame rail and ran it from the brake pressure differential valve (the one with the electric plug) and ran it down the left frame rail and across the back side of the front cross-member. Here are the pictures that prompted that decision.
Nice and clean installation. Where did you get the new lines? I'm planning to do the same since I need more room for a turbo down pipe that gets close to the stock front brake line.
PaulR
-
When I first installed a Holley "red" pump, it was real loud. I then mounted it to a bracket and mounted the bracket to the chassis using these isolators from McMaster Carr. Made a big difference (but I can still hear it)
-
I just bought a Hobart Handler 175 thru Harbour Freight for $549 2 weeks ago (free shipping and no sales tax)! I was going to get the 135 (110V) which was on sale for $469, but I figured since I had the 220 outlet already in the shop, I would go for the extra amps in case I ever need them. Looks like that sale is over since they now have it listed at $599.
http://www.harborfreight.com/cpi/ctaf/Displayitem.taf?itemnumber=42338
-
I remember doing a lot of hammering to clearance the tunnel for the 700R4. Not just for the tranny, but also for the exhaust that runs down each side. And I had to make a little extra room for the dip-stick tube up near the top. I agree with Mark, plan on several trial fits to get things right.
Paul
-
http://www.wheelreplicas.com/cobrar5lug.htm
Its offers them in' date=' "+24mm or +34mm, and +27mm".
Which ones do you have Paul?
Thanks!!![/quote']
Here are the factors/specs affecting my wheel selection
Rears:
17x 10.5 wheel
275-40-17 tires
28mm offset (6.8" Back Spacing)
rear axles redrilled for 5-lug
1.25" alum spacer (the kind that attaches to the hub using the existing lugs and has its own set of lugs for the wheel to attach to.
MSA fiberglass "street" flares
Coil-Over Springs (2.5 x 10 inch Eibach)
Fronts:
17 x 9 wheel
245-45-17 tires
24mm offtet (5.9" Back Spacing)
'87 300ZX 5-lug hubs (different offset than 240Z)
no spacer
no flares
Coil-Over Springs (2.5 x 10 inch Eibach)
Nothing rubs. Front is a tight fit, but rear could go bigger. A 295 tire would fit for sure... 315 might?
-
Thanks for the torque info! Another trivia question
Is it a good idea to use a gasket sealer (like Permatex or RTV) on the cover gasket? When I went to remove the original cover, it was stuck really good! there didn't seem to be any evidence of sealer and I have no reason to believe it had ever been removed before, but I don't know for sure. BTW, have just completed the install of a NISMO LSD carrier into this diff. Hope to have it back on the road soon.Paul
-
Hi, Hoping someone has the torque specs handy for the 12mm ring-gear bolts used on the R200. I have a 280ZX manual that specs the 10mm ?? bolts at 43-51 ft-lb, but I assume the 12mm bolts are different. As usual, thanks in advance.
Paul
-
Wow!! That looks like an awesome deal. You can install that right into the R200 case? If I have been reading correctly my R200 out of my 75 280 should have a 12mm ring gear which is required for this application? Right?
After looking around their web site it looks like they have a 10mm vesion as well for the R200.
My understanding is, yes, if you have an R200 case and gears, you can use a NISMO LSD carrier designed for your 10mm or 12mm ring gear. But, realize that getting the correct gear mesh and backlash is not a trivial matter. A good diff shop should be able to do the install for (from what I've heard) about $100. I'm adventurous, and plan to try it myself
If your R200 is out of a 75 280Z, it is most likely a 10mm style ring gear. My R200 is from an 84 300ZXT and is definitly a 12mm. You can check by removing the rear cover to see if the bolt heads are 14mm hex (10mm bolt) or 17mm hex (12mm bolt)
They also list this one for a 10mm R200
Sorry, I don't know what the difference is. Probably should call them.
OK, while I'm at it, the web site describes these LSD's as being set-up with approx 70 ft-lb break-away torque. How does this compare with an OEM '87-89 LSD. Is this a reasonable amount for a street driven car?
Paul
-
You can get a Quafie for $1099! Not too bad!
Guy
Anyone using the LSD carrier from Nissan Motorsports (NISMO)? Courtesy Nissan lists it for $731.50
and has both a 10mm and 12mm version. With used LSD's going for $500 and up (I know they used to be around $300, but I've been watching eBay for several months and seen several go for over $600), seems like a better way to go, ie all new clutches & discs. Anyway, this is the route I plan to take. BTW, any good references on how to install one of these units would be appreciated
Paul
-
PaulR, your're using an automatic tranny though right? .
Yes I am, 700R4, so shifter location was not an issue for me.
Paul
-
instead of using the aluminum spacer, i'm going to use 3 pieces of 1" round steel stock with the center drilled out which will be tig welded to the setback plates.
I'm using something similar. It's a thick-walled steed tubing I found a local scrap yard. It measures approx .850 OD and .450 ID (.200 wall thickness) I simply band sawed 3 for each side and slid them over the bolts as I mount the set-back plates to the block. No need to weld them to the plates since they can't go anywhere once bolted into place. Been set-up that way for several years now.
BTW, I modified the design of the set-back plates to give me another 1/2" of nominal set-back. I did this because I am using a small diameter (Late model, computer controlled HEI) distibutor, which is the limiting factor for set-back distance. 1/2" isn't much, but it was easy to do, so why not
Paul
-
Thanks Don. Looks like the break is somewhere between 83-85.Eventually we get enough of them taken apart, we'll know!
Another data point: I pulled an R200 from an '84 300ZX Turbo today and it had the 12mm bolts. I recently bought a NISMO LSD carrier and needed a 12mm style ring gear to work with it. The R200 I already had from a 280Z used the 10mm bolts. One caveat, this diff I just pulled at a local Pull-A-Part yard had some yellow paint marks (illegible) like those commonly found on used parts, so it may not have been an original.
Paul
-
Hey Silicone Boy, any updates your TT installation? I picked up a set of those Corvette manifolds and really like the way they fit when mounted "up-side-down". Looks like you came up with a very neat solution. Did you have any trouble welding the turbo flange to the manifold? I'm not an expert on welding, but I thought welding to cast iron was difficult to do. BTW, I've also seen aftermarket replacement (bolt in) tube style headers for these manifolds.
Hooker (pn 2061) and SLP (Part No.: 30056) both make them and sell for about $350 to $400. Quite a bit more expensive, but they may flow a little better and be easier to modify/weld. Keep up the good work!
Paul
-
I thought it was a well written series of articles. I couldn't find the 2nd issue on-line either, so I ended up going to the Library to copy it from an issue they had on the shelf.
-
I ran a Pertronix Ignitor II in a points style distributor and used it to trigger a MSD-6AL. Worked great! The following wiring diagram from Pertronix's tech info shows how to hook it up:
-
Hanns, Beautiful installation! I figured a pair of turbos would fit nicely up front of the V8. Which turbos are you using? Did you make the exhaust manifolds from scratch? I would love to see some pics of the manifolds if anyone has them.
-
I bought a Canon A70 after my Coolpix 850 that I had for 2+ years was stolen (house buglary). I like the A70 camera, but I had a bad experience with it. The motor drive in the optical unit went bad, so I had to send it in for Warrantee repair. They told me it would be 10 days at the most. 6 weeks and many phone calls later I finally got it back! They kept telling me that since it was such a new model, they were having trouble getting parts from the factory because they needed them to build new units. Anyway, nice camera, but reliabilty and customer service are, IMHO, in question.
-
17x9 front 17x10.5 rear
-
I made mine out of sections of thick-wall steel tubing, one for each of the 6 mounting bolts (3 per side). I bought the tubing at a local metal scrap yard for very little money. The tubing measures 7/16 ID and 7/8 OD. I cut them on a horizontal band saw, but a hacksaw and vise is all you would need.
-
I tried your experiment with the same results. I noticed that the dates only went back as far as Feb 15... the day of the switch to this new BB software?
-
Power Steering!! Not a big deal for highway cruzing, but it sure makes parking a whole lot easier... 'specially with the bigger tires, smaller steering wheel and quick ratio steering arms. I can now parallel park with one hand
-
Hi Tom,
Here are a couple pictures I took of your car at the show in Everett last summer... good luck with the business:


240Z Remote Master Cylinder Reservoir
in Brakes, Wheels, Suspension and Chassis
Posted
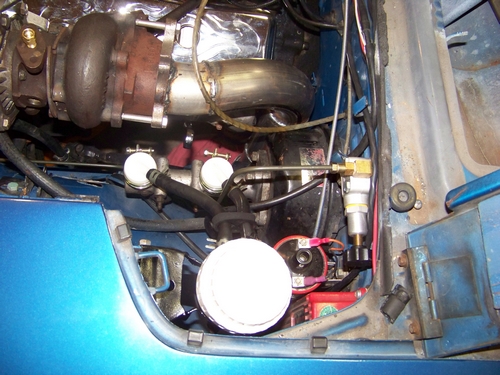
I had some inquiries about this on another post, so I thought I would post a separate summary of a mod I did to remote-mount my Master Cylinder (MC) reservoir.
I needed to do this because the stock ones were going to interfere with one of the twin turbos I am mounting on my 350 Chevy V8 (more on this in a future post )
)
First I used "Tilton Remote Inlet Fittings" from Pegasus Racing:
http://www.pegasusautoracing.com/productdetails.asp?RecID=1117
Turns out the Tilton MC reservoir flanges are the same diameter as the Z MC and these adapters fit perfectly They are only $3.80 each. (need 2) I also bought 2 new clamps, but the stock ones should work fine.
You could also buy new reservoirs from Pegasus, but with a little looking around in the local Pull-A-Part I found a reservoir from a Mitsubishi Eclipse (also used in Mirages, and Gallant) would work even better. It has a large capacity, dual outlets and even the lines that came with it worked great after clipping about an inch or so off. This reservoir even has a low fluid level switch that could be wire up if you wanted to (didn't do that yet).
I kept the bracket that Mitsubushi used to mount it to the firewall and "massaged" it a bit to mount it under the drivers side access panel.
Hope this helps anyone else who might need to do the same.
Paul