Briguy280Z
-
Posts
96 -
Joined
-
Last visited
Briguy280Z's Achievements
")


-
LS1/ T56 280Z questions
Briguy280Z replied to banditzed's topic in Gen III & IV Chevy V8Z Tech Board
Hey All I used the JTR kit for my 280z conversion back in 2001 when I was going to put a SBC in college. Then I got a killer deal on a LS-1 and T56 package with all the accessories. Then I made a custom crossmember for the corvette mounting style. But now that the car is back on the radar I’m ripping it all out and installing an apex-engineered front end crossmember to my Tecno Toy Tuning front end suspension. I need to find a supercharger to install on the car. Any ideas https://www.apexengineered.com/s30---240z--260z--280z.html https://technotoytuning.com/nissan/280z/gtx2-front-lower-control-arms-and-tc-rods-datsun-240z-260z-and-280z -
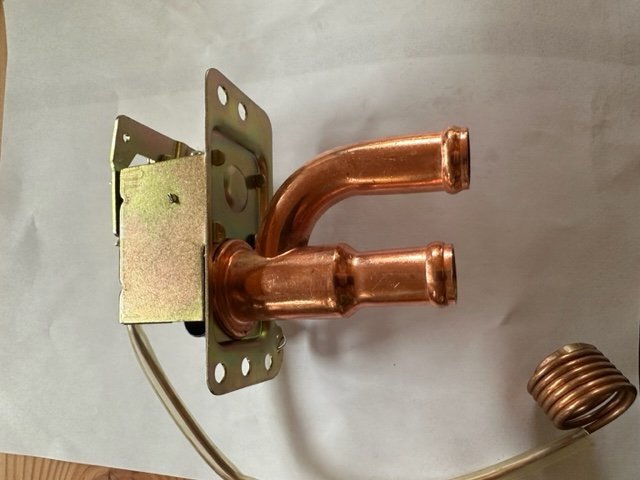
I was looking on the internet and couldn't find the unattainable replacement heater control valve. I stumbled on to this little jewel and saw the body was exactly like the 280z but the actuator was not the same. Mine had a broken diaphragm at the top which drained about a quart of anti-freeze into my passenger side footwell. I removed the top of the Volvo model and replaced it with the original Z so I could use the original actuator. Zcarsource used to rebuild them but they are not out of business. But this is an fairly easy replacement for $100. https://www.ipdusa.com/products/7482/Heater-Control-Valve-PV-Amazon-for-Volvo-MTC-171404-673452-108671 Just for those Z owners that don't have heat.

-
Ok, I got my driveshaft last week and i'am pretty happy with the result. FYI on Driveshaft Fab: Take the 400R input shaft and Q45 flange but they will not be able to use the Q45 flange because it is designed with nonserviceable u-joints but its nice to use as a reference. So they will need to order (Powertrain Industries #3102-69) Q-45 flange that can use the 1310 u-joint. It is alot beefier of a u-joint than the stock q45 u-joint and its serviceable. Anyways when you install the differential bolted down to it's final position you will need to take a measurement from the Flange face to the Transmission Seal. Mine was 28 3/4" but take a measurement with yours inplace because it will be different with each car. Take all this information down to your local driveline shop and they will make it...mine was done in 5 hours, so i picked it up the same day. I think the diameter for my shaft is 2 5/8" which clears everything under the car. All this came out to about $244.00 with a steel shaft. If you want allumium you will have to pay $100-$150 more. I figured it was so short allready allumium wouldn't make much difference. As for the drivability I am very satisfied. I laided into the gas abit much with my wife in the car and she was about ready to walk home from there. LOL!! Alot quieter that the u-joints and smooth excelleration. I went back and saw two nice even black patches of rubber. SWEET!!!
-
Rear Sway Bar Clearance
Briguy280Z replied to Bartman's topic in Brakes, Wheels, Suspension and Chassis
You have the rear mounted swaybar on your 240Z. My 280z has the front mounted swaybar and dont have as much options as you would. Anyone with a 280z has a fix for this situation? -
Rear Sway Bar Clearance
Briguy280Z replied to Bartman's topic in Brakes, Wheels, Suspension and Chassis
I just installed the Q45 differential on my car and have the same problem. I couldnt get the CV mounted with the end link in place, so i removed the swaybar. I was planning on shortening the end link but would that mean i would have to drop the swaybar mount down the same distance? or just shortening the swaybar be easier? Has anyone shifted the swaybar mount forward 3/4 inch and see if this clears? Trying to find which way i want to go? thanks Brian -
When I last talked to Ross he was working on a final cost for a complete package. I am not sure what he will be retailing this setup as...I had an email into him and got a responce that he will be back today sometime. Maybe he'll chime in on order status and priceing. Drive Line got ordered today...he said it will be ready tomarrow.
-
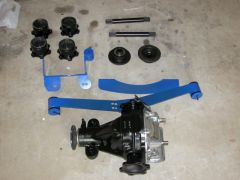
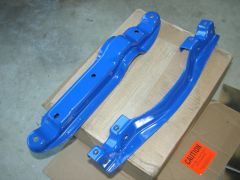
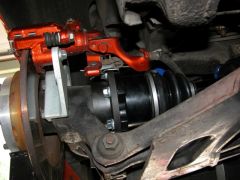
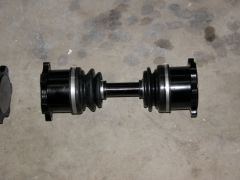
User Review Modern Motorsport Rear Differential Package: Includes: 1 - Front Differential Mount & Hardware 1 - Mustache Bar & Hardware(For Both Q45 & R230) 1 - Rear Crossmember Support Brace & Hardware & Spacers 8 - Upper Mounting Spacers 4 - End Stops 2 - Axles 2 - R230 Companion Flanges Complete Package to install Few things to make the install go a little faster When removing the old differential loosen all the U Joint and driveshaft bolts first before you remove them. this allows you to use the E-Brake to hold the shafts from moving when untightening the bolts for the shafts and the drive line. I didn't remove the control arms to install the Differential, and dont think its nessessary to do so, but i had a helper. Wives are good at jacking...lol If you look at the Mustache bar it has provisions for both R200 and r230 mounting. The R200 mounts in both positions without any interferance with anything but the R230 cannot be mounted to the top mounting position without modification. I am not sure what you have to do because i used the R200 Diff. I decided to use the top mounting position to see where everything lays out. The front mount attaches to the retension strap mounting holes right above the front crossmember. Before mounting the front differential mount you have to bend out two sheet metal tabs, they will interfear with the front mount. I had my wife jack up the differential wile i guided it up to its correct location and then bolted it down. Modifications to crossmembers: By mounting the q45 R200 differential in the upper location i was able to clear the front crossmember with very little modification. You will have to cut a tab in the crossmember to clear the front differential mount. Rear Crossmember has to be modified to clear the larger differential cover. I took a cutoff wheel on a small grinder and cut along the arc for a nice clean look. I cleaned up the cuts with the grinder and then a metal file. Then everything got sent off to be powdercoated. My camaro gas tank gets in the way a bit when mounting the crossmember so i did it in parts. I am sure if you had a Z tank install as one piece would not be much of a problem. I had some problems at the end when trying to install the r230 CV. The stock swaybar end links get in the way of the CV boots. I think i have read somewhere that you can run with out the swaybar. I plan on putting it back in when i get a shorter end links. I am using Modern Motorsports Rear disk conversion for about a year now and have not any problems with. It was a very easy install and clearance with this is not an issue I did the companion flange conversion wile everything was out getting powdercoated. I cant wait to get on the road with this guy!!! Overall the install was quick and strait forward. Really no supprises except for the end links interfearing. I read that even the 280zxt cv boots even interfear with the end links. Maybe someone will chime up with a solution with this last detail. Mounting the differential at the top postion allows be a strait shot to the t-56 input flange. I used a laser to see how strait the shaft is going to be and i was amazed that its about 1-2 degrees inline with the transmission. I talked to Jay at Powertrain and he feels as long as i am within 1-2 degrees vibration should be minimal. Driveshaft is going to be ordered tomarrow, not sure on the turnaround on this but should be on the road by the end of the week. Then i'll put it to the test then! I have to give it to Ross and Modern Motorsport for a pretty complete package and taking out alot of the guess work when doing this install. Thanks Ross and Modern Motorsport Good Job!!! Brian
-
-
 Powdercoated Crossmembers
 -
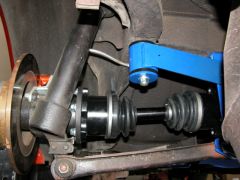
 Modern Motorsport Rear disk brake clearance with r230 CV axles
 -
-
-
LS1 guys - radiator hoses?
Briguy280Z replied to Slammed68's topic in Gen III & IV Chevy V8Z Tech Board
I used a Griffin 26" alluminum radiator..Then i bent a peice of welding rod and took it down to Autozone and rummaged through their radiator hoses. I'll take a look and see if the #'s are still on the hoses when i get home -
Good Job! Getting another LS-1 Z on the road!
-
I am going to do the Q45 rearend swap currently have all the q45 parts but i am lacking the halfshaft/ halfshaft adapters, mustashe bar and front mount. I noticed the parts lists and was wonder what everyone did for the drive shaft? -Brian