Andrew Bayley
-
Posts
358 -
Joined
-
Last visited
Content Type
Profiles
Forums
Blogs
Events
Gallery
Downloads
Store
Everything posted by Andrew Bayley
-
 Thanks for the response(s) guys. The problem I’m getting is definitely an interference hit. Under normal street driving, everything is nice, quiet and smooth. However, under heavy torque loads, something is banging around down there. First gear is obviously the worst (as the banging goes). After I originally put the mount in, I could easily get the differential to “thump†in all three gears. After the disappointing initial drive, I shaved a v-shaped “notch†into the polyurethane GM Transmission mount. Before I did this, there was a good ¼ inch of space between the mounting tab(s) and the differential (where the bolts feed through). After I “notched†the mount, the mounting tabs sit flush against the diff mounting surface. Another thing I noticed was that the stock differential mounting bolts appear to be too long. Rather than using the stock flat washers, I simply used a couple spare lug nuts as nuts for the mounting bolts. As I torque’d down the bolts, I noticed that I was bottoming out the threads of the bolt before the mount was tightly fastened against the differential. A washer was fitted onto ONE of the bolts, but this pushed the mount too far over to use a washer on the second nut. Since I was in a rush to finish up, the second bolt was installed WITHOUT a spacing washer. If one of the mounting bolts isn’t pulling the mount firmly against the differential (even though the other one is) would this be a cause of the loud “thumping†I’m hearing? I’ve checked all the u-joints and they are all perfect. Also, while time for replacement bushings, the moustache bar and bushings are all still intact. As it sits, I’ve got about ¼ of inch clearance between the bolt heads for the differential mounting bolts and the original cross member. Is this enough?
 -
I just installed my home-made R/T diff mount this evening and it seems like I still need to do some tweaking. When I was originally bolting everything together, I noticed some interference issues with the mounting hardware on the differential against the cross member. I switched the direction of the bolt (goes up now instead of down) and removed the flat washer. This gave me about 1/4 inch of clearance between the mounting bolt heads and the cross member. On the test drive, I was getting a loud banging noise under mild torque loads. Since this is the first time I've gotten this noise and the mount was the only thing I change, I can only assume that one of the bolt heads is hitting the cross member. So, all the people who are successfully running this mount, how much clearance is between YOUR cross member and mounting bolts? I'm thinking I might need to grind a little more material away from the bottom of the urethane mount. All I did to prepare the mount was grind the bottom portion of the mount so it was flush with the gold metal tabs. I'm thinking that maybe I should have grinded a little more. Oh well, at least the side pipes I installed last summer make differential swaps / work TONS easier.
-
Remember one thing though... most mandrel bends aren't 100% perfect. There is still going to be some deformation of the diameter inside the bend. You will need to weld the difference at the pipe connections if you cut inside the bend and splice a pipe into the cut.
-
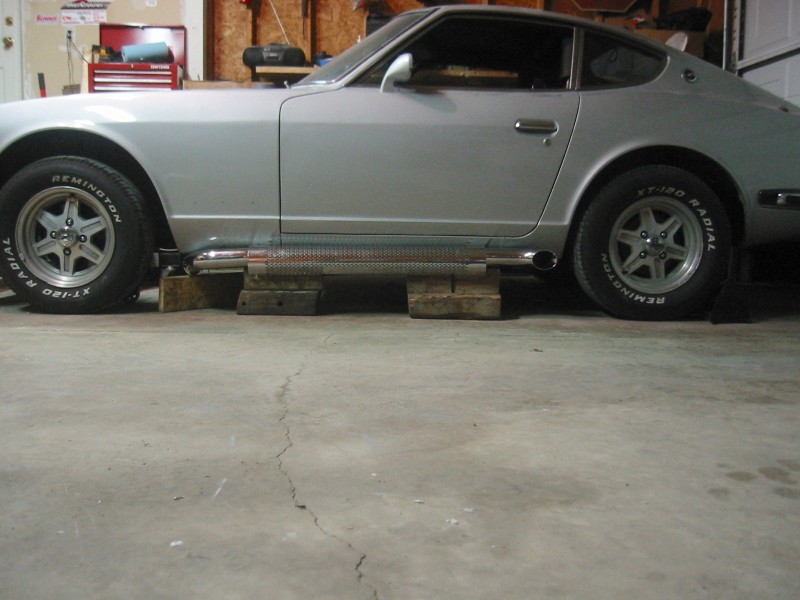
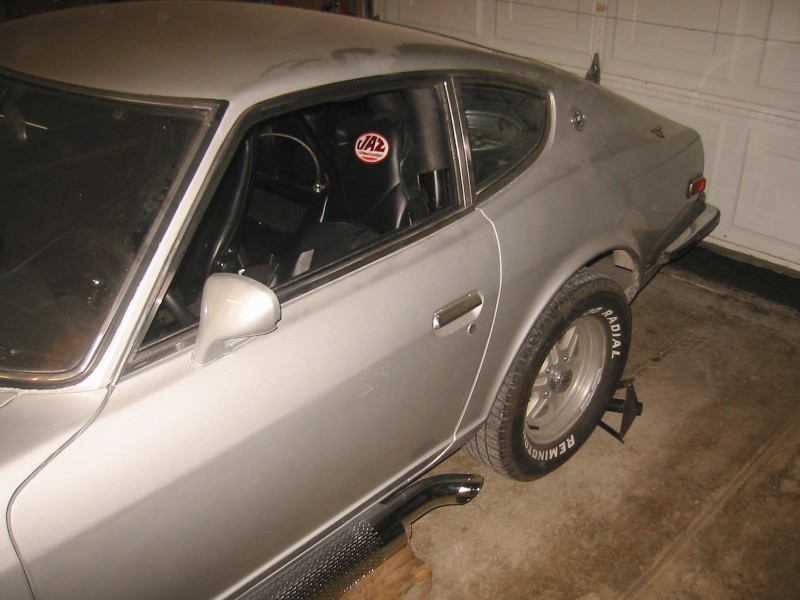
Dynomax Sidepipes Mocked up and ready to go!
Andrew Bayley replied to Andrew Bayley's topic in Exhaust
VIDEO link! -
Dynomax Sidepipes Mocked up and ready to go!
Andrew Bayley replied to Andrew Bayley's topic in Exhaust
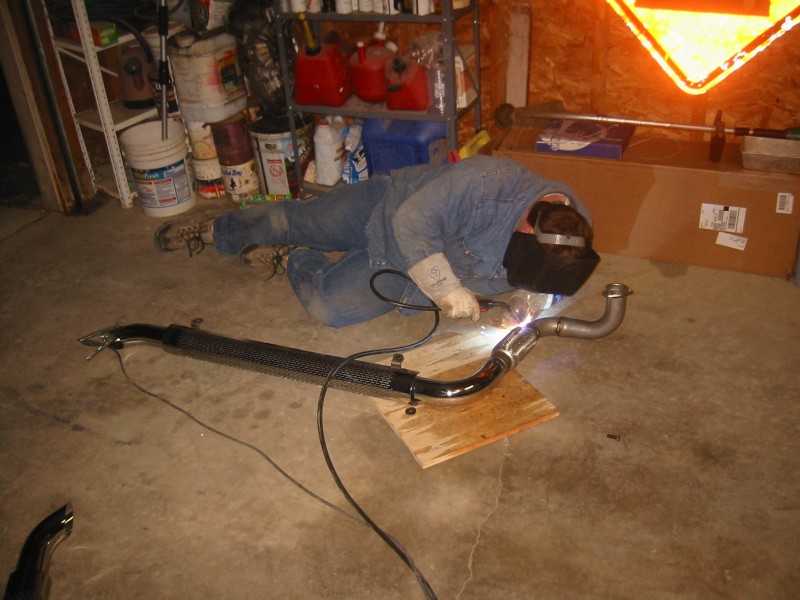
Just finished the final install and... wow, I was (am) very pleased with how these sound. I got a feeling what little fiberglass I left in the muffler isn't going to last very long. Just blipping the throttle in nuetral blasted all sorts of fiberglass material out of the tailpipe. Oh... darn!!! After tacking everything in place I had my friend "big Jer" stop by and finish the welding job. He also helped lift the pipes in place and bolted them in. Even suckered him into doing collectors. Hehe... I would have shot a short video with sound. However, the camera battery was on its last millivolt and my new rubber valve cover gasket is already leaking. Gotta love SBC valve covers. Anyway, here are a few pictures:
-
Dynomax Sidepipes Mocked up and ready to go!
Andrew Bayley replied to Andrew Bayley's topic in Exhaust
Update after last night: Well, the pipes are now securing fastened to the car. However, the more I look at my setup, and the more I look at “Coze Z Cole’s” setup, the more I think I need a flex piece between the pipe and header. Gonna try to shop around today and see if anybody locally (Detroit area) has a 2.5” flex piece. If not, I’m sure Summit sells them. As for the mounting, I basically took half of the Dynomax brackets and threw them in the garbage. I wound up keeping the rounded section of the clamps and used those to connect the heat shield to the muffler section. I had to cut off the threaded section of the clamp so just the raw rounded metal section of the U-shaped clamp was left. First, I welded one of these pieces to each end of the muffler pipe. Next, I took the heat shield and placed it over the muffler section with the U-clamps provided a good ½ inch spacing between the two. I started welding one edge of the heat shield to the U-clamp on both ends of the pipe. Then, I had a fairly burly friend squeeze the heat shield and hold it in place against the other end of the U-clamp as I welded it in place. With the muffler section and heat shield now permanently connected as one, I took to hanging the pipe from the car. I drilled holes for the front and rear hangers and installed the Dynomax supplied hangers and rubber isolators. Instead of the cheap shiiit metal screws, I used thru bolts and fender washers. After all, these Datsun floor boards aren’t known for the superior thickness. Anyway, I then held the pipes in place then welded the hanging section of the bracket to the side of the pipe. Overall, it came out a lot better than I had originally expected. It is impossible to see any of the mounting hardware from outside the car. There is maybe a 1/4 inch gap between the top of the heat shield and the rocker panel. Even go, the gap is outwards and not hanging down. While I would have still preferred to hang the pipes along the rocker panels, it just wasn’t going to happen with what I had. I’m pretty happy with what I came with instead. I would have tried to finish more last night, but it was already 11:30 PM by the time I made it this far, and the Wings just tied it up in the second period. Still need to finish up the two bends coming off the header and insert a flex piece. Once that is done, she should be ready to fire. I’ll hopefully be able to post up pictures and a video clip when it’s all done. -
Dynomax Sidepipes Mocked up and ready to go!
Andrew Bayley replied to Andrew Bayley's topic in Exhaust
I’m trying to run the pipes along the sides of the rocker panels to not loose any ground clearance. If I use the Dynomax mounting kit, I can only get about 2 or 3 inches of ground clearance. Plus, there is a rather large sized gap between the rocker and top of the pipes when I do this. I’m trying to make everything look tight and clean, but it’s not happening with those HUGE clamps Dynomax provides. The sheer size pretty much guarantees your pipes can’t be mounted closer than a couple inches away from the rockers. As for the internals, my biggest concern is the 1 and 5/8th inch inner diameter of the muffler section. I don’t think that is going to flow 500hp very well. Right now, I’m ready to give up the whole side pipe idea. I am very frustrated with this kit as a whole. I’ve already stripped two of the screws they provided to attach the heat shield to the clamps simply because the shield wouldn’t line up with the clamps. Nevermind the sheet metal SCREWS they expect you drill through the floor to hold up the pipes. Yeah, that ain’t gonna happen. Thanks for the advice Larry, but I’ve got a feeling if I can’t figure out something tonight… it’s back to the drawing board. Davy, yeah I’ve been on a “retro” kick lately. Also, I drove my friends factory five Cobra last fall and immediately fell in love with the sidepipe idea. -
Dynomax Sidepipes Mocked up and ready to go!
Andrew Bayley replied to Andrew Bayley's topic in Exhaust
Dear lord... this kit is a steaming pile of dog poop! The holes for the heat shield do NOT line up and the clamps they provide are so rediculously HUGE it almost forces you to hang the exhaust a good 2 - 3 inches below the frame rail. This is not an option. I'm going to try and weld up something tomorrow to see if I have any more luck (or lack of). However, I don't feel too confident about the outcome. -
Patriot Sidepipes: 3" reduced to 2"... why?
Andrew Bayley replied to Andrew Bayley's topic in Exhaust
Or so I'm told! Started fartin' around with the old girl again trying to jump start my enthusiasm again. So far, its working! Got the engine dropped back in last night, need to finish up the final wiring, drop in the radiator, then tackle the new exhaust project. Got a big car show in late June I'm hoping to attend (St. Ignace Michigan). The (new) wife is really looking forward to going so I don't want to disappoint. -
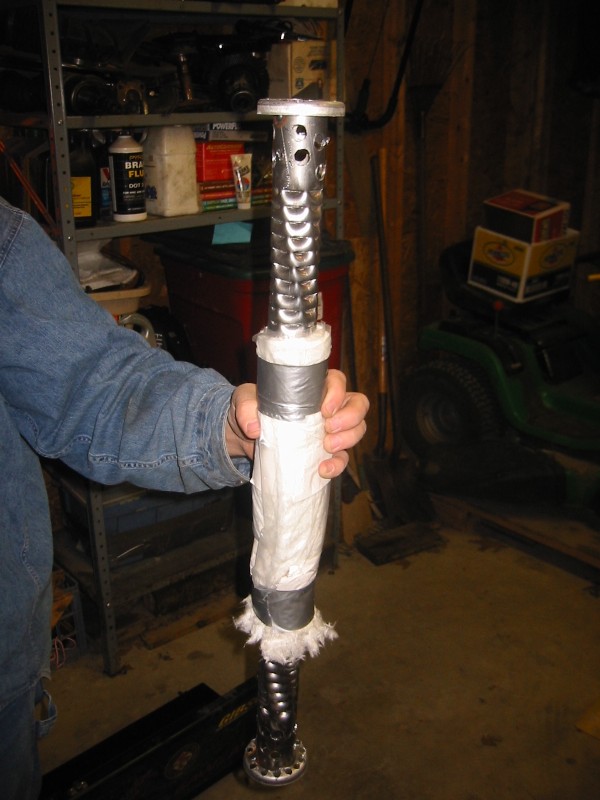
After discovering that the Patriot sidepipes had an ultra restrictive inner diameter of 1 and 5/8th inch in the muffler section, I ordered the ($100 more expensive) Dynomax kit that advertises a 2.5" inner diameter. Nope, they lied. The Dynomax muffler is just as poopy as the Patroit. However, the Dynomax muffler section easily slides out of the 3 inch exhaust pipe it is housed in. After sliding the muffler piece out, I drilled about ten 1/4 inch holes on both sides of the retaining ring and removed all the fiberglass. Not sure how loud this will be, but it's got to flow at least a little better now. Earlier tonight I heard a 350 SBC with the Patroit side pipes at a local car show. I was pretty bummed at how quiet his setup was. Hopefully my "cutsomization" of the muffler inserts will wake it up some. If all goes well, I plan to have this wrapped up by next week some time.
-
Patriot Sidepipes: 3" reduced to 2"... why?
Andrew Bayley replied to Andrew Bayley's topic in Exhaust
YEAH!!! The Dynomax system arrive today! BOO!!! It's just as bad as the Patriot System. I'm going to post pictures in another topic. -
Patriot Sidepipes: 3" reduced to 2"... why?
Andrew Bayley replied to Andrew Bayley's topic in Exhaust
OK, I just got off the phone with the manufacturers at Patriot Exhaust. The inner diameter of the muffler section goes down to 1 and 5/8th on an inch. Ouch! Gonna call up Dynomay next. If they aren't any better, I might have to go commando and make my own set. -
Patriot Sidepipes: 3" reduced to 2"... why?
Andrew Bayley replied to Andrew Bayley's topic in Exhaust
Any ideas where I can get just the covers? -
I'm looking at a set of sidepipes and keep coming across this “Patriot†sidepipe. I'm intrigued, but also concerned about the 2†inlet pipe. Does anybody know what the inner diameter is of the muffler section? Reason I’m asking this, is because I’m thinking about cutting the 2†section off and welding it to a 2.5†pipe. However, if the muffler inner diameter is only 2†(or even smaller like most exhaust manufacturers do without informing you) then there really isn’t much of a point in cutting the 2†section off. I also found a set of Dynomax sidepipes that have a 2.5†advertised inlet, but their price is almost $100 more for otherwise the same thing. Is the extra half an inch worth a hundred bucks on a 450 hp SBC or would the Patriot pipes work just as well? (Dynomax pipes with 2.5" inlet)
-
Here’s one for the all the SBC guru’s that is currently stumping me. Pulled the engine and trans out last week for some much needed cleaning, maintenance and upgrades. While removing the engine, I noticed the rear passenger side of the oil pan had a significant amount of oil running down its side. Mind you, I never noticed this while the engine was running since the clouds of transmission smoke that would trigger alarms at the local EPA office would “Mask†all other leaks / burning oil. Upon close investigation, I’ve narrowed down the source of the oil leak to one of two places: 1) The valve cover gasket 2) The head gasket I’m 99% that the valve cover gasket is indeed leaking, I’m just curious if the head gasket is ALSO leaking in since I can see significant buildup of oil between the head and block just below the exhaust port. I’ve blown through my fair share of head gaskets before but I’ve never seen one that has leaked oil between the head and block. I’m sure its possible, but how common is this? The oil looked fine and my coolant level hadn’t dropped. I’m wondering if I should pull the heads now since I’ve already got the engine out of the car and slap some new gaskets in, or if I’m making a big deal out of nothing. New head gaskets and bolts (probably switch to studs) will probably set me back at least $100. Is it worth it for a piece of mind or am I just paranoid (people think I’m insane because I am frowning… all the time!) I guess on the plus side, if I pull the heads off I can hit the ports with a die grinder in the shop after work.
-
Rich and Famous…? I think you meant to say: broke and busted! I’ve spent the last two summers chasing down all sorts of gremlins with the new 502’s I dropped into that thing. Been a very long and painful road. Hopefully, everything is set to run this summer, dropping the second motor back in tomorrow morning. I also went out and bought a 2004 Subaru WRX (not officially an STi, but might as well be). I’ve been having fun playing with that thing as well. However, the WRX is alarmingly getting as fast as the Z (both mid 12 second cars) so figured it was time to update the Z and make it a little friendlier to drive. I’ve abandoned the idea of an all out race car and replaced that idea with something I can actually enjoy driving to work. Hence the reason I ditched the long tubes. Also, the side pipes I have planned won‘t work with the long tubes. I also just bolted in the new valve body for the (700R4) automatic transmission last night. I’m going with a FULL manual reverse pattern valve body. Yeah, yeah, I now that totally contradicts what I just said about a daily driver and all, but I still want something at least a little bit original and different. This should be interesting. I also finally broke down and bought a new 10” torque converter. Would like to get a new radiator and (electric) water pump, but I need to finish the exhaust first.
-
FWIW: Unless you are going for every last bit if horsepower, save yourself the headache and avoid the long tubes. I've regretted the long tubes since day one. First off, you loose a lot ground clearance. Second off, the collector dumps straight into the floor board. This needs to be modified (i.e. HAMMER TIME!) for any type of exhaust to fit. Finally the headers cannot be removed with the engine in place. However, the engine cannot be removed with the headers bolted to the engine (unless you want to unbolt the steering rod). Yes, I have to pull the engine half way out before I can install / remove the header. It really is a major pain in the butt. The block huggers always slid in and out no problem with the engine in place. If you are still interested, I've got a set of moderately rusty long tubes that I will give away. Seriously, if anybody want them, they are free for the taking (yes, I hate them that much). Pay for shipping or pick them up yourself.
-
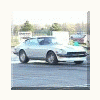
Hey... I recognize that car. I remember following that car (with a smashed front end) all the way up I-75. Ahhh... the memories.
-
Just tossing some ideas around recently and was wondering if anybody knew the quick answer about putting an LT1 intake on an older SBC (pre-87… standard coolant flow heads). I’m looking at switching over to EFI in the next year and was attracted to the LT1 because of it’s low profile and rumored flow capabilities. Also, I think it’s a cool looking intake. I’ve found a few bare intakes on Car-Part, but they all wanted between $150 and $250. I’m sure a better deal could be had on e-Bay with somebody upgrading to an LT4 intake. Thoughts, comments?
-
Even after five years, I still catch myself lurking from time to time.
-
This is a pretty cool site, I really should hang out here more often… Scottie, I know exactly where you are coming from. I had a blast the first few years out of college building my Z car(s). However, it got tiresome after a while. I found myself spending all my free time and money into building and eventually simply maintaining a project car. It wasn’t long before I started to realize that I could simply “buy†a car that was almost as quick, had working climate controls, was quiet and wouldn’t leave me smelling like an oil refinery after a 10 mile drive. Of course, add to this equation a wife, kids, career, etc… and everything in your life is amplified. However, having a new (well, it’s been a year… does that still count as new?) garage with plenty of empty space has amped up my interest in my old project Z again. Also, my smack-talking buddy with his Furd 302-powered ’87 RX-7 ($2004 Grassroots Motorsports Challenge – 3rd place overall) is keeping me focused as well. I’m getting excited again. But on the down side, all those “new†cars over the past 4 –5 years have turned into project cars themselves. I’m down to three cars these days (from seven). Need to get rid of the Impala SS, then I will be a two car man again. Good luck with whatever you pursue. -Andy
-
I've got the full length MSA's and had to do a bit of modifying (i.e. hammer!) to the floor boards. The passenger side needed the most hamme... uh, modifying. They will fit. Currently I am running 2 and 1/4 " pipes into a single 3". The two pipes Y together about half way between the trans and differential. I used the pre-fabricated flowmaster Y-pipe that Summit sells. It made the exhaust job MUCH easier, I highly recommend it. I do believe that make a 2.5" to 3.5" Y-pipe which would be more suitable for the 406c.i. My 3" is not enough for my 358 at 6200 RPM's. As for MSA claiming nobody has ever complained about the full lengths not fitting... that is complete bullschit! I called them up a week after I got mine and told them about the clearance issues. I was told they could send me another pair and see if they were any better... assuming I was willing to swallow the shipping charges for both the old headers to return, and the new headers to ship. No thanks. MSA really disappointed me on that deal (and many others as well).
-
Ford vs. Chevy - Battle of the Brands! Well, after about a three year break from the action, I was finally able to muster up some motivation and pull my Z to the track. It took about a month of constant badgering from a friend of mine who recently built a 302 powered Mazda RX-7 (for the Grassroots Motorsports $2004 Challenge). Late last week, I pulled the old girl from her sleeping bag, slapped some new tags on the plates and took her out for some quick testing. Lately, I've been pulling out my hairs trying to track down a valve body problem that stemmed from a very poor transmission rebuild some cowboy did for me. Essentially, the transmission will automatically shift into second gear... even when the gear shifter is in the first gear position. I tried everything to fix this problem. I was under that car adjusting the shift cable, TV cable, you name it. Nothing has worked. Anyway, I figured I would simply let the transmission shift on it's own at the crappy 4500 default setting (I usually shift at about 6300). Now my buddy's RX-7 is an 1987 model with a 302 Furd V8 mated to a T-5 tranny. The engine originally came with the speed density fuel injection system, but that was ripped off and replaced with a single plane and holley 600 vac. secondary. My friend was pretty confident that he could, at least, keep up with my Chevy 350 powered Z car assuming I didn't spray any gas or use slicks. Sounded like a good old fashioned drag race to me, off to the track we went! My first run was a MAJOR disappointment. That "little" trans problem I was having turned out to be a much bigger thorn in my side than originally thought. The transmission had shifted into second gear at a whopping 2800 rpm. I still was able to beat the little 302 RX-7, but not by much. My sixty foot time was a blistering 2.224 seconds, and the quarter mile E.T. was 13.106 but my MPH was up there at 109 mph. Jer's Rx-7 ran a 13.401 @ 104 mph with a 1.868 sixty foot (that little cheater showed up with Nitto Drag Radials!!!) Back to the pits I went where I "tricked" the transmission by extending the TV cable out more than it should have been. This time at the lights, I was able to shift into second at 5500 rpm. Still not where it should be, but enough to actually yield a 1.909 sixty foot time (on hard as a rock street tires none the less!!!) and a 12.505 @ 110 mph. Jer knocked a few tenth's off his time as well at: 13.211 @ 106 (it was getting cool out) but obviously couldn't quite keep up with Big Blue! I sent his butt back to Dearborn, with tail between his legs! All in all, it was good fun. Jer and I have been grudge racing just about everything with an engine since we got our drivers licenses. I only shudder to think what his next creation will be. Jer trying to look all tough... The smile of a winner!
-
Manual Valve Body for the 700R4 - Should I go for it?
Andrew Bayley replied to Andrew Bayley's topic in Drivetrain
Indeed, it has been a while. And yes, that dash is (mostly) crack free. It has one small hair line crack, but that was only from when I rolled over my second Z at +100 mph. That dash has seen three Z cars now. Truly a legend unto itself! I've got a friend who is building an '87 RX-7 for the Grassroots $2004 challenge. I told him I would run his 302 powered Mazda against my 350 powered Datsun (I figured it would be pretty fitting), motor vs. motor... no psssht - psssht for me! He's hoping for mid - low 12's, so it should be a good race. ...In fact, this is the same guy (Jeremy) that originally bought the yellow hulk off you. It's a small world, eh? -Andy -
I was wondering if anybody has had any experiences with fully manual valve body, automatic transmissions. I am currently at my whits end with a 700R4 that refuses to stay in second gear, even though the shifter is in the first gear positions. I've rebuilt the valve body myself twice (second time was just a pull apart and check my previous job), and have spent countless hours verifying the cable position. Everything looks good to the best of my knowledge. Right now, I'm guessing that I probably over looked something very small in the valve body that is causing the transmission to automatically shift into 2nd on its own. So this brings me to my current solution to this problem... switch to a fully manual valve body. I've never been impressed with many automatic valve bodies (i.e. shift delay time), and my 700R4 is no exception. Is the manual shifting going to be too much of a pain in the butt for street driving? It's not really a daily driver anymore, but I do still go for quick runs around town. The part I'm looking at is a TCI unit that has a fully manual reverse pattern valve body. Cost is about $250 (average valve body of $150 + 700R4 Premium Fee of $100 ). If this was your situation, would you consider it? -Andy