

Oddmanout84
-
Posts
658 -
Joined
-
Last visited
Content Type
Profiles
Forums
Blogs
Events
Gallery
Downloads
Store
Posts posted by Oddmanout84
-
-
Not to be a nasty critic, but I see three of those upper small holes are tapped into the hollow part of the chassis that feeds into the fresh air ducts. Perhaps you have your ducts blocked up at the end, but it's worth mentioning. Doing so will feed hot, smelly engine bay air into the cabin.
74Adam,
When I did mine, I made several small holes about the same size as you see here, then used a dimple die to reinforce them (not an original idea of mine). I believe it was bjhines that inspired me to do it.
Last question though, what type of fan is that blowing out the large hole?
-
There are several alternator upgrades documented within this forum, and linked to from this forum. That's essentially what you need, a higher output alternator.
-
I've just about finished up the piping. The only problem I see now is the fuel filter placement. Unfortunately it was an after tought
 . It looks to be positioned too far to the drivers side, past where the fuel rail will be located. Since the engine is out I don't have a good reference. I could put a 180 fitting on the end of the filter and come back to the fuel rail...but I don't know if that will work. Any ideas?
Since I made my other comment, I've run most of my fuel line. When I got to the point of bending to fit my fuel filter in that location, I decided against it for that same exact reason. Instead, I ran the feed and return lines toward the battery tray. They're both going to be oriented vertically directly to the left of that raised vertical ridge in the firewall (in your first pic). I figured that way I'd have more room for the soft line connection to the fuel rail, which adds a little bit more in the way of flexibility to compensate for engine movement. That, and I figured if I ever did a swap to the RB, the locations of the lines would be on the "correct" side of the engine. I don't know if that's an option for you though, unless you want to start over. I'd say if anything else you could use your current situation to your advantage and make a large "loop" of soft line that might make for decent movement stress reduction. I'm no expert though, as this is also my first rodeo.
You've made some beautiful bends in your lines, I'm impressed (and jealous!). I've been cursing the anodized 1/2" aluminium lines I purchased from Summit almost the whole way. Any small touch from tooling causes big, nasty gouges that expose the raw metal. I spent a few hours grinding and polishing my bending tool to help this, but it only worked marginally. As a consequence I took advantage of the softness and bent each line slowly by hand anywhere that doesn't require an angle 45 degrees or greater.
-
Buy some 4" PVC pipe plugs from home depot, modify accordingly. There's a great writeup on this site somewhere.
-
Thanks for the pictures. I'm shocked that the Koyo doesn't have a drain plug!
You and me both.
-
I have to ask, which side did you pull these smaller fans from? From the products (Dorman, on Summit) I've seen, they only list the part number and sometimes which side it goes on. I have not yet seen annotation of the dimensions in any product description, since I suppose they assume that the customers that buy these are just looking for OEM specific replacement and don't need to know additional info. What I'd like to know is which side the smaller diameter fan resides on.
If you're wondering why I don't just go to a pick and pull and see for myself, the answer is that around here it's pretty rare to find a good junkyard, let alone one that you can actually walk through.
-
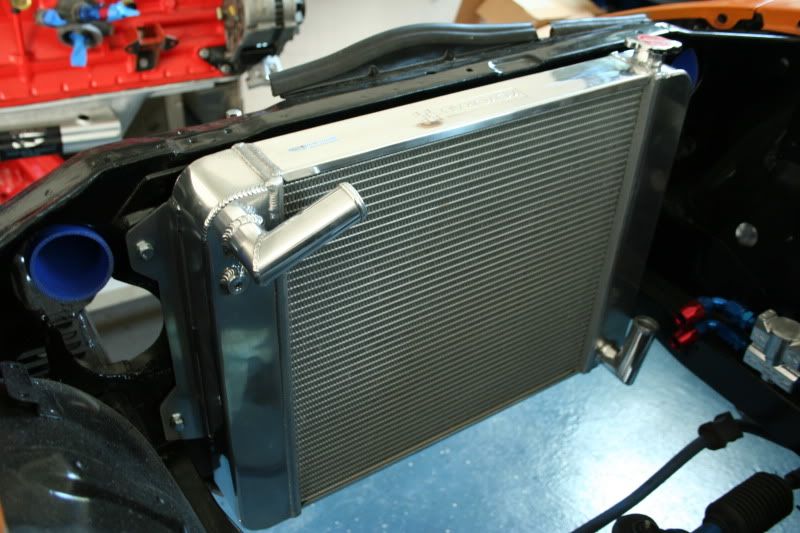
Just an observation on the Koyo radiator - it seems from the images Oddmanout84 posted that a lot of potential cooling area is wasted by the side tanks. This seems especially so when viewed from in front of the radiator support where you see so much of the side tanks through the opening. I would speculate that you want as much cooling area as possible aligned with the opening in the radiator support.
Just my 2 cents.
I'd agree with this. Though I didn't mention it in my previous post, I thought it was a bit peculiar. The only thing I can think of is that they did it for clearance issues or to keep it as close to stock dimensions as possible? Maybe increasing the tank size on the top/bottom of the radiator to compensate for smaller side tanks didn't work well? From what I've gathered, this might be due to the fact that they were going for the superior performance of cross-flow rather than down-flow design. That's the theory anyway.
I guess once my car is running again some testing will tell. I'm going to try to develop a mounting bracket for the thinner-style Taurus fans, but mounting room for fans is tight. Not just for the clearance between the radiator and engine pulleys, but the width of the radiator core as well. It's been difficult finding a twin fan setup or large single that will fit well and maximize the potential space.
Sorry, I've edited this a bunch of times and it might be getting a bit convoluted. Probably because I've been huffing paint fumes all day from restoring furniture.
-
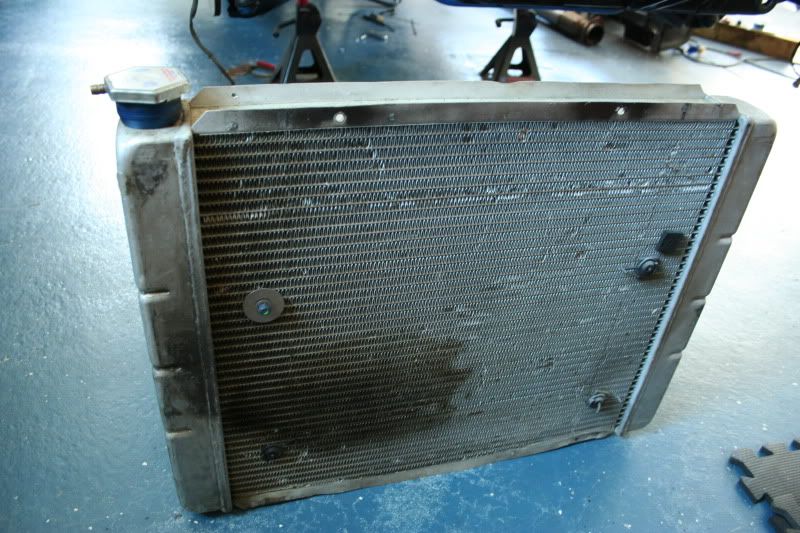
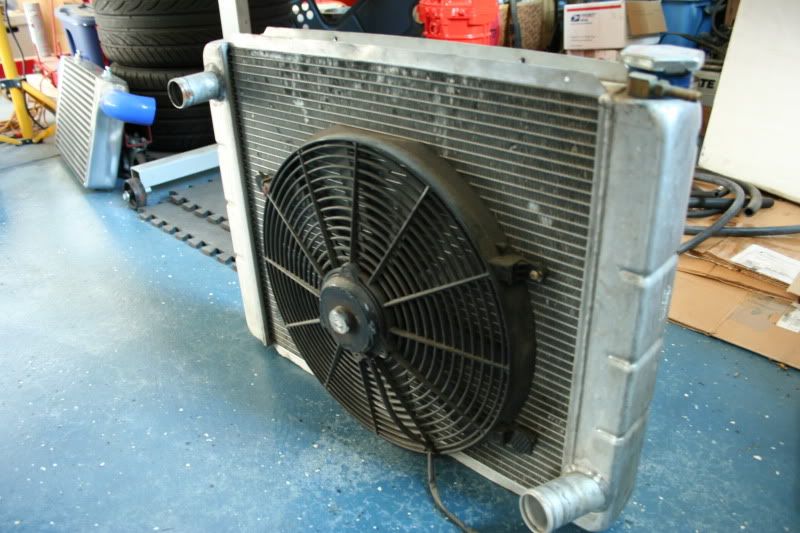
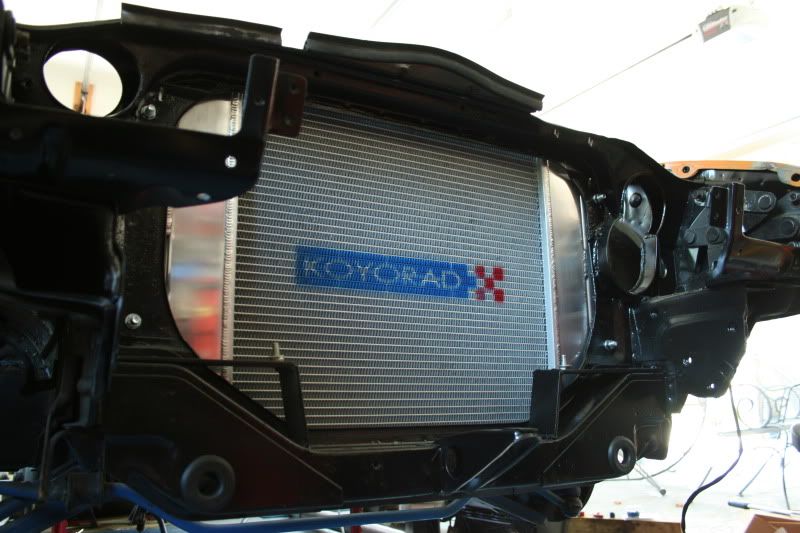
I run a Koyo radiator (technically speaking). I bought one a while ago and it took over a month to get here. From what the seller stated it wasn't his fault, but the fact that the recovery from the recent tsunami has affected their production. When I say I "technically" run one, I mean it's in the car, but I've never operated it. So.... I can't give you any performance data. I can however attest that it is the highest quality (appearance wise) radiator I've seen in or around my Z. The mounting brackets line up perfectly, and the way the radiator itself sits in the chassis is perfect.
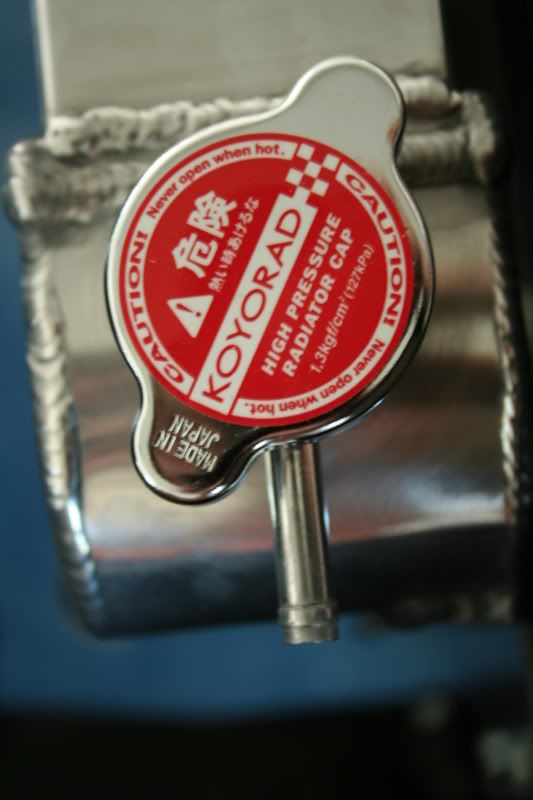
There are some minor annoyances though. The reason I got this was to replace an aging used aftermarket aluminium rad that I put in the Z during my turbo swap. It sat too low, had no mountings for the fan shroud, no drain plug, no mounting brackets. The Koyo solved the mounting problem, and looks better. The core thickness is the same as my other aftermarket radiator (53mm thick?).That's it from what I can gather so far. I could have swore when they made the thread here about it's design that they were going to implement their "N flow" or "Z flow" technology and that it would have provisions for the stock fan shroud. Neither of those are present, and those were features I really wanted. It also does not have a drain plug (@%^@$%&!?!?!?!) which dumbfounded me. I knew at the time of purchase that it wasn't going to have the "N Flow" from the data on their website, but those other things are really annoying. So all it really solved for me so far has been the mounting situation. I'll have to make my own fan mounts and radiator shroud for the fan, and possibly TIG a drain bung on the bottom.
For your viewing pleasure:
The old setup
Sorry for the mess, but that picture was taken mid-swap two years ago.
It's a "Northern" radiator, Manufactured in 11/20/03, "Made in USA" tag on it.
The Koyo
I removed the intercooler to show the front. Too bad it covers this.
Here showing the bottom clearances. The old radiator hung just about even if not slightly lower than the radiator support.
It also does not include a radiator cap, so you will have to buy one of these from Koyo separately. Another minor annoyance.
All in all, I'm happier. I just wish it was a little better.
-
I've never used an RTV that matches the black of the windshield seal. It always looks a slightly different color and looks like crap. So no, don't do it. I painted my stainless trim with SEM trim black a few years ago and never looked back. It looks great and holds up well if you prep the surface right. I've also known some people who just don't put the molding back in the windshield seal. Yes there is a big gap, yes it's a pain to put the trim back in. Your choice on whether the effort is worth it to you or not.
-
Crap, wish I had an actual data log to show you, but Haltech usually displayed around 100-110F when my engine was running last year. No cold air intake either, just a short pipe that put the filter just forward of the AC compressor bracket location and offset diagonally slightly to the wheel well. This is kind of irrelevant now, since I routed a cold air intake during my rebuild. I'll try to remember to post my new results when it's running again.
-
If you go to the Cars 2 website and watch the Weezer music video, there is an orange S30 "sitting" in the bleachers at 00:48.
Link:
http://disney.go.com/index?int_cmp=SOC-intDPFY11Q3cars223-06-11@0003
-
I painted my Z for the first time for about $300 total. That's paint, primer, activator, reducer, mixing cups, gun etc. The paint used was Transtar single-stage urethane. I did not opt to remove the doors, windows and weatherstrip. It came out *ok* besides some minor flaws in the paint and was a good learning experience. The paint, though on the low end of the cost end of the spectrum, held up very well over the years. It would have held up flawlessly had I not decided later to delete my sunroof and cut and weld various bits for the flares and fuel filler. Of course, I will have to do it again, and this time I will do it completely right with all the necessary disassembly. What I learned was that it's better to go cheap on your first paint job (though not dirt quality) for your first, especially if you plan on any modifications later on down the road. If nothing else, the experience of spraying it once will give you experience to use a better technique for the next time. Keep in mind that my reasoning is based on doing ALL the work yourself and not taking it to a professional painter.
Of course, you could always go full out and hopefully not worry about painting it again for a long, long time but it will cost you.
My vote is still on the cheaper paint job.
-
Why is this not in the shed yet? lol.
-
IHATErustIHATErustIHATErustIHATErustIHATErustIHATErustIHATErustIHATErustIHATErustIHATErustIHATErustIHATErustIHATErustIHATErustIHATErustIHATErustIHATErustIHATErustIHATErustIHATErustIHATErustIHATErustIHATErustIHATErustIHATErustIHATErustIHATErustIHATErustIHATErustIHATErustIHATErustIHATErustIHATErustIHATErustIHATErustIHATErustIHATErustIHATErustIHATErustIHATErustIHATErustIHATErustIHATErustIHATErustIHATErustIHATErustIHATErustIHATErustIHATErustIHATErustIHATErustIHATErustIHATErustIHATErustIHATErustIHATErustIHATErustIHATErustIHATErustIHATErustIHATErustIHATErustIHATErustIHATErustIHATErustIHATErustIHATErustIHATErustIHATErustIHATErustIHATErustIHATErustIHATErustIHATErustIHATErustIHATErustIHATErustIHATErustIHATErustIHATErustIHATErustIHATErustIHATErustIHATErustIHATErustIHATErustIHATErustIHATErustIHATErustIHATErustIHATErustIHATErustIHATErustIHATErustIHATErustIHATErustIHATErustIHATErustIHATErustIHATErustIHATErustIHATErustIHATErustIHATErustIHATErustIHATErustIHATErustIHATErustIHATErustIHATErustIHATErustIHATErustIHATErustIHATErustIHATErustIHATErustIHATErustIHATErustIHATErustIHATErustIHATErustIHATErustIHATErustIHATErustIHATErustIHATErustIHATErustIHATErustIHATErustIHATErustIHATErustIHATErustIHATErustIHATErustIHATErust
-
I'm not opposed to running stainless steel lines, I just read so many horror stories of how much of a pain in the butt it is (kinking, etc). With a 240z, would to be possible to simply pull out the stock line that runs the length of the body, bend up a line to essentially duplicate it, and throw it in? I would be installing AN fittings on the ends and running flexible line to the tank and the fuel rail (short runs, of course).
Thanks!
Kinking? It's not that bad if you use a proper bending tool. Yes, you could do that, of course the stock fuel/brake rubber isolation mounts would need to be enlarged if you ran larger tube. To connect AN fittings all you would need would be the appropriate size tube nuts, sleeves, and a 37 degree flaring tool (NOT a 45 degree, that's for brake lines).
-
You're a kid and you've got your first car. That's not meant to be taken as a put-down, mind you. Unless you have a regular job that you need to be at, there's usually no real pressing need for a daily driver. Get it running and enjoy it, the upcoming license makes for an interesting deadline which gives more incentive to finish the car. Have your fun now, because your time for working on fun hobbies such as this gets drastically shortened as you age.
The next time you get that sort of opportunity is retirement...
-
Thanks. I'm actually growing tired of the work though, since now it's getting close to summer. It seems like the driving season is already slipping by again, without me having a running Z... I'm painting the engine bay with rattlecan ceramic engine paint from advance auto, not that expensive, lol. Though I kinda wish now I was doing it with POR-15.
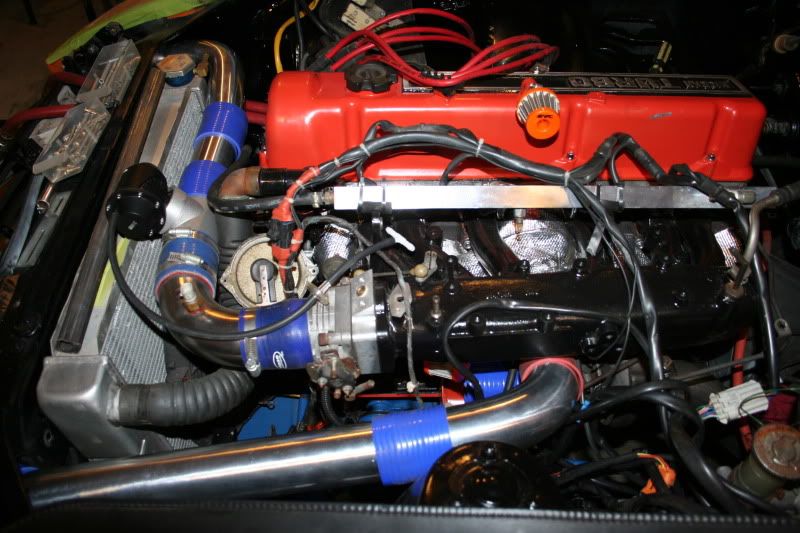
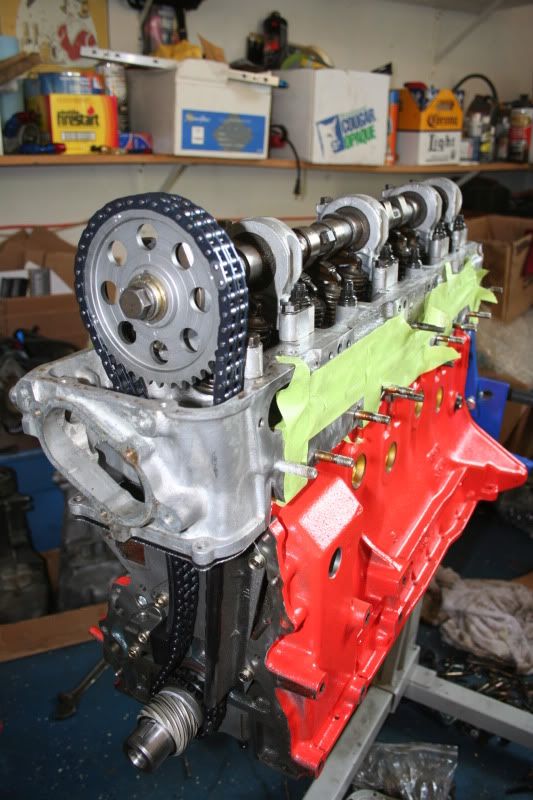
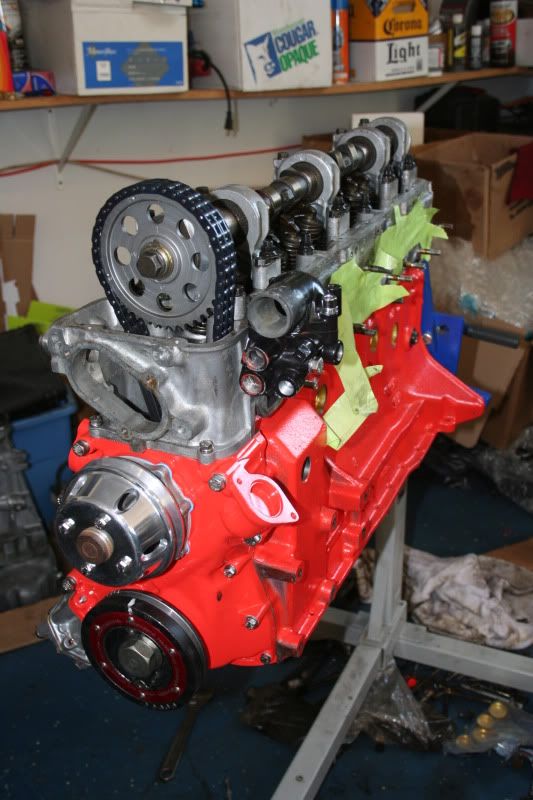
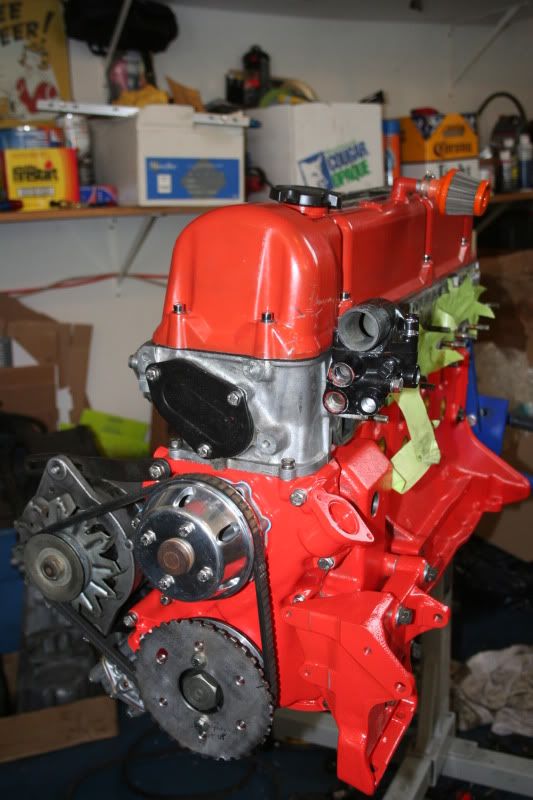
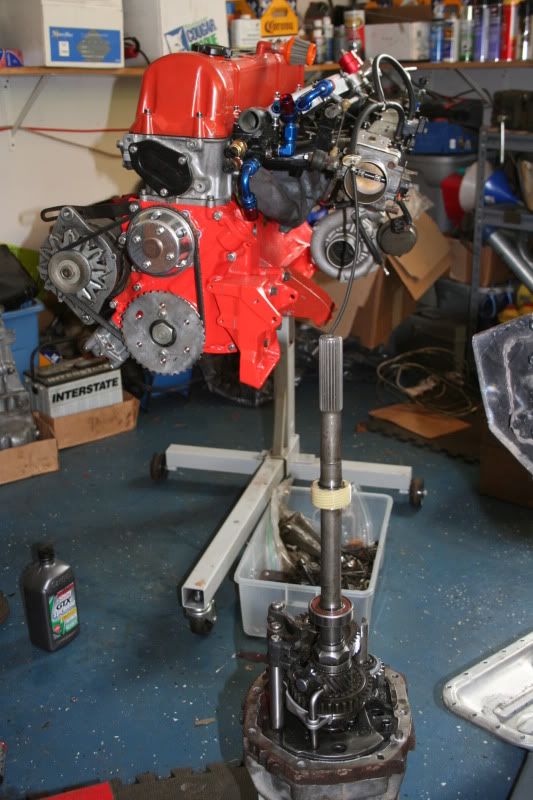
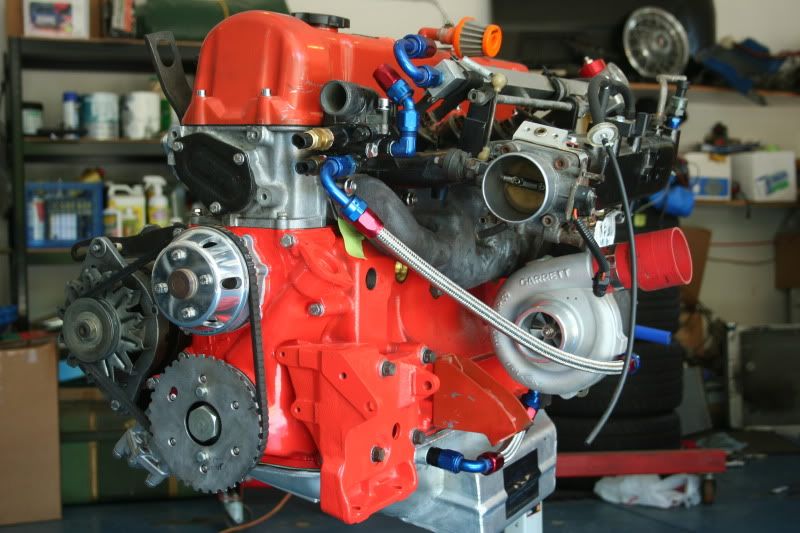
Photos speak for themselves, mostly.
I'll admit the last photo shows a lot of ancillary components like the manifolds merely mocked up on the block, not fully installed, for clearancing the plumbing. The tiny stock turbo probably won't be put on there, but because my other T3 exhaust housing has two broken studs WITH broken extractors in it I'm screwed unless I either cannibalize the stock Nissan turbo or find another T3 stage 1 housing (nearly impossible it seems). I can't run the OEM turbo anymore because it has a dry housing, and the motor is now set up for a water cooled center section. Sure, I could just cap off the lines temporarily or join them together to complete the circuit, but that would just be silly.
Also making an appearance in the photo is my modified transmission (FINALLY done). There's a red puddle under the engine that you might be able to see. I'm still in the process of modifying the oil pan and the pickup to fit the engine, which has been a total pain. The recent heat wave has decreased the viscosity of the assembly fluid so it's been dripping down to the floor, with no oil pan to catch it.
The engine is nearly ready to drop in. The car itself it seems, is not.
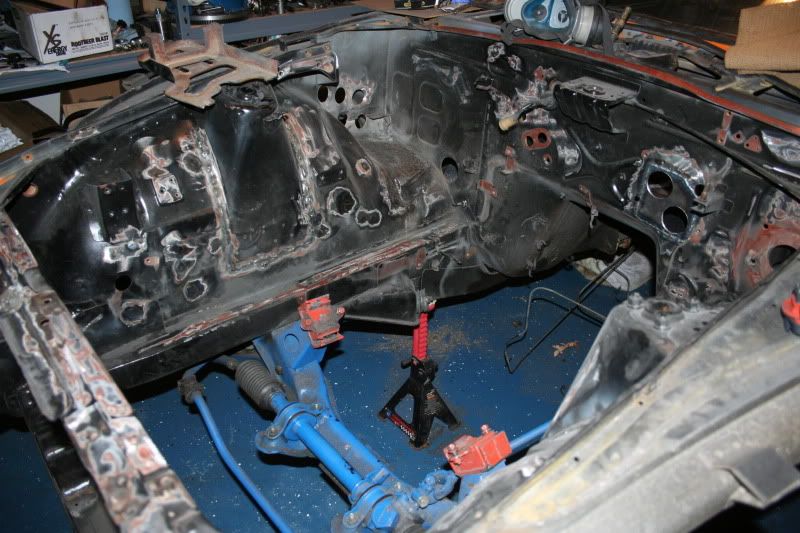
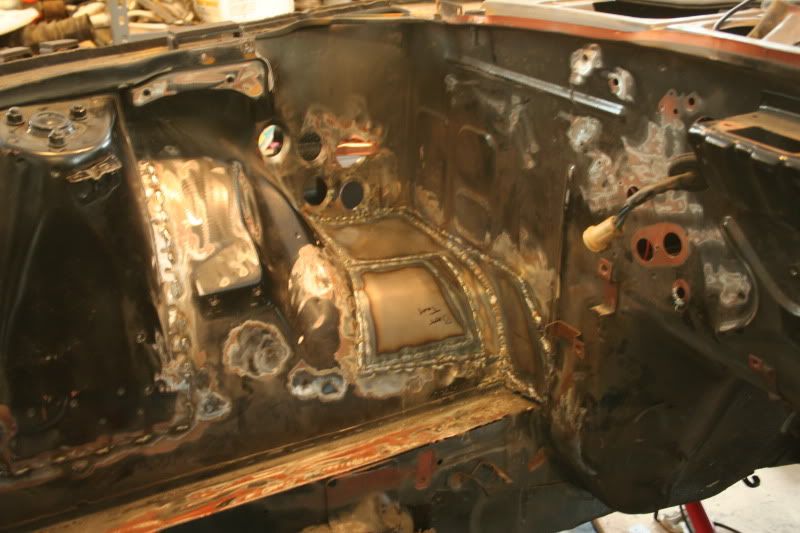
It's been so long since this thing has been "grounded" that it barely feels like I'm working on a car anymore... Bodywork is the worst. I love welding, but I wish I didn't have to do so much of it on the car itself.
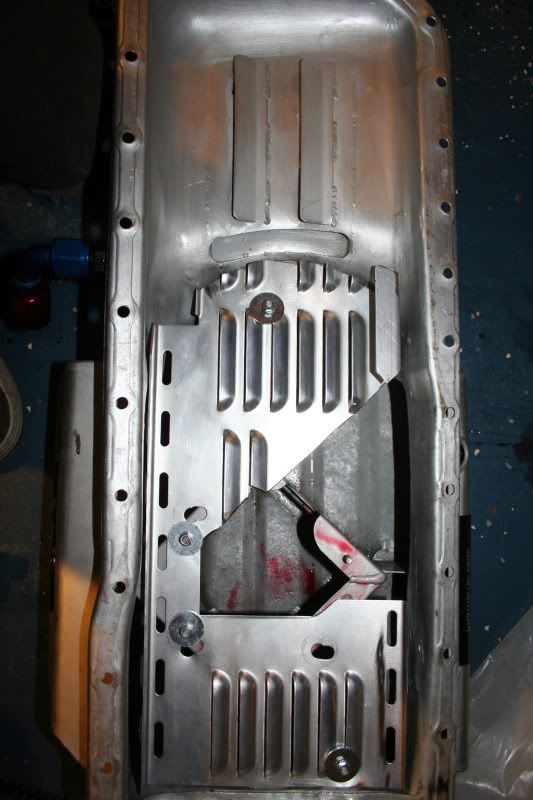
The oil pan I bought was almost more trouble than it was worth, with the amount of modifications I had to make just to get it to work. I ended up having to cut two holes in the back to clear the rear main ARP studs and weld two "bumps" back in to seal it. The windage tray I procured from the company that made the pan was for a later model so it didn't fit the pan, meaning I had to hack it up quite a bit. I had to pickup that would fit, so I took one of my 280z oil pickups and a junk KA24DE (240sx) pickup and sectioned both of them to give me one longer one. I clearanced the pickup about 200 times by packing a 1/8" thick pancake of clay into the pickup box and bolting the pan up to make sure it was sitting close to parallel and not crushing into the floor of the pan. With any luck, this will work well.
Thank you Cygnus, for bringing this mod to my attention.
Welding has been an absolute pain, at least for the engine bay. I had to reconstruct the battery tray from several pieces of new metal. I originally had just one, perfectly cut and fit piece. However, once I started tacking it everything went to hell, and I had to cut some of the excess that wouldn't form to the original curve. Whether this is because I mis-measured or the welds stretched it, I don't know. I had to tack in another piece so it looks like a mess.
My new plumbing has so far been ridiculously easy to assemble, I don't know what all the fuss is about. We'll see if I start eating my words when the engine springs multiple leaks when I start breaking it in.
These are stock colors, right?
-
This is what I'm doing for my car
http://www.classiczcars.com/forums/showthread.php?42393-JDM-Style-Tail-Lights
Nigel
I love that link you provided in the classic Z thread. As you said, it would be interesting to see how hard it is to cast the amber/red/clear of the 240z tail lens into a single piece.
-
I'd say make a separate abridged version if you must, but don't ruin this thread by cutting it down Barney style. There's so much good information here...
-
I was lucky enough to have had a black leather biker jacket from my days when I still had my Harley. When I got my welder, it gained new use as a welding jacket and does so admirably. You can weld with just suntan lotion if you want, but I wouldn't recommend it. Temporary discomfort from welding with PPE in warm weather is better than the prolonged discomfort of burnt skin from UV radiation or molten bits of steel. In my opinion, suntan lotion is a pretty insufficient barrier. If you do use something leather as protection, just make sure what you're wearing is genuine leather and not man-made pleather or something. Almost anything synthetic will melt on contact with sparks, leading to those swiss-cheese looking garments I often see on employees when I take a trip to the local steel distributor.
-
It would also make it easier to fit -8 lines with T-fittings.
-
THANK you Rossman! I don't think I'll drill and tap above #4 until I get some of the initial test running done with #5 & #6 and replace my radiator, but I'll definitely be keeping that photo and description for future reference!
-
Excellent looking fuel line routing. This is EXACTLY how I planned to run mine. The only problem for me was that I couldn't get a hold of some 5/8 SS from Summit, so I ended up ordering the same size in aluminium. We'll have to see how that goes...
I'm also running the A1000 fuel pump. It would be interesting to see where you plan to mount yours. The plan I have for mine is to make a low hanging cradle out of 1/8" steel bar welded to the front of the stock fuel tank, just about level with the bottom of the tank so it's not hanging *too* low.
-
Nice work!
The ARP rod, main, and head studs all torque to 60ft-lbs with their special lube.
Pete
Hold that thought, cause the ARP rod bolts I have on my L28ET say to torque to 44 ft/lbs with their moly (blue packet)lube.


Forza Motorsport 4
in Non Tech Board
Posted
Yes, I have it. The game is excellent, though not too far from Forza 3. Still, it is the best racing game I've played thus far, and the Jeremy Clarkson commentary would make everything worth it even with half of the features. Leaves me wanting for more, though. I still haven't played the game "proper" due to waiting on the rest of my setup to arrive, then be built.
I was wondering when someone would start a thread about this, or if I would be the first. Looks like I have my answer. In terms of the 240z, there is only the Z432, as with previous games. This time, you can remove the bumpers. However, when you install the front BRE-inspired spook it curiously also applies body-colored covers on your headlights. Annoying. Also, there is only one engine conversion available now (down from three) which is the RB26DETT. ADDITIONALLY, the only displacement upgrades for your stock S20 engine reach a maximum of 2.2L of displacement. Meanwhile, the Skyline 2000GT-R in this game which carries the SAME EXACT ENGINE can go up to 2.4L. Strange.