

supernova_6969
-
Posts
229 -
Joined
-
Last visited
-
Days Won
2
Content Type
Profiles
Forums
Blogs
Events
Gallery
Downloads
Store
Posts posted by supernova_6969
-
-
thanks red zed.
I've got some significant other issues that cropped up lately (I believed issues with my injectors, my oil pan is out as i'm replacing the gasket (here is the link for what i've been diogn. http://forums.hybridz.org/topic/123168-changing-oil-pan-gasket-on-l28et-with-engine-in-car/), and I just fixed the passenger floor)...
but definately, i'll look into what you suggested. I don't like what it's doign, and i'm pretty certain, down the line, it could screw things up a little if I manage to fine tune the car on a dino.
Thanks to everyone who posted.. I'll try to post if I ever get around to changing it...
-
hey!
amazing work once again.
but why will the mold will have to be destroyed? I thought the mold was going to partly enveloping the part, but it seems not..
the details also don't seem to be convex (concave?) in a way that will grab the part in the end....
?
thanks!
-
Hi again!
so I finally took some time for the 280, and the oil pan is out. here is what I did. I'm not super confident when doing this kind of stuff, so I took all the picts I would have liked to see before starting....
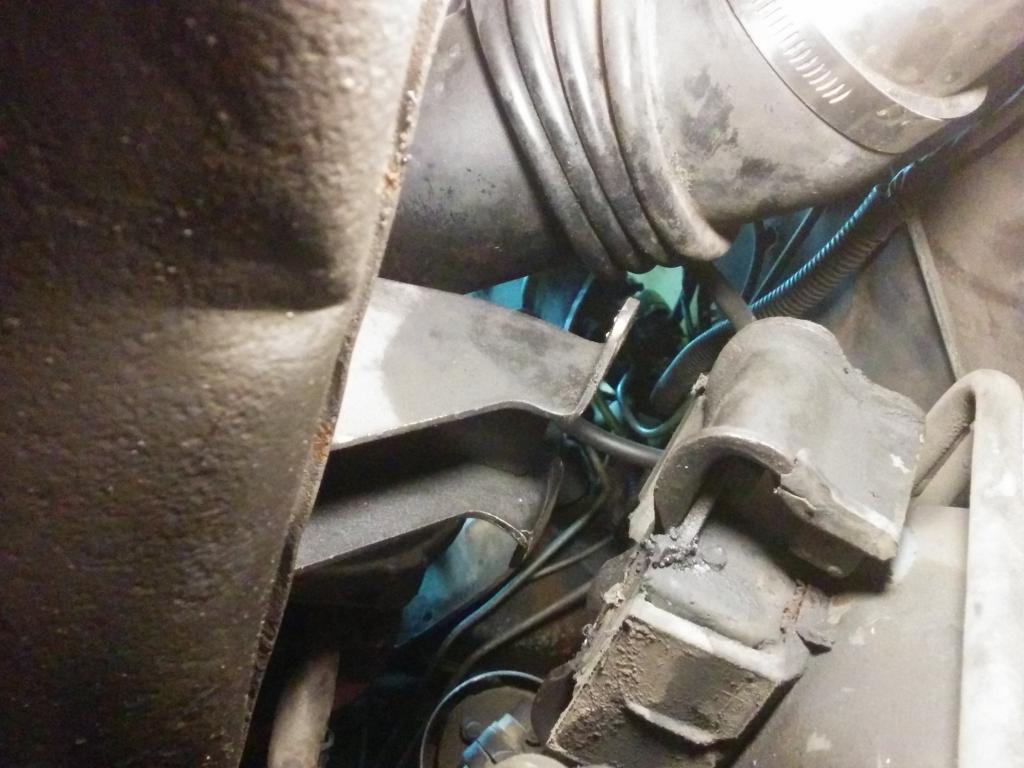
a few days ago, i undid everything that was going to be in the way : removed the fan shroud (turns out I only have the top half of the shroud; I'll have to fabricate a bottom half. that explains why it gets a little hot in summer traffic) and unplugged all the intercooler pipes.
tonight, I took the pan off the engine. here is what I did
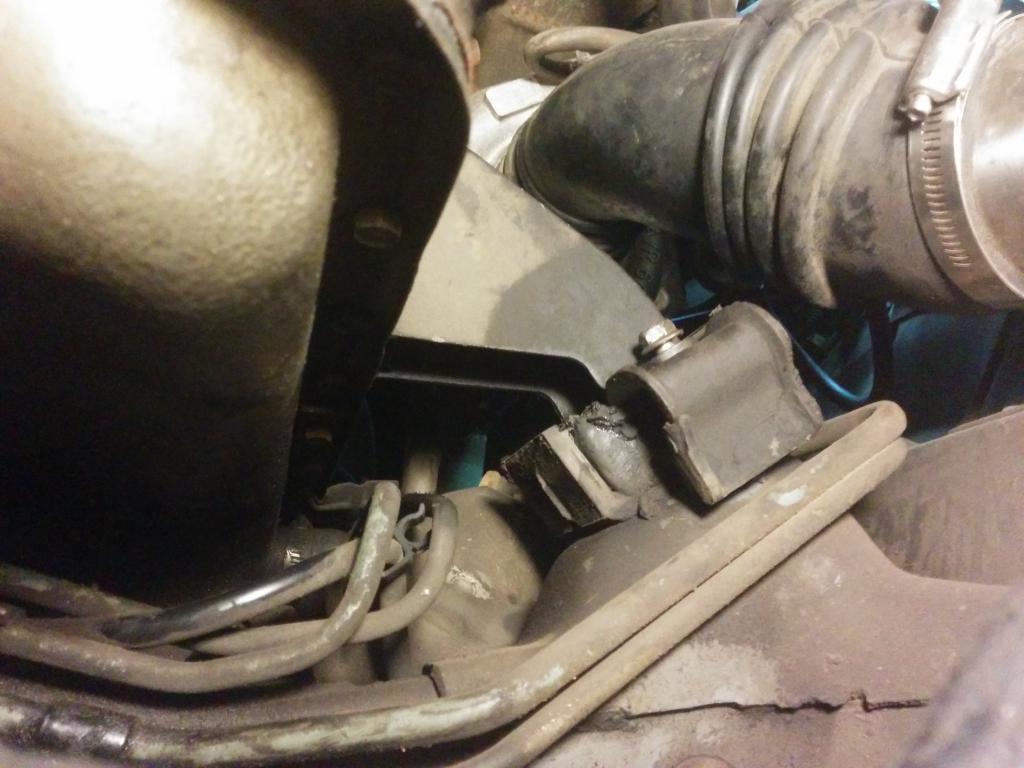
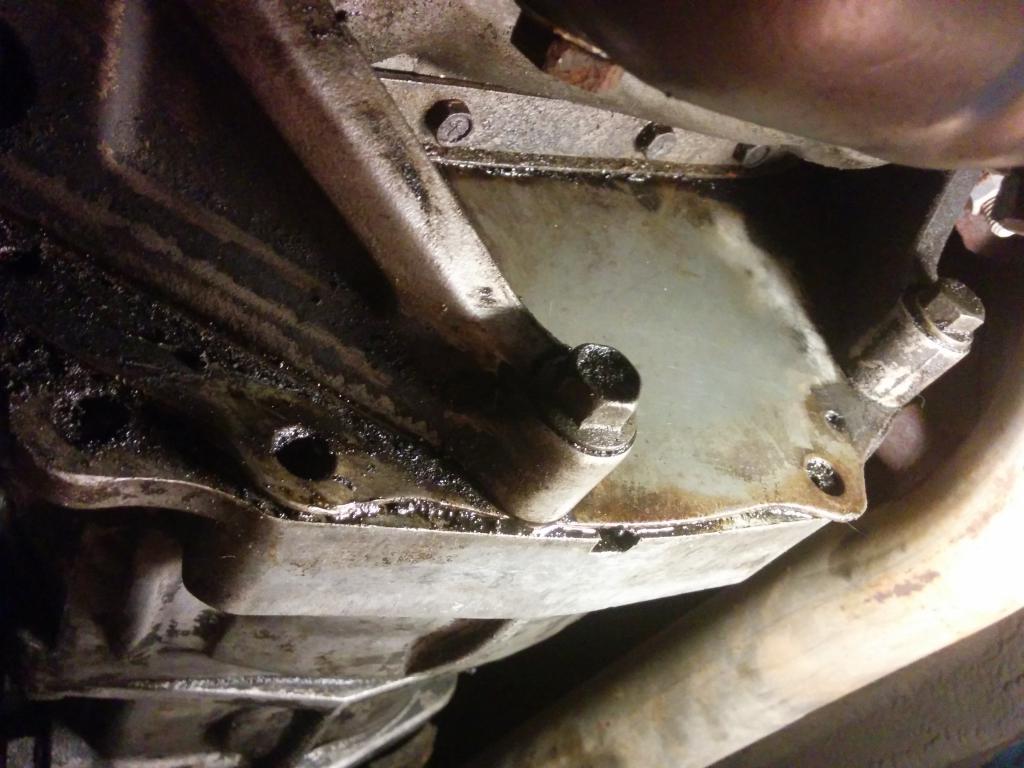
first, i took apart the engine mounts. instead of undoing it from under the cross member and leaving the mounts as a whole, I undid the bolts that are linking the part attached to the engine to rubber part (I hope that does not come to bite me in the ass by being super tough to re-position...). I've taken shots of both sides from the front, but note that there are two bolts on each side, one in the front, one in the back of each mount, all easily accessible. Here are photos with those bolts in the forefront.

once the engine essentially free from the car, I set up the jack under the trany and engine. I don't have a hoist, so I raised the engine from under, using a floor jack.. I used two planks under the oil pan (the one close to the drain plug has a notch so that there is no pressure on the bump where the plug screws in), and one under the front of the trany; I figured it was best to spread the load as much as possible. between these and the jack is 2 2x4...
I jacket up, and eventually, the car stopped raising, and the engine continued up. the driver's side raised much more than the passenger side. here is what I got on both sides.
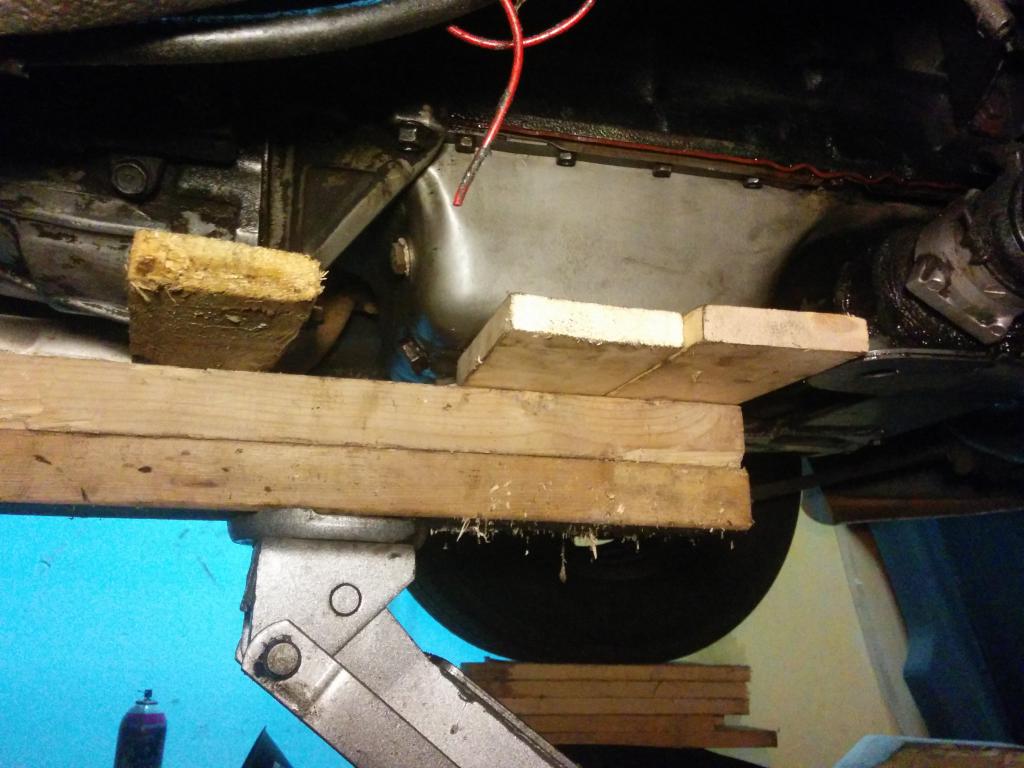
I stuck some wooden blocks in the space between the two halves of the engine mounts, although I first removed the top part of the bottom half of the mount (that's what I'm holding in the photo, under the oil pump, C-shaped... the part does not stand out, but you'll know when you see it). That made it so that my pieces of wood fit. I managed to put a 2x3 (thin side) on the driver's side, and a plank (about 3/4) on the drivers' side.
once that done, I ended up with a total of about 4-5 inches between the bottom of the pan and the crossmember/steering rack. sorry for this photo, it's blurry. gives an idea though; looks like a cavern.) even with that amount of room, I still had to fiddle a bit to get the pan to clear the bottom of the trany bellhousing; I suspect getting that pan back on with the gasket on it might be a challenge. I'll let you know, but I definitely suggest trying to jack the engine up a little bit more, maybe just enough to be able to put similar sized blocks of wood WITH the engine mounts that I took off in place...
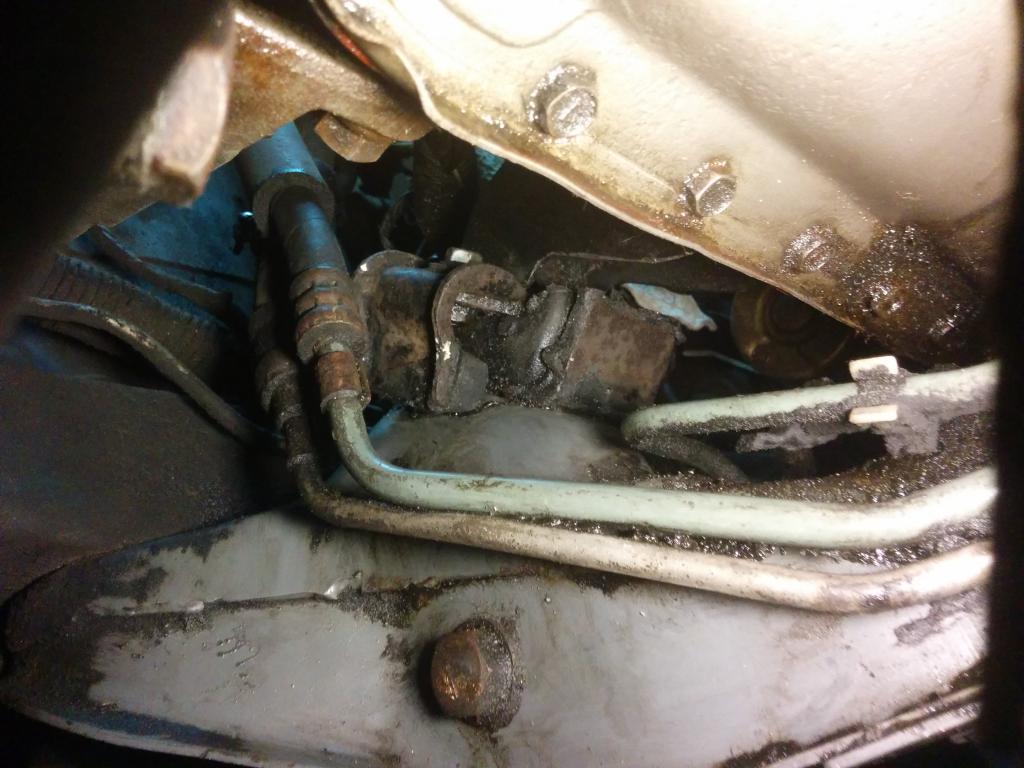
finally, I took off the parts that hold the engine and trany together (those bits cover the back part of the pan). three bolts each, took 1 minute each with a 2 foot long pry bar. this is the end result, where the engine meets the trany:
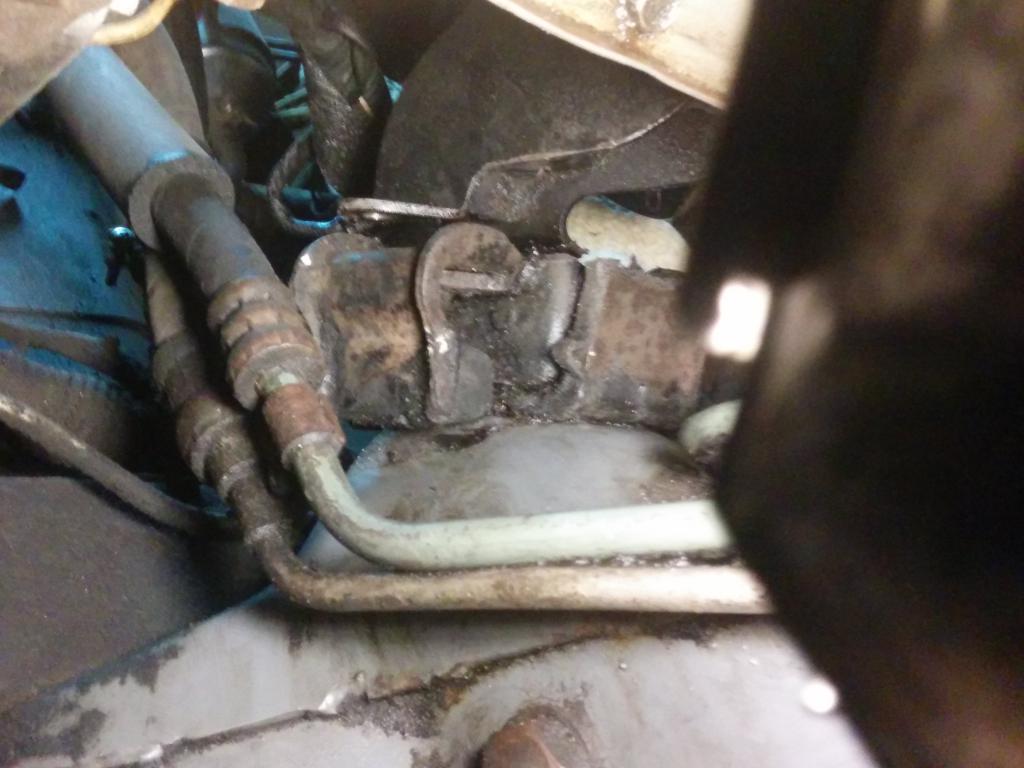
finally, i unscrewed all the pan screws. turns out that while I thought the leaking side had been over tightened, most of the bolts on that side were barely more than finger tight, while the dry side's were all snug. looking at the pan later, I also realized that the holes on that side had at some point been over tightened and the lip around these is now bulging on the gasket side. so two good reason for a leak (well, bad reasons, but....). the pan fell on the crossmember on it's own. I tried to simply slide it back but it bumped against the very bottom of the trany. i decided to give me a little bit more play by undoing the oil pick up ; it's right there on the passenger side.. by the way, should I replace the gasket? can i use a paper gasket, cut of from gasket sheet?
once the oil pick up was out of the way, i still had a minor clearance issue (maybe 1/16), so I moved the pan back and forth and side to side a little (no need to push hard or anything) and it fell down..
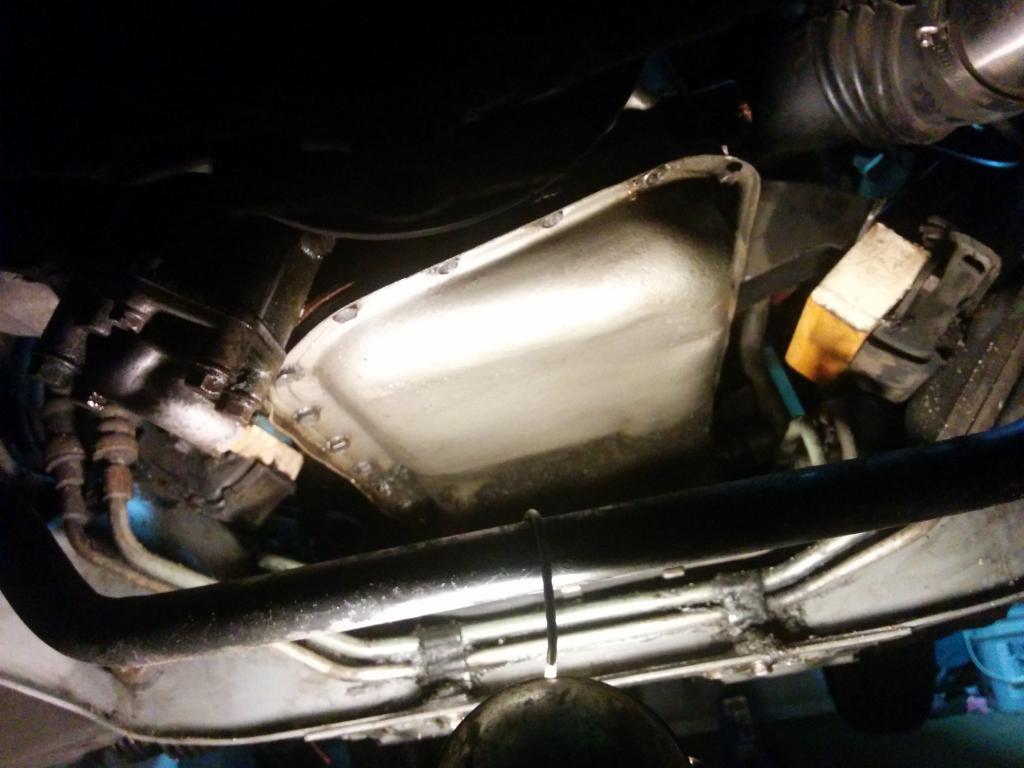
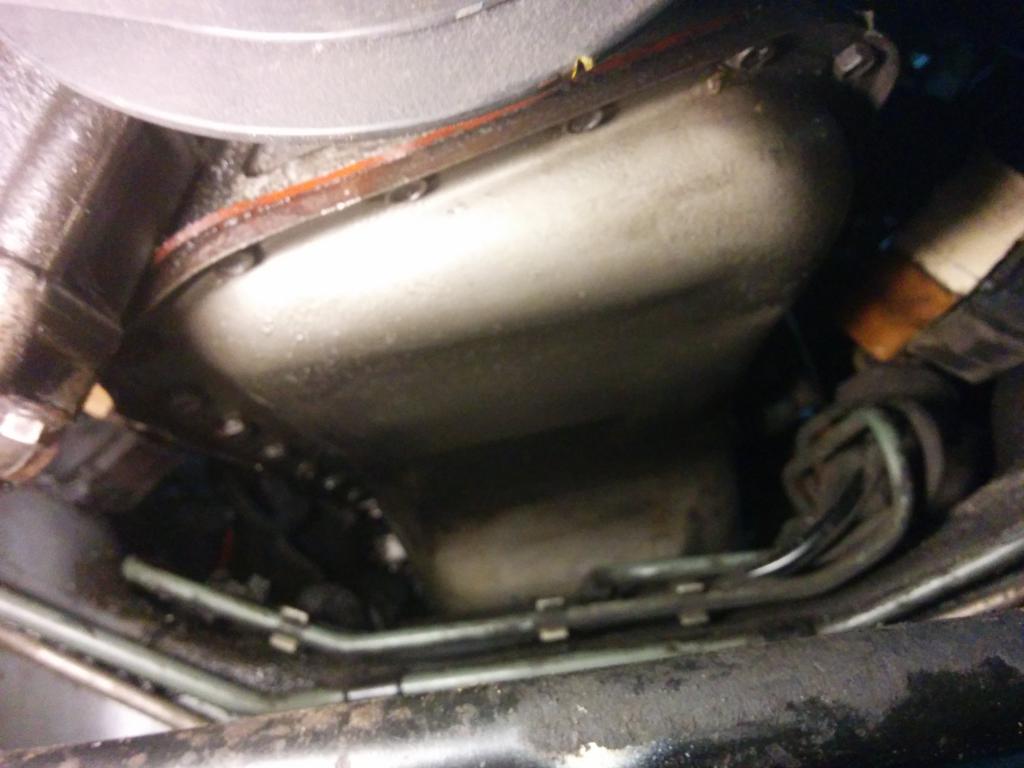
here is the underside of the engine, and the pan itself, left to drain over night.
so that's it. tomorrow, I'm off to buy brake cleaner to use to clean all that (used the last of mine tonight). I think i'll use either a little plastic brush or a kitchen scrubber to completely clean the bottom of the pan....
as soon as I have time, hopefully this week, I plan on straightening the lip of the pan, cleaning the lip of the pan, cleaning the engine mating surface, then cleaning the pan and the engine again. Then once more. After that, a tiny ATV bead on the pan lip and a little more on the engine where the front cover AND the rear main seal meet the block, put the gasket on the pan, re-cleaning the engine, cleanly slide the pan back in (yeah right. maybe on the 6th try), and screw all that up.
that's it for now; i'm going to bed, way too late. comments welcomed. seriously, just say hi if you like this; it validates the trouble i'm giving myself.
-
Oddman, thanks for the comment.
I'm glad to see you managed it.
the two problems you mentioned are the ones that bother me the most as well: getting all the bolts out (and then back in - arg) and sliding the pan back on without moving the gasket around. I AM also thinking about getting the engine mounts back where they belong once i'm done, but one problem at a time (and that one I can strong arm into place. not so with the gasket or bolts)
I was thinking of using a small bead of ATV sealant on the pan side, to compensate for possible issues with the pan not being 100% straight (i'll try to make it as straight as possible while it's out), which should definitely make my life more miserable as if the gasket + ATV moves around, it might create issues. ah well, I'll live to tell you guys about that!
s
-
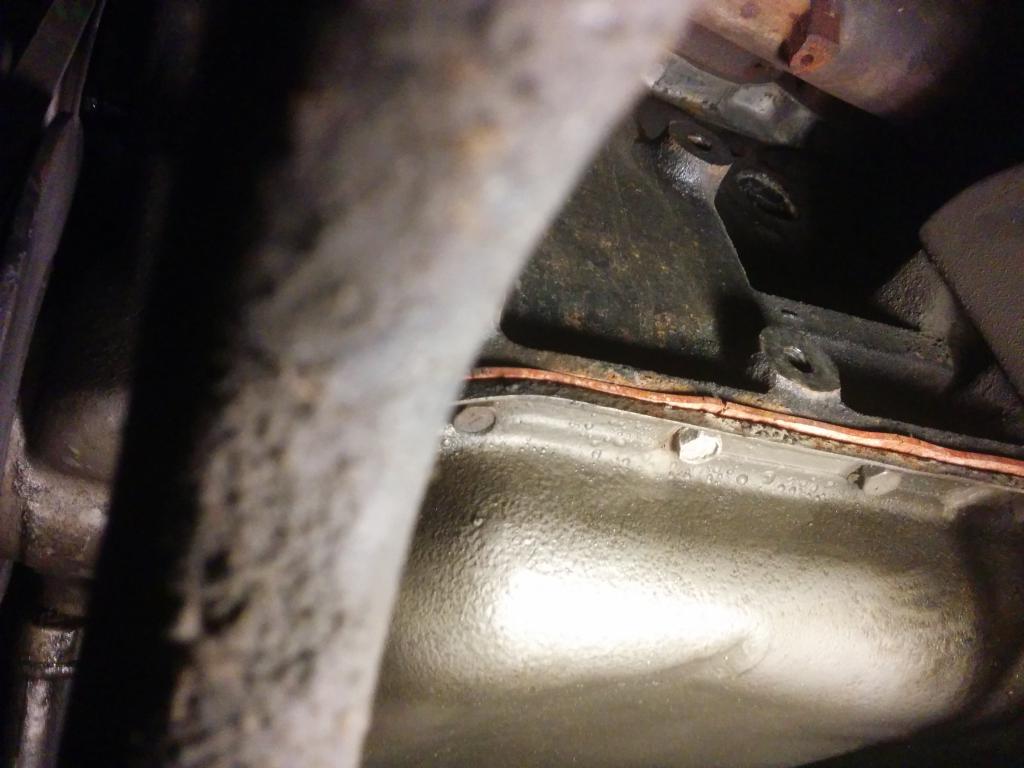
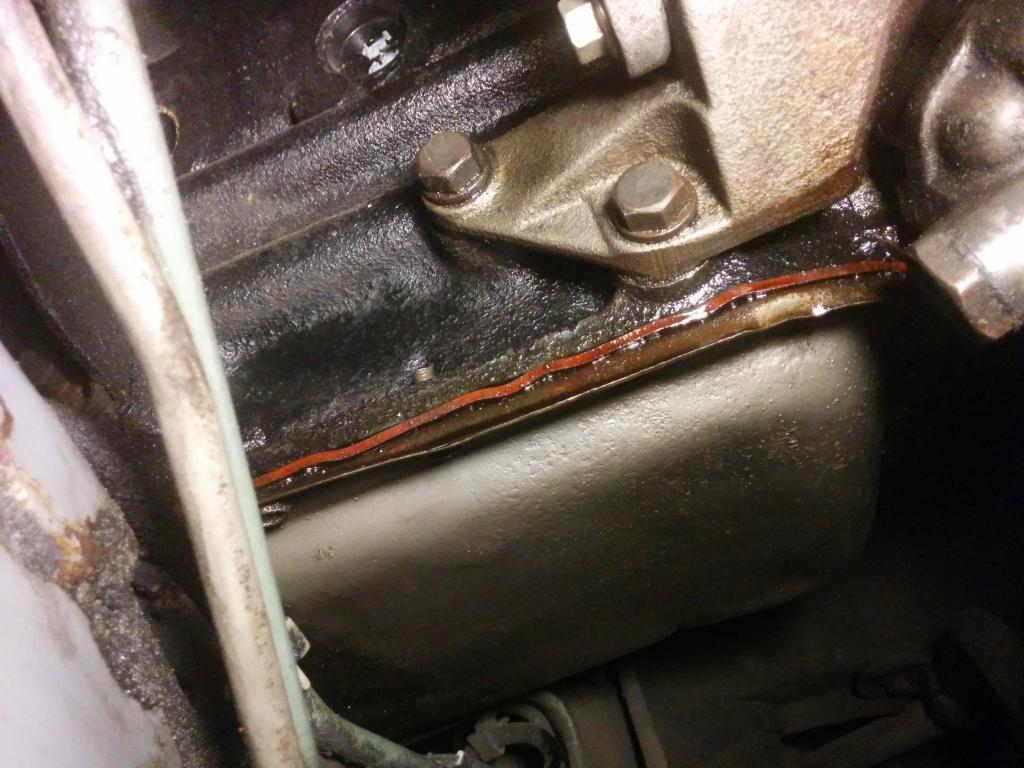
I've got the exact same problem, although I haven't checked inside the bellhousing.. here are some picts of what I found (suspected all along) was the leak.
just to be clear, I cleaned everything two days ago, and ran the engine for a total of about 6-7 minutes since, to back the car up and then put it on ramps.
you can see a nice clean (but dry and a little squished) gasket on the driver side of the engine.
here you can see the front and then the back on the passenger side. the gasket is wavy from over torquing, and everything is wet.
and here you can see where the engine meets the tranny, and that was also dripping slightly (it's wet now, I wiped it so it wouldn't drip on me as i was under).
I was afraid that there might be a rear seal leak, but with everythign leakign so badly from the oil pan seal, I'll change that and see if I need to open everything else up.
here is the post I'm making, as of tonight,on my adventures changing the oil pan gasket. I'm hoping everything will be done within 2 weeks (I work a few hours a week on it only, once the kids and wife are in bed)
http://forums.hybridz.org/topic/123168-changing-oil-pan-gasket-on-l28et-with-engine-in-car/
-
Hey guys.
You might know me from other, silly posts about air intake temps and insulating intercooler pipes (probably not though, these weren't THAT interesting).
quick background: I bought a 1983zx that had been modified by the previous owner: L28E with a turbo bolted on, and a megasquirt II for ECU. overall good condition but it ran rough. The guy tells me (me, who is willing and able, but not all that knowledgeable) that all it need is a good tunning via the ECU; he told me he'd build it, tuned it perfectly, then took it apart and rebuilt it so it would be able to tolerate more boost and make more power, but then never re-tuned it, thus the roughness.
Long story short, one year later, yes the tune was rough, but the mechanical needs a bit of love too: the plug wires were shot, I suspect the injectors aren't all working properly, and it leaks oil enough that it's a bother, there is oil EVERYWHERE under the car (oil pan, alternator, crossmember, tranny, and everything all the way to the diff (I suspect maybe the tranny leaks or something, since there is so much all the way back there).
I need to change the oil badly (am slightly over the 5000kms) and figured I'd fix the leak. I was convinced that the leak was from the oil pan gasket, so a few days ago, while under the car welding new bits of floor (small holes, nothing to write home about), I cleaned everything up that was under the engine: oil pan, crossmember, and tranny.
Today, I super-Jacked the car (front on block that are on ramps, and rear jaket up on stands), and checked it all out after having rune the engine about 5-7 minutes. here are the results:
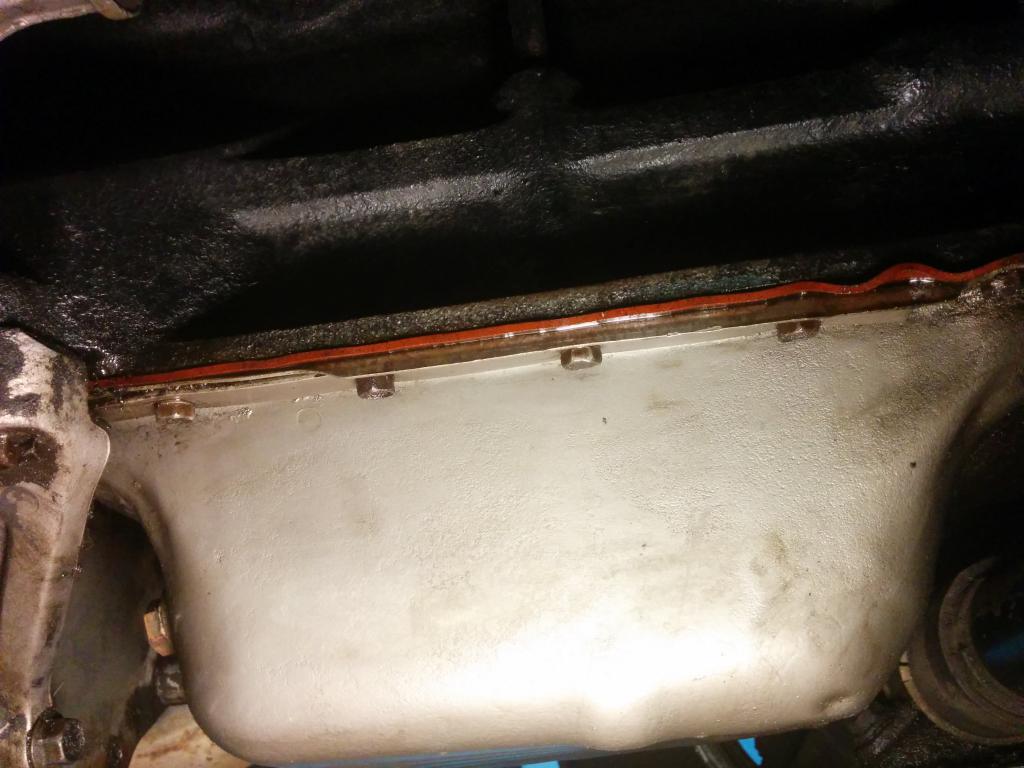
Driver side of the engine/pan was squeaky clean (well not squeaky. looks dry enough that it wouldn't squeak if it's life depended on it):
the passenger side, around the gasket was wet at the front and the back. you can actually see the gasket sticking out and waving about, which made me suspect all along that it had been over-torqued:
finally, the front of the tranny was also wet. that makes me nervous, as I wonder if the rear main seal might be leaking but we'll see once i change the oil pan gasket if it dries up..
so, over the next 10 days or so (I only work on her at night, once I put the kids and the wife to bed, and only a few nights a week, so nothing gets done fast), I'll be changing the gasket.
from what I've seen, I can undo the engine mounts, jack up the engine a few inches, unbolt everything, slide the pan towards the back and put everything back the other way around. I've seen it described, but have never seen it with photos. I'll try to document everything with photos and hopefully not to many funny stories of how I screwed up....
Replies welcomed, even if it's only to say you're curious/interested!
-
ok!
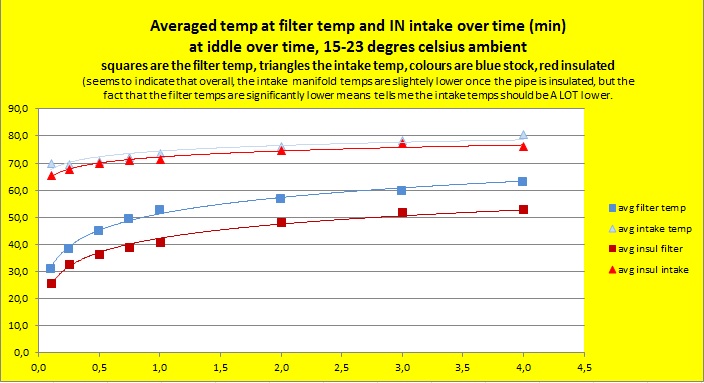
So I got more data (3-4 more runs) and the averages stay pretty stable. Remember I parked the car, and kept it iddling for 3 minutes while gathering info on the time, the ouside temp, the filter temp and the intake manifold air temp (MAT). Here are the graphs that I thought would be important (graphs have a lot of info in the titles, including some of my conclusions:
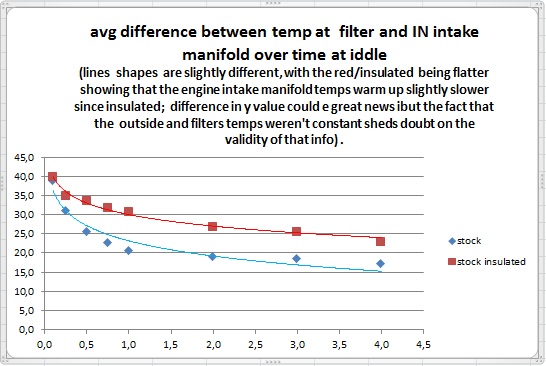
The difference between the filter temps and the MAT (the blue line are before insulation, red after):
and the overall temps at the filter and from the MAT (the blue lines are before insulation, red after)
Overall, at this point in time, my conclusions on simply insulating the pipe that goes from the intercooler to the throttle body are as follow:
1- the temperature of the pipe that is now insulated has DROPPED significantly. that is the pipe's temperature only (see post #5)...
2- this seems to make the temperature of the the air in the intake manifold get warm SLIGHTLY slower . probably not significantly so. this could be useful for when you're at a light or getting ready for a drag.
3- the overall temps of the air in the intake manif. seems to be very SLIGHTLY lower on average. probably not significantly so... Meaning that insulating the pipe might not be really worth it...
My thoughts at this point?
1-maybe i should move the MAT sensor to the piping just in front of the throttle body; I have a strong suspicion that the intake manifold radiates heat that influences the MAT data (http://forums.hybridz.org/topic/122459-air-intake-temperature-soar-when-i-step-off-the-gas/)
2- no matter what, the air around the filter gets stupidly hot when iddling, so I need to pick up some colder air. which means I'm about to start construcing a cold air kit. stay tuned, i'll post about it and then link it here.
PLEASE comment!
-
Hi guys I know its been a while and it seems like I'm not doing anything with the car. Don't worry about it... I've tried to gather data but everything didn't work out as I planned. First my car started to untune itself (megasquirt), then i tried to gather data but the laptop battery died on me as i was parking, ready ti reccord.. Finally I did manage to get 2 or 3 iddling's worth of data but then the problem was that it was inconclusive so I'm going to try to get another day's worth it and posted as soon as I can.
Thanks for being here...
-
Hey fric. I read about wrapping the exhaust.. Although ive never seen data about before and after re: performance. The actual engine bay temps dont bother me all that much ( unless like in my case the intake is in the bay i guess) but its definately interesting...
What do you mean by ducting the intercooler?
***edit: i just realised what you mean. Ducting it is an idea i've been really excited about... Its simple and easy and i suspect the results will be good. Im currently waiting for the next political campain yo gather a bunch of coroplast to usr as a mock up, as it sturdier than cardboard.....
-
do you think you can take pictures of all the steps in the molding process? even the little stupid details, like how you lay the fiber, take the mold off, and how you cut the edges to make them the way they are supposed to be (and not sticking out or super sharp)
It's not something regular people get to see, and i'm quite curious....
thanks!
s
PS: the work you're doing is stunning, man. keep it up!
-
red zed.
when you moved the sensor to the intake pipe before the throttle, you got more constant temperatures.. but does the car run as well?
What i mean is is the temperature reading just as useful to the ecu? I'm still not 100% certain if the spike is heatsoak or if the air temp actually goes up (or both). I'd be worried that changing it to a more stable temp area might screw the actual calculations....?
s.
PS: it might help me with another problem i've experienced, that I believe is due to temp readings; if I use the car multiple times within a day when it's somewhat hot (above 25C/77F), I get really rich AFR (around -2 afr on average) for the drives after the initial ones. I suspect heatsoak, although I haven't noticed the sensor readings to be higher while driving...).
-
Red zed, are you going to dyno before and after? Or measure temps in the engine bay?
From what ive read wrapping the exhaust manifold is supposed to help keep the heat of the gases and thus the more exhaust gas pressures. Not certain how much pressure you can loose in less than a foot of piping but..... Would love to find out if it actually does anything significant.
You can also measure the engine bay temps and see how long it takes to reach a certain temp once you stop driving before and after wrapping.... That would tell us if it does anything for temps...
-
Thanks tim
Yeah im thinking the same. Under actual driving it probably wont change anything.
Im also taking data when i'm actually driving but i dont have enough to conclude anything yet.
As for the other pipes, yeah the turbo to intercooler is actually warmer than the sutrounding air, so that would be a bad place to insulate. I was giving some thoughts on insulating the filter to turbo though... I'll see it that'ds worth it once i finish this bunch of tests. one mod at a time to be able to see each's impact.Thanks for the reply.
oh!
as an afterthought regarding air speed, you chan check this thread http://forums.hybridz.org/topic/122459-air-intake-temperature-soar-when-i-step-off-the-gas/ where I discuss air temp spikes under certain conditions. that's how I started looking into reducing the spike; it takes place at a time where the air is going significantly slower.. but again, not certain how much of an impact it can have. hopefully a clear answer will come up.
-
hi!
I ran the car today with the insulation for the first time and the preliminary data suggests that it might actually make a difference (not sure if it's a big wnough difference for it to be worthy). I don't want to post a graph just yet, not until i've got at least 2-3 runs on it, to get an average...
One thing I CAN tell for certain is that the pipe from the intercooler to the intake is SIGNIFICANTLY cooler.
I'm talking from too-hot-to-touch-for-more-than-2-seconds to cool-to-the-touch. And that's after iddling for 4 minutes with surrounding engine bay air temperatures of about 122 Farenheight (50C).
So I can conclude that the pipe itself is at least 45F (25celsius) COOLER with the insulation. Whether that has an effect on intake temperatures, I'm not certain. Stay posted.
oh!
I see that a few people have viewed this, but no one has left comments; I get that since it's all baseline and shit so far, it doesn't really creates the space for a discussion, but I don't want to post stuff that is uninteresting at large, so if you ARE interested, or curious, please let me know... just say hi or something.
-
totally man.
they have both a modern and classic look. they'd fit right on, as long as they are not too big. 16 should be good..
nice...
-
Baseline data in post number 2!
Actual post-mod data as soon as I can gather it!
-
****sorry guys, i keep forgettingto post the data. tomorow, I'm putting on an alarm!!!!
-
hi!
six shooter, i pulled the sensor our. this is it:
Stamped on it are:
Delphi
1938
ACr-12v-3
From that and google searches, I can confirm it's a GM model, and it's an open element. It's basically what the megamanual orders (my card is megasquirted). To be certain that all worked properly, I did some calibration tests as per these instructions http://www.diyautotune.com/tech_articles/iat_clt_resistance_curve_calculation.htm and that gave me the right output for a GM sensor...
Word to the wise: do it like the link above says, it's much faster and much less fussing around (I used a soldering third had to hold the sensor in the water; I tried hand holding it, but I wasn't able to hold it in the steam and connect the probes to the sensor at the same time). I tried (before following the instructions, I was worried about dunking an open element sensor in water) with a cheap digital thermometer and a hair dryer pointed at the sensor, but the thermometer was not precise enough and the range of temperatures was not wide enough (+-82 to 140 farenheight). Then I put the sensor in the fridge, but the temperature was all wrong by the time I'd managed to get a solid connection with the multimeter probes...
After all that, I put the sensor in the car and started her up; the temp reading was exactly the ambient temp, suggesting that it's well calibrated. I checked to see what the setup was on the thermistor calibration page for my megasquirt, but the current setup is not available, only what you could possibly set it to..... just to be certain I'll set it up for a GM sensor... if you don't hear me say in a few days that it's solved the issue, then that means that didn't help (it's going to be raining for a few days here, so no driving' I've got a big gaping hole in the pass. floor that i'm working on and I'm pretty certain there is a leak around the windshield)...
-
Hi goldfish
i still HAVE an EGR valve, but it's not plugged into anything; it's just blocking the intake manifold hole, and I'm only waiting till I get my hands on a plate to block the hole before I take it off.
That said, I don't think there is a connection (bung?) on the exhaust for it to pull hot gases from. The exhaust was made by the guy that rebuilt the whole car, and the only thing on it is a bung for the o2 sensor and a straight through muffler.
As far as I understand, if it was plugged in, the vacuum from the engine would be pulling hot gases, making the temperature higher in the manifold, yes? is that what you were talking about?
In my case, that wouldn't apply...
By the way, I really appreciate everyone who's trying to help. Thanks a lot!
-
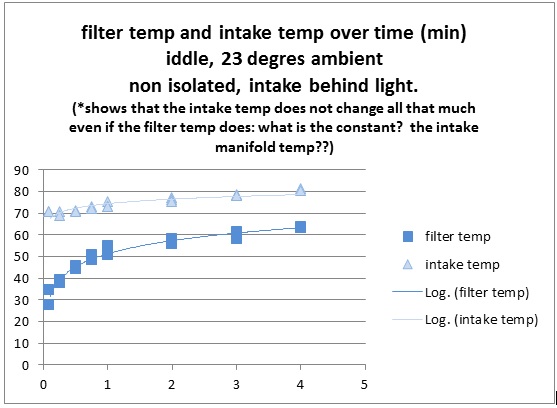
so here is the baseline data
this is esentially the temperature at the filter (dark blue) and in the intake manifold (pale blue) at iddle, once I get to the parking lot at my work.
This entails driving on the highway for at least 10 minutes (meaning everything is fresh and cool in the engine and engine bay), then going stop and go city driving for about 2 minutes, then parking.
What I get from this is that as I park, the filter is still sucking in pretty cool air, but then warms up rather quickly (from 28 Celsius/82 Fahrenheit to 63C/145F in about 4 minutes). on the other hand, the manifold air temp goes up much much slower, but still goes up a little (from 70 Celsius/158 Fahrenheit to 80C/176Fin about 4 minutes).
If my contraption is effective, I expect that the air temp at the filter will climb just as fast and as much, but that the air temp in the manifold will be slower to climb.
I'ts been rainy over here, so i haven't had much of a chance to drive her in the last week, but as soon as I do two consecutive days, i'll post the new tables with this data and also the new data for a direct comparison.
-
Hi six shooter.
Thanks for the answer. The info confirms what i'd been reading happens with most people.
My numbers are right. Ambient these days are around 30-25 celsius, air filter temps around ambient+5 when cruising above 40mph, and the IAT (or MAT as you pointed out) is around 55-60 celsius (ambient + 25-30, filter +20-25) when i'm cruising, and goes all the way up to 90-100 celsius withing about 2-3 seconds when I let go of the gaz pedal while the transmission is engaged and I let her coast. If i declutch imnediately as i let the gaz go, it'll go to about 75 celsius and then slowly come back....
When i get boost the IAT/MAT temps actually go down a few degrees from cruising down at least 5-10 celsius (can't be precise i usually don't check the computer when under boost....). That tells me the intercooler works, i guess, although the temps go up once i stop boosting, also all the way up to 90-100C/95-210F. Heatsoak's a bitch.... Of i hit the gaz again (boost or not) it goes right back down at least 20-30 degrees so obviously the air flow volume is playing quite a role in the air temps....
What you mentionned makes me wonder if anyone else has a temp sensor right smack in the intake manifold. Most people seem to have a properly located IAT, so that might make a difference.
-
Hey guys.
so the crank is still connected to the intake via a PCV valve, but I haven't had a chance to disconnect them to see if that's what cause the heat spike....
I'll try to do it over the next week or so..
In case anyone is interested, i just started a thread on insulating air pipes. I'm gathering before and after data to see if it's actually useful.
http://forums.hybridz.org/topic/122561-insulated-intercooler-to-intake-pipes/
seb
-
Hi guys.
as some of you guys might have seen from another topic I started (http://forums.hybridz.org/topic/122459-air-intake-temperature-soar-when-i-step-off-the-gas/), I've been giving some thoughts to the air intake temperature.
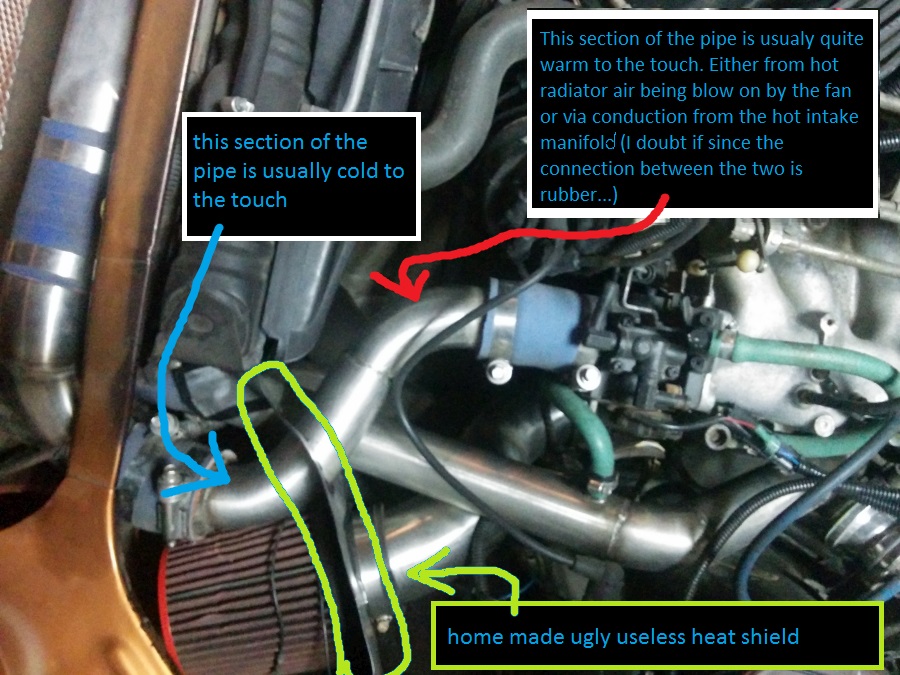
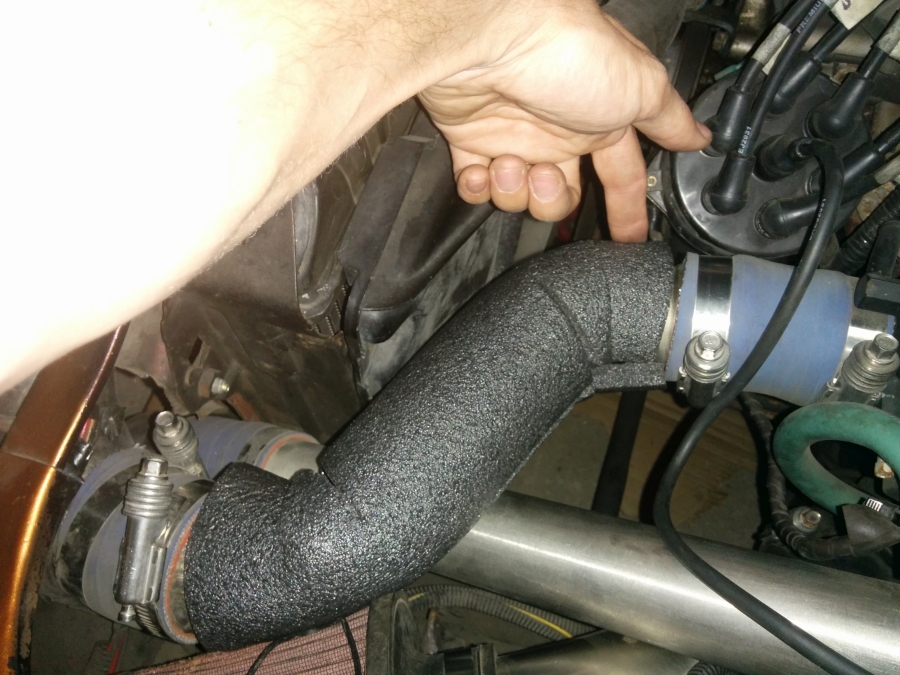
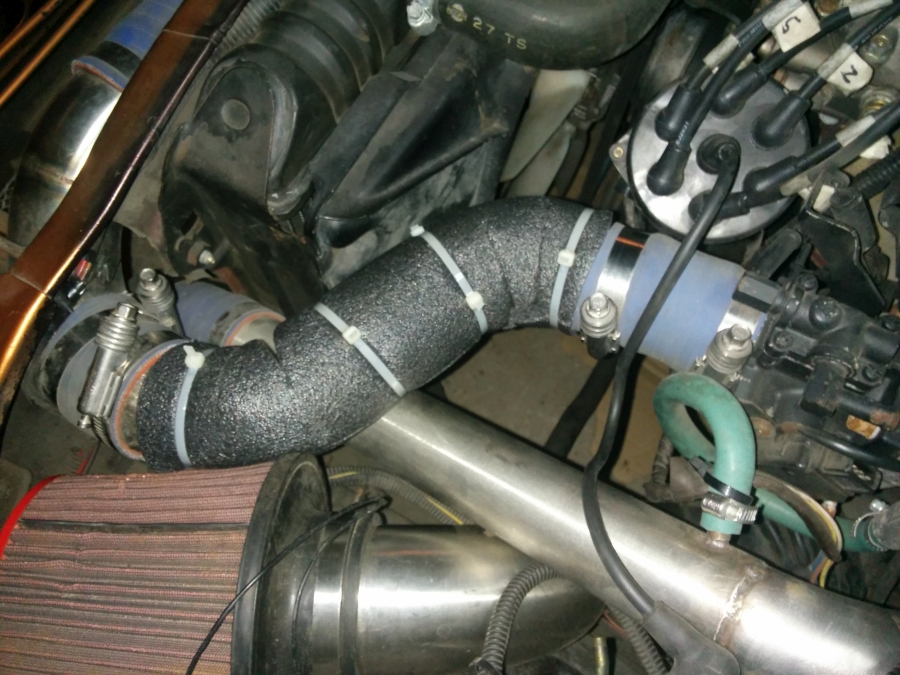
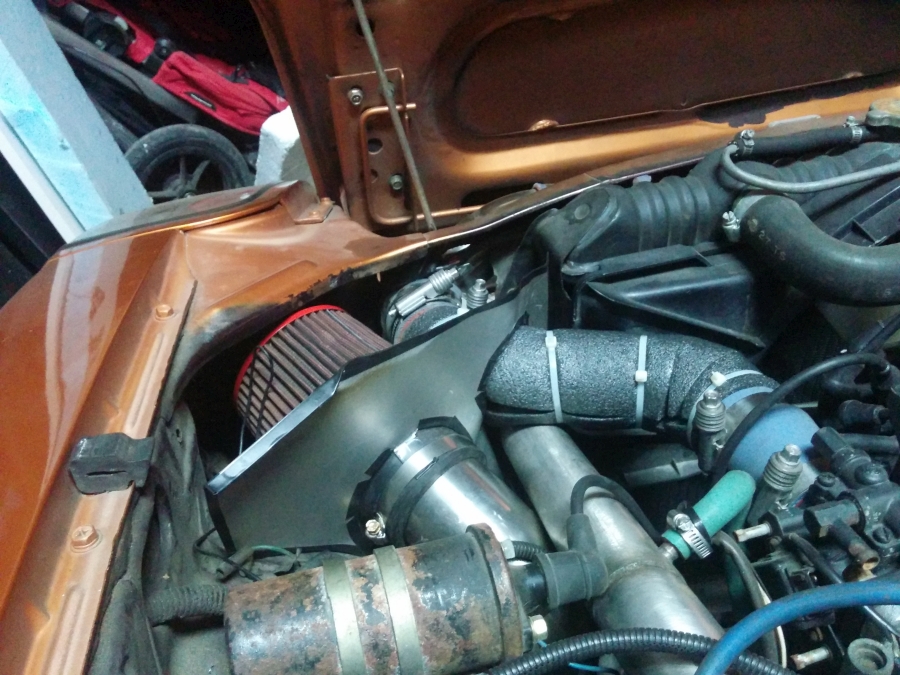
Afer poking around the engine while it was still warm, I realized that all the metal air pipes (duh, yeah i know, but it's important for heat conduction) were exposed to the warm engine bay air, and to the engine's radiating heat, and that the radiator's fan blew hot air pretty much directly on them. Touching all these nice pipes, I realized that the pipe from the turbo to the intercooler pretty much too hot to touch (duh again, I'd read about the heat coming from compressing the air but you don't realize how hot till you experience it).
I also realized that the pipe from the intercooler to the throttle body started off cool and ended up very warm (can touch for a few seconds) close to the TB. The transition was quite sharp where I've placed a heat shield (sheet metal cut to fit around the pipes to try to limit the filter breathing in air from the engine bay - it didn't make much of a difference for the air temp there). I don't know if the heat shield is helping or it's just because the hot air blown by the fan hits the pipe from there on...
I started looking around on the net, and some people had also thought of insulating this particular pipe. There is some debate as to the usefulness of doing this, and none of the sites were particularly methodical with the data taking, so i figured I'd try it, and gather before and after data too.
Here is a series of pictures as to what I did to insulate the pipe (after gathering data; more on this later)
this is the piping system, as I got the car (plus the heat shield I made)
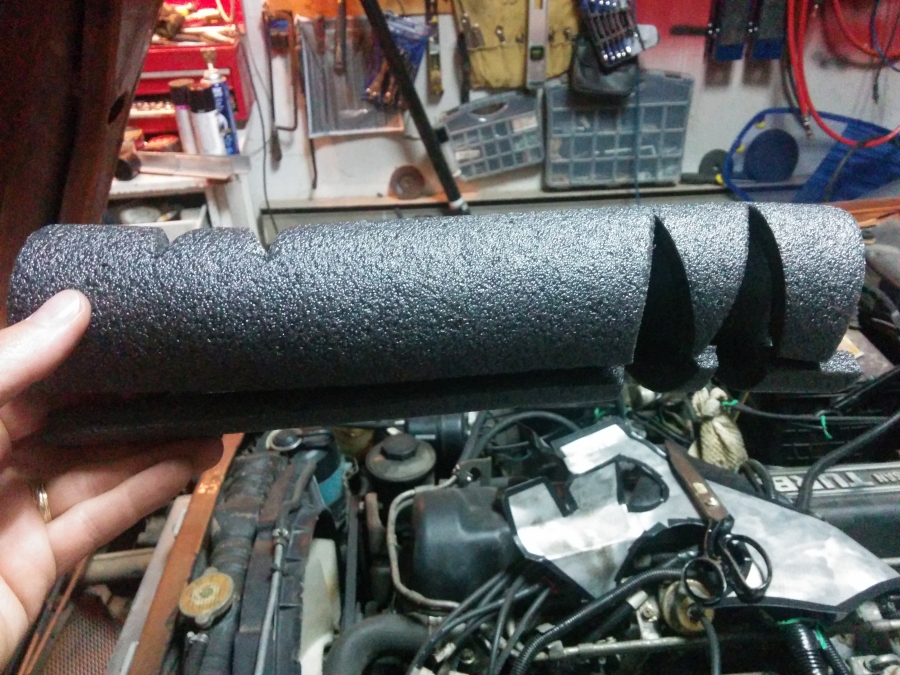
This is the insulation I've used. It's a foam tube to insulate house piping bought at a hardware store for 5$ for 6 feet, 2inch diameter. as you can see, I cut triangles out so I'd be able to bend it to follow the pipe. I eyeballed the cuts, and had to make the triangles wider only once to be able to follow the curve of the pipe
this is the other side, since the pipe is s-shaped.
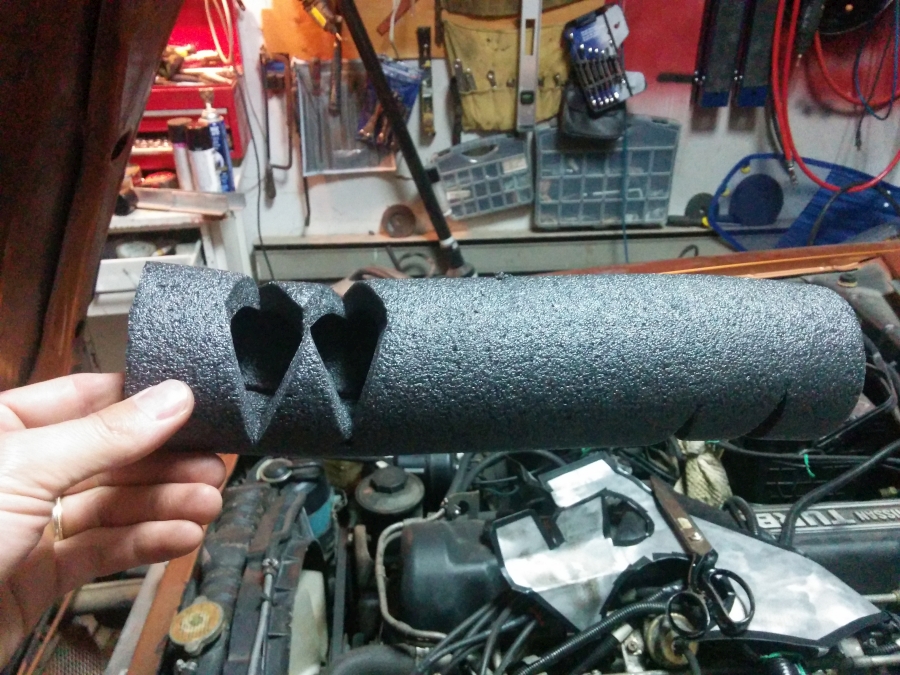
with the foam almost all on the pipe to illustrate the use of the cuts
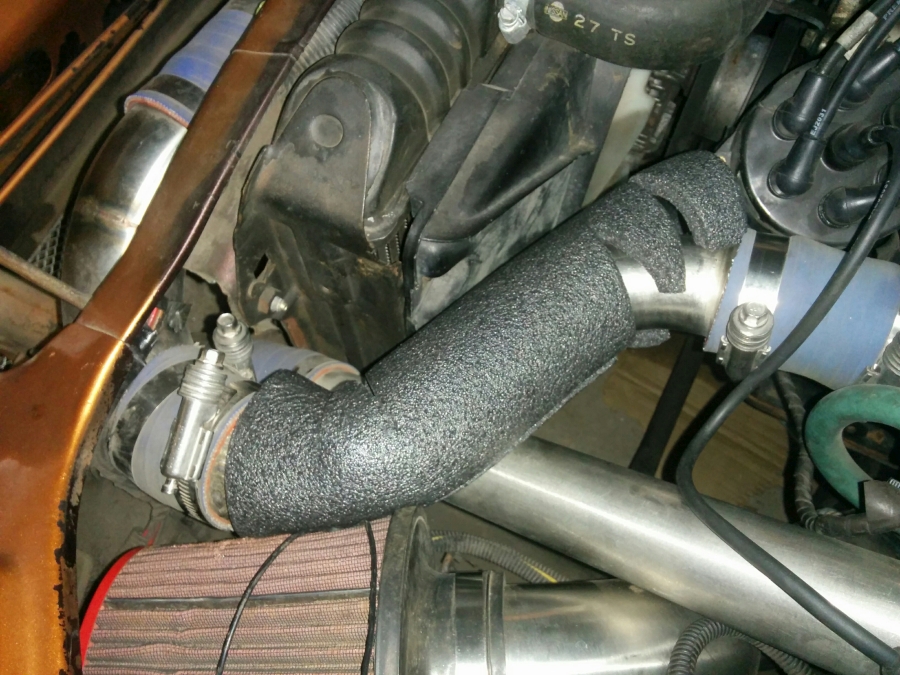
With it all in place.
tie wrapped on, ghetto style with ugly, white, break-if-you-look-at-them-too-long tie-wraps I had around
The final product, with the heat shield seen from a different angle. I know there are gaps in the insulation, but i figure this can be a prototype and i can make it better if it turns out to be useful....
I'll try to post tomorrow on the data I've gathered about the intake temperature before the insulation mod; the file is on my work computer. I've gathered a bunch of info on how fast the temperature goes up once I'm parked iddling after the drive to work. I've got graphs and all, easy to read. post insulation data will be another week or so, I'm guessing, since I don't drive it to work every day (t-tops were leaky, and I've recently cut out part of the floor to fix rust, so no driving when it's wet)
I'm also planning on changing the air filter location and making a cold air scoop under the radiator mount, so that and other data will be useful on that too. Stay tuned for other topics I'll start when I gather the supplies I need, the main supply I lack being time)...
Comments and suggestions welcomed, follow this post if you're curious to see how it turned out.
******************************see posts 2 and 5 for info, and post 15 for a pre-emptive conclusion********************************
-
Hey New Zed
I'm with you on most of what you said. I get that the sensor won't pick up temps higher than the surrounding metal (or else the surrounding metal itself would adsorb and diffuse it to the outside, I guess).
I guess you might be right about the turbo not being involved.. I suppose that, even though the RPMs are higher when I let go of the pedal (compared to when I disengage the clutch), they are not high enough to create boost, therefore heat.
what keeps bugging me though is how the temp goes up when engages, but does not when on neutral.
I think your explanation is really interesting. as far as I know, the engine has less than 5000kms on it (that's about 3000 miles) on it, so I'd be surprised that the rings are already shot.. but, you never know. I'll try to see if there is still a pcv valve on it, and if so, disconect it and drive it like that. that's going to show me if that's the issue (the blow-by)
nice theory. can't wait to check it out.


Changing oil pan gasket on L28e(t) with engine in car
in Nissan L6 Forum
Posted · Edited by supernova_6969
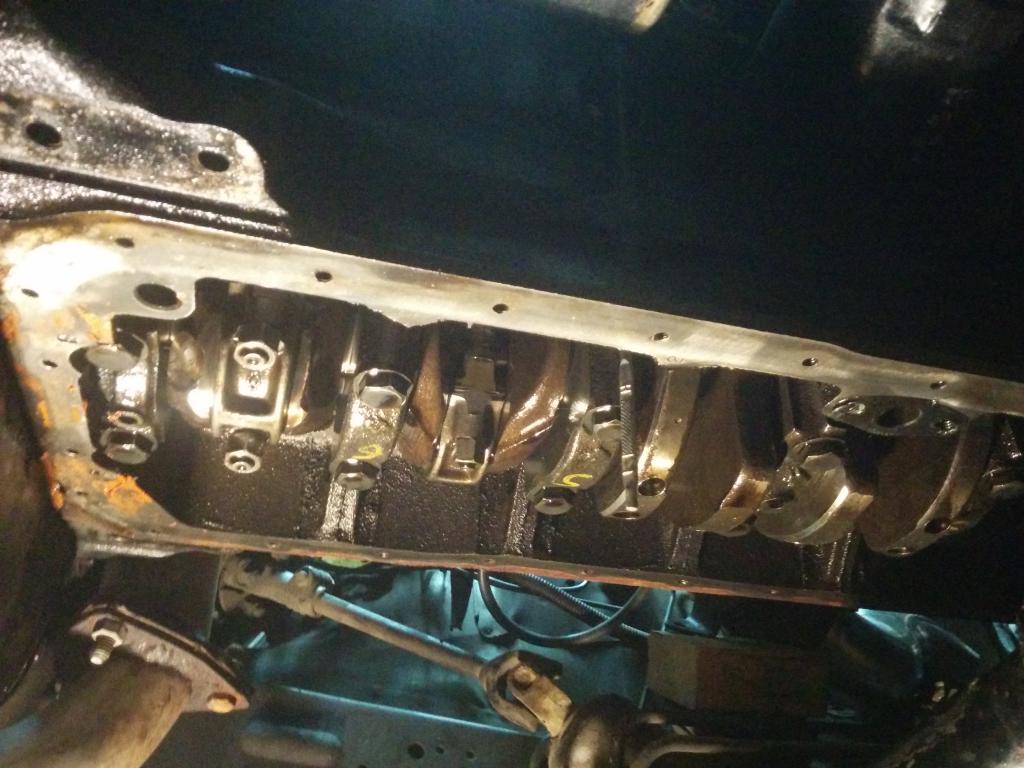
Hey guys
Took a little time to work on the pan today.
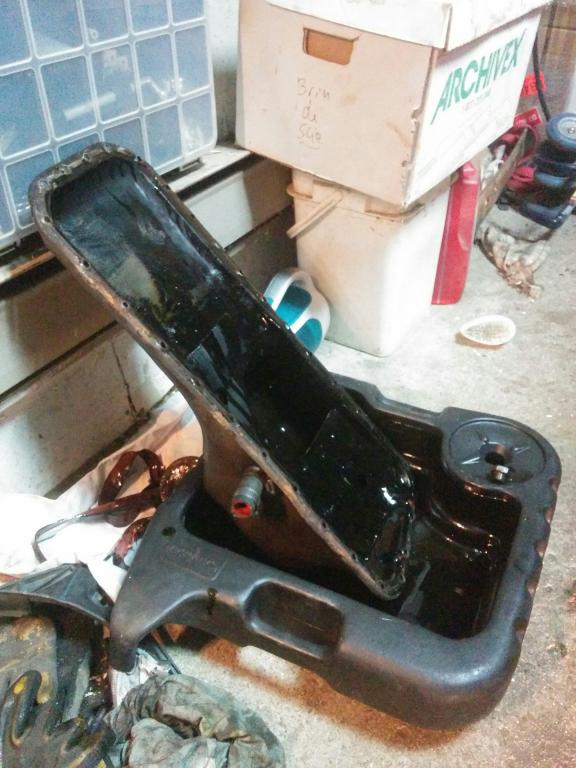
first thing to see is that the pan's lips have started to get pitted from rust on the outside edge (on the side that was dry, obviously; the leaky side was good as new). first thing I did to the pan was to use a grinder with a brush wheel to get rid of most of the rust and whatever paint was on there. I did that to the lip only, not the whole pan. Here are two picks of the before..
As you can see, the problem that caused the leak is really obvious: the lip was raised around every bolt hole on the side that had leaked; my final guess was that at some point they were overtorqued to the point where the pan's lips bulged around and that this had never gotten fixed. The picture shows clearly every bump against pale background. on the non-leaky areas, the lip of the pan is almost perfectly level.
To get rid of that problem, I found something flat that fit under the edge of the pan (in this case a plank left over from a compost bin project), I lay the pan's lips on it and banged on the bumps until there were pretty flat. It takes a surprising amount of force to bend those back straight (surprising is relative, I didn't use a sledgehammer, but it was more than I expected). You have to be careful though, as I ended up making some spot a little too flat (the mating edge is a little raised all around the pan). I had to lay the pan on a table and hit those spots with a flat punch from the outside of the pan (sorry no picts of that. if you can't figure that out, go to the mechanics and get your pan changed there ).
).
Lying the pan flat on a table made me realise that the whole pan was slightly kinked, making the pan want to have a gap where it had leaked. I'm not certain if I did that after hitting on it or if it was like that to begin with, but I fixed most of it by twisting it back into shape. I didn't simply grab both ends and twist (tried, didn't work); I had to put one side of the pan on a table with the other side far over the edge, and I put pressure where it kinked up (and on the table side too, duh). 2-3 times like that and it was better, but I ended up finding where it was kinked (rocking it until I found the "high spot"), putting a plank right under there and pushing down on both opposite corners... that made it almost perfectly straight. here it is before; it's not super clear, but the pan really wanted to have a gap of about 3mm-1/8 of an inch...
After all of this was done I used a metal ruler (some sort of straight edge I have) to see if the lips of the pan were all level.
the first pict is how I used it, and the second is how it's supposed to look like when perfect.
Obviously, I have some spots that were pretty perfect and some that were weird. The lip on one of the side of the pan was bent away for the block, making it so that the only spot that would have wanted to make contact was on very inside edge of the pan. I used pliers to bend it back straight, being careful not to mar the mating surface. I didn't get everything perfectly straight, but I figure I probably made a significant difference.
I also used the ruler along the long side (just laying it on one side of the pan, as opposed to across like on the picture) to see if the mating edge was level and found a few more spots that I had to touch up with the hammer and punch; eyeballing it earlier was good, but not good enough.. I managed to get everything to be flatish to within about slightly larger than a hair's width... should be plenty good enough for the gaskets (I'll use a very thin coat of ATV gasket and a proper rubber gasket on top of that).
After all that was done, I cleaned the edges with the the wired brush again, then brake cleaner, masked the inside and painted the lip (and outside edge the lip, that was also rusted) with rust reformer paint. I'm thinking it's probably no the best paint for the conditions it'll be in, but that's what I had so there you go. I didn't paint the inside nor the outside. too lazy, and I figured whatever was on there was good enough. Here is the finished product.
Unless someone here tells me I did something wrong, the next step is to put it back on the engine. I'll try to do that this week... stay tuned, comments welcomed... actually comments very encouraged.